Page 472 of 573

471
uuMaintenance Under the HooduOpening the Hood
Maintenance
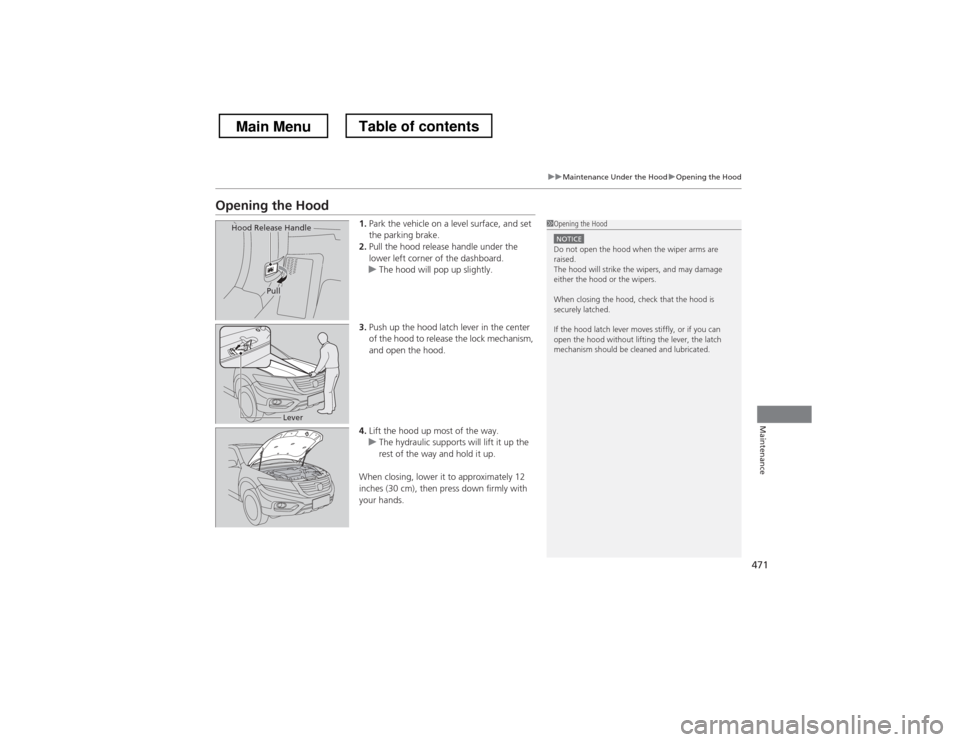
Opening the Hood1.Park the vehicle on a level surface, and set
the parking brake.
2. Pull the hood release handle under the
lower left corner of the dashboard.
uThe hood will pop up slightly.
3. Push up the hood latch lever in the center
of the hood to release the lock mechanism,
and open the hood.
4. Lift the hood up most of the way.
uThe hydraulic supports will lift it up the
rest of the way and hold it up.
When closing, lower it to approximately 12
inches (30 cm), then press down firmly with
your hands.
1Opening the Hood
NOTICEDo not open the hood when the wiper arms are raised.
The hood will strike the wipers, and may damage
either the hood or the wipers.
When closing the hood, check that the hood is
securely latched.
If the hood latch lever moves stiffly, or if you can
open the hood without lifting the lever, the latch
mechanism should be cleaned and lubricated.
Hood Release Handle
Pull
Lever
Main MenuTable of contents
Page 485 of 573

484
Maintenance
Replacing Light Bulbs
Headlight Bulbs
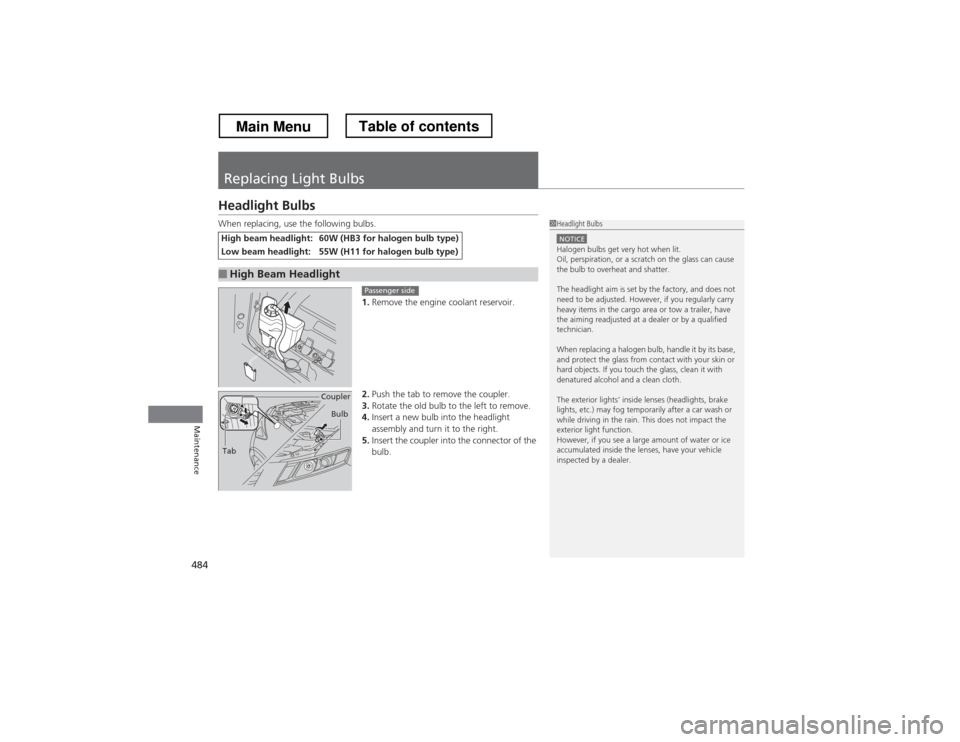
When replacing, use the following bulbs.1.Remove the engine coolant reservoir.
2. Push the tab to remove the coupler.
3. Rotate the old bulb to the left to remove.
4. Insert a new bulb into the headlight
assembly and turn it to the right.
5. Insert the coupler into the connector of the
bulb.
High beam headlight:60W (HB3 for halogen bulb type)
Low beam headlight:55W (H11 for halogen bulb type)
■High Beam Headlight
1Headlight Bulbs
NOTICEHalogen bulbs get very hot when lit.
Oil, perspiration, or a scratch on the glass can cause
the bulb to overheat and shatter.
The headlight aim is set by the factory, and does not
need to be adjusted. However, if you regularly carry
heavy items in the cargo area or tow a trailer, have
the aiming readjusted at a dealer or by a qualified
technician.
When replacing a halogen bulb, handle it by its base,
and protect the glass from contact with your skin or
hard objects. If you touch the glass, clean it with
denatured alcohol and a clean cloth.
The exterior lights’ inside lenses (headlights, brake
lights, etc.) may fog temporarily after a car wash or
while driving in the rain. This does not impact the
exterior light function.
However, if you see a large amount of water or ice
accumulated inside the lenses, have your vehicle
inspected by a dealer.
Passenger side
Tab Coupler
Bulb
Main MenuTable of contents
Page 491 of 573
490
uuReplacing Light BulbsuBrake/Taillights, Back-Up Light, Rear Turn Signal Light and Rear Side Marker Light Bulbs
Maintenance
2.Turn the socket to the left and remove it.
3. Push in the old bulb, rotate to the left until
it unlocks, and remove.
4. Insert new bulb.
Brake/Taillights, Back-Up Light, Rear Turn Signal
Light and Rear Side Marker Light Bulbs
When replacing, use the following bulbs. 1.Pry on the edge of the cover using a flat-tip
screwdriver to remove the covers.
uWrap the flat-tip screwdriver with a cloth
to prevent scratches.
Bulb
Socket
Brake/Taillight: 21/5 W
Back-Up Light: 21 W
Rear Turn Signal Light: 21 W (Amber)
Rear Side Maker Light: 3 CP
Cover
Main MenuTable of contents
Page 492 of 573
491
uuReplacing Light BulbsuBrake/Taillights, Back-Up Light, Rear Turn Signal Light and Rear Side Marker Light Bulbs
Maintenance
2.Use a Phillip-head screwdriver to remove
the bolts.
3. Pull the light assembly out of the rear pillar.
4. Turn the socket to the left and remove it.
Remove the old bulb.
5. Insert a new bulb.
Bolt
Bulb
Socket
Main MenuTable of contents
Page 493 of 573
492
uuReplacing Light BulbsuRear License Plate Light Bulb
Maintenance
Rear License Plate Light Bulb
When replacing, use the following bulb.1.Push the left edge of the lens to the right
and pull out the licence light assembly.
2. Push the tabs to remove the lens.
3. Remove the old bulb.
4. Insert a new bulb.
High-Mount Brake Light Bulb
High-mount brake light bulbs are LED type. Have an authorized Honda dealer
inspect and replace the light bulbs.
Rear License Plate Light: 5 W
Bulb
Tab Tab
Lens
Main MenuTable of contents
Page 518 of 573

517
Continued
Handling the Unexpected
If a Tire Goes Flat
Changing a Flat Tire
If a tire goes flat while driving, grasp the steering wheel firmly, and brake gradually
to reduce speed. Then, stop in a safe place. Replace the flat tire with a compact
spare tire. Go to a dealer as soon as possible to have the full-size tire repaired or
replaced. 1.
Park the vehicle on firm, level, and non-slippery surface and apply the parking
brake.
2. Move the shift lever to
(P .
3. Turn on the hazard warning lights and turn the ignition switch to LOCK (0*1
.
*1: Models with the smart entry system have an ENGINE START/STOP button instead of an
ignition switch.
1Changing a Flat Tire
Periodically check the tire pressure of the compact
spare. It should be set to the specified pressure.
Specified Pressure: 60 psi (420 kPa, 4.2 kgf/cm 2
)
When driving with the compact spare tire, keep the
vehicle speed under 50 mph (80 km/h). Replace with
a full-size tire as soon as possible.
The compact spare tire and wheel in your vehicle are
specifically for this model.
Do not use them with another vehicle.
Do not use another type of compact spare tire or
wheel with your vehicle.
Do not mount tire chains on a compact spare tire.
If a chain-mounted front tire goes flat, remove one of
the full-size rear tires and replace it with the compact
spare tire. Remove the flat front tire and replace it
with the full-size tire that was removed from the rear.
Mount the tire chains on the front tire.
Do not use a puncture-repairing agent on a flat tire,
as it can damage the tire pressure sensor.
Main MenuTable of contents
Page 537 of 573

536
uuIndicator, Coming On/BlinkinguIf the Brake System Indicator (Red) Comes On
Handling the Unexpected
If the Brake System Indicator (Red) Comes On■Reasons for the indicator to come on
• The brake fluid is low.
• There is a malfunction in the brake system.
■ What to do when the indicator comes on while driving
Press the brake pedal lightly to check pedal pressure. • If normal, check the brake fluid level the next time you stop.
• If abnormal, take immediate action. If necessary, downshift the
transmission to slow the ve hicle using engine braking.
If the EPS System Indicator Comes On
■Reasons for the indicator to come on
• Comes on when there is a problem with EPS system.
• If you depress the accelerator pedal repeatedly to increase the engine
speed while the engine is idling, the indicator comes on, and
sometimes the steering wheel becomes harder to operate.
■ What to do when the indicator comes on
Stop the vehicle in a safe place and restart the engine.
If the indicator comes on and stays on, immediately have your vehicle inspected by a dealer.
1If the Brake System Indicator (Red) Comes On
Have your vehicle repaired immediately.
It is dangerous to drive with low brake fluid. If there
is no resistance from the brake pedal, stop
immediately in a safe place. If necessary downshift
the gears.
If the brake system indicator and ABS indicator come
on simultaneously, the electronic brake distribution
system is not working. This can result in vehicle
instability under sudden braking.
Have your vehicle inspected by a dealer immediately.U.S.
Canada
1If the EPS System Indicator Comes On
NOTICEIf you repeatedly turn the steering wheel at an
extremely low speed, or hold the steering wheel on
the full left or right position for a while, the system
heats up. The system goes into a protective mode,
and limits its performance. The steering wheel
becomes harder and harder to operate. Once the
system cools down, EPS is restored. Repeated
operation under these conditions can eventually
damage the system.6-cylinder models
Main MenuTable of contents
Page 539 of 573

538
Handling the Unexpected
Fuses
Fuse Locations
If any electrical devices are not working,
turn the ignition switch to LOCK
(0*1
and
check to see if any applicable fuse is blown.
Located near the brake fluid reservoir. Push
the tabs to open the box.
Fuse locations are shown on the fuse box
cover. Locate the fuse in question by the
fuse number and box cover number.
■Engine Compartment Fuse Box
■ Circuit protected and fuse rating
Circuit ProtectedAmps
1Battery120 A *3Battery100 A
*2Passenger’s Fuse Box40 A
2
ESP MTR70 AVSA SFR40 AVSA Motor30 AAS F/B OP40 AHeadlight washer *30 A−−
3
IG Main50 A−−Passenger Side Light Main30 ADR F/B STD60 ADriver Side Light Main30 AMain Fan30 AWiper Motor30 ASub Fan30 A
4 Fan Relay 7.5 A
5Rear Defroster40 A
6 Sub Fan Motor *2
20 A
*1:Models with the smart entry system have an
ENGINE START/STOP button instead of an
ignition switch.
*2:4-cylinder models
*3:6-cylinder models
7Hazard15 A
8 Horn, STOP 20 A
9−−
10 Trailer 15 A
11IG Coil15 A
12 FI Sub 15 A
13IGI Main 1 *330 A
14 IGI Main 2 *3
30 A
15Back up10 A
16 Interior Lights 7.5 A
17FI Main15 A
18 DBW 15 A
19ACM *320 A
20 Heater Motor 40 A
21MG Clutch7.5 A
Circuit ProtectedAmps
* Not available on all models
Main MenuTable of contents