2013 HONDA CROSSTOUR sensor
[x] Cancel search: sensorPage 140 of 573
139
uuAdjusting the SeatsuRear Seats
Continued
Controls
Rear Seats
Separately fold down the left and right halves of the rear seat to make room for
cargo. ■To fold down the seat
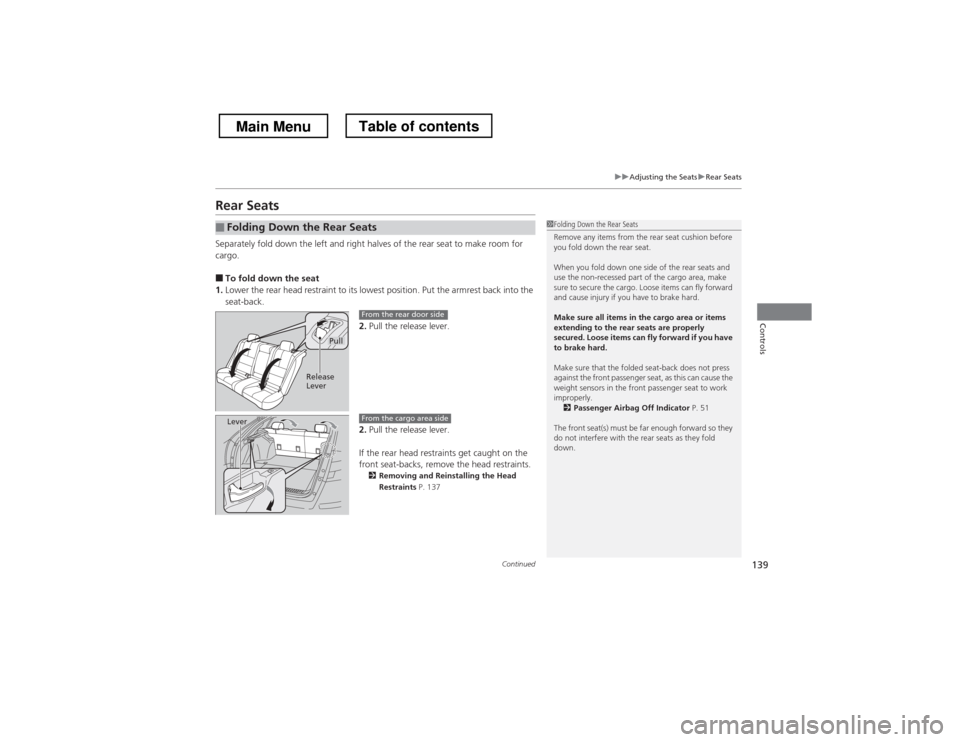
1. Lower the rear head restraint to its lowest position. Put the armrest back into the seat-back.
2.Pull the release lever.
2. Pull the release lever.
If the rear head restraints get caught on the
front seat-backs, remove the head restraints. 2 Removing and Reinstalling the Head
Restraints P. 137
■Folding Down the Rear Seats1Folding Down the Rear Seats
Remove any items from the rear seat cushion before
you fold down the rear seat.
When you fold down one side of the rear seats and
use the non-recessed part of the cargo area, make
sure to secure the cargo. Loose items can fly forward
and cause injury if you have to brake hard.
Make sure all items in the cargo area or items
extending to the rear seats are properly
secured. Loose items can fly forward if you have to brake hard.
Make sure that the folded seat-back does not press
against the front passenger seat, as this can cause the
weight sensors in the front passenger seat to work
improperly.
2 Passenger Airbag Off Indicator P. 51
The front seat(s) must be far enough forward so they
do not interfere with the rear seats as they fold
down.
Pull
Release
Lever
From the rear door side
LeverFrom the cargo area side
Main MenuTable of contents
Page 162 of 573
161
uuClimate Control System*uSynchronized Mode
Controls
Synchronized Mode
You can set the temperature synchronously for the driver side and the passenger
side in synchronized mode. 1.
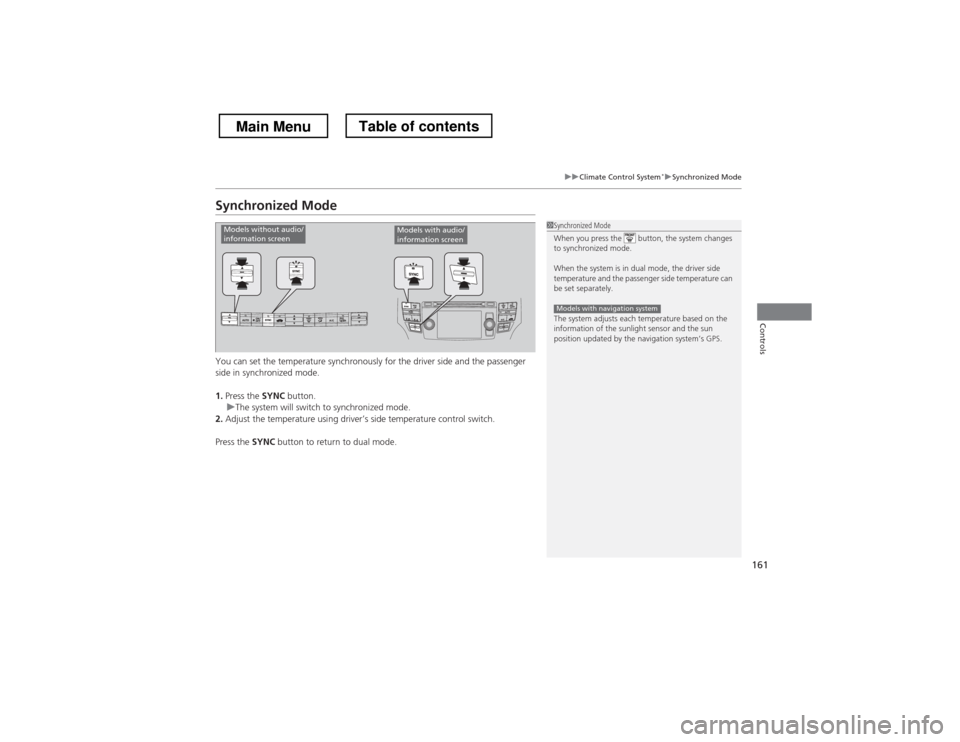
Press the SYNC button.
uThe system will switch to synchronized mode.
2. Adjust the temperature using driver’s side temperature control switch.
Press the SYNC button to return to dual mode.
1Synchronized Mode
When you press the button, the system changes
to synchronized mode.
When the system is in dual mode, the driver side
temperature and the passenger side temperature can
be set separately.
The system adjusts each temperature based on the
information of the sunlight sensor and the sun
position updated by the navigation system’s GPS.
Models with navigation system
Models without audio/
information screenModels with audio/
information screen
Main MenuTable of contents
Page 163 of 573
162
uuClimate Control System*uAutomatic Climate Control Sensors
Controls
Automatic Climate Control Sensors
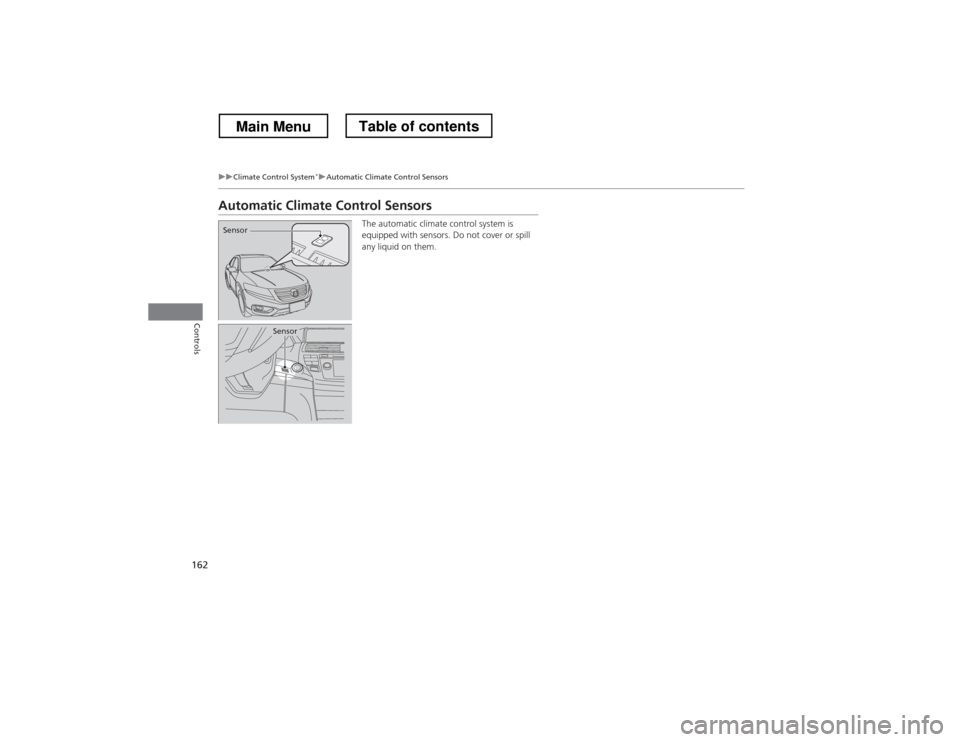
The automatic climate control system is
equipped with sensors. Do not cover or spill
any liquid on them.
Sensor
Sensor
Main MenuTable of contents
Page 413 of 573
412
uuBefore DrivinguDriving Preparation
Driving
•Be sure items placed on the floor behind the front seats cannot roll under the seats.
uThey can interfere with the driver’s ability to operate the pedals, the operation
of the seats, or the operation of the sensors under the seats.
• Everyone in the vehicle must fasten their seat belt.
2 Fastening a Seat Belt P. 35
• Make sure that the indicators in the instrument panel come on when you start the
vehicle, and go off soon after.
uAlways have a dealer check the vehicle if a problem is indicated.
2 Indicators P. 70
Main MenuTable of contents
Page 455 of 573
454
Driving
Rearview Camera
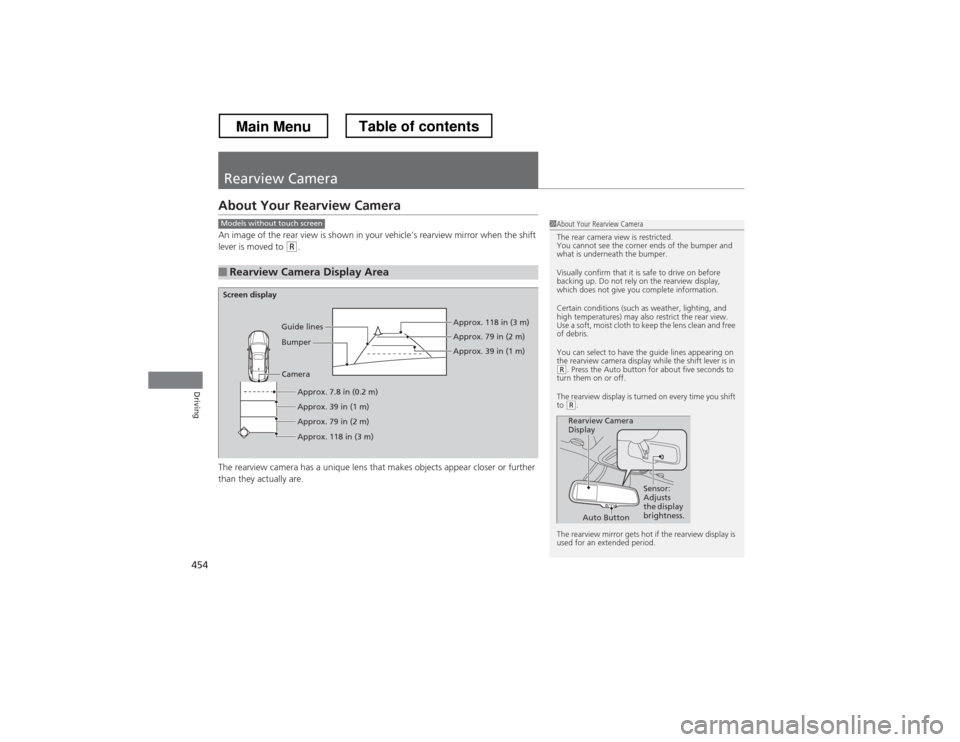
About Your Rearview Camera
An image of the rear view is shown in your vehicle’s rearview mirror when the shift
lever is moved to
(R.
The rearview camera has a unique lens that makes objects appear closer or further
than they actually are.
■Rearview Camera Display Area
1About Your Rearview Camera
The rear camera view is restricted.
You cannot see the corner ends of the bumper and
what is underneath the bumper.
Visually confirm that it is safe to drive on before
backing up. Do not rely on the rearview display,
which does not give you complete information.
Certain conditions (such as weather, lighting, and
high temperatures) may also restrict the rear view.
Use a soft, moist cloth to keep the lens clean and free
of debris.
You can select to have the guide lines appearing on
the rearview camera display while the shift lever is in
(R . Press the Auto button for about five seconds to
turn them on or off.
The rearview display is turned on every time you shift to
(R .
The rearview mirror gets hot if the rearview display is
used for an extended period.
Rearview Camera
Display Sensor:
Adjusts
the display
brightness.
Auto Button
Models without touch screen
Screen display
CameraApprox. 7.8 in (0.2 m)
Approx. 39 in (1 m)
Approx. 79 in (2 m) Approx. 118 in (3 m) Approx. 118 in (3 m) Approx. 79 in (2 m) Approx. 39 in (1 m)
Bumper
Guide lines
Main MenuTable of contents
Page 518 of 573

517
Continued
Handling the Unexpected
If a Tire Goes Flat
Changing a Flat Tire
If a tire goes flat while driving, grasp the steering wheel firmly, and brake gradually
to reduce speed. Then, stop in a safe place. Replace the flat tire with a compact
spare tire. Go to a dealer as soon as possible to have the full-size tire repaired or
replaced. 1.
Park the vehicle on firm, level, and non-slippery surface and apply the parking
brake.
2. Move the shift lever to
(P .
3. Turn on the hazard warning lights and turn the ignition switch to LOCK (0*1
.
*1: Models with the smart entry system have an ENGINE START/STOP button instead of an
ignition switch.
1Changing a Flat Tire
Periodically check the tire pressure of the compact
spare. It should be set to the specified pressure.
Specified Pressure: 60 psi (420 kPa, 4.2 kgf/cm 2
)
When driving with the compact spare tire, keep the
vehicle speed under 50 mph (80 km/h). Replace with
a full-size tire as soon as possible.
The compact spare tire and wheel in your vehicle are
specifically for this model.
Do not use them with another vehicle.
Do not use another type of compact spare tire or
wheel with your vehicle.
Do not mount tire chains on a compact spare tire.
If a chain-mounted front tire goes flat, remove one of
the full-size rear tires and replace it with the compact
spare tire. Remove the flat front tire and replace it
with the full-size tire that was removed from the rear.
Mount the tire chains on the front tire.
Do not use a puncture-repairing agent on a flat tire,
as it can damage the tire pressure sensor.
Main MenuTable of contents
Page 525 of 573
uuIf a Tire Goes FlatuChanging a Flat Tire
524
Handling the Unexpected
If you replace a flat tire with the spare tire, the low tire pressure indicator comes on
while you are driving. After driving for a few miles (kilometers), the indicator will go
off and the TPMS indicator comes on, but this is normal.
If you replace the tire with a specified regular tire, the low tire pressure or TPMS
indicator will go off after a few miles (kilometers).
■TPMS and the Spare Tire1TPMS and the Spare Tire
The system cannot monitor the pressure of the spare
tire. Manually check the spare tire pressure to be sure
that it is correct.
Use TPMS specific wheels. Each is equipped with a
tire pressure sensor mounted inside the tire behind
the valve stem.
Main MenuTable of contents
Page 564 of 573

563
Index
Bluetooth® Audio ............................. 213, 266
Bluetooth ® HandsFreeLink ®.... 320, 332, 367
Booster Seats (For Children) ...................... 65
Brake System ............................................ 449
Anti-lock Brake System (ABS) .................. 451
Brake Assist System................................. 452
Fluid ....................................................... 481
Foot Brake .............................................. 450
Indicator ........................................... 70, 536
Parking Brake.......................................... 449
Brightness Control (Instrument Panel) ... 125
Bulb Replacement .................................... 484
Brake Light, Taillight, Back-Up Light,
Rear Turn Signal Light and Lower Rear
Side Marker Light ................................ 490
Fog Lights ............................................... 486
Front Turn Signal/Parking Light ............... 489
Headlights .............................................. 484
High-Mount Brake Light........ .................. 492
Rear License Plate Light ........................... 492
Side Marker Lights .................................. 488
Bulb Specifications ........................... 546, 548
C
Carbon Monoxide Gas ............................... 66
Cargo Hook .............................................. 149
Carrying Cargo ................................. 411, 413
CD Player .................................. 173, 200, 239
Center Pocket ........................................... 152
Certification Label ................................... 550 Changing Bulbs
......................................... 484
Charging System Indicator ................. 71, 534
Child Safety ................................................. 54
Childproof Door Locks ............................. 100
Child Seat .................................................... 54
Booster Seats............................................. 65
Child Seat for Infants ................................. 56
Child Seat for Small Children ..................... 57
Installing a Child Seat with a Lap/ Shoulder Seat Belt ................................... 61
Larger Children.......................................... 64
Rear-facing Child Seat ............................... 56
Selecting a Child Seat ................................ 58
Childproof Door Locks ............................. 100
Cleaning the Exterior ............................... 512
Cleaning the Interior ................................ 510
Climate Control System ............................ 157
Changing the Mode ................................ 157
Defrosting the Windshield and
Windows ............................................... 159
Dust and Pollen Filter ............................... 509
Recirculation and Fresh Air Mode ............ 158
Recirculation/Fresh Air Mode ................... 157
Sensors.................................................... 162
Synchronized Mode ................................. 161
Using Automatic Climate Control ............ 157
Clock ............................................................ 88
Coat Hook ................................................. 148
Compact Spare Tire .................. 517, 547, 549
Compass ............................................ 405, 407
Console Compartment ............................. 145 Controls
....................................................... 87
Coolant (Engine) ...................................... 478
Adding to the Radiator ............................ 479
Adding to the Reserve Tank..................... 478
Overheating ............................................ 532
Creeping (Automatic Transmission) ........ 425
Cruise Control ........................................... 432
Indicator.................................................... 81
Cup Holders .............................................. 146
Customer Service Information ................. 558
Customized Features ................................ 281
D
Daytime Running Lights .......................... 122
Dead Battery ............................................. 528
Defrosting the Windshield and Windows ......................................... 156, 159
Devices that Emit Radio Waves ............... 551
Dimming
Headlights ............................................... 119
Rearview Mirror....................................... 130
Dipstick (Engine Oil) ................................. 473
Directional Signals (Turn Signal) ............. 119
Display Button .................................. 186, 218
Door Mirrors ............................................. 131
Doors ........................................................... 91
Auto Door Locking .................................. 101
Auto Door Unlocking .............................. 101
Door and Trunk Open Indicator ................. 74
Door Open Indicator.................................. 31
Main Menu