2013 HONDA CR-Z open hood
[x] Cancel search: open hoodPage 2 of 325

Contents
Child Safety P. 54 Exhaust Gas Hazard P. 62 Safety Labels P. 63
Opening and Closing the Hatch P. 104 Security System P. 106 Opening and Closing the Windows P. 108
Adjusting the Mirrors P. 119Adjusting the Seats P. 121
Climate Control System P. 134
General Information on the Audio System P. 155 Bluetooth® HandsFreeLink ® P. 158
When Driving P. 178 Braking P. 208 Parking Your Vehicle P. 212
Rearview Camera P. 214
Accessories and Modifications P. 220
Maintenance Under the Hood P. 229 Replacing Light Bulbs P. 242
Checking and Maintaining Tires P. 253 12 Volt Battery P. 262 Remote Transmitter Care P. 263
Cleaning P. 265
Engine Does Not Start P. 286 Jump Starting P. 287 Shift Lever Does Not Move P. 289
Fuses P. 297 Emergency Towing P. 301 When You Cannot Open the Hatch P. 303
Devices that Emit Radio Waves P. 309 Reporting Safety Defects P. 310
Authorized Manuals P. 315 Customer Service Information P. 316
Quick Reference GuideP. 2
Safe DrivingP. 27
Instrument PanelP. 65
ControlsP. 97
FeaturesP. 137
DrivingP. 171
MaintenanceP. 221
Handling the UnexpectedP. 269
InformationP. 305
IndexP. 317
Note: All page numbers referenced in this document are hyperlinked.
2013 CR-Z Online Reference Owner's Manual
Page 7 of 325

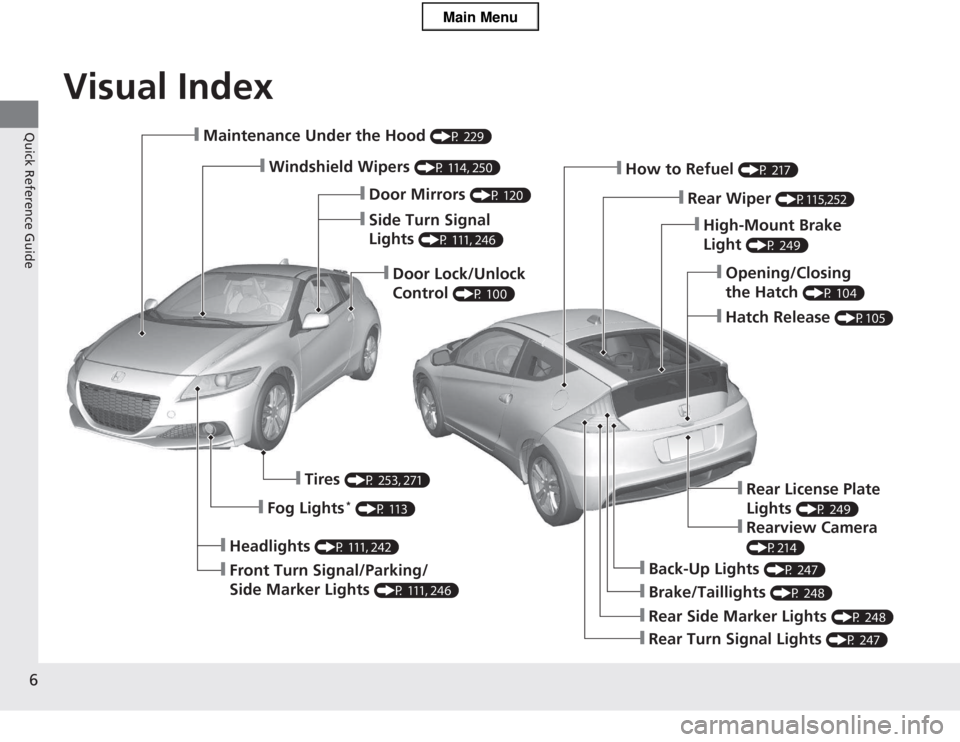
Visual Index
6
Quick Reference Guide❙Maintenance Under the Hood (P 229)
❙Windshield Wipers (P 114, 250)
❙Door Lock/Unlock Control (P 100)
❙Headlights
(P 111, 242)
❙Front Turn Signal/Parking/
Side Marker Lights (P 111, 246)
❙Tires
(P 253, 271)
❙Fog Lights *
(P 113)
❙Brake/Taillights (P 248)
❙Back-Up Lights (P 247)
❙Rear Turn Signal Lights (P 247)
❙Rear Side Marker Lights (P 248)
❙High-Mount Brake Light (P 249)
❙How to Refuel
(P 217)
❙Rear Wiper (P115,252)
❙Opening/Closing the Hatch (P 104)
❙Hatch Release
(P105)
❙Side Turn Signal Lights (P 111, 246)
❙Door Mirrors
(P 120)
❙Rear License Plate Lights (P 249)
❙Rearview Camera
(P214)
Main Menu
Page 23 of 325

22
Quick Reference Guide
Handling the Unexpected (P269)
Flat Tire (P271)
● Park in a safe place and repair the flat tire
using the temporary tire repair kit.
● Park in a safe place and replace the flat
tire with the compact spare tire in the
cargo area.
Indicators Come On
(P292) ● Identify the indicator and consult the
owner's manual.
Models with an optional compact spare tire
Engine Won't Start (P286)
● If the battery is dead, jump start using a booster battery.
Blown Fuse (P297)
● Check for a blown fuse if an electrical device does not operate.Overheating (P290)
● Park in a safe location. If you do not see
steam under the hood, open the hood, and let the engine cool down.
Emergency Towing (P301)
● Call a professional towing service if you need to tow your vehicle.
Main Menu
Page 107 of 325

106
Controls
Security System
Immobilizer System
The immobilizer system prevents a key that has not been pre-registered from
starting the engine. Each key contains electronic transmitters that use electronic
signals to verify the key.
Pay attention to the following when inserting the key into the ignition switch: •Do not allow objects that emit strong radio waves near the ignition switch.
• Make sure the key is not covered by or touching a metal object.
• Do not bring a key from another ve hicle's immobilizer system near the ignition
switch.
Security System Alarm
The security system alarm activates when the doors, hatch, or hood are opened
without the key, or remote transmitter. ■ When the security system alarm activates
The horn sounds intermittently, and all of the exterior lights flash. ■ To deactivate the security system alarm
Unlock the vehicle using the key or remote transmitter or turn the ignition switch to ON
(w . The system, along with the horn and flashing lights, is deactivated.
1Immobilizer System
NOTICE
Leaving the ignition key in the vehicle can result in
theft or accidental movement of the vehicle.
Always take the ignition key with you whenever you
leave the vehicle unattended.
Do not alter the system or add other devices to it.
Doing so may damage the system and make your
vehicle inoperable.
1Security System Alarm
The security alarm continues for a maximum of two
minutes until the security system alarm deactivates.
Main MenuTable of Contents
Page 108 of 325

107
uuSecurity SystemuSecurity System Alarm
Controls
■Setting the security system alarm
The security system alarm automatically sets when the following conditions have
been met: • The ignition switch is in LOCK
(0 , and the key has been removed from the
ignition switch.
• The hood is closed.
• Both doors and the hatch are locked with the key or the remote transmitter.
■ When the security system alarm sets
The security system alarm indicator in the instrument panel blinks. When the
blinking interval changes after about 15 seconds, the security system alarm is set. ■ To cancel the security system alarm
The security system alarm is canceled when the vehicle is unlocked using the key or
remote transmitter, or the ignition switch is turned to ON
(w . The security system
alarm indicator goes off at the same time.
■The panic button on the remote
transmitter
If you press the panic button for
approximately one second, the following will
occur for about 30 seconds: • The horn sounds.
• Some exterior lights flash.
■ Canceling panic mode
Press any button on the remote transmitter, or turn the ignition switch to ON
(w .
■Panic Mode
1Security System Alarm
Do not set the security system alarm when someone
is in the vehicle or a window is open. The system can
accidentally activate when unlocking the door with
the lock tab or the master door lock switch.
If the 12 volt battery goes de ad after you have set the
security system alarm, the security alarm may go off
once the battery is recharged or replaced.
If this occurs, deactivate the security system alarm by
unlocking a door using the key or remote transmitter.
Do not attempt to alter this system or add another
device to it.
Panic Button
Main MenuTable of Contents
Page 173 of 325

172
Driving
Before Driving
Driving Preparation
Check the following items before you start driving. •Make sure there are no obstructions on the windows, door mirrors, exterior
lights, or other parts of the vehicle.
uRemove any frost, snow, or ice.
uRemove any snow on the roof, as this can slip down and obstruct your field of
vision while driving. If frozen solid, remove ice once it has softened.
uWhen removing ice from around the wheels, be sure not to damage the wheel
or wheel components.
• Make sure the hood is securely closed.
uIf the hood opens while driving, your front view will be blocked.
• Make sure the tires are in good condition.
uCheck air pressures, and check for damage and excessive wear.
2 Checking and Maintaining Tires P. 253
• Make sure there are no people or objects behind or around the vehicle.
uThere are blind spots from the inside.
■Exterior Checks1Exterior Checks
NOTICE
When doors are frozen shut, use warm water around
the door edges to melt any ice. Do not try to force
them open, as this can damage the rubber trim
around the doors. When done, wipe dry to avoid further freezing.
Do not pour warm water into the key cylinder.
You will be unable to insert key if the water freezes in
the hole.
Heat from the engine and exhaust can ignite
flammable materials left under the hood, causing a
fire. If you've parked your vehicle for an extended
period, inspect and remove any debris that may have
collected, such as dried grass and leaves that have
fallen or have been carried in for use as a nest by a
small animal.
Also check under the hood for leftover flammable
materials after you or someone else has performed
maintenance on your vehicle.
Main MenuTable of Contents
Page 231 of 325

230
uuMaintenance Under the HooduOpening the Hood
Maintenance
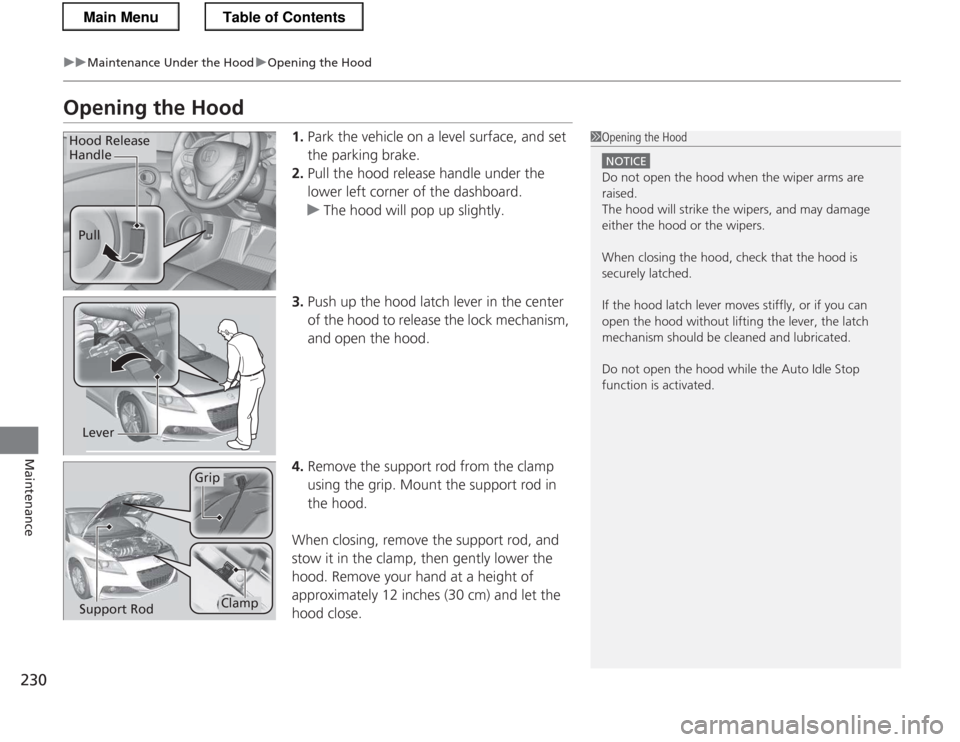
Opening the Hood1.Park the vehicle on a level surface, and set
the parking brake.
2. Pull the hood release handle under the
lower left corner of the dashboard.
uThe hood will pop up slightly.
3. Push up the hood latch lever in the center
of the hood to release the lock mechanism,
and open the hood.
4. Remove the support rod from the clamp
using the grip. Mount the support rod in
the hood.
When closing, remove the support rod, and
stow it in the clamp, then gently lower the
hood. Remove your hand at a height of
approximately 12 inches (30 cm) and let the
hood close.
1Opening the Hood
NOTICE
Do not open the hood when the wiper arms are raised.
The hood will strike the wipers, and may damage
either the hood or the wipers.
When closing the hood, check that the hood is
securely latched.
If the hood latch lever moves stiffly, or if you can
open the hood without lifting the lever, the latch
mechanism should be cleaned and lubricated.
Do not open the hood while the Auto Idle Stop
function is activated.
Hood Release
Handle
Pull
Lever
Support Rod
Grip
Clamp
Main MenuTable of Contents
Page 235 of 325

234
uuMaintenance Under the HooduChanging the Engine Oil and Oil Filter
Maintenance
Changing the Engine Oil and Oil Filter
You must change the engine oil and oil filter regularly in order to maintain the
engine's lubrication. The engine may be damaged if they are not changed regularly.
Change the oil and filter in accordance with the maintenance message on the multi-
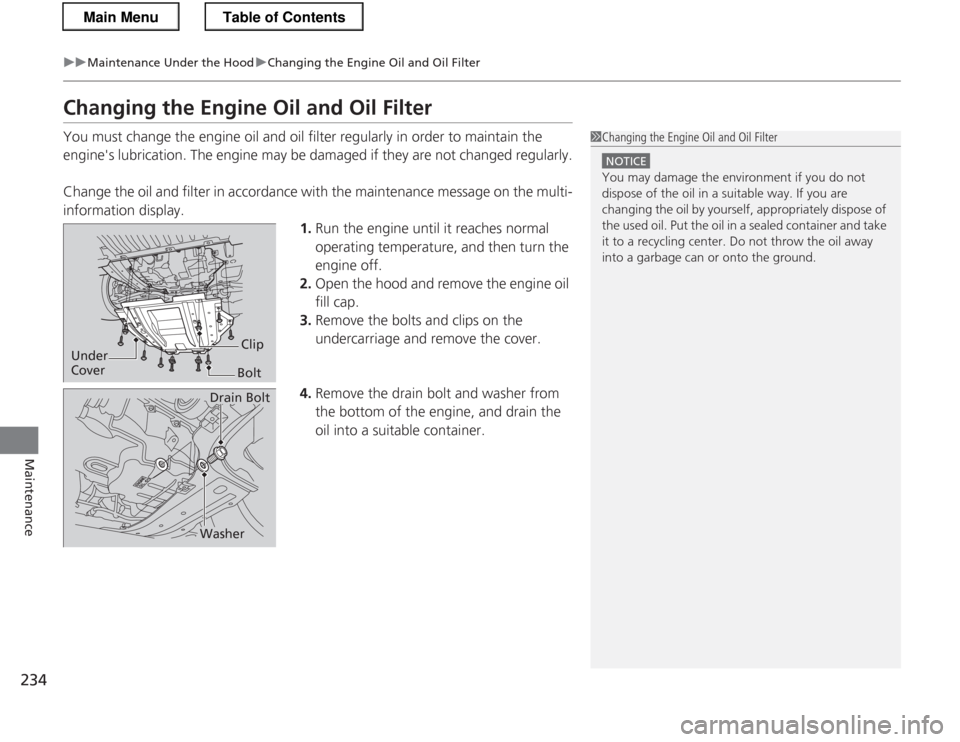
information display. 1.Run the engine until it reaches normal
operating temperature, and then turn the
engine off.
2. Open the hood and remove the engine oil
fill cap.
3. Remove the bolts and clips on the
undercarriage and remove the cover.
4. Remove the drain bolt and washer from
the bottom of the engine, and drain the
oil into a suitable container.
1Changing the Engine Oil and Oil Filter
NOTICE
You may damage the environment if you do not
dispose of the oil in a suitable way. If you are
changing the oil by yourself, appropriately dispose of
the used oil. Put the oil in a sealed container and take
it to a recycling center. Do not throw the oil away
into a garbage can or onto the ground.
Under
Cover
Bolt Clip
Drain Bolt
Washer
Main MenuTable of Contents