Page 206 of 325
205
uuWhen DrivinguTPMS (Tire Pressure Monitoring System)
Driving
TPMS (Tire Pressure Monitoring System)Monitors the tire pressure while you are
driving. If your vehicle’s tire pressure becomes
significantly low, the low tire pressure/TPMS indicator comes on and a message appears on the multi-information display.
CHECK TIRE PRESSURE is displayed when a
tire has significantly low pressure.
U.S. models only
1TPMS (Tire Pressure Monitoring System)
Conditions such as low ambient temperature and
altitude change di rectly affect tire pressure and can
trigger the low tire pr essure/TPMS indicator to come
on. 2 If the Low Tire Pressure/TPMS Indicator
Comes On or Blinks P. 296
Tire pressure checked and inflated in: • Warm weather can become under-inflated in
colder weather.
• Cold weather can become over-inflated in warmer
weather.
The low tire pressure/TP MS indicator will not come
on as a result of over inflation.
READY
Main MenuTable of Contents
Page 209 of 325
208
Driving
Braking
Brake System
Use the parking brake to keep the vehicle stationary when parking.To apply:
Pull the lever fully up without pressing the release button.
To release: 1.Pull the lever slightly, and press and hold the release button.
2. Lower the lever down all the way, then release the button.
■Parking Brake1Parking Brake
NOTICE
Release the parking brake fully before driving. The
rear brakes and axle can be damaged if you drive
with the parking brake applied.
If you start driving without fully releasing the parking
brake, a buzzer sounds as a warning, and RELEASE
PARKING BRAKE appears on the multi-information
display.
Always apply the parking brake when parking.
Main MenuTable of Contents
Page 214 of 325
213
Driving
Multi-View Rear Camera
About Your Multi-View Rear Camera
For models with the navigation system, see the Navigation System Manual.
Models with navigation system1About Your Multi-View Rear Camera
The rear camera view is restricted. You cannot see
the corner ends of the bumper or what is underneath
the bumper. Its unique lens also makes objects
appear closer or farther than they actually are.
Visually confirm that it is safe to drive before backing
up. Certain conditions (such as weather, lighting, and
high temperatures) may also restrict the rear view. Do
not rely in the rearview display which does not give you all information about conditions at the back of
your vehicle.
If the camera lens is covered with dirt or moisture,
use a soft, moist cloth to keep the lens clean and free of debris.
Main MenuTable of Contents
Page 215 of 325

214
Driving
Rearview Camera
About Your Rearview CameraAn image of the rear view is shown in your
vehicle’s rearview mirror when the shift lever is moved to
(R.
The rearview camera has a unique lens that makes objects appear closer or further
than they actually are.
Rearview Camera Display
Auto ButtonModels without navigation system
■Rearview Camera Display Area
1About Your Rearview Camera
The rear camera view is restricted. You cannot see
the corner ends of the bumper or what is underneath
the bumper. Its unique lens also makes objects
appear closer or farther than they actually are.
Visually confirm that it is safe to drive before backing
up. Certain conditions (such as weather, lighting, and
high temperatures) may also restrict the rear view. Do
not rely on the rearview display which does not give you all information about conditions at the back of
your vehicle.
If the camera lens is covered with dirt or moisture,
use a soft, moist cloth to keep the lens clean and free of debris.
The rearview display is turned on every time you shift to
(R .
The rearview mirror gets hot if the rearview display is
used for an extended period.
To turn the guidelines on or off, press and hold the
auto button for about three seconds.
If you turn the guidelines off, they remain off until
you turn them back on.
Screen display
GuidelinesBumper Approx. 118 in (3 m)
Approx. 79 in (2 m)
Approx. 39 in (1 m)
Approx. 20 in (0.5 m)
Approx. 39 in (1 m)
Approx. 79 in (2 m)
Approx. 118 in (3 m)
Camera
Main MenuTable of Contents
Page 216 of 325
215
uuRearview CamerauAbout Your Rearview Camera
Driving
You can select the displayed language on the rearview mirror between English, French and Spanish.1.Move the shift lever to
(R to display the
rearview monitor.
uMake sure that the automatic dimming
rearview mirror is on.
2. Press and hold the auto butto n for about six
seconds or more.
uThe displayed operation guide message
begins blinking.
3. Press the auto button to change the
language while it is blinking.
uPressing the button switches the
displayed language.
uYour selection is set about five seconds
after you stop adjusting.
■Customizing the Displayed Language
Main MenuTable of Contents
Page 220 of 325

219
Driving
Fuel Economy
Improving Fuel Economy
Fuel economy depends on several conditions, including driving conditions, your
driving habits, the condition of your vehicle, and loading. Depending on these and
other conditions, you may or may not achieve the rated fuel economy of this vehicle.
You can optimize your fuel economy with proper maintenance of your vehicle.
Always maintain your vehicle in accordance with the messages displayed on the
multi-information display. • Use the recommended viscosity engine oil, displaying the API Certification Seal.
• Maintain the specified tire pressure.
• Do not load the vehicle with excess cargo.
• Keep your vehicle clean. A buildup of snow or mud on your vehicle's underside adds weight and increases wind resistance.
■Maintenance and Fuel Economy
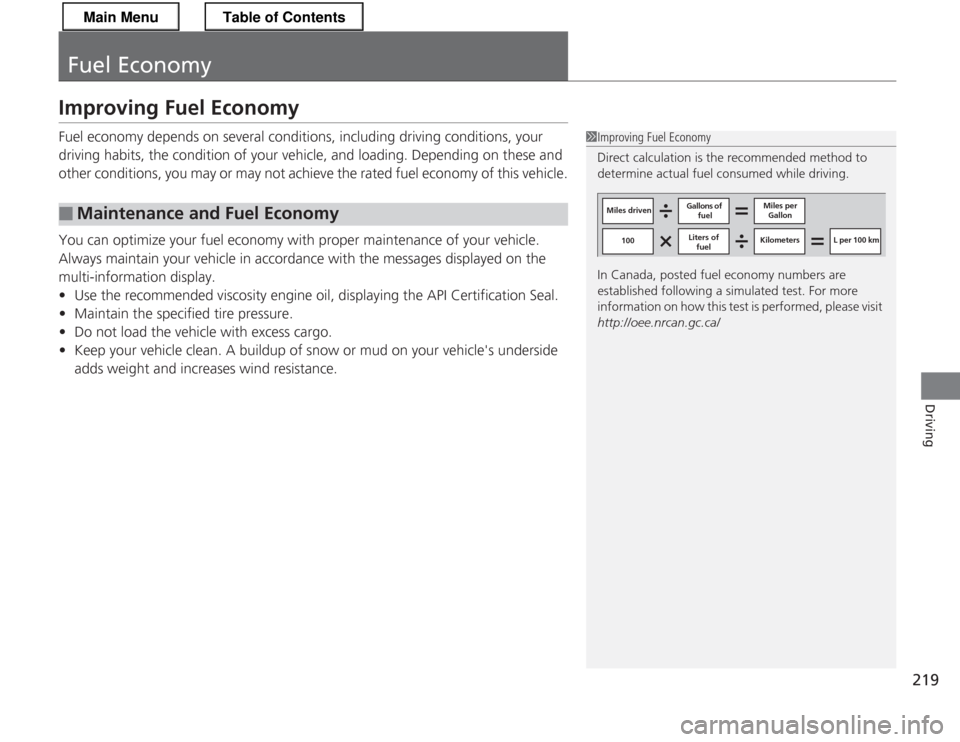
1Improving Fuel Economy
Direct calculation is the recommended method to
determine actual fuel consumed while driving.
In Canada, posted fuel economy numbers are
established following a simulated test. For more
information on how this test is performed, please visit http://oee.nrcan.gc.ca/
Miles driven Gallons of
fuel Miles per
Gallon
100 Liters of
fuel Kilometers L per 100 km
Main MenuTable of Contents
Page 223 of 325

222
Maintenance
Before Performing Maintenance
Inspection and Maintenance
For your safety, perform all listed inspections and maintenance to keep your vehicle
in good condition. If you become aware of any abnormality (noise, smell, insufficient
brake fluid, oil residue on the ground, etc.), have your vehicle inspected by a dealer.
(Note, however, that service at a dealer is not mandatory to keep your warranties in
effect.) Refer to the separate maintenance booklet for detailed maintenance and
inspection information. ■ Daily inspections
Perform inspections before long distance trips, when washing the vehicle, or when refueling. ■ Periodic inspections
• Check the continuously variable transmission fluid level monthly.
2 Continuously Variable Transmission Fluid P. 238
• Check the brake fluid level monthly.
2 Brake/Clutch Fluid P. 240
• Check the tire pressure monthly. Examine the tread for wear and foreign objects.
2 Checking and Maintaining Tires P. 253
• Check the operation of the exterior lights monthly.
2 Replacing Light Bulbs P. 242
• Check the condition of the wiper blades at least every six months.
2 Checking and Mainta ining Wiper Blades P. 250
■Types of Inspection and Maintenance
1Inspection and Maintenance
Maintenance, replacement, or repair of
emissions control devices and systems may be
done by any automotive repair establishment or
individuals using parts that are “certified” to EPA standards.
According to state and federal regulations, failure to
perform maintenance on the maintenance main
items marked with # will not void your emissions
warranties. However, all maintenance services should
be performed in accordance with the intervals
indicated by the multi-information display. 2 Maintenance Service Items P. 227
If you want to perform complex maintenance tasks
that require more skills and tools, you can purchase a
subscription to the Service Express website at
www.techinfo.honda.com .
2 Authorized Manuals P. 315
If you want to perform maintenance yourself, make
sure that you have the necessary tools and skills first.
After performing maintenance, update the records in
the separate maintenance booklet.
U.S. models
Main MenuTable of Contents
Page 235 of 325

234
uuMaintenance Under the HooduChanging the Engine Oil and Oil Filter
Maintenance
Changing the Engine Oil and Oil Filter
You must change the engine oil and oil filter regularly in order to maintain the
engine's lubrication. The engine may be damaged if they are not changed regularly.
Change the oil and filter in accordance with the maintenance message on the multi-
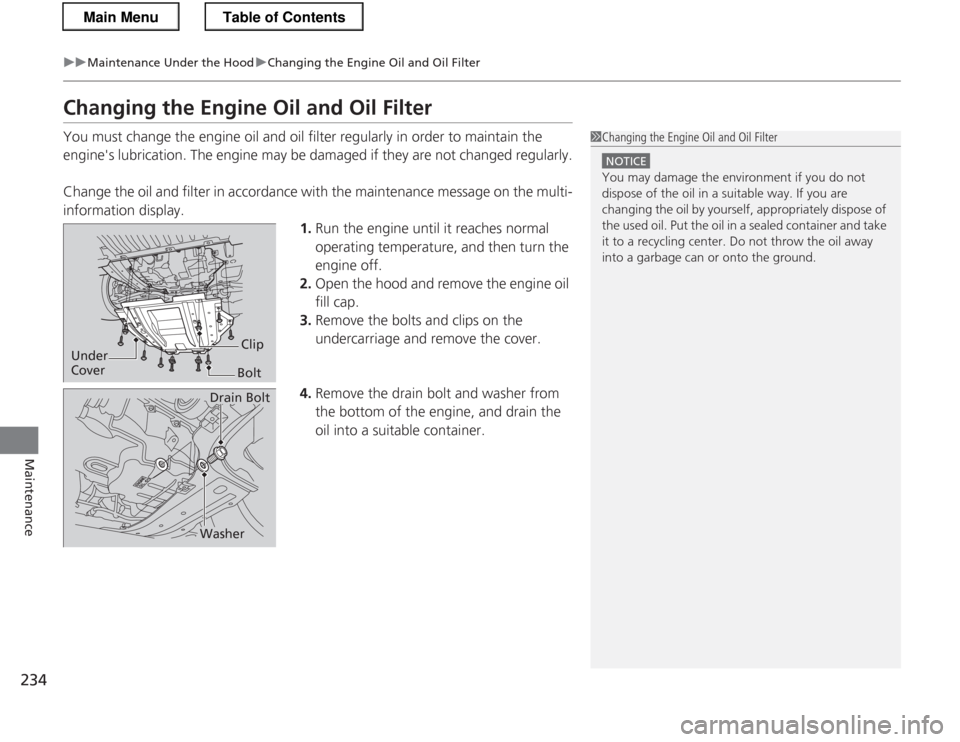
information display. 1.Run the engine until it reaches normal
operating temperature, and then turn the
engine off.
2. Open the hood and remove the engine oil
fill cap.
3. Remove the bolts and clips on the
undercarriage and remove the cover.
4. Remove the drain bolt and washer from
the bottom of the engine, and drain the
oil into a suitable container.
1Changing the Engine Oil and Oil Filter
NOTICE
You may damage the environment if you do not
dispose of the oil in a suitable way. If you are
changing the oil by yourself, appropriately dispose of
the used oil. Put the oil in a sealed container and take
it to a recycling center. Do not throw the oil away
into a garbage can or onto the ground.
Under
Cover
Bolt Clip
Drain Bolt
Washer
Main MenuTable of Contents