2013 HONDA CIVIC SEDAN clutch
[x] Cancel search: clutchPage 20 of 368

18
Quick Reference Guide
Maintenance (P 253)
Under the Hood (P 265)
● Check engine oil, engine coolant, and windshield washer
fluid. Add when necessary.
● Check brake fluid and clutch fluid.
● Check the battery regularly.
aPull the hood release handle under the corner of the
dashboard.
bLocate the hood latch lever, pull the lever up, and lift up
the hood.
cWhen finished, clos e the hood and make su re it is firmly
locked in place.
Lights (P 282)
● Inspect all lights regularly.
Wiper Blades (P 295)
● Replace blades if they leave streaks
across the windshield.
Tires (P 297)
● Inspect tires and wheels regularly.
● Check tire pre ssures regularly.
● Install snow tires for winter
driving.
Page 225 of 368

223Continued
Driving
When Driving
Starting the Engine
1.Make sure the parking brake is applied.
2. Check that the shift lever is in
(P, then
depress the brake pedal.
u Although it is possible to start the vehicle
in
(N, it is safer to start it in (P.
2. Check that the shift lever is in
(N. Then
depress the brake peda l with your right
foot, and the clutch pedal with your left
foot.
u The clutch pedal must be fully depressed
to start the engine.
1Starting the Engine
Keep your foot firmly on the brake pedal when
starting the engine.
The engine is harder to start in cold weather and in
thinner air found at altit udes above 8,000 feet (2,400
meters).
When starting the engine in cold weather, turn off all
electrical accessories such as the lights, heating and
cooling system
*/climate control system*, and rear
defogger in order to reduce battery drain.
If you live in a region where winter is extremely cold,
an engine block heater will improve starting and
warming of the engine. If temperatures consistently
below -22
°F (-30°C) are expected, the coolant
mixture should be changed to a higher concentration
to prevent freezing. Cons ult a dealer for details.
If the exhaust system s ounds abnormal or you can
smell exhaust gas inside the vehicle, have your vehicle
checked by a dealer. There may be a problem with
the engine or exhaust system.
Brake PedalAutomatic transmission models
Brake Pedal
Clutch Pedal
Manual transmission models
* Not available on all models
Page 231 of 368

229
uuWhen Driving uShifting
Continued
Driving
Shifting
Fully depress the clutch pedal to operate the shift lever and change gears, then
slowly release the pedal.
Depress the clutch pedal, and pause for a few seconds before shifting into
( R, or
shift into one of the forward gears for a moment. This stops the gears so they do not
“grind.”
■Shift Lever Operation
Manual transmission models
1 Shifting
NOTICEDo not shift to (R before the vehicle comes to a
complete stop.
Shifting to
( R before stopping can damage the
transmission.
NOTICEBefore downshifting, make sure the engine will not
go into the tachometer's red zone. Should this occur,
it can severely da mage your engine.
There is a metallic part on the shift lever. If you leave
the vehicle parked outside for a long time on a hot
day, be careful before movi ng the shift lever. Because
of heat, the shift lever may be extremely hot. If the
outside temperature is low, the shift lever may feel
cold.
Page 232 of 368
uuWhen Driving uShifting
230
Driving
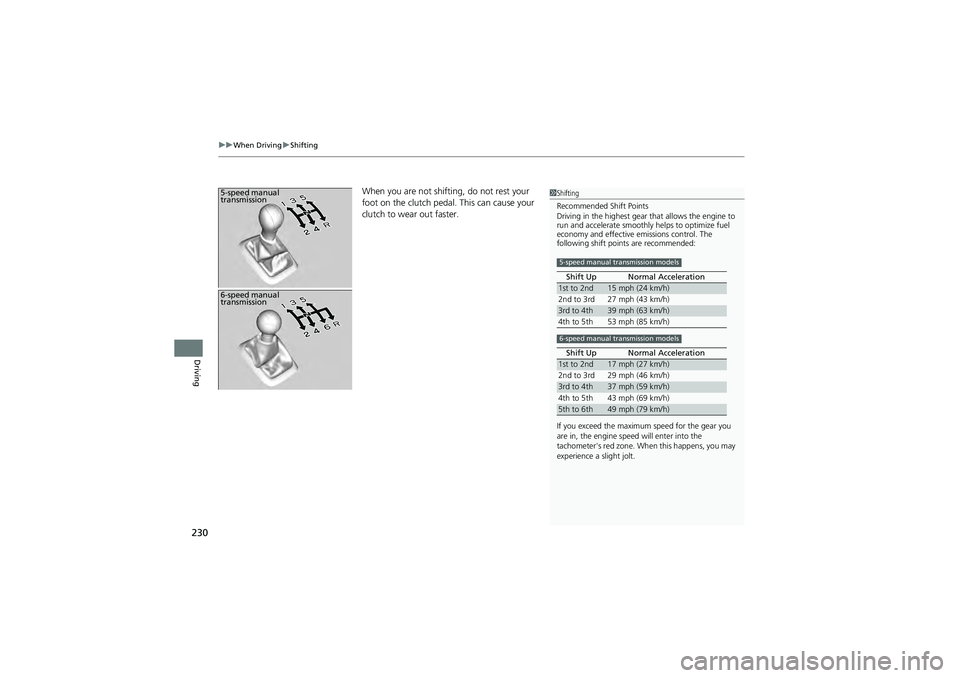
When you are not shifting, do not rest your
foot on the clutch pedal. This can cause your
clutch to wear out faster. 5-speed manual
transmission1Shifting
Recommended Shift Points
Driving in the highest gear that allows the engine to
run and accelerate smoothly helps to optimize fuel
economy and effective emissions control. The
following shift points are recommended:
If you exceed the maximu m speed for the gear you
are in, the engine speed will enter into the
tachometer's red zone. Wh en this happens, you may
experience a slight jolt. Shift Up Normal Acceleration
1st to 2nd15 mph (24 km/h)
2nd to 3rd 27 mph (43 km/h)
3rd to 4th39 mph (63 km/h)
4th to 5th 53 mph (85 km/h)
Shift Up Normal Acceleration
1st to 2nd17 mph (27 km/h)
2nd to 3rd 29 mph (46 km/h)
3rd to 4th37 mph (59 km/h)
4th to 5th 43 mph (69 km/h)
5th to 6th49 mph (79 km/h)
5-speed manual transmission models
6-speed manual transmission models
6-speed manual
transmission
Page 233 of 368
231
uuWhen Driving uShifting
Driving
The manual transmission has a lockout mech anism that stops you from accidentally
shifting into
(R from a forward gear while the vehicle is moving above a certain
speed.
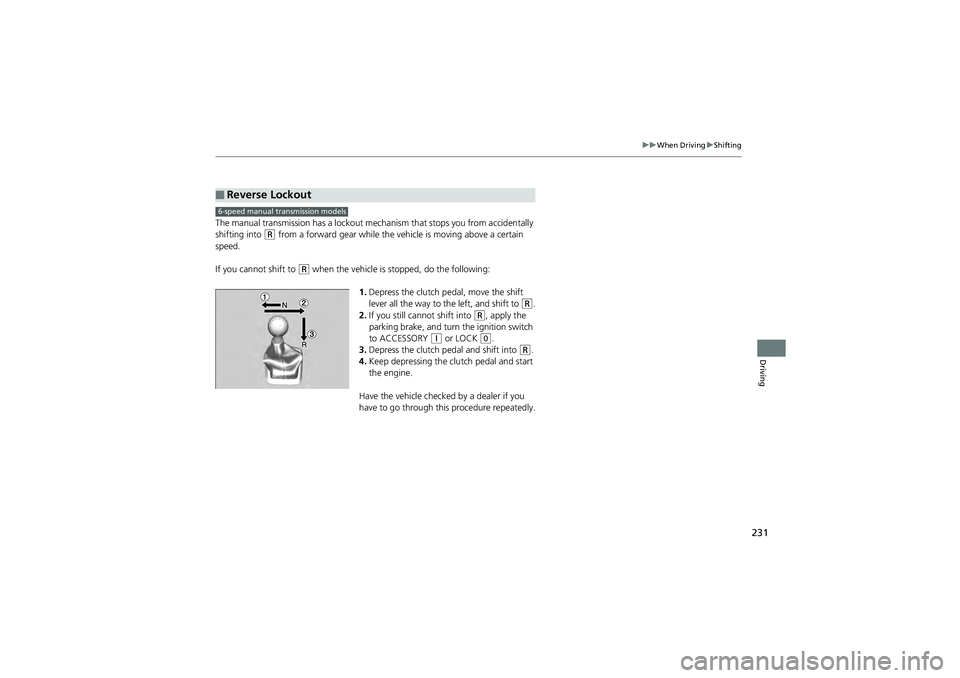
If you cannot shift to
(R when the vehicle is stopped, do the following:
1.Depress the clutch pe dal, move the shift
lever all the way to the left, and shift to
(R.
2. If you still cannot shift into
(R, apply the
parking brake, and turn the ignition switch
to ACCESSORY
(q or LOCK (0.
3. Depress the clutch pedal and shift into
(R.
4. Keep depressing the cl utch pedal and start
the engine.
Have the vehicle checked by a dealer if you
have to go through this procedure repeatedly.
■Reverse Lockout
6-speed manual transmission models
Page 237 of 368

235
uuWhen Driving uCruise Control*
Driving
Increase or decrease the vehicle speed using the RES/+ or –/SET buttons on the
steering wheel.
• Each time you press the button, the vehicl e speed is increased or decreased by
about 1 mph (1.6 km/h).
• If you keep the button pressed, the vehicl e speed increases or decreases until you
release it. This speed is then set.
To cancel cruise control, do any of the
following:
•Press the CANCEL button.
• Press the CRUISE button.
• Depress the brake pedal.
• Depress the clutch pedal for five seconds or
more.
The CRUISE CONTROL indicator goes off.
■To Adjust the Vehicle Speed1To Adjust the Vehicle Speed
You can set the vehicle speed using the –/SET button
on the steering wheel when adjusting the speed with
the accelerator and brake pedals.
■To Cancel
To decrease speed
To increase speed
1 To Cancel
Resuming the prior set speed:
After cruise control has b een canceled, you can still
resume the prior set speed by pressing the RES/+
button while driving at a speed of at least 25 mph (40
km/h) or more.
You cannot set or resume in the following situations:
•When vehicle speed is less than 25 mph (40 km/h)•When the CRUISE button is turned off
At vehicle speeds of 22 mph (35 km/h) or less, cruise
control is canceled automatically.
CRUISE
Button
CANCEL
Button
Page 255 of 368

253
Maintenance
This chapter discusses basic maintenance.
Before Performing MaintenanceInspection and Maintenance ............ 254
Safety When Performing Maintenance..... 255Parts and Fluids Used in Maintenance Service ........................................... 256
Maintenance Minder
TM..................... 257
Maintenance Under the Hood
Maintenance Items Under the Hood ..... 265Opening the Hood ........................... 267
Recommended Engine Oil ................ 268
Oil Check ......................................... 269
Adding Engine Oil ............................ 271
Changing the Engine Oil and Oil Filter ..... 272
Engine Coolant ................................ 275
Transmission Fluid ............................ 277
Brake/Clutch Fluid ............................ 280
Refilling Window Washer Fluid......... 281
Replacing Light Bulbs ....................... 282
Checking and Maintaining Wiper
Blades .......................................... 295
Checking and Maintaining Tires
Checking Tires ................................. 297
Tire and Loading Information Label ...... 298Tire Labeling .................................... 298DOT Tire Quality Grading (U.S. Vehicles)....... 300Wear Indicators................................ 302 Tire Service Life ................................ 302
Tire and Wheel Replacement ........... 303
Tire Rotation .................................... 304
Winter Tires ..................................... 305
Battery ............................................... 306
Remote Transmitter Care
*
Replacing the Button Battery ........... 307
Heating and Cooling System*/Climate
Control System* Maintenance ....... 308
Cleaning
Interior Care .................................... 309
Exterior Care.................................... 311
* Not available on all models
Page 256 of 368

254
Maintenance
Before Performing Maintenance
Inspection and Maintenance
For your safety, perform all listed inspections and maintenance to keep your vehicle
in good condition. If you become aware of any abnormality (noise, smell, insufficient
brake fluid, oil residue on the ground, etc.), have your vehicle inspected by a dealer.
(Note, however, that service at a dealer is not mandatory to keep your warranties in
effect.) Refer to the separate maintenanc e booklet for detailed maintenance and
inspection information.
■Daily inspections
Perform inspections before lo ng distance trips, when washing the vehicle, or when
refueling.
■Periodic inspections
• Check the automatic transmi ssion fluid level monthly.
2Automatic Tran smission Fluid P. 277
•Check the brake fluid level monthly.2 Brake/Clutch Fluid P. 280
•Check the tire pressure monthly. Examin e the tread for wear and foreign objects.2Checking and Maintaining Tires P. 297
•Check the operation of the exterior lights monthly.2 Replacing Light Bulbs P. 282
•Check the condition of the wiper bl ades at least every six months.2Checking and Maintaining Wiper Blades P. 295
■Types of Inspection and Maintenance
1Inspection and Maintenance
Maintenance, replacement, or repair of
emissions contro l devices and systems may be
done by any automotive repair establishment or
individuals using parts th at are “certified” to
EPA standards.
According to state and federal regulations, failure to
perform maintenance on the maintenance main
items marked with # will not void your emissions
warranties. However, all maintenance services should
be performed in accordance with the intervals
indicated by the information display
*/i-MID*.
2 Maintenance Service Items P. 259, 263
If you want to perform complex maintenance tasks
that require more skills and tools, you can purchase a
subscription to the Serv ice Express website at
www.techinfo.honda.com .
2 Authorized Manuals P. 357
If you want to perform ma intenance yourself, make
sure that you have the nece ssary tools and skills first.
After performing ma intenance, update the records in
the separate maintenance booklet.
U.S. models
* Not available on all models