2013 FORD TAURUS inflation pressure
[x] Cancel search: inflation pressurePage 329 of 541

Damage
Periodically inspect the tire treads and sidewalls for damage (such as
bulges in the tread or sidewalls, cracks in the tread groove and
separation in the tread or sidewall). If damage is observed or suspected
have the tire inspected by a tire professional. Tires can be damaged
during off-road use, so inspection after off-road use is also recommended.
WARNING: Age
Tires degrade over time depending on many factors such as
weather, storage conditions, and conditions of use (load, speed, inflation
pressure, etc.) the tires experience throughout their lives.
In general, tires should be replaced after six years regardless of tread
wear. However, heat caused by hot climates or frequent high loading
conditions can accelerate the aging process and may require tires to be
replaced more frequently.
You should replace your spare tire when you replace the road tires or
after six years due to aging even if it has not been used.
U.S. DOT Tire Identification Number (TIN)
Both U.S. and Canada Federal regulations require tire manufacturers to
place standardized information on the sidewall of all tires. This
information identifies and describes the fundamental characteristics of
the tire and also provides a U.S. DOT Tire Identification Number for
safety standard certification and in case of a recall.
This begins with the letters “DOT” and indicates that the tire meets all
federal standards. The next two numbers or letters are the plant code
designating where it was manufactured, the next two are the tire size
code and the last four numbers represent the week and year the tire was
built. For example, the numbers 317 mean the 31st week of 1997. After
2000 the numbers go to four digits. For example, 2501 means the 25th
week of 2001. The numbers in between are identification codes used for
traceability. This information is used to contact customers if a tire defect
requires a recall.
Wheels and Tires329
2013 Taurus
Owners Guide gf, 1st Printing
USA(fus)
Page 333 of 541
The tires should also be balanced periodically. An unbalanced tire and
wheel assembly may result in irregular tire wear.
Tire Rotation
Note:If your tires show uneven wear ask an authorized dealer to check
for and correct any wheel misalignment, tire imbalance or mechanical
problem involved before tire rotation.
Note:Your vehicle may be equipped with a dissimilar spare tire/wheel. A
dissimilar spare tire/wheel is defined as a spare tire and/or wheel that is
different in brand, size or appearance from the road tires and wheels. If
you have a dissimilar spare tire/wheel it is intended for temporary use
only and should not be used in a tire rotation.
Note:After having your tires rotated, inflation pressure must be checked
and adjusted to the vehicle requirements.
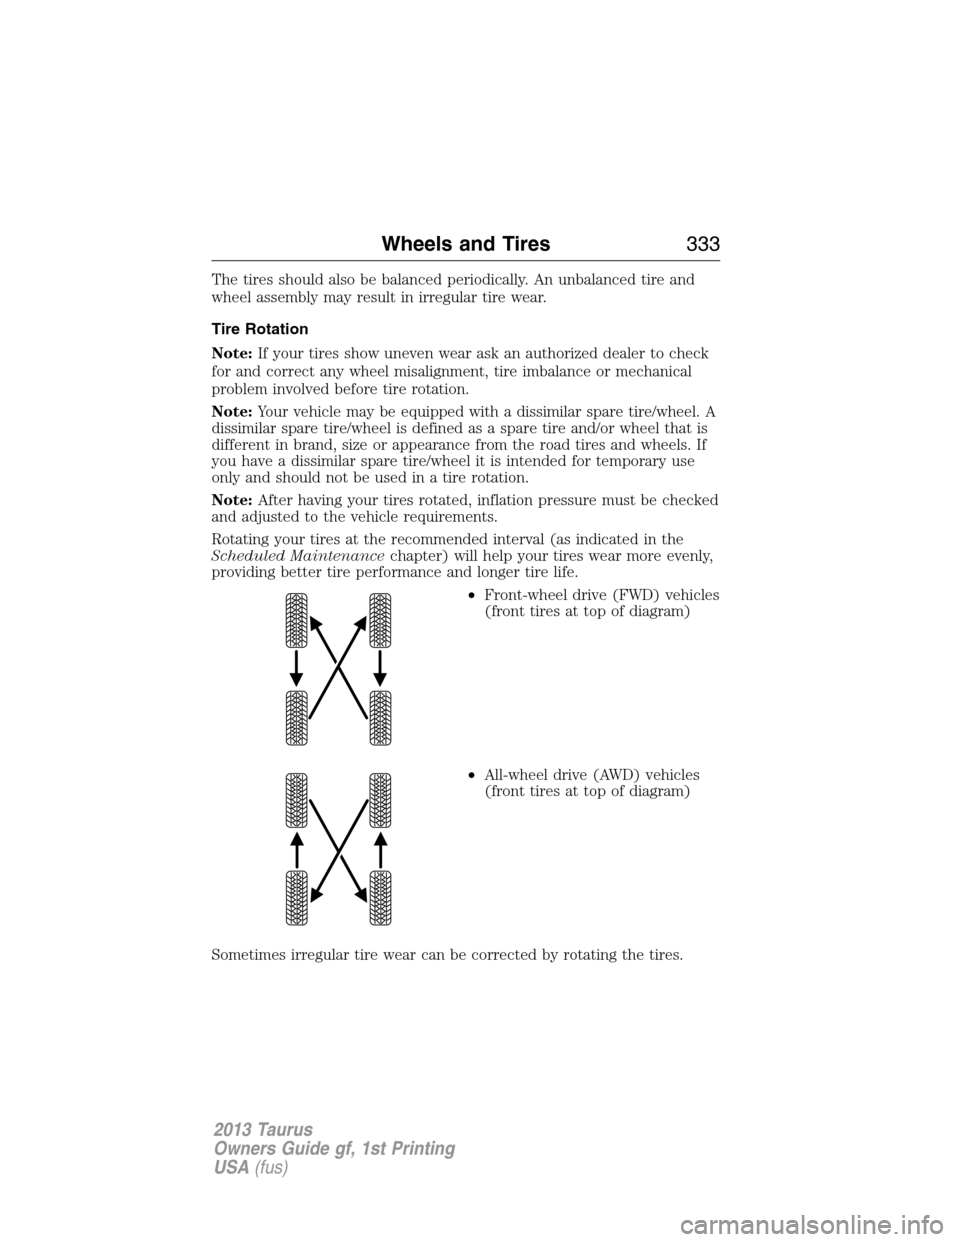
Rotating your tires at the recommended interval (as indicated in the
Scheduled Maintenancechapter) will help your tires wear more evenly,
providing better tire performance and longer tire life.
•Front-wheel drive (FWD) vehicles
(front tires at top of diagram)
•All-wheel drive (AWD) vehicles
(front tires at top of diagram)
Sometimes irregular tire wear can be corrected by rotating the tires.
Wheels and Tires333
2013 Taurus
Owners Guide gf, 1st Printing
USA(fus)
Page 335 of 541
•Install tire cables securely, verifying that the tire cables do not touch
any wiring, brake lines or fuel lines.
•Do not exceed 30 mph (48 km/h) with tire cables on your vehicle.
•Drive cautiously. If you hear the cables rub or bang against your
vehicle, stop and retighten the cables. If this does not work, remove
the cables to prevent damage to your vehicle.
•Remove the tire cables when they are no longer needed. Do not use
tire cables on dry roads.
TIRE PRESSURE MONITORING SYSTEM
Each tire, including the spare (if provided), should be checked
monthly when cold and inflated to the inflation pressure
recommended by the vehicle manufacturer on the vehicle
placard or tire inflation pressure label.
As an added safety feature, your vehicle has been equipped with a tire
pressure monitoring system (TPMS) that illuminates a low tire pressure
telltale when one or more of your tires is significantly under-inflated.
Accordingly, when the low tire pressure telltale illuminates, you should
stop and check your tires as soon as possible, and inflate them to the
proper pressure. Driving on a significantly under-inflated tire causes the
tire to overheat and can lead to tire failure. Under-inflation also reduces
fuel efficiency and tire tread life, and may affect the vehicle’s handling
and stopping ability.
Please note that the TPMS is not a substitute for proper tire
maintenance, and it is the driver’s responsibility to maintain correct tire
pressure, even if under-inflation has not reached the level to trigger
illumination of the TPMS low tire pressure telltale.
Your vehicle has also been equipped with a TPMS malfunction indicator to
indicate when the system is not operating properly. The TPMS malfunction
indicator is combined with the low tire pressure telltale. When the system
detects a malfunction, the telltale will flash for approximately one minute
and then remain continuously illuminated. This sequence will continue
upon subsequent vehicle start-ups as long as the malfunction exists.
When the malfunction indicator is illuminated, the system may not be
able to detect or signal low tire pressure as intended. TPMS malfunctions
may occur for a variety of reasons, including the installation of
replacement or alternate tires or wheels on the vehicle that prevent the
TPMS from functioning properly. Always check the TPMS malfunction
telltale after replacing one or more tires or wheels on your vehicle to
ensure that the replacement or alternate tires and wheels allow the
TPMS to continue to function properly.
Wheels and Tires335
2013 Taurus
Owners Guide gf, 1st Printing
USA(fus)
Page 338 of 541
Low tire
pressure
warning lightPossible cause Customer action required
Flashing
warning lightSpare tire in use Repair the damaged road wheel/tire
and reinstall it on the vehicle to
restore system functionality. For a
description on how the system
functions, refer toWhen your
temporary spare tire is installed
in this section.
TPMS
malfunctionIf the tires are properly inflated
and the spare tire is not in use but
the light remains on, contact your
authorized dealer as soon as
possible.
When inflating your tires
When putting air into your tires (such as at a gas station or in your
garage), the tire pressure monitoring system may not respond
immediately to the air added to your tires.
It may take up to two minutes of driving over 20 mph (32 km/h) for the
light to turn off after you have filled your tires to the recommended
inflation pressure.
How temperature affects your tire pressure
The tire pressure monitoring system (TPMS) monitors tire pressure in
each pneumatic tire. While driving in a normal manner, a typical
passenger tire inflation pressure may increase approximately 2 to 4 psi
(14 to 28 kPa) from a cold start situation. If the vehicle is stationary
overnight with the outside temperature significantly lower than the
daytime temperature, the tire pressure may decrease approximately 3 psi
(21 kPa) for a drop of 30°F (17°C) in ambient temperature. This lower
pressure value may be detected by the TPMS as being significantly lower
than the recommended inflation pressure and activate the TPMS warning
light for low tire pressure. If the low tire pressure warning light is on,
visually check each tire to verify that no tire is flat. (If one or more tires
are flat, repair as necessary.) Check air pressure in the road tires. If any
tire is under-inflated, carefully drive the vehicle to the nearest location
where air can be added to the tires. Inflate all the tires to the
recommended inflation pressure.
338Wheels and Tires
2013 Taurus
Owners Guide gf, 1st Printing
USA(fus)
Page 346 of 541
General Information
WARNING:Failure to follow these guidelines could result in an
increased risk of loss of vehicle control, injury or death.
Note:Do not use the temporary mobility kit if a tire has become
severely damaged by driving the vehicle with a tire that has insufficient
air pressure. Only punctured areas located within the tire tread can be
sealed with the temporary mobility kit.
Do not attempt to repair punctures larger than
1�4inch (6.4 mm) or
damage to the tire’s sidewall. The tire may not completely seal.
Loss of air pressure may adversely affect tire performance. For this
reason:
•Note:Do not drive the vehicle above 50 mph (80 km/h).
•Note:Do not drive further than 120 miles (200 km). Drive only to the
closest Ford Motor Company authorized dealer or tire repair shop to
have your tire inspected.
•Drive carefully and avoid abrupt steering maneuvers.
•Periodically monitor tire inflation pressure in the affected tire; if the
tire is losing pressure, have the vehicle towed.
•Read the information in theTips for use of the temporary mobility
kitsection to ensure safe operation of the temporary mobility kit and
your vehicle.
Tips for Use of the Temporary Mobility Kit
Read the following list of tips to ensure safe operation of the temporary
mobility kit:
•Before operating the temporary mobility kit, make sure your vehicle is
safely off the road and away from moving traffic. Turn on the hazard
lights.
•Always set the parking brake to ensure the vehicle doesn’t move
unexpectedly.
•Do not remove any foreign objects, such as nails or screws, from the
tire.
•When using the temporary mobility kit, leave the engine running (only
if the vehicle is outdoors or in a well-ventilated area) so the
compressor doesn’t drain the vehicle’s battery.
•Do not allow the compressor to operate continuously for more than
15 minutes; this will help prevent the compressor from overheating.
346Wheels and Tires
2013 Taurus
Owners Guide gf, 1st Printing
USA(fus)
Page 347 of 541

•Never leave the temporary mobility kit unattended when it is operating.
•Sealant compound contains latex. Make sure that you use the
non-latex gloves provided to avoid an allergic reaction.
•Keep the temporary mobility kit away from children.
•Only use the temporary mobility kit when the ambient temperature is
between -40°F (-40°C) and 158°F (70°C).
•Only use the sealing compound before the use by date. The use by
date is on the lower right hand corner of the label located on the
sealant canister (bottle). Check the use by date regularly and replace
the canister after four years.
•Do not store the temporary mobility kit unsecured inside the
passenger compartment of the vehicle as it may cause injury during a
sudden stop or collision. Always store the kit in its original location.
•After sealant use, the TPMS sensor and valve stem on the wheel must
be replaced by an authorized Ford dealer.
•When inflating a tire or other objects, use the black air hose only. Do
not use the transparent hose which is designed for sealant application
only.
•Operating the temporary mobility kit could cause an electrical
disturbance in radio, CD, and DVD player operation (if equipped).
What to do when a Tire Is Punctured
A tire puncture within the tire’s tread area can be repaired in two stages
with the temporary mobility kit:
•In the first stage, the tire will be reinflated with a sealing compound
and air. After the tire has been reinflated, you will need to drive the
vehicle a short distance (approximately 4 miles [6 km]) to distribute
the sealant in the tire.
•In the second stage, you will need to check the tire pressure and
adjust, if necessary, to the vehicle’s tire inflation pressure.
Wheels and Tires347
2013 Taurus
Owners Guide gf, 1st Printing
USA(fus)
Page 348 of 541
First Stage: Reinflating the Tire with Sealing Compound and Air
WARNING:Do not stand directly over the temporary mobility kit
while inflating the tire. If you notice any unusual bulges or
deformations in the tire’s sidewall during inflation, stop and call
roadside assistance.
WARNING:If the tire doesn’t inflate to the recommended tire
pressure within 15 minutes, stop and call roadside assistance.
Preparation
Park the vehicle in a safe, level and secure area, away from moving
traffic. Turn the hazard lights on. Apply the parking brake and turn the
engine off. Inspect the flat tire for visible damage.
Sealant compound contains latex. To avoid any allergic reactions, use the
non-latex gloves located in the accessory box on the underside of the
temporary mobility kit housing.
Do not remove any foreign object that has pierced the tire. If a puncture
is located in the tire sidewall, stop and call roadside assistance.
1. Remove the valve cap from the tire valve.
2. Unwrap the clear tube from the compressor housing.
3. Remove the tube cap and fasten the metal connector of the tube to
the tire valve, turning clockwise. Make sure the connection is tightly
fastened.
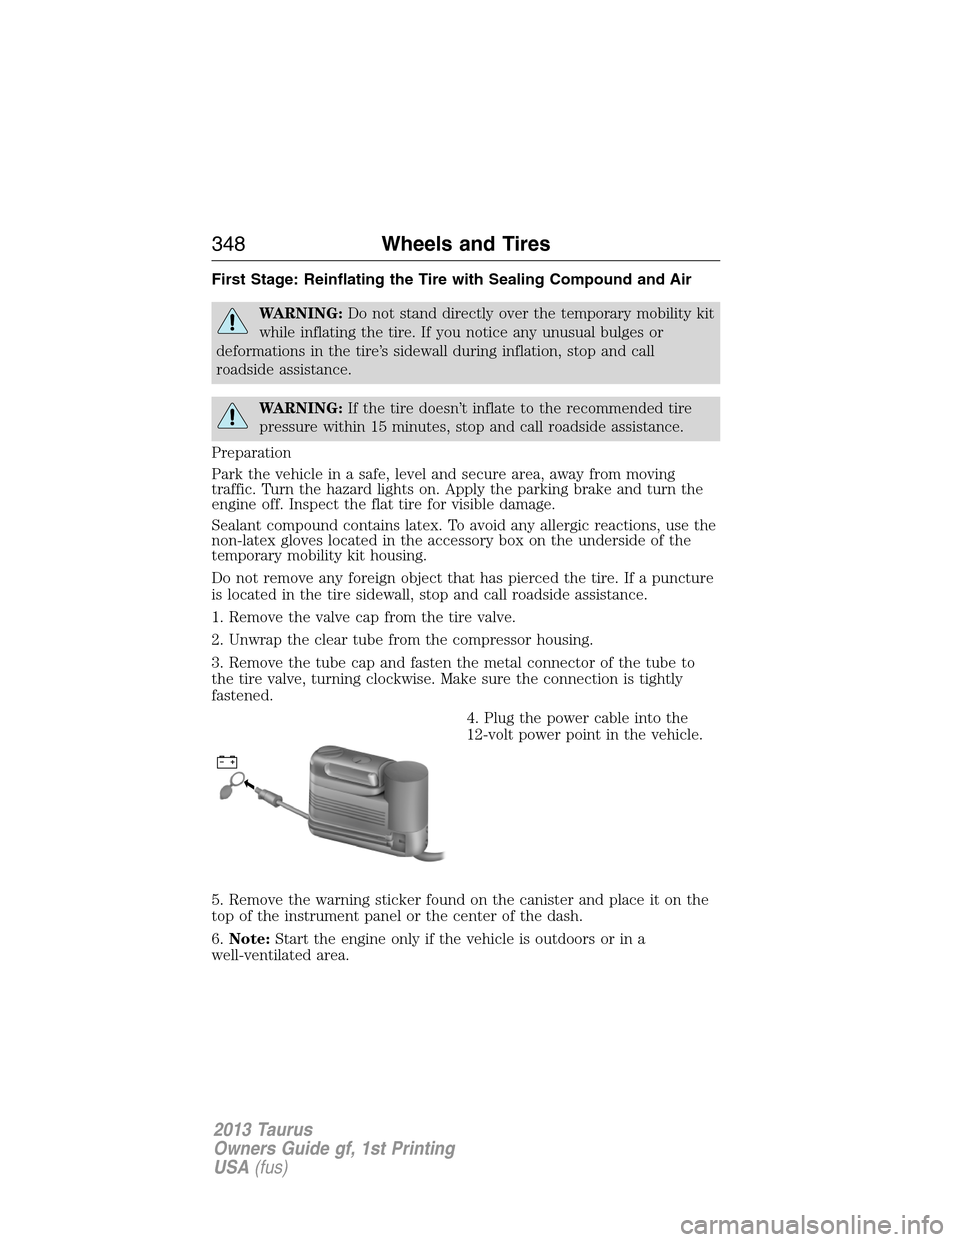
4. Plug the power cable into the
12-volt power point in the vehicle.
5. Remove the warning sticker found on the canister and place it on the
top of the instrument panel or the center of the dash.
6.Note:Start the engine only if the vehicle is outdoors or in a
well-ventilated area.
348Wheels and Tires
2013 Taurus
Owners Guide gf, 1st Printing
USA(fus)
Page 350 of 541
Second Stage: Checking Tire Pressure
WARNING:The power plug may get hot after use and should be
handled carefully while unplugging.
Check the air pressure of your tires as follows:
1. Remove the valve cap from the tire valve.
2. Unhook the black hose from the side of the compressor and fasten
firmly on the valve stem by turning clockwise.
WARNING:If you are proceeding from theFirst stage:
Reinflating the tire with sealing compound and airsection
and have injected sealant in the tire and the pressure is below 20 psi
(1.4 bar), stop and call roadside assistance. If tire pressure is above
20 psi (1.4 bar), continue to the next step.
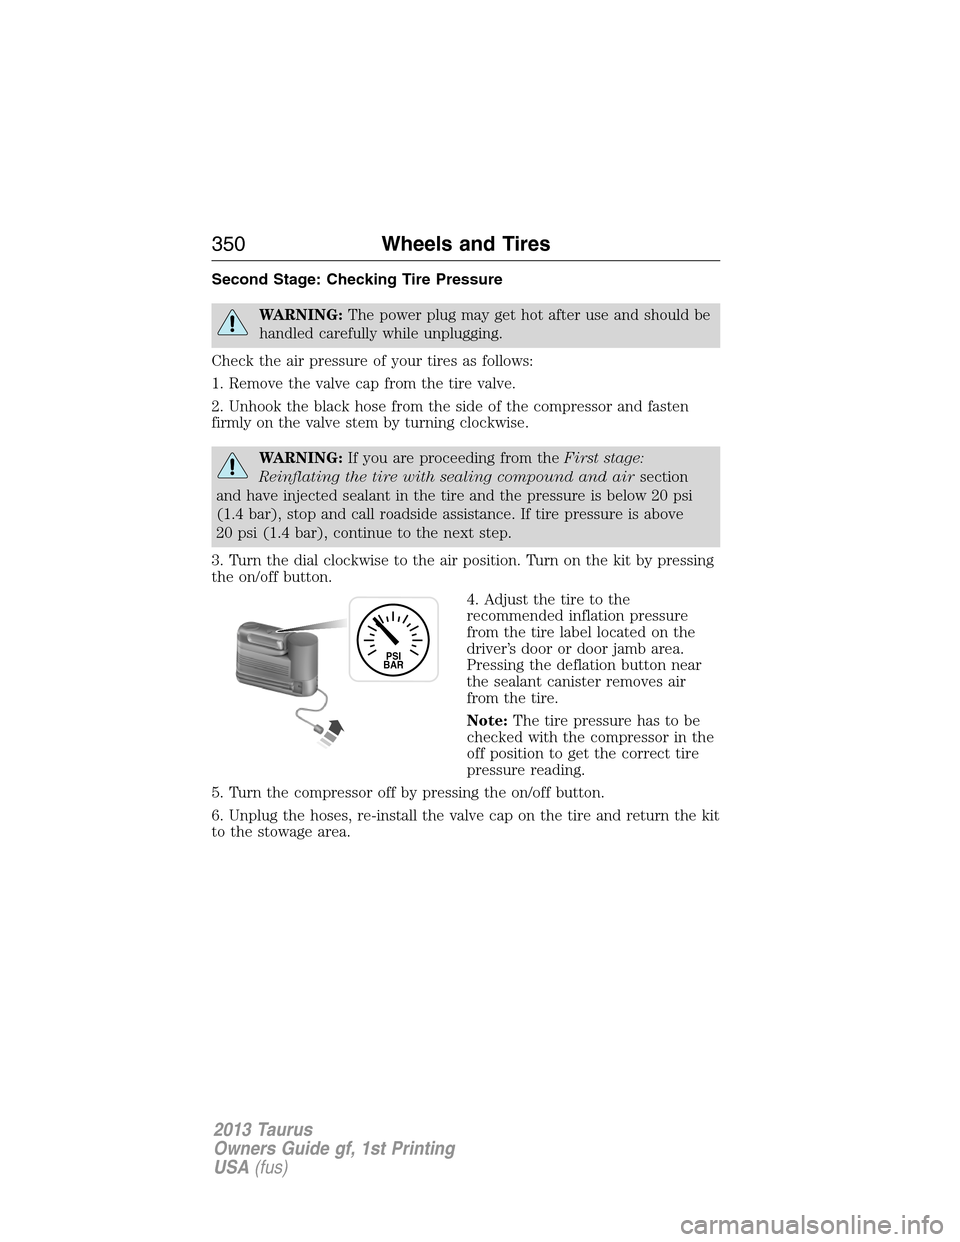
3. Turn the dial clockwise to the air position. Turn on the kit by pressing
the on/off button.
4. Adjust the tire to the
recommended inflation pressure
from the tire label located on the
driver’s door or door jamb area.
Pressing the deflation button near
the sealant canister removes air
from the tire.
Note:The tire pressure has to be
checked with the compressor in the
off position to get the correct tire
pressure reading.
5. Turn the compressor off by pressing the on/off button.
6. Unplug the hoses, re-install the valve cap on the tire and return the kit
to the stowage area.
PSI
BAR
350Wheels and Tires
2013 Taurus
Owners Guide gf, 1st Printing
USA(fus)