2013 FORD F250 change wheel
[x] Cancel search: change wheelPage 274 of 577
•The Total Accessory Reserve Capacity (TARC) is shown on the lower
right side of the vehicle’s Safety Compliance Certification Label. This
applies to Ford-completed vehicles of 10,000 pounds (4,536 kilograms)
GVWR or less. This is the weight of permanently-attached auxiliary
equipment, such as snowplow frame-mounting hardware, that can be
added to the vehicle and satisfy Ford compliance certification to
FMVSS. Exceeding this weight may require the auxiliary equipment
installer additional safety certification responsibility. The Front
Accessory Reserve Capacity (FARC) is added for customer
convenience.
•Rear ballast weight behind the rear axle may be required to prevent
exceeding the FGAWR, and provide front-to-rear weight balance for
proper braking and steering.
•Front wheel toe may require re-adjustment to prevent premature
uneven tire wear. Specifications are found in the FordWorkshop
Manual.
•Headlight aim may require re-adjustment.
•The tire air pressures recommended for general driving are found on
the vehicle’s Safety Certification Label. The maximum cold inflation
pressure for the tire and associated load rating is imprinted on the
tire sidewall. Tire air pressure may require re-adjustment within these
pressure limits to accommodate the additional weight of the snowplow
installation.
•Federal and some local regulations require additional exterior lamps
for snowplow-equipped vehicles. Consult your authorized dealer for
additional information.
Operating the Vehicle with the Snowplow Attached
Note:Do not use your vehicle for snow removal until it has been driven
at least 500 miles (800 kilometers).
Ford recommends vehicle speed does not exceed 45 mph (72 km/h)
when snowplowing.
The attached snowplow blade restricts airflow to the radiator, and may
cause the engine to run at a higher temperature: Attention to engine
temperature is especially important when outside temperatures are
above freezing. Angle the blade to maximize airflow to the radiator and
monitor engine temperature to determine whether a left or right angle
provides the best performance.
Follow the severe duty schedule in yourscheduled maintenance
informationfor engine oil and transmission fluid change intervals.
Driving Hints273
2013 F-250/350/450/550(f23)
Owners Guide gf, 3rd Printing, December 2012
USA(fus)
Page 342 of 577
Body
•Wash vehicle thoroughly to remove dirt, grease, oil, tar or mud from
exterior surfaces, rear-wheel housing and underside of front fenders.
•Periodically wash vehicles stored in exposed locations.
•Touch up raw or primed metal to prevent rust.
•Cover chrome and stainless steel parts with a thick coat of auto wax
to prevent discoloration. Re-wax as necessary when the vehicle is
washed.
•Lubricate hood latch, all door latches and trunk lid hinges with a light
grade oil.
•Cover interior trim to prevent fading.
•Keep all rubber parts free from oil and solvents.
Engine
•The engine oil and filter should be changed prior to storage, as used
engine oil contains contaminates that may cause engine damage.
•Start the engine every 15 days. Run at fast idle until it reaches normal
operating temperature.
•With your foot on the brake, shift through all the gears while the
engine is running.
Fuel system
•Fill the fuel tank with high-quality fuel until the first automatic shutoff
of the fuel pump nozzle.
Note:During extended periods of vehicle storage (30 days or more),
fuel may deteriorate due to oxidation. Add a quality gas stabilizer
product to the vehicle fuel system whenever actual or expected storage
periods exceed 30 days. Follow the instructions on the additive label.
The vehicle should then be operated at idle speed to circulate the
additive throughout the fuel system.
Cooling system
•Protect against freezing temperatures.
•When removing vehicle from storage, check coolant fluid level.
Confirm there are no cooling system leaks, and fluid is at the
recommended level.
Vehicle Care341
2013 F-250/350/450/550(f23)
Owners Guide gf, 3rd Printing, December 2012
USA(fus)
Page 349 of 577

INFORMATION CONTAINED ON THE TIRE SIDEWALL
Both U.S. and Canada Federal regulations require tire manufacturers to
place standardized information on the sidewall of all tires. This information
identifies and describes the fundamental characteristics of the tire and also
provides a U.S. DOT Tire Identification Number for safety standard
certification and in case of a recall.
Information on P Type Tires
P215/65R15 95H is an example of
a tire size, load index and speed
rating. The definitions of these
items are listed below. (Note that
the tire size, load index and speed
rating for your vehicle may be
different from this example.)
A.P:Indicates a tire, designated by the Tire and Rim Association, that
may be used for service on cars, sport utility vehicles, minivans and light
trucks.
Note:If your tire size does not begin with a letter, this may mean it is
designated by either the European Tire and Rim Technical Organization
or the Japan Tire Manufacturing Association.
B.215:Indicates the nominal width of the tire in millimeters from
sidewall edge to sidewall edge. In general, the larger the number, the
wider the tire.
C.65:Indicates the aspect ratio which gives the tire’s ratio of height to
width.
D.R:Indicates a radial type tire.
E.15:Indicates the wheel or rim diameter in inches. If you change your
wheel size, you will have to purchase new tires to match the new wheel
diameter.
H
I
J
KL
M
A
B
CDEFG
348Wheels and Tires
2013 F-250/350/450/550(f23)
Owners Guide gf, 3rd Printing, December 2012
USA(fus)
Page 353 of 577

Information on T Type Tires
T type tires have some additional
information beyond those of P type
tires. These differences are
described below.
T145/80D16 is an example of a tire
size.
Note:The temporary tire size for
your vehicle may be different from
this example. Tire Quality Grades
do not apply to this type of tire.
A.T:Indicates a type of tire, designated by the Tire and Rim
Association, that is intended for temporary service on cars, sport-utility
vehicles, minivans and light trucks.
B.145:Indicates the nominal width of the tire in millimeters from
sidewall edge to sidewall edge. In general, the larger the number, the
wider the tire.
C.80:Indicates the aspect ratio, which gives the tire’s ratio of height to
width. Numbers of 70 or lower indicate a short sidewall.
D.D:Indicates a diagonal type tire.R:Indicates a radial type tire.
E.16:Indicates the wheel or rim diameter in inches. If you change your
wheel size, you will have to purchase new tires to match the new wheel
diameter.
Location of the Tire Label
You will find a Tire Label containing tire inflation pressure by tire size
and other important information located on the B-Pillar or the edge of
the driver’s door. See the payload description and graphic in theLoad
Carryingchapter .
A
BCDE
352Wheels and Tires
2013 F-250/350/450/550(f23)
Owners Guide gf, 3rd Printing, December 2012
USA(fus)
Page 355 of 577
Note:Do not reduce tire pressure to change the ride characteristics of
the vehicle. If you do not maintain the inflation pressure at the levels
specified by Ford, your vehicle may experience a condition known as
shimmy. Shimmy is a severe vibration and oscillation in the steering
wheel after the vehicle travels over a bump or dip in the road that
does not dampen out by itself. Shimmy may result from significant
under-inflation of the tires, improper tires (load range, size, or type),
or vehicle modifications such as lift-kits. In the event that your vehicle
experiences shimmy, you should slowly reduce speed by either lifting off
the accelerator pedal or lightly applying the brakes. The shimmy will
cease as the vehicle speed decreases.
Maximum Inflation Pressureis the tire manufacturer’s maximum
permissible pressure or the pressure at which the maximum load
can be carried by the tire. This pressure is normally higher than the
manufacturer’s recommended cold inflation pressure which can be found
on the Safety Compliance Certification Label (affixed to either the door
hinge pillar, door-latch post, or the door edge that meets the door-latch
post, next to the driver’s seating position), or Tire Label which is located
on the B-Pillar or the edge of the driver’s door. The cold inflation
pressure should never be set lower than the recommended pressure
on the Safety Compliance Certification Label or Tire Label.
When weather temperature changes occur, tire inflation pressures also
change. A 10°F (6°C) temperature drop can cause a corresponding
drop of 1 psi (7 kPa) in inflation pressure. Check your tire pressures
frequently and adjust them to the proper pressure which can be found
on the Safety Compliance Certification Label or Tire Label.
To check the pressure in your tire(s):
1. Make sure the tires are cool, meaning they are not hot from driving
even a mile.
If you are checking tire pressure when the tire is hot (for example,
driven more than 1 mile [1.6 kilometers]), never bleed or reduce air
pressure. The tires are hot from driving and it is normal for pressures
to increase above recommended cold pressures. A hot tire at or below
recommended cold inflation pressure could be significantly
under-inflated.
Note:If you have to drive a distance to get air for your tire(s), check
and record the tire pressure first and add the appropriate air pressure
when you get to the pump. It is normal for tires to heat up and the air
pressure inside to go up as you drive.
2. Remove the cap from the valve on one tire, then firmly press the tire
gauge onto the valve and measure the pressure.
354Wheels and Tires
2013 F-250/350/450/550(f23)
Owners Guide gf, 3rd Printing, December 2012
USA(fus)
Page 377 of 577
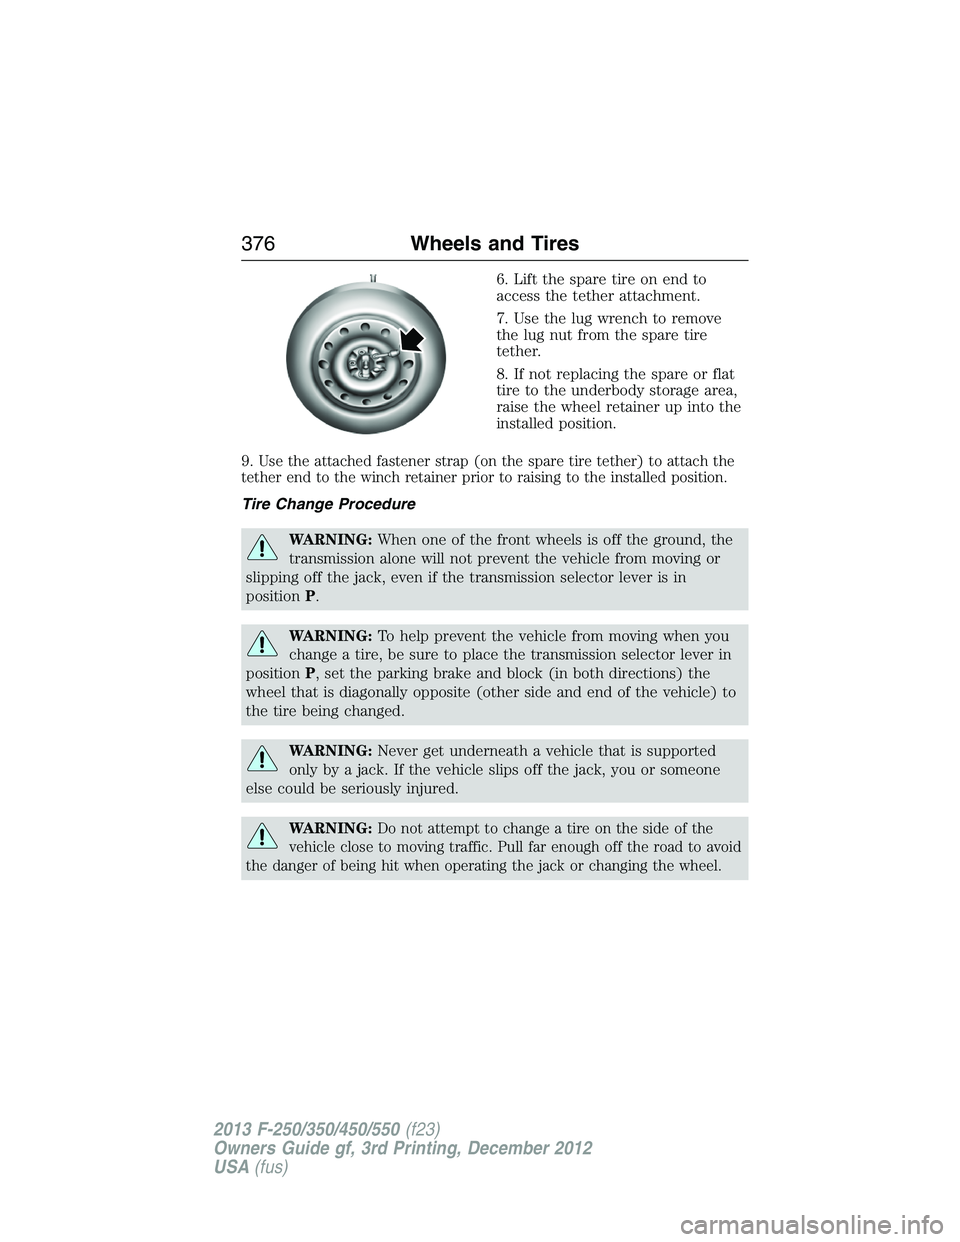
6. Lift the spare tire on end to
access the tether attachment.
7. Use the lug wrench to remove
the lug nut from the spare tire
tether.
8. If not replacing the spare or flat
tire to the underbody storage area,
raise the wheel retainer up into the
installed position.
9.
Use the attached fastener strap (on the spare tire tether) to attach the
tether end to the winch retainer prior to raising to the installed position.
Tire Change Procedure
WARNING:When one of the front wheels is off the ground, the
transmission alone will not prevent the vehicle from moving or
slipping off the jack, even if the transmission selector lever is in
positionP.
WARNING:To help prevent the vehicle from moving when you
change a tire, be sure to place the transmission selector lever in
positionP, set the parking brake and block (in both directions) the
wheel that is diagonally opposite (other side and end of the vehicle) to
the tire being changed.
WARNING:Never get underneath a vehicle that is supported
only by a jack. If the vehicle slips off the jack, you or someone
else could be seriously injured.
WARNING:Do not attempt to change a tire on the side of the
vehicle close to moving traffic. Pull far enough off the road to avoid
the danger of being hit when operating the jack or changing the wheel.
376Wheels and Tires
2013 F-250/350/450/550(f23)
Owners Guide gf, 3rd Printing, December 2012
USA(fus)
Page 409 of 577
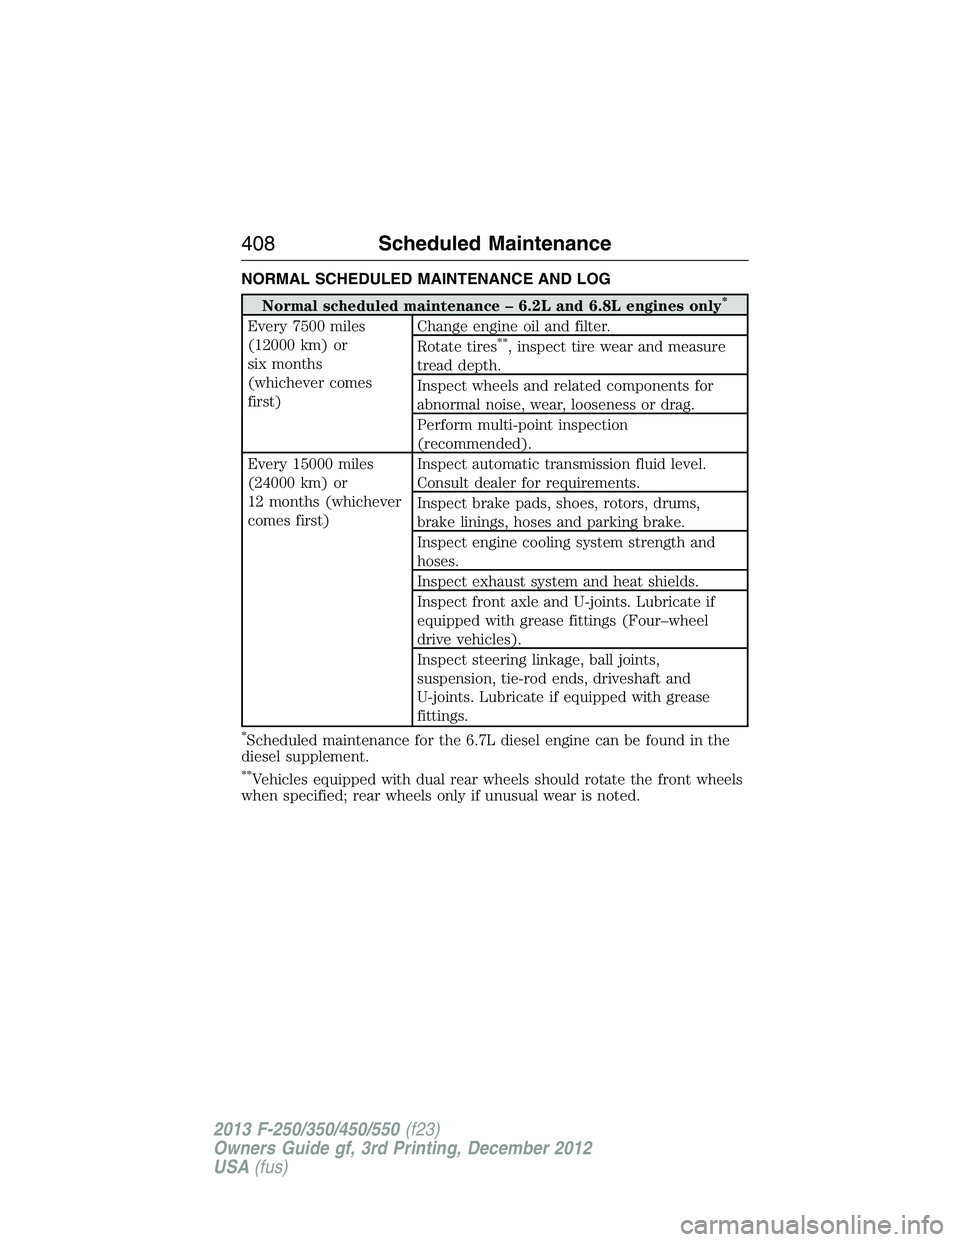
NORMAL SCHEDULED MAINTENANCE AND LOG
Normal scheduled maintenance – 6.2L and 6.8L engines only*
Every 7500 miles
(12000 km) or
six months
(whichever comes
first)Change engine oil and filter.
Rotate tires**, inspect tire wear and measure
tread depth.
Inspect wheels and related components for
abnormal noise, wear, looseness or drag.
Perform multi-point inspection
(recommended).
Every 15000 miles
(24000 km) or
12 months (whichever
comes first)Inspect automatic transmission fluid level.
Consult dealer for requirements.
Inspect brake pads, shoes, rotors, drums,
brake linings, hoses and parking brake.
Inspect engine cooling system strength and
hoses.
Inspect exhaust system and heat shields.
Inspect front axle and U-joints. Lubricate if
equipped with grease fittings (Four–wheel
drive vehicles).
Inspect steering linkage, ball joints,
suspension, tie-rod ends, driveshaft and
U-joints. Lubricate if equipped with grease
fittings.
*Scheduled maintenance for the 6.7L diesel engine can be found in the
diesel supplement.
**Vehicles equipped with dual rear wheels should rotate the front wheels
when specified; rear wheels only if unusual wear is noted.
408Scheduled Maintenance
2013 F-250/350/450/550(f23)
Owners Guide gf, 3rd Printing, December 2012
USA(fus)
Page 410 of 577

Other maintenance items
Every 30000 miles
(48000 km)Replace climate-controlled (heated and
cooled) seat filter (if equipped).
Replace engine air filter.
Every 60000 miles
(96000 km)Change automatic transmission fluid and filter
on 5–speed transmission. Consult dealer for
requirements.
Replace front wheel bearing grease and grease
seal if non-sealed bearings are used.
Every 97500 miles
(156000 km)Replace spark plugs.
Every 105000 miles
(168000 km)Change engine coolant.
*
Change rear axle fluid (Dana axles).
Inspect accessory drive belt(s).**
Every 150000 miles
(240000 km)Change automatic transmission fluid and filter
on 6–speed transmission. Consult dealer for
requirements.
Change front axle fluid (Four–wheel drive
vehicles).
Change rear axle fluid (non-Dana axles).
Change transfer case fluid (Four–wheel drive
vehicles).
Replace accessory drive belt(s) if not replaced
within the last 100000 miles (160000 km).
Replace front wheel bearings and seals if
non-sealed bearings are used.
*Initial replacement at six years or 105000 miles (168000 kilometers),
then every three years or 45000 miles (72000 kilometers).
**If not replaced, inspect every 15000 miles (24000 kilometers).
Scheduled Maintenance409
2013 F-250/350/450/550(f23)
Owners Guide gf, 3rd Printing, December 2012
USA(fus)