2013 FORD F SERIES MOTORHOME AND COMMERCIAL CHASSIS engine
[x] Cancel search: enginePage 51 of 157
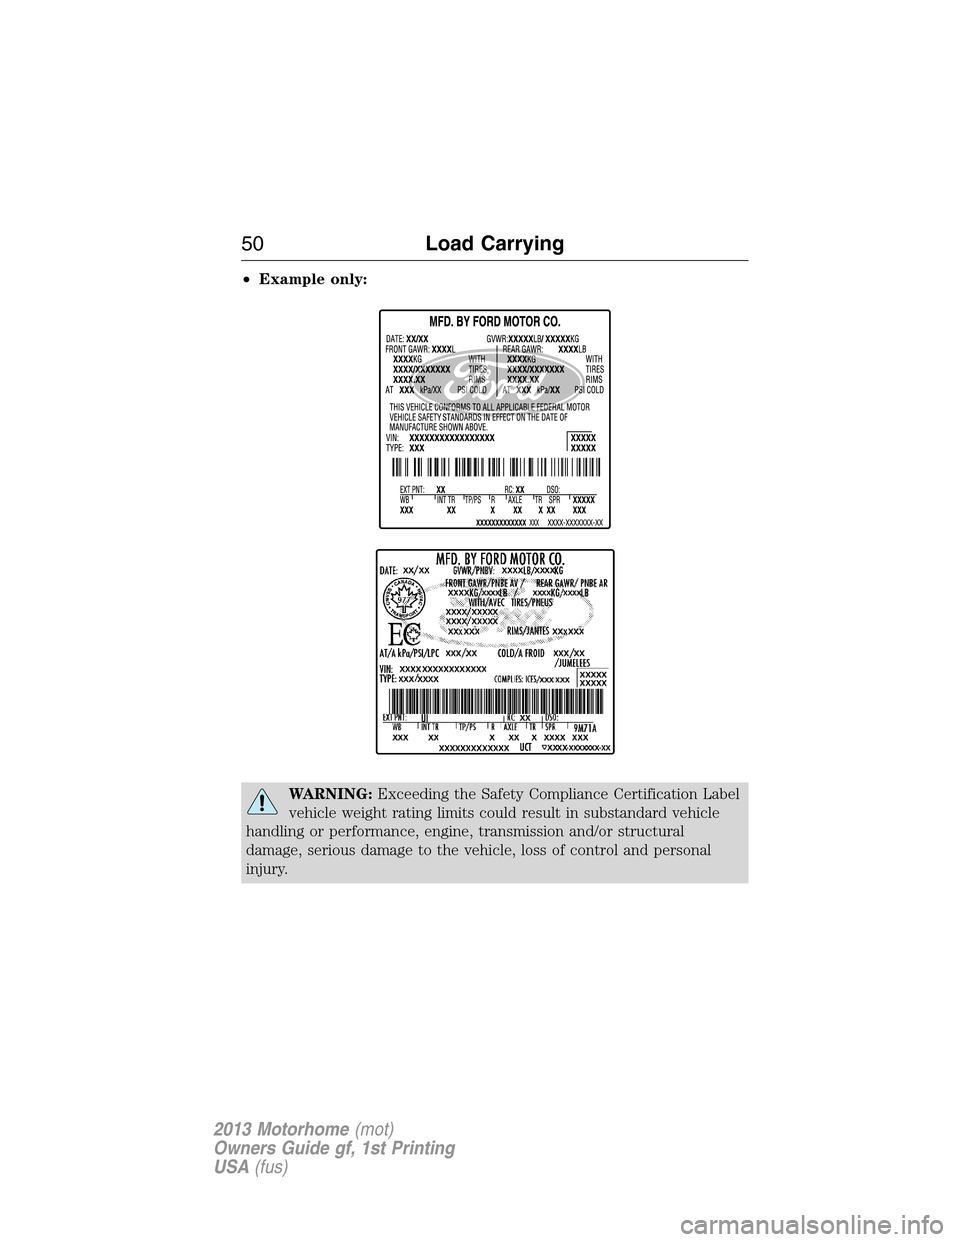
•Example only:
WARNING:Exceeding the Safety Compliance Certification Label
vehicle weight rating limits could result in substandard vehicle
handling or performance, engine, transmission and/or structural
damage, serious damage to the vehicle, loss of control and personal
injury.
50Load Carrying
2013 Motorhome(mot)
Owners Guide gf, 1st Printing
USA(fus)
Page 55 of 157
TOWING A TRAILER
WARNING:Do not exceed the GVWR or the GAWR specified on
the certification label.
WARNING:Towing trailers beyond the maximum recommended
gross trailer weight exceeds the limit of the vehicle and could
result in engine damage, transmission damage, structural damage, loss
of vehicle control, vehicle rollover and personal injury.
Your vehicle’s load capacity is designated by weight, not by volume, so
you cannot necessarily use all available space when loading a vehicle.
Towing a trailer places an additional load on your vehicle’s engine,
transmission, axle, brakes, tires and suspension. Inspect these
components periodically during, and after, any towing operation.
Load Placement
To help minimize how trailer movement affects the vehicle when driving:
•Load the heaviest items closest to the trailer floor.
•Load the heaviest items so they are centered between the left and
right side trailer tires.
•Load the heaviest items above the trailer axles or just slightly forward
toward the trailer tongue. Do not allow the final trailer tongue weight
to go above or below 10–15% of the loaded trailer weight.
•Select a tow bar with the correct rise or drop. When both the loaded
vehicle and trailer are connected, the trailer frame should be level, or
slightly angled down toward the vehicle, when viewed from the side.
When driving with a trailer or payload, a slight takeoff vibration or
shudder may be present due to the increased payload weight. Additional
information regarding proper trailer loading and setting your vehicle up
for towing is noted underLoad limitin theLoad Carryingchapter and
in theRV & Trailer Towing Guide,available at your authorized dealer.
RECOMMENDED TOWING WEIGHTS
Note:Do not exceed the trailer weight for your vehicle configuration
listed in the chart below.
Note:Make sure to take into consideration trailer frontal area. Do not
exceed:
•60 feet
2(5.6 meters2) trailer frontal area.
Note:For high altitude operation, reduce the gross combined weight by
2% per 1000 feet (300 meters) starting at the 1000 foot (300 meter)
elevation point.
54Towing
2013 Motorhome(mot)
Owners Guide gf, 1st Printing
USA(fus)
Page 58 of 157
Trailer Brakes
Electric brakes and manual, automatic or surge-type brakes are safe if
installed properly and adjusted to the manufacturer’s specifications. The
trailer brakes must meet local and Federal regulations.
WARNING:Do not connect a trailer’s hydraulic brake system
directly to your vehicle’s brake system. Your vehicle may not have
enough braking power and your chances of having a collision greatly
increase.
The towing vehicle braking system is rated for operation at the
GVWR, not the GCWR.
Separate functioning brake systems are required for safe control
of towed vehicles and trailers weighing more than 1,500 lb
(680 kg) when loaded.
Trailer Lamps
Trailer lamps are required on most towed vehicles. Make sure all running
lights, brake lights, turn signals and hazard lights are working. Contact
your authorized dealer or trailer rental agency for proper instructions
and equipment for hooking up the lamps.
Before Towing a Trailer
Practice turning, stopping and backing-up to get the feel of the
vehicle-trailer combination before starting on a trip. When turning, make
wider turns so the trailer wheels will clear curbs and other obstacles.
When Towing a Trailer
•Do not drive faster than 70 mph (113 km/h) during the first 500 miles
(800 kilometers).
•Do not make full-throttle starts.
•Check your hitch, electrical connections and trailer wheel lug nuts
thoroughly after you have traveled 50 miles (80 kilometers).
•When stopped in congested or heavy traffic during hot weather, place
gearshift in P (Park) to aid engine and transmission cooling and to
help A/C performance.
•Turn off the speed control with heavy loads or in hilly terrain. The
speed control may turn off automatically when you are towing on
long, steep grades.
Towing57
2013 Motorhome(mot)
Owners Guide gf, 1st Printing
USA(fus)
Page 59 of 157
•Shift to a lower gear when driving down a long or steep hill. Do not
apply the brakes continuously, as they may overheat and become less
effective.
•If your transmission is equipped with a Grade Assist or Tow/Haul
feature, use this feature when towing. This provides engine braking
and helps eliminate excessive transmission shifting for optimum fuel
economy and transmission cooling.
•Allow more distance for stopping with a trailer attached; anticipate
stops and brake gradually.
•Avoid parking on a grade. However, if you must park on a grade:
1. Turn the steering wheel to point the vehicle tires away from
traffic flow
2. Set the vehicle parking brake
3. Place the automatic transmission in P (Park) or manual
transmission in a high gear
4. Place wheel chocks under in front and back of the trailer wheels.
(Chocks not equipped with vehicle.)
Launching or Retrieving a Boat or Personal Water Craft (PWC)
Note:Disconnect the wiring to the trailerbeforebacking the trailer into
the water.
Note:Reconnect the wiring to the trailer after the trailer is removed
from the water.
When backing down a ramp during boat launching or retrieval:
1. Do not allow the static water level to rise above the bottom edge of
the rear bumper.
2. Do not allow waves to break higher than six inches (15 centimeters)
above the bottom edge of the rear bumper.
Exceeding these limits may allow water to enter vehicle components:
1. Causing internal damage to the components.
2. Affecting driveability, emissions, and reliability.
Replace the rear axle lubricant any time the rear axle has been
submerged in water. Water may have contaminated the rear axle
lubricant, which is not normally checked or changed unless a leak is
suspected or other axle repair is required.
58Towing
2013 Motorhome(mot)
Owners Guide gf, 1st Printing
USA(fus)
Page 61 of 157
BREAKING-IN
You need to break in new tires for approximately 300 miles
(480 kilometers). During this time, your vehicle may exhibit some unique
driving characteristics. Avoid driving too fast during the first 1000 miles
(1600 kilometers). Vary your speed frequently and change up through
the gears early. Do not labor the engine. Do not tow during the first
1000 miles (1600 kilometers).
ECONOMICAL DRIVING
Fuel economy is affected by several things such as how you drive, the
conditions you drive under and how you maintain your vehicle.
There are some things to keep in mind that may improve your fuel
economy:
•Accelerate and slow down in a smooth, moderate fashion.
•Drive at steady speeds without stopping.
•Anticipate stops; slowing down may eliminate the need to stop.
•Combine errands and minimize stop-and-go driving.
•Close the windows for high-speed driving.
•Drive at reasonable speeds (traveling at 55 mph [88 km/h] uses 15%
less fuel than traveling at 65 mph [105 km/h]).
•Keep the tires properly inflated and use only the recommended size.
•Use the recommended engine oil.
•Perform all regularly scheduled maintenance.
There are also some things you may not want to do because they may
reduce your fuel economy:
•Sudden or hard accelerations.
•Rev the engine before turning it off.
•Idle for periods longer than one minute.
•Warm up your vehicle on cold mornings.
•Use the air conditioner or front defroster.
•Use the speed control in hilly terrain.
•Rest your foot on the brake pedal while driving.
•Drive a heavily loaded vehicle or tow a trailer.
60Driving Hints
2013 Motorhome(mot)
Owners Guide gf, 1st Printing
USA(fus)
Page 62 of 157
![FORD F SERIES MOTORHOME AND COMMERCIAL CHASSIS 2013 12.G Owners Manual •Carry unnecessary weight (approximately 1 mpg [0.4 km/L] is lost for
every 400 lb [180 kg] of weight carried).
•Add particular accessories to your vehicle (e.g. bug deflectors,
rollbars/light bar FORD F SERIES MOTORHOME AND COMMERCIAL CHASSIS 2013 12.G Owners Manual •Carry unnecessary weight (approximately 1 mpg [0.4 km/L] is lost for
every 400 lb [180 kg] of weight carried).
•Add particular accessories to your vehicle (e.g. bug deflectors,
rollbars/light bar](/manual-img/11/5009/w960_5009-61.png)
•Carry unnecessary weight (approximately 1 mpg [0.4 km/L] is lost for
every 400 lb [180 kg] of weight carried).
•Add particular accessories to your vehicle (e.g. bug deflectors,
rollbars/light bars, running boards, ski racks).
•Drive with the wheels out of alignment.
DRIVING THROUGH WATER
If driving through deep or standing
water is unavoidable, proceed very
slowly. Never drive through water
that is higher than the bottom of
the wheel rims (for cars) or the
bottom of the hubs (for trucks).
When driving through water, traction or brake capability may be limited.
Also, water may enter your engine’s air intake and severely damage your
engine or your vehicle may stall.
Note:Driving through deep water where the transmission vent tube is
submerged may allow water into the transmission and cause internal
transmission damage.
Note:Once through the water, always dry the brakes by moving your
vehicle slowly while applying light pressure on the brake pedal. Wet
brakes do not stop the vehicle as quickly as dry brakes.
Driving Hints61
2013 Motorhome(mot)
Owners Guide gf, 1st Printing
USA(fus)
Page 65 of 157
JUMP-STARTING THE VEHICLE
WARNING:The gases around the battery can explode if exposed
to flames, sparks, or lit cigarettes. An explosion could result in
injury or vehicle damage.
WARNING:Batteries contain sulfuric acid which can burn skin,
eyes and clothing, if contacted.
Do not attempt to push-start your automatic transmission vehicle.
Automatic transmissions do not have push-start capability. Attempting to
push-start a vehicle with an automatic transmission may cause
transmission damage.
When the battery is disconnected or a new battery is installed, the
automatic transmission must relearn its shift strategy. As a result, the
transmission may have firm soft shifts, firm shifts or both. This operation
is considered normal and will not affect function or durability of the
transmission. Over time, the adaptive learning process will fully update
transmission operation.
Preparing Your Vehicle
Note:Use only a 12 volt supply to start your vehicle.
Note:Do not disconnect the battery of the disabled vehicle as this could
damage the vehicle’s electrical system
1. Park the booster vehicle close to the hood of the disabled vehicle
making sure the two vehicles do not touch. Set the parking brake on
both vehicles and stay clear of the engine cooling fan and other moving
parts.
2. Check all battery terminals and remove any excessive corrosion before
you attach the battery cables. Ensure that vent caps are tight and level.
3. Turn the heater fan on in both vehicles to protect from any electrical
surges. Turn all other accessories off.
64Roadside Emergencies
2013 Motorhome(mot)
Owners Guide gf, 1st Printing
USA(fus)
Page 66 of 157
Connecting the Jumper Cables
WARNING:Do not connect the end of the second cable to the
negative (-) terminal of the battery to be jumped. A spark may
cause an explosion of the gases that surround the battery.
Note:Do not attach the negative (-) cable to fuel lines, engine rocker
covers, the intake manifold or electrical components as grounding points.
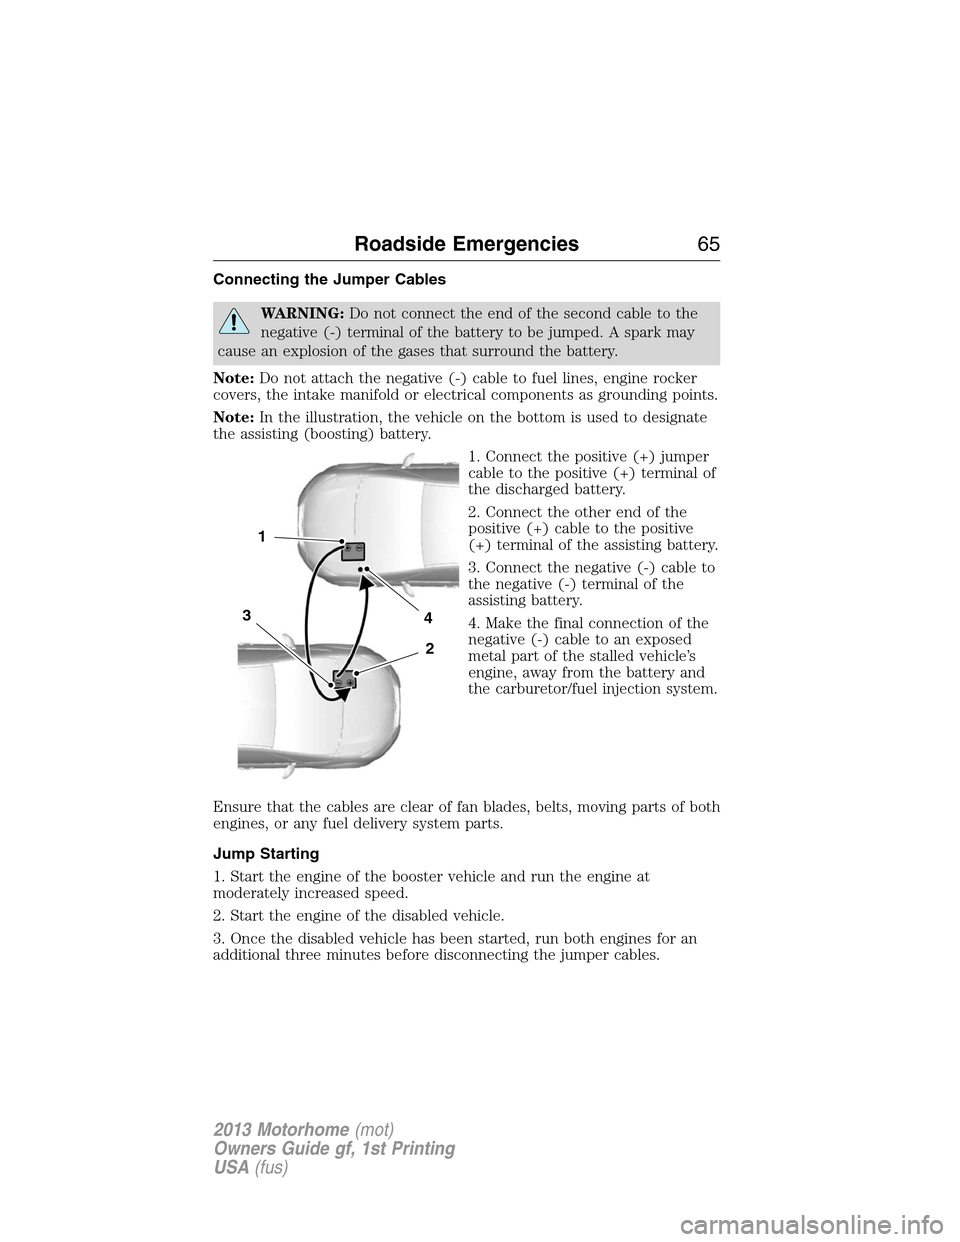
Note:In the illustration, the vehicle on the bottom is used to designate
the assisting (boosting) battery.
1. Connect the positive (+) jumper
cable to the positive (+) terminal of
the discharged battery.
2. Connect the other end of the
positive (+) cable to the positive
(+) terminal of the assisting battery.
3. Connect the negative (-) cable to
the negative (-) terminal of the
assisting battery.
4. Make the final connection of the
negative (-) cable to an exposed
metal part of the stalled vehicle’s
engine, away from the battery and
the carburetor/fuel injection system.
Ensure that the cables are clear of fan blades, belts, moving parts of both
engines, or any fuel delivery system parts.
Jump Starting
1. Start the engine of the booster vehicle and run the engine at
moderately increased speed.
2. Start the engine of the disabled vehicle.
3. Once the disabled vehicle has been started, run both engines for an
additional three minutes before disconnecting the jumper cables.
4
2
1
3
Roadside Emergencies65
2013 Motorhome(mot)
Owners Guide gf, 1st Printing
USA(fus)