Page 296 of 576

BREAKING-IN
Your vehicle does not need an extensive break-in. Try not to drive
continuously at the same speed for the first 1,000 miles (1,600 km) of
new vehicle operation. Vary your speed frequently in order to give the
moving parts a chance to break in.
Drive your new vehicle at least 1,000 miles (1,600 km) before towing a
trailer.
Do not add friction modifier compounds or special break-in oils since
these additives may prevent piston ring seating.
ECONOMICAL DRIVING
Fuel economy is affected by several things such as how you drive, the
conditions you drive under and how you maintain your vehicle.
There are some things to keep in mind that may improve your fuel
economy:
•Accelerate and slow down in a smooth, moderate fashion.
•Drive at steady speeds without stopping.
•Anticipate stops; slowing down may eliminate the need to stop.
•Combine errands and minimize stop-and-go driving.
•Close the windows for high-speed driving.
•Drive at reasonable speeds (traveling at 55 mph [88 km/h] uses 15%
less fuel than traveling at 65 mph [105 km/h]).
•Keep the tires properly inflated and use only the recommended size.
•Use the recommended engine oil.
•Perform all regularly scheduled maintenance.
There are also some things you may not want to do because they may
reduce your fuel economy:
•Sudden or hard accelerations.
•Rev the engine before turning it off.
•Idle for periods longer than one minute.
•Warm up your vehicle on cold mornings.
•Use the air conditioner or front defroster.
•Use the speed control in hilly terrain.
•Rest your foot on the brake pedal while driving.
296Driving Hints
2013 Explorer(exp)
Owners Guide gf, 1st Printing
USA(fus)
Page 315 of 576
Fuse/Relay
NumberFuse Amp
RatingProtected Components
4 30A** Wipers, Front washer
5 50A** Anti-lock brake system (ABS)
pump
6 — Not used
7 30A** Power liftgate
8 20A** Moonroof
9 20A** Power point #2 (console rear)
10 — 3rd row rear seat release relay
11 — Rear window defroster relay
12 — Trailer tow battery charge relay
13 — Starter motor relay
14 — Engine cooling fan #2 high speed
relay
15 — Fuel pump relay
16 — Not used
17 40A** 110V AC powerpoint
18 40A** Front blower motor
19 30A** Starter motor
20 20A** Powerpoint #1/cigar lighter
21 20A** Powerpoint #3 (cargo area)
22 30A** 3rd row seat module
23 30A** Driver power seat, Memory
module
24 30A** Trailer tow (TT) battery charge
25 — Not used
26 40A** Rear window defroster, Heated
mirrors
27 20A** Powerpoint (console)
28 30A** Climate controlled seats
29 40A** Engine cooling fan #1 high speed
power, Engine cooling fan #1 and
#2 low speed primary fuse
Fuses315
2013 Explorer(exp)
Owners Guide gf, 1st Printing
USA(fus)
Page 319 of 576
Passenger Compartment Fuse Panel
The fuse panel is located below and to the left of the steering wheel by
the brake pedal. Remove the panel cover to access the fuses.
To remove a fuse use the fuse puller tool provided on the fuse panel
cover.
The fuses are coded as follows:
Fuse/Relay
NumberFuse Amp
RatingProtected Components
1 30A One touch up/down driver side
front window
2 15A Not used (spare)
3 30A One touch up/down passenger
side front window
1
2
3
4
5
6
7
8
9
10
11
12
13
14
15
16
17
18
19
20
21
223341
42
43
44
45
34
35
36
37
23
24
25
26
27
283846
394729
32
40
31
30
48
49
Fuses319
2013 Explorer(exp)
Owners Guide gf, 1st Printing
USA(fus)
Page 321 of 576

Fuse/Relay
NumberFuse Amp
RatingProtected Components
19 20A Memory seat power
20 20A Locks
21 10A Intelligent access (IA), Keypad
22 20A Horn relay
23 15A Steering wheel control module,
IA, Headlamp switch
24 15A Datalink connector, Steering
wheel control module
25 15A Liftgate release
26 5A Radio frequency module
27 20A IA module
28 15A Ignition switch, Push button start
switch
29 20A Radio, Global positioning system
module
30 15A Front park lamps
31 5A Trailer tow brake controller
32 15A 110V AC power point, Power
folding mirror, Power mirrors, One
touch up/down front windows,
Door lock illumination, Memory
switch illumination
33 10A Occupant classification sensor
34 10A Blind spot monitor, Rearview
camera, Reverse sensing system,
Lane departure warning module
35 5A Heads-up display, Climate control
humidity sensor, Terrain
management system, Hill descent
switch, Headlamp switch IGN
sense
36 10A Heated steering wheel
Fuses321
2013 Explorer(exp)
Owners Guide gf, 1st Printing
USA(fus)
Page 322 of 576
Fuse/Relay
NumberFuse Amp
RatingProtected Components
37 10A Restraints control module
38 10A Auto-dimming rear view mirror,
Moon roof
39 15A High beam headlamp shutters
40 10A Rear park lamps, License plate
lamps, TT park lamps
41 7.5A Overdrive cancel, Tow/haul
42 5A Not used (spare)
43 10A Not used (spare)
44 10A Not used (spare)
45 5A Not used (spare)
46 10A Climate control module
47 15A Fog lamps, left and right turn
signal mirror feed
48 30A Circuit
BreakerRear power windows, Passenger
power window, One touch down
(driver side only), Driver window
switch
49 Delayed
accessory relayBody control module
322Fuses
2013 Explorer(exp)
Owners Guide gf, 1st Printing
USA(fus)
Page 340 of 576

CHANGING THE WIPER BLADES
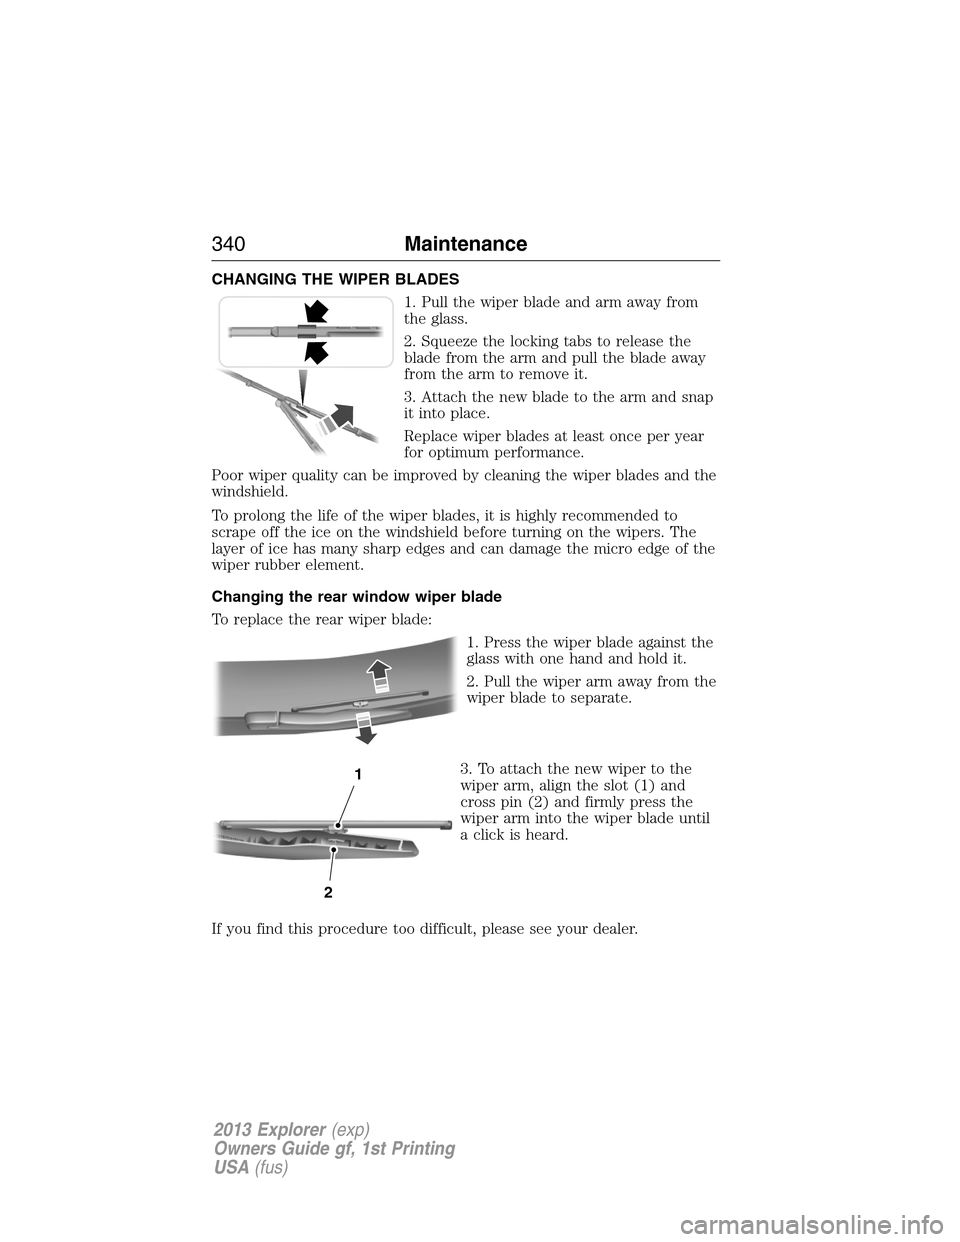
1. Pull the wiper blade and arm away from
the glass.
2. Squeeze the locking tabs to release the
blade from the arm and pull the blade away
from the arm to remove it.
3. Attach the new blade to the arm and snap
it into place.
Replace wiper blades at least once per year
for optimum performance.
Poor wiper quality can be improved by cleaning the wiper blades and the
windshield.
To prolong the life of the wiper blades, it is highly recommended to
scrape off the ice on the windshield before turning on the wipers. The
layer of ice has many sharp edges and can damage the micro edge of the
wiper rubber element.
Changing the rear window wiper blade
To replace the rear wiper blade:
1. Press the wiper blade against the
glass with one hand and hold it.
2. Pull the wiper arm away from the
wiper blade to separate.
3. To attach the new wiper to the
wiper arm, align the slot (1) and
cross pin (2) and firmly press the
wiper arm into the wiper blade until
a click is heard.
If you find this procedure too difficult, please see your dealer.
2
1
340Maintenance
2013 Explorer(exp)
Owners Guide gf, 1st Printing
USA(fus)
Page 353 of 576

CLEANING THE WINDOWS AND WIPER BLADES
The windows and wiper blades should be cleaned regularly. If the wipers
do not wipe properly, substances on the vehicle’s glass or the wiper
blades may cause squeaking or chatter noise from the blades, and
streaking and smearing of the windshield. To clean these items, follow
these tips:
•The windows may be cleaned with a non-abrasive cleaner such as
Motorcraft�Ultra-Clear Spray Glass Cleaner.
•The wiper blades can be cleaned with isopropyl (rubbing) alcohol or
Motorcraft�Premium Windshield Washer Concentrate in the U.S., or
Premium Quality Windshield Washer Fluid in Canada. Be sure to
replace wiper blades when they appear worn or do not function
properly.
•Do not use abrasives, as they may cause scratches.
•Do not use fuel, kerosene, or paint thinner to clean any parts.
If you cannot remove those streaks after cleaning with the glass cleaner
or if the wipers chatter and move in a jerky motion, clean the outer
surface of the windshield and the wiper blades using a sponge or soft
cloth with a neutral detergent or mild-abrasive cleaning solution. After
cleaning, rinse the windshield and wiper blades with clean water. The
windshield is clean if beads do not form when you rinse the windshield
with water.
Note:Do not use sharp objects, such as a razor blade, to clean the inside
of the rear window or to remove decals, as it may cause damage to the
rear window defroster’s heated grid lines.
CLEANING THE INTERIOR
WARNING:Do not use cleaning solvents, bleach or dye on the
vehicle’s safety belts, as these actions may weaken the belt
webbing.
WARNING:On vehicles equipped with seat-mounted airbags, do
not use chemical solvents or strong detergents. Such products
could contaminate the side airbag system and affect performance of the
side airbag in a collision.
Vehicle Care353
2013 Explorer(exp)
Owners Guide gf, 1st Printing
USA(fus)
Page 358 of 576
Removing vehicle from storage
When your vehicle is ready to come out of storage, do the following:
•Wash your vehicle to remove any dirt or grease film build-up on
window surfaces.
•Check windshield wipers for any deterioration.
•Check under the hood for any foreign material that may have collected
during storage (mice/squirrel nests).
•Check the exhaust for any foreign material that may have collected
during storage.
•Check tire pressures and set tire inflation per the Tire Label.
•Check brake pedal operation. Drive the vehicle 15 ft (4.5 meters) back
and forth to remove rust build-up.
•Check fluid levels (including coolant, oil and gas) to make sure there
are no leaks, and fluids are at recommended levels.
•If the battery was removed, clean the battery cable ends and inspect.
Contact your authorized dealer if you have any concerns or issues.
358Vehicle Care
2013 Explorer(exp)
Owners Guide gf, 1st Printing
USA(fus)