2013 FORD EXPLORER towing
[x] Cancel search: towingPage 301 of 576

Vehicles sold in the U.S. : Using roadside assistance
Complete the roadside assistance identification card and place it in your
wallet for quick reference. This card is found in the owner’s information
portfolio in the glove compartment.
U.S. Ford vehicle customers who require Roadside Assistance, call
1-800-241-3673.
If you need to arrange roadside assistance for yourself, Ford Motor
Company will reimburse a reasonable amount for towing to the nearest
dealership within 35 miles (56 km). To obtain reimbursement
information, U.S. Ford vehicle customers call 1-800-241-3673. Customers
will be asked to submit their original receipts.
Vehicles sold in Canada : Getting roadside assistance
Canadian customers who require roadside assistance, call 1–800–665–2006.
Vehicles sold in Canada : Using roadside assistance
Complete the roadside assistance identification card and place it in your
wallet for quick reference. In Canada, the card is found in the Warranty
Guide in the glove box.
Canadian Roadside coverage and benefits may differ from the U.S.
coverage. Please refer to your Warranty Guide or visit our website at
www.ford.ca for information on Canadian services and benefits.
Canadian customers who need to obtain roadside information, call
1-800-665-2006 or visit our website at www.ford.ca.
HAZARD WARNING FLASHERS
The hazard flasher control is located on the instrument panel
by the radio. Use it when your vehicle is disabled and is
creating a safety hazard for other motorist.
•Press the flasher control and all front and rear direction signals will
flash.
•Press the flasher control again to turn them off.
Vehicles equipped with MyTouch
•Press and hold the flasher control and all front and rear direction
signals will flash.
•Press and hold the flasher control again to turn them off.
Note:With extended use, the flasher may run down your battery.
Roadside Emergencies301
2013 Explorer(exp)
Owners Guide gf, 1st Printing
USA(fus)
Page 331 of 576
At this time, you may notice your engine coolant temperature gauge
needle move toward the H and the POWER REDUCED TO LOWER
TEMP message may appear on the message center.
You may notice a reduction in the vehicle’s speed caused by reduced
engine power. Your vehicle has been designed to enter this mode if
certain high temperature/high load conditions take place in order to
manage the engine’s fluid temperatures. The amount of speed reduction
will depend on the vehicle loading, towing, grade, ambient temperature,
and other factors. If this occurs, there is no need to pull off the road.
The vehicle can continue to be driven while this message is active.
The air conditioning may also cycle on and off during severe operating
conditions to protect overheating of the engine. When the engine coolant
temperature decreases to a more normal operating temperature, the air
conditioning will turn on once again.
If you notice any of the following:
•the engine coolant temperature gauge moves fully into the red (hot)
area
•the coolant temperature warning light illuminates
•the service engine soon indicator illuminates
1. Pull off the road as soon as safely possible and place the vehicle in P
(Park).
2. Leave the engine running until the coolant temperature gauge needle
moves away from the H range. After several minutes, if this does not
happen, follow the remaining steps.
3. Turn the engine off and wait for it to cool before checking the coolant
level.
WARNING:Never remove the coolant reservoir cap while the
engine is running or hot.
4. If the coolant level is normal, you may restart your engine and
continue on.
5. If the coolant is low, add coolant, restart the engine and take your
vehicle to an authorized dealer. SeeAdding engine coolantin this
chapter for more information.
Refer to fail-safe cooling for additional information.
Maintenance331
2013 Explorer(exp)
Owners Guide gf, 1st Printing
USA(fus)
Page 385 of 576
•Ground clearance and parking at curbs
•Winter weather driving capability
•Wet weather driving capability
•All-wheel driving capability (if applicable)
•Load leveling adjustment (if applicable)
When driving with the full-size dissimilar spare tire and wheel assembly,
additional caution should be given to:
•Towing a trailer
•Driving vehicles equipped with a camper body
•Driving vehicles with a load on the cargo rack
Drive cautiously when using a full-size dissimilar spare tire and wheel,
and seek service as soon as possible.
Tire Change Procedure
WARNING:When one of the front wheels is off the ground, the
transmission alone will not prevent the vehicle from moving or
slipping off the jack, even if the vehicle is in P (Park) (automatic
transmission) or R (Reverse) (manual transmission).
WARNING:To help prevent the vehicle from moving when you
change a tire, be sure the parking brake is set, then block (in
both directions) the wheel that is diagonally opposite (other side and
end of the vehicle) to the tire being changed.
WARNING:If the vehicle slips off the jack, you or someone else
could be seriously injured.
WARNING:Do not attempt to change a tire on the side of the
vehicle close to moving traffic. Pull far enough off the road to
avoid the danger of being hit when operating the jack or changing the
wheel.
Wheels and Tires385
2013 Explorer(exp)
Owners Guide gf, 1st Printing
USA(fus)
Page 386 of 576

WARNING:To lessen the risk of personal injury, do not put any
part of your body under the vehicle while changing a tire. Do not
start the engine when your vehicle is on the jack. The jack is only
meant for changing the tire.
Note:Passengers should not remain in the vehicle when the vehicle is
being jacked.
Note:If the 3rd row seat is stowed in the floor, you will need to unstow
it (raised position) to access the spare tire and jack. Refer toUnstowing
the third row seatin theSeatingchapter for this procedure.
1. Park on a level surface, set the parking brake and activate the hazard
flashers.
2. Place the gearshift lever in P (Park) and turn the engine off.
3. Turn the two knobs on the floor
filler counterclockwise, then remove
the floor filler and carpeted floor
panel located in the rear of the
vehicle.
4. Remove the wing nut securing the
spare tire by turning it
counterclockwise.
5. Lift and remove the spare tire from
the spare tire well.
386Wheels and Tires
2013 Explorer(exp)
Owners Guide gf, 1st Printing
USA(fus)
Page 389 of 576
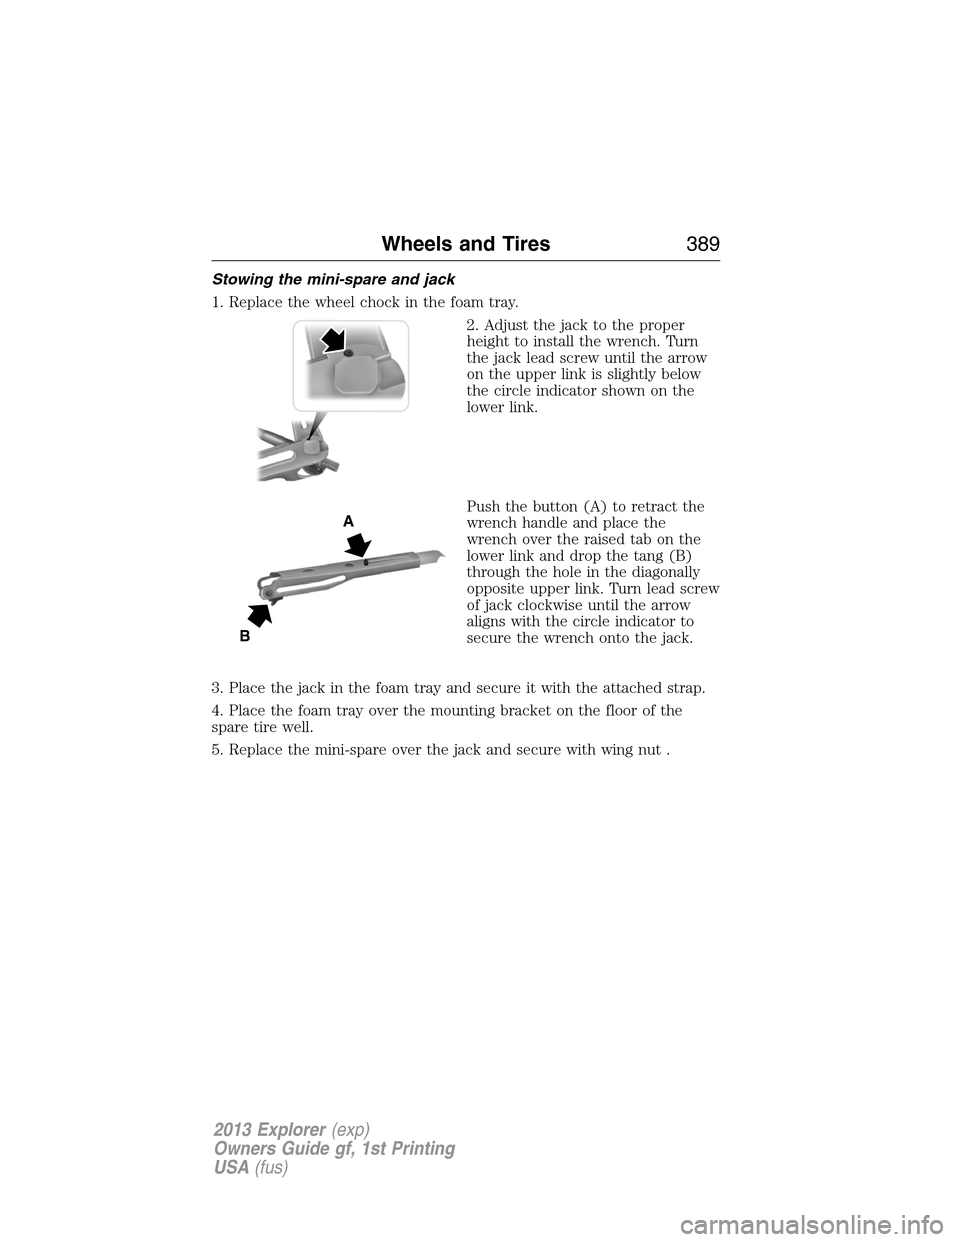
Stowing the mini-spare and jack
1. Replace the wheel chock in the foam tray.
2. Adjust the jack to the proper
height to install the wrench. Turn
the jack lead screw until the arrow
on the upper link is slightly below
the circle indicator shown on the
lower link.
Push the button (A) to retract the
wrench handle and place the
wrench over the raised tab on the
lower link and drop the tang (B)
through the hole in the diagonally
opposite upper link. Turn lead screw
of jack clockwise until the arrow
aligns with the circle indicator to
secure the wrench onto the jack.
3. Place the jack in the foam tray and secure it with the attached strap.
4. Place the foam tray over the mounting bracket on the floor of the
spare tire well.
5. Replace the mini-spare over the jack and secure with wing nut .
A
B
Wheels and Tires389
2013 Explorer(exp)
Owners Guide gf, 1st Printing
USA(fus)
Page 390 of 576
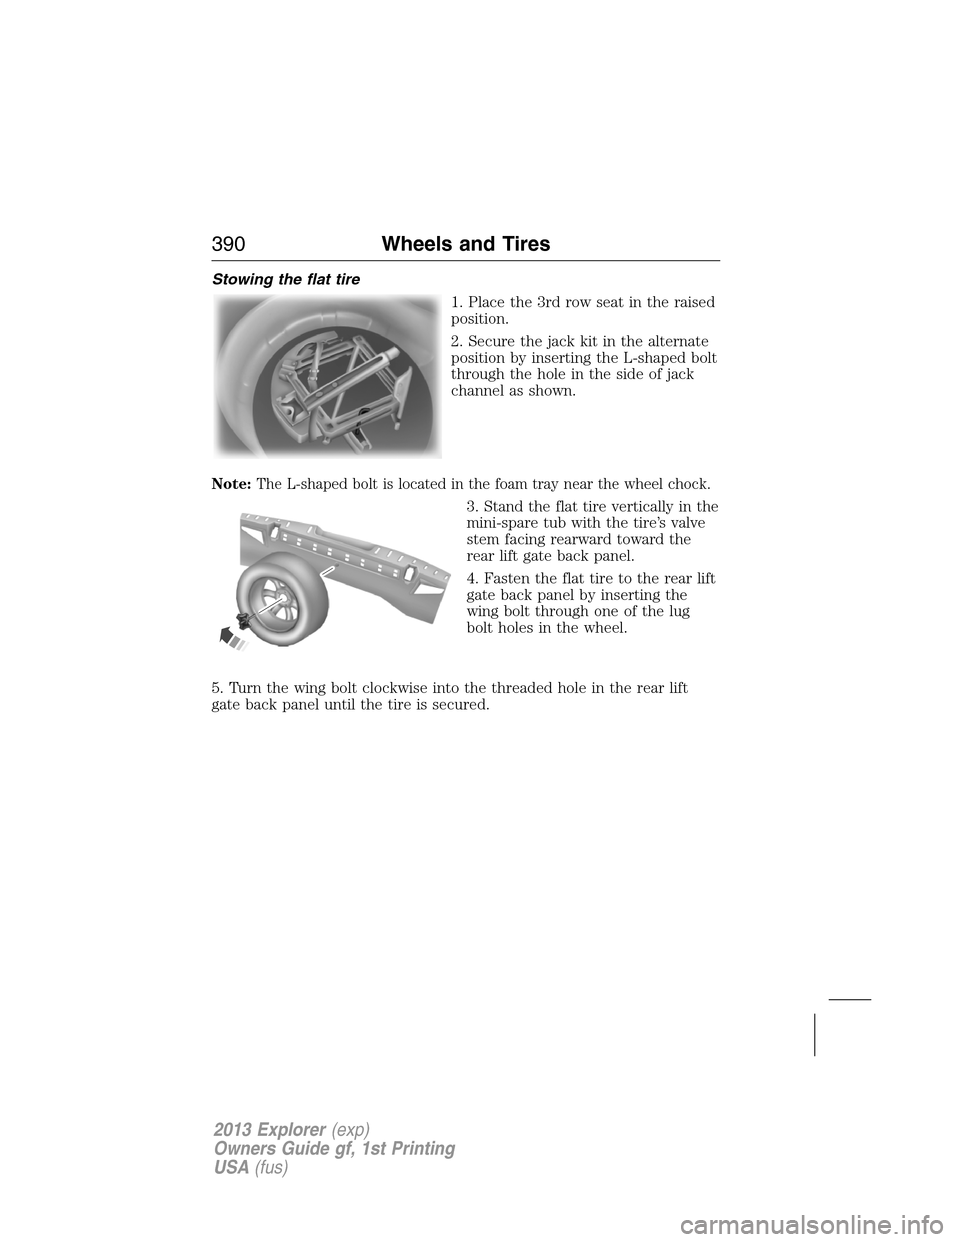
Stowing the flat tire
1. Place the 3rd row seat in the raised
position.
2. Secure the jack kit in the alternate
position by inserting the L-shaped bolt
through the hole in the side of jack
channel as shown.
Note:The L-shaped bolt is located in the foam tray near the wheel chock.
3. Stand the flat tire vertically in the
mini-spare tub with the tire’s valve
stem facing rearward toward the
rear lift gate back panel.
4. Fasten the flat tire to the rear lift
gate back panel by inserting the
wing bolt through one of the lug
bolt holes in the wheel.
5. Turn the wing bolt clockwise into the threaded hole in the rear lift
gate back panel until the tire is secured.
390Wheels and Tires
2013 Explorer(exp)
Owners Guide gf, 1st Printing
USA(fus)
Page 400 of 576
ACCESSORIES
For a complete listing of the accessories that are available for your
vehicle, please contact your dealer or visit our online store at:
Accessories.Ford.com(U.S. only).
Ford Custom Accessories are available for your vehicle through your
local Ford or Ford of Canada dealer. Ford Motor Company will repair or
replace any properly dealer-installed Ford Custom Accessories found to
be defective in factory-supplied materials or workmanship during the
warranty period, as well as any component damaged by the defective
accessories. The accessories will be warranted for whichever provides
you the greatest benefit:
•12 months or 12,000 miles (20,000 km) (whichever occurs first), or
•the remainder of your new vehicle limited warranty.
Contact your dealer for details and a copy of the warranty.
Exterior style
•Hood deflectors
•Bumper protector
•Side window deflectors
•Splash guards
•Cargo area protector
Interior style
•Ambient lighting
•Floor mats
Lifestyle
•Ash cup / smoker’s package
•Trailer hitch balls
•Rear seat entertainment*
•Cargo organization and management
•Trailer hitch drawbars, and towing accessories
•Camping tent*
•Racks and carriers*
•Roof crossbars
400Accessories
2013 Explorer(exp)
Owners Guide gf, 1st Printing
USA(fus)
Page 403 of 576

FORD ESP EXTENDED SERVICE PLANS (U.S. ONLY)
More than 32 million Ford and Lincoln owners have discovered the
powerful protection of Ford ESP. It is the only extended service plan
backed by Ford Motor Company, and provides “peace of mind” protection
beyond the New Vehicle Limited Warranty coverage.
Up to 500+ Covered Vehicle Components
There are four, new-vehicle Extended Service Plans with different levels
of coverage. Ask your dealer for details.
PremiumCare –Our most comprehensive coverage. With over 500
covered components, this plan is so complete that we generally only
discuss what’s not covered!
ExtraCare –Covers 113 components, and includes many high-tech
items.
BaseCare –Covers 84 components.
PowertrainCare –Covers 29 critical components.
Ford ESP is honored by all Ford and Lincoln Dealers in the U.S.
and CanadaIt’s the only extended service plan authorized and backed
by Ford Motor Company. That means you get:
•Reliable, quality service anywhere you go.
•Factory-trained technicians.
•Ford Authorized Parts used with every covered repair.
Rental car reimbursement
If your vehicle is kept overnight for covered repairs,you are
eligible for rental car coverage, including Bumper-to-Bumper warranty
repairs, or manufacturer’s recalls.
Transferable coverage
If you sell your vehicle before your Ford ESP coverage expires, you can
transfer any remaining coverage to the new owner. Whenever you’re
ready to sell your car, prospective buyers may feel better about taking a
risk on your used vehicle. Ford ESP may add resale value!
Plus,exclusive 24/7 roadside assistance,including:
•Towing, flat-tire change and battery jump starts.
•Out-of-fuel and lock-out assistance.
•Travel expense reimbursement for lodging, meals and rental car.
•Destination assistance for taxi, shuttle, rental car coverage and
emergency transportation.
Ford Extended Service Plan403
2013 Explorer(exp)
Owners Guide gf, 1st Printing
USA(fus)