2013 FORD EXPEDITION navigation
[x] Cancel search: navigationPage 8 of 497
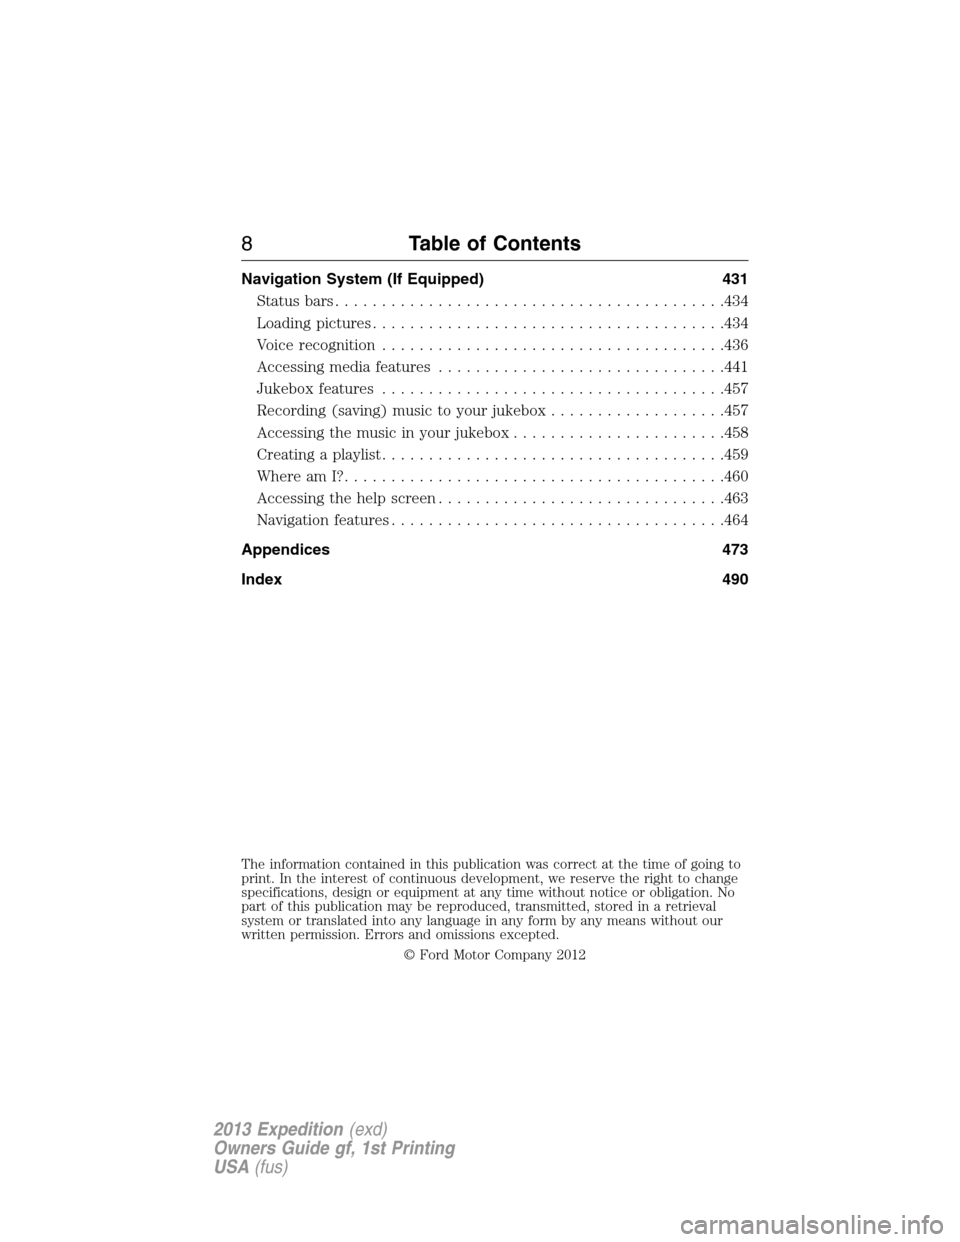
Navigation System (If Equipped) 431
Statusbars..........................................434
Loading pictures......................................434
Voice recognition.....................................436
Accessing media features...............................441
Jukebox features.....................................457
Recording (saving) music to your jukebox...................457
Accessing the music in your jukebox.......................458
Creating a playlist.....................................459
Where am I?.........................................460
Accessing the help screen...............................463
Navigation features....................................464
Appendices 473
Index 490
The information contained in this publication was correct at the time of going to
print. In the interest of continuous development, we reserve the right to change
specifications, design or equipment at any time without notice or obligation. No
part of this publication may be reproduced, transmitted, stored in a retrieval
system or translated into any language in any form by any means without our
written permission. Errors and omissions excepted.
© Ford Motor Company 2012
8Table of Contents
2013 Expedition(exd)
Owners Guide gf, 1st Printing
USA(fus)
Page 78 of 497
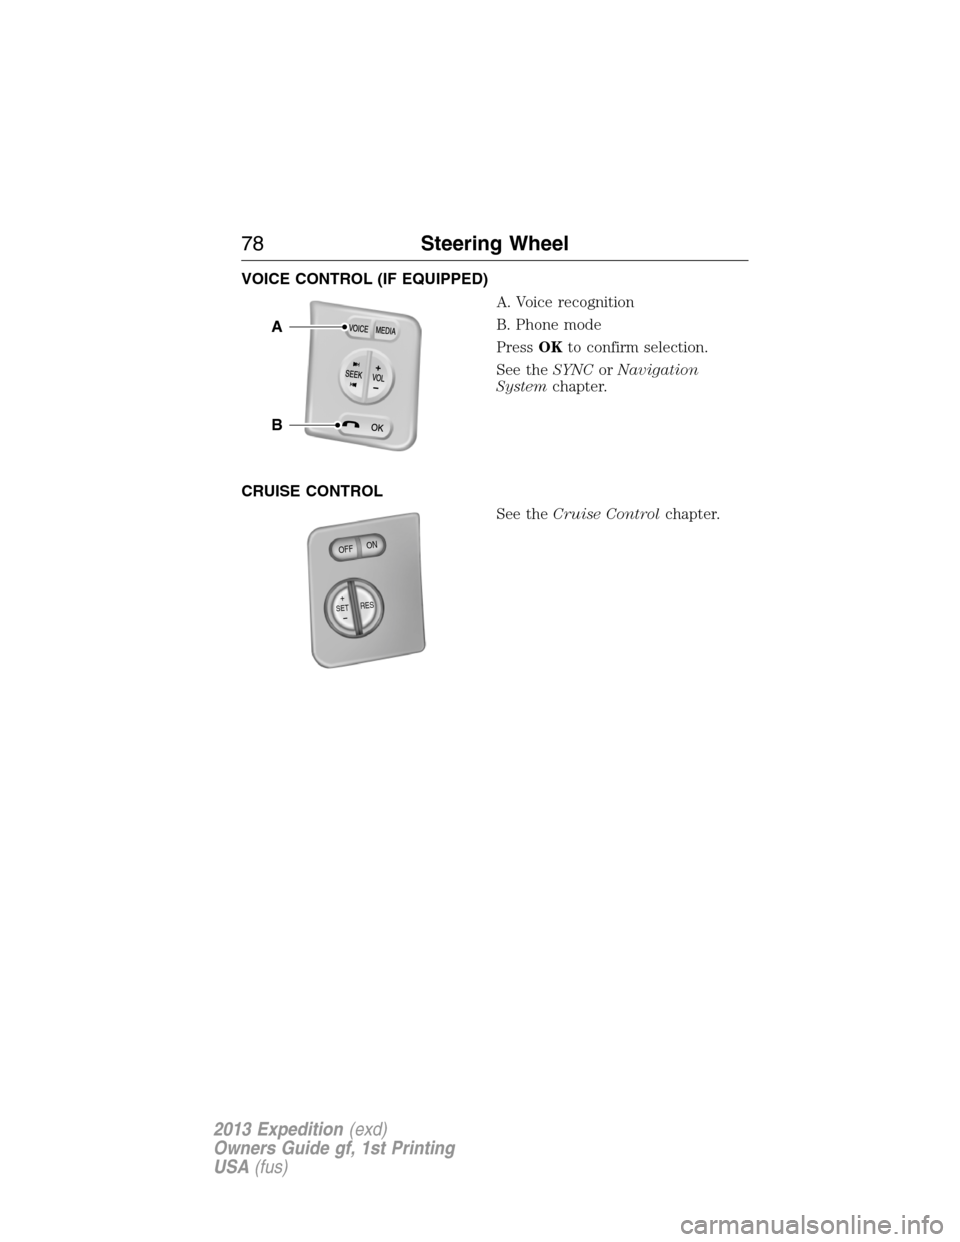
VOICE CONTROL (IF EQUIPPED)
A. Voice recognition
B. Phone mode
PressOKto confirm selection.
See theSYNCorNavigation
Systemchapter.
CRUISE CONTROL
See theCruise Controlchapter.
B
A
+SETRES
O
F
FO
N
78Steering Wheel
2013 Expedition(exd)
Owners Guide gf, 1st Printing
USA(fus)
Page 117 of 497
MP3 Track and Folder Structure
Audio systems capable of recognizing and playing MP3 individual tracks
and folder structures work as follows:
•There are two different modes for MP3 disc playback: MP3 track
mode (system default) and MP3 folder mode.
•MP3 track mode ignores any folder structure on the MP3 disc. The
player numbers each MP3 track on the disc (noted by the .mp3 file
extension) from T001 to a maximum of T255.Note:The maximum
number of playable MP3 files may be less depending on the structure
of the CD and exact model of radio present.
•MP3 folder mode represents a folder structure consisting of one level
of folders. The CD player numbers all MP3 tracks on the disc (noted
by the .mp3 file extension) and all folders containing MP3 files, from
F001 (folder) T001 (track) to F253 T255.
•Creating discs with only one level of folders helps with navigation
through the disc files.
If you are burning your own MP3 discs, it is important to understand
how the system reads the structures you create. While various files may
be present, (files with extensions other than mp3), only files with the
.mp3 extension are played; other files are ignored by the system. This
enables you to use the same MP3 disc for a variety of tasks on your work
computer, home computer and your in-vehicle system.
In track mode, the system displays and plays the structure as if it were
only one level deep (all .mp3 files are played, regardless of being in a
specific folder). In folder mode, the system only plays the .mp3 files in
the current folder.
Audio System11 7
2013 Expedition(exd)
Owners Guide gf, 1st Printing
USA(fus)
Page 134 of 497
8.UP/DOWN:
•For DVD: Navigation button, you can use this button to move the
select bar to items among the menu or file list.
•For TV: Use these buttons to advance to the next higher or lower
channel.
•For OSD: Increase or decrease the setting of selected item.
9.LEFT/RIGHT:Navigation button; you can use this button to move the
select bar to one of the items in the menu or file list.
10.ENTER:Makes a selection or begins playback of the disc.
11.TITLE:Navigate the title menu included in the disc.
12.SUBTITLE:If the current disc has different subtitles options,
pressing this button brings up the menu. Press this button repeatedly
until you have reached your desired subtitles option.
13.Numbers:Decimal numbers: 0 to 9.
14.CLR:Press this button to clear any incorrect numeric input from the
number keypad.
15.P L AY:Press this button to play a disc that is inserted into the DVD
Player.
16.STOP:Stop playing the movie or songs.
•Pressing STOP once, then PLAY, resumes disc playback.
•Pressing STOP twice, then PLAY, resumes from the beginning of
the disc.
17.PAUSE:Press this button to pause the playback of the CD or DVD.
18.FR (Fast Rewind):Press this button to search disc backward
continuously. There are five speed options to choose: 2X, 4X, 8X, 16X,
and 32X.
19.FF (Fast Forward):Press this button to search disc forward
continuously. There are five speed options to choose: 2X, 4X, 8X, 16X,
and 32X.
20.SETUP:Navigate the Setup Menu. Refer toHow to use the DVD
on-screen display (OSD) menufor more information.
21.EJECT:Eject or load a disc.
22.TV-Monitor B
*:Transmit IR codes for TV mode of Monitor B.
23.DVD-Monitor B:Transmit IR codes for DVD mode of Monitor B.
24.SOUND AROUND SELECT
*:Select a FM transmitter channel.
25.PIX:Each time the button is pressed, the picture adjustment OSD,
cycles through bars for BRIGHTNESS, CONTRAST, SATURATION,
HUE, SHARPNESS, IR HEADPHONE, and RESET. Once the desired
adjustment bar is displayed, use the UP/DOWN button to adjust the
setting. The bar display automatically disappears if no adjustments are
made within six seconds or if any button is pressed.
134Audio System
2013 Expedition(exd)
Owners Guide gf, 1st Printing
USA(fus)
Page 140 of 497
Playing an Audio CD
When playing an audio CD, the DISPLAY banner appears automatically. It
displays the current track and the amount of time the track has been
playing, the total amount of time on the disc and the current time
running on the disc.
Press the DISPLAY button on the remote control to display the DISPLAY
banner.
•Press DISPLAY one time:“Single Elapsed” appears along with the
current track playing and the time of that track.
•Press DISPLAY two times:“Single Remain” appears along with the
current track playing and the amount of time left.
•Press DISPLAY three times:“Total Elapsed” appears along with the
current track playing and the total time playing on CD.
•Press DISPLAY four times:“Total Remain” appears along with the
current track playing and the amount of time left on CD.
Press the REPEAT button on the remote control to either repeat the
currently playing track or the entire CD.
Playing an MP3 Disc
MP3 is a format for storing digital audio. An audio CD-quality song can
be compressed into the MP3 format with very little loss of quality, while
taking up much less space. CD-R discs that have been encoded in MP3
format can be played in your DVD player.
Selecting Folders and Songs
When an MP3 disc is inserted in the player, the navigation screen
appears automatically. You can change folders and songs by navigating
the file system. The DVD player plays the songs in the order they were
burned to the disc.
1. If a disc is playing, press the DISPLAY button on the remote control,
and then press the up/down arrow buttons to go through the folder
list on the left side of the navigation screen.
2. Once the folder you want is highlighted, press the ENTER button on
the remote control.
3. Press the up/down arrow buttons on the remote control to go
through the song list and highlight the song you want. Press the
ENTER button to begin the playback of the highlighted song.
Skipping Songs
Press the NEXT button on the remote control to move to the next song.
Use the PREV button to move to the beginning of the currently playing
song. Press the PREV button twice to move to the previous song.
140Audio System
2013 Expedition(exd)
Owners Guide gf, 1st Printing
USA(fus)
Page 234 of 497
Using the Rear View Camera System
The rear view camera system displays what is behind your vehicle when
you place the transmission in R (Reverse). The system uses two types of
guides to help you see what is behind your vehicle:
1. Fixed guidelines: Show the actual path the vehicle is moving in while
reversing in a straight line, which can be helpful when backing into a
parking space or aligning the vehicle with another object behind the
vehicle.
2. Centerline: Helps align the center of the vehicle with an object (i.e. a
trailer).
Note:If the image comes on while the transmission is not in R
(Reverse), have the system inspected by your authorized dealer.
Note:When towing, the camera only sees what is being towed behind
the vehicle. This might not provide adequate coverage as it usually
provides in normal operation and some objects might not be seen. In
some vehicles, the guidelines may disappear once the trailer tow
connector is engaged.
Note:The default setting for the camera delay is off. Press the Settings
button found on the navigation screen (if equipped) to set the camera
delay feature to on or off.
Note:The camera may not operate correctly under the following
conditions:
•Nighttime or dark areas if one or both reverse lamps are not
operating.
•The camera’s view is obstructed by mud, water or debris. Clean the
lens with a soft, lint-free cloth and non-abrasive cleaner.
•The rear of the vehicle is hit or damaged, causing the camera to
become misaligned.
234Parking Aids
2013 Expedition(exd)
Owners Guide gf, 1st Printing
USA(fus)
Page 235 of 497

Guidelines and the Centerline
Note:Fixed guidelines are only available when the transmission is in R
(Reverse).
Note:The centerline is only available if fixed guidelines are on.
A. Rear bumper
B. Fixed guideline: Red zone
C. Fixed guideline: Yellow zone
D. Fixed guideline: Green zone
E. Centerline
The fixed guidelines fade in and out depending on the steering wheel
position.
Always use caution while reversing. Objects in the red zone are closest
to your vehicle and objects in the green zone are further away. Objects
are getting closer to your vehicle as they move from the green zone to
the yellow or red zones. Use the side view mirrors and rear view mirror
to get better coverage on both sides and rear of the vehicle.
Selectable settings for this feature are FIXED and OFF.
Rear Camera Delay
Navigation display
When shifting the transmission out of R (Reverse) and into any gear
other than P (Park), the camera image remains in the display until the
vehicle speed reaches 5 mph (8 km/h). This occurs when the rear
camera delay feature is on, or until a radio button is selected.
Selectable settings for this feature are ON and OFF. The default setting
for the rear camera delay is OFF.
Rearview mirror display
When shifting out of R (Reverse) and into any other gear, the image in
the rearview mirror will remain on for a few seconds before it shuts off
to assist in parking or trailer hookup.
A
E
D
C
B
Parking Aids235
2013 Expedition(exd)
Owners Guide gf, 1st Printing
USA(fus)
Page 289 of 497

Fuse/Relay
LocationFuse Amp
RatingProtected Circuits
38 20A Subwoofer
39 20A Radio
40 20A Navigation amplifier
41 15A Power windows, Power vents,
Power moonroof, Auto dimming
rear view mirror, 110 volt AC
power point
42 10A Not used (spare)
43 10A Rear wiper logic, Rain sensor
44 10A Trailer tow battery charge relay
coil
45 5A Front wiper logic
46 7.5A Climate control, Auxiliary relay
control
47 30A Circuit
BreakerPower windows, Moonroof
48 — Delayed accessory relay
Fuses289
2013 Expedition(exd)
Owners Guide gf, 1st Printing
USA(fus)