Page 286 of 497
Fuse/Relay
LocationFuse Amp
RatingProtected Circuits
82 — Not used
83 — Not used
84 — Not used
85 — Wiper motor relay
* Mini Fuses ** Cartridge Fuses
Passenger Compartment Fuse Panel
The fuse panel is located under the right-hand side of the instrument
panel.
To remove the trim panel for access
to the fuse box, pull the panel
toward you and swing it out away
from the side and remove it. To
reinstall it, line up the tabs with the
grooves on the panel, then push it
shut.
To remove the fuse box cover, press in the tabs on both sides of the
cover, then pull the cover off.
To reinstall the fuse box cover, place the top part of the cover on the
fuse panel, then push the bottom part of the cover until you hear it click
shut. Gently pull on the cover to make sure it is seated properly.
286Fuses
2013 Expedition(exd)
Owners Guide gf, 1st Printing
USA(fus)
Page 289 of 497
Fuse/Relay
LocationFuse Amp
RatingProtected Circuits
38 20A Subwoofer
39 20A Radio
40 20A Navigation amplifier
41 15A Power windows, Power vents,
Power moonroof, Auto dimming
rear view mirror, 110 volt AC
power point
42 10A Not used (spare)
43 10A Rear wiper logic, Rain sensor
44 10A Trailer tow battery charge relay
coil
45 5A Front wiper logic
46 7.5A Climate control, Auxiliary relay
control
47 30A Circuit
BreakerPower windows, Moonroof
48 — Delayed accessory relay
Fuses289
2013 Expedition(exd)
Owners Guide gf, 1st Printing
USA(fus)
Page 302 of 497
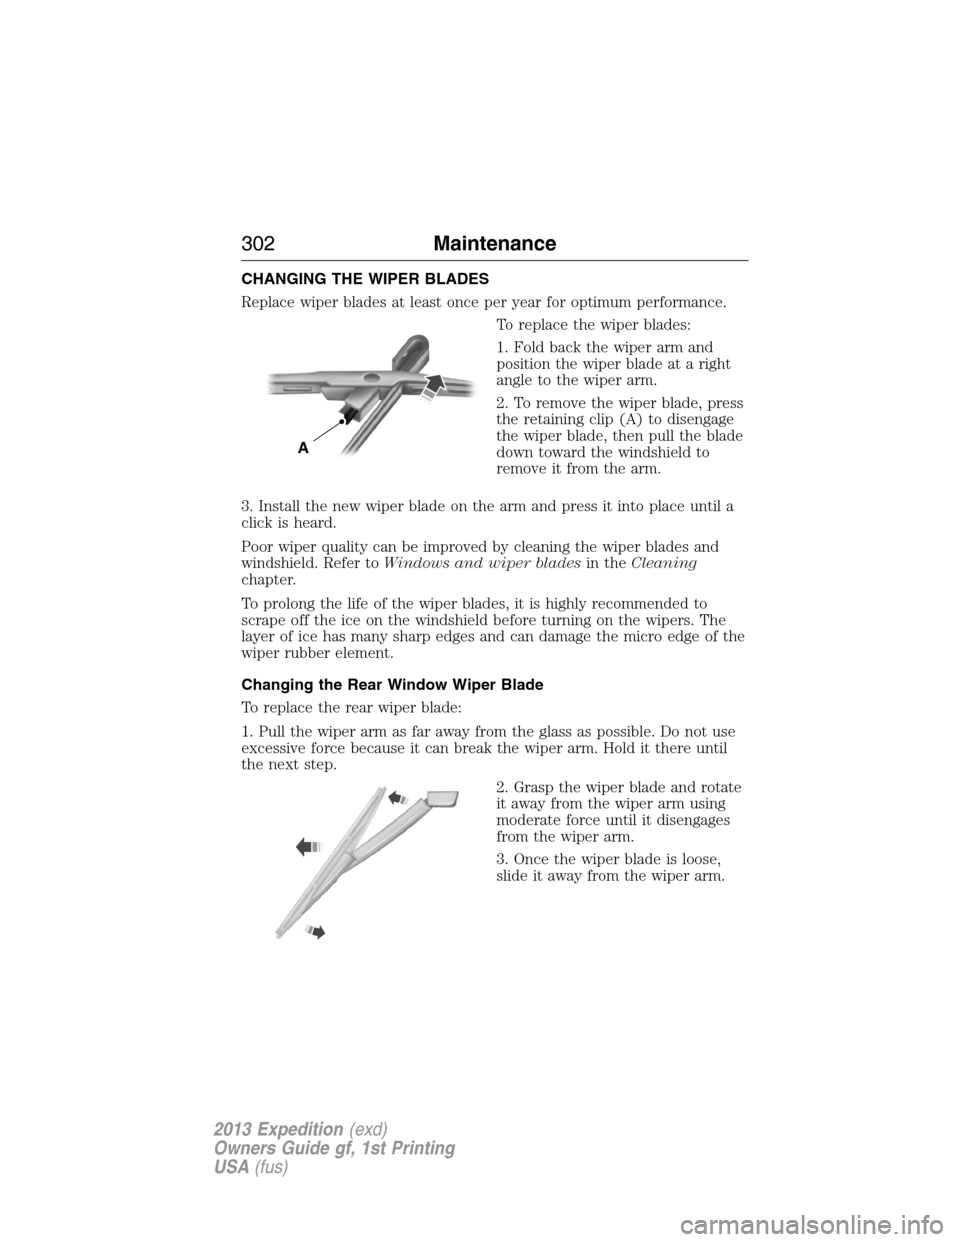
CHANGING THE WIPER BLADES
Replace wiper blades at least once per year for optimum performance.
To replace the wiper blades:
1. Fold back the wiper arm and
position the wiper blade at a right
angle to the wiper arm.
2. To remove the wiper blade, press
the retaining clip (A) to disengage
the wiper blade, then pull the blade
down toward the windshield to
remove it from the arm.
3. Install the new wiper blade on the arm and press it into place until a
click is heard.
Poor wiper quality can be improved by cleaning the wiper blades and
windshield. Refer toWindows and wiper bladesin theCleaning
chapter.
To prolong the life of the wiper blades, it is highly recommended to
scrape off the ice on the windshield before turning on the wipers. The
layer of ice has many sharp edges and can damage the micro edge of the
wiper rubber element.
Changing the Rear Window Wiper Blade
To replace the rear wiper blade:
1. Pull the wiper arm as far away from the glass as possible. Do not use
excessive force because it can break the wiper arm. Hold it there until
the next step.
2. Grasp the wiper blade and rotate
it away from the wiper arm using
moderate force until it disengages
from the wiper arm.
3. Once the wiper blade is loose,
slide it away from the wiper arm.
A
302Maintenance
2013 Expedition(exd)
Owners Guide gf, 1st Printing
USA(fus)
Page 305 of 497
5. Release the three clamps that secure
the cover to the air filter housing. Push
the air filter cover toward the center of
the vehicle and up slightly to release it.
6. Remove the air filter element
from the air filter housing.
7. Install a new air filter element.
8. Replace the air filter housing
cover and secure the clamps. Be
careful not to crimp the filter
element edges between the air filter
housing and cover and ensure that
the tabs on the edge are properly
aligned into the slots.
9. Slip the air tube onto the air
filter housing and tighten the
air-tube clamp bolt snugly, but do
not overtighten it.
10. Reconnect the mass air flow
sensor electrical connector to the
outlet tube. Make sure the locking
tab on the connector is in the
“locked” position (connector shown
from below for clarity).
Maintenance305
2013 Expedition(exd)
Owners Guide gf, 1st Printing
USA(fus)
Page 306 of 497
ADJUSTING THE HEADLAMPS
The headlamps on your vehicle are properly aimed at the assembly plant.
If your vehicle has been in an accident, the alignment of your headlamps
should be checked by your authorized dealer.
Vertical Aim Adjustment
Before aim adjustment, disable the air suspension system. Refer to
Message centerin theDriver Controlschapter.
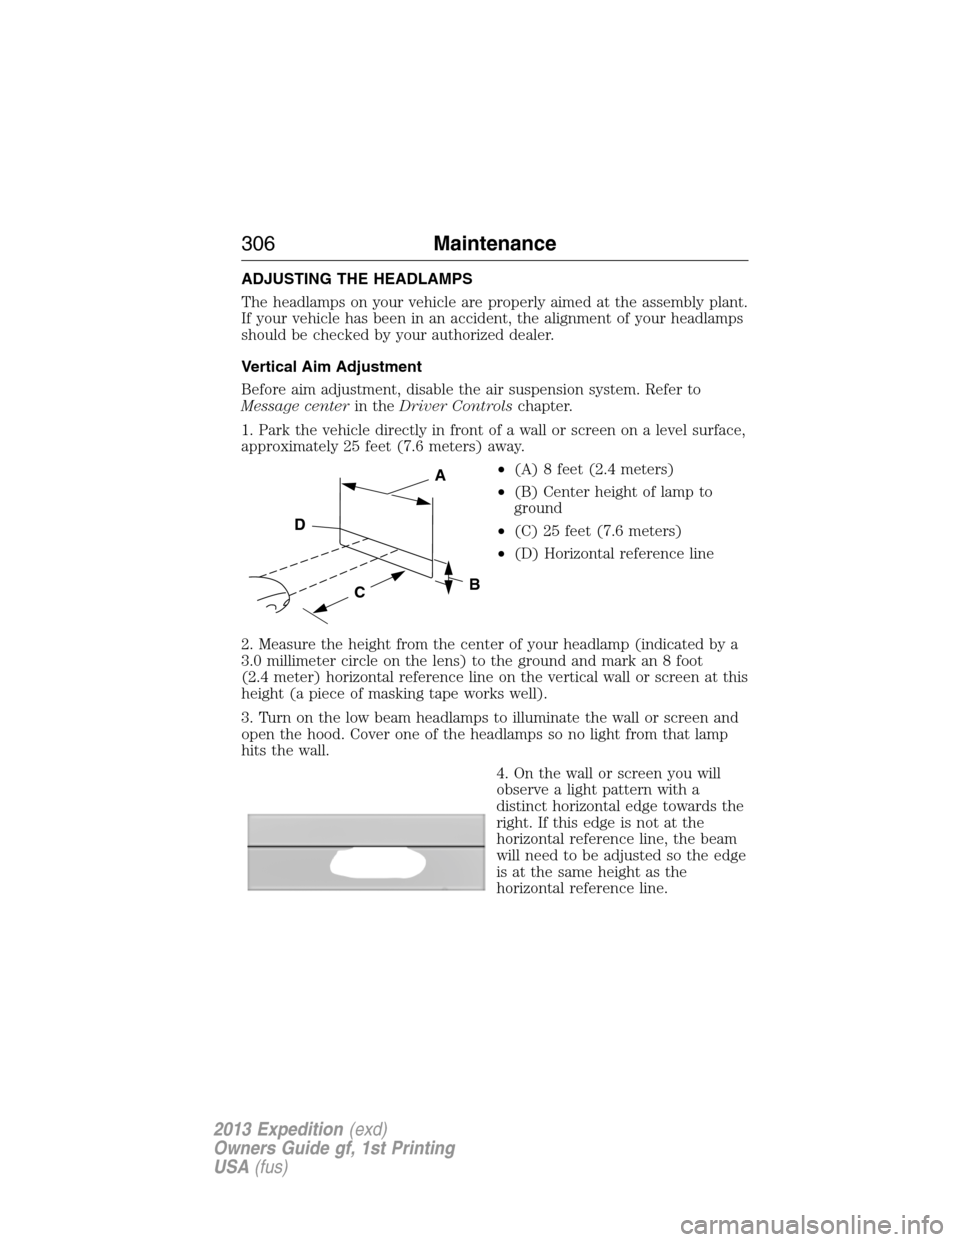
1. Park the vehicle directly in front of a wall or screen on a level surface,
approximately 25 feet (7.6 meters) away.
•(A) 8 feet (2.4 meters)
•(B) Center height of lamp to
ground
•(C) 25 feet (7.6 meters)
•(D) Horizontal reference line
2. Measure the height from the center of your headlamp (indicated by a
3.0 millimeter circle on the lens) to the ground and mark an 8 foot
(2.4 meter) horizontal reference line on the vertical wall or screen at this
height (a piece of masking tape works well).
3. Turn on the low beam headlamps to illuminate the wall or screen and
open the hood. Cover one of the headlamps so no light from that lamp
hits the wall.
4. On the wall or screen you will
observe a light pattern with a
distinct horizontal edge towards the
right. If this edge is not at the
horizontal reference line, the beam
will need to be adjusted so the edge
is at the same height as the
horizontal reference line.
C
A
B
D
306Maintenance
2013 Expedition(exd)
Owners Guide gf, 1st Printing
USA(fus)
Page 313 of 497
GENERAL INFORMATION
Your Ford or Lincoln authorized dealer has many quality products
available to clean your vehicle and protect its finishes.
CLEANING PRODUCTS
For best results, use the following products or products of equivalent
quality:
Motorcraft�Bug and Tar Remover (ZC-42)
Motorcraft�Custom Bright Metal Cleaner (ZC-15)
Motorcraft�Detail Wash (ZC-3-A)
Motorcraft�Dusting Cloth (ZC-24)
Motorcraft�Engine Shampoo and Degreaser (U.S. only) (ZC-20)
Motorcraft�Engine Shampoo (Canada only) (CXC-66-A)
Motorcraft�Multi-Purpose Cleaner (Canada only) (CXC-101)
Motorcraft�Premium Glass Cleaner (Canada only) (CXC-100)
Motorcraft�Premium Quality Windshield Washer Fluid (Canada only)
[CXC-37-(A, B, D or F)]
Motorcraft�Premium Windshield Washer Concentrate (U.S. only)
(ZC-32-A)
Motorcraft�Professional Strength Carpet & Upholstery Cleaner (ZC-54)
Motorcraft�Spot and Stain Remover (U.S. only) (ZC-14)
Motorcraft�Ultra-Clear Spray Glass Cleaner (ZC-23)
Motorcraft�Vinyl Cleaner (Canada only) (CXC-93)
Motorcraft�Wheel and Tire Cleaner (ZC-37-A)
CLEANING THE EXTERIOR
Wash your vehicle regularly with cool or lukewarm water and a neutral
pH shampoo, such as Motorcraft�Detail Wash.
•Never use strong household detergents or soap, such as dish washing
or laundry liquid. These products can discolor and spot painted
surfaces.
•Never wash a vehicle that is “hot to the touch” or during exposure to
strong, direct sunlight.
•Dry the vehicle with a chamois or soft terry cloth towel in order to
eliminate water spotting.
Vehicle Care313
2013 Expedition(exd)
Owners Guide gf, 1st Printing
USA(fus)
Page 339 of 497
Important:Remember to replace the wheel valve stems when the road
tires are replaced on your vehicle.
It is recommended that the two front tires or two rear tires generally be
replaced as a pair.
The tire pressure sensors mounted in the wheels (originally installed on
your vehicle) are not designed to be used in aftermarket wheels.
The use of wheels or tires not recommended by Ford Motor Company
may affect the operation of your tire pressure monitoring system.
If the TPMS indicator is flashing, your TPMS is malfunctioning. Your
replacement tire might be incompatible with your TPMS, or some
component of the TPMS may be damaged.
Safety Practices
WARNING:If your vehicle is stuck in snow, mud, sand, etc., do
not rapidly spin the tires; spinning the tires can tear the tire and
cause an explosion. A tire can explode in as little as three to five seconds.
WARNING:Do not spin the wheels at over 35 mph (56 km/h).
The tires may fail and injure a passenger or bystander.
Driving habits have a great deal to do with your tire mileage and safety.
•Observe posted speed limits.
•Avoid fast starts, stops and turns.
•Avoid potholes and objects on the road.
•Do not run over curbs or hit the tire against a curb when parking.
Highway Hazards
No matter how carefully you drive, there is always the possibility that
you may eventually have a flat tire on the highway. Drive slowly to the
closest safe area out of traffic. This may further damage the flat tire, but
your safety is more important.
If you feel a sudden vibration or ride disturbance while driving, or you
suspect your tire or vehicle has been damaged, immediately reduce your
speed. Drive with caution until you can safely pull off the road. Stop and
inspect the tires for damage. If a tire is under-inflated or damaged,
deflate it, remove the wheel and replace it with your spare tire and
wheel. If you cannot detect a cause, have the vehicle towed to the
nearest repair facility or tire dealer to have the vehicle inspected.
Wheels and Tires339
2013 Expedition(exd)
Owners Guide gf, 1st Printing
USA(fus)
Page 344 of 497
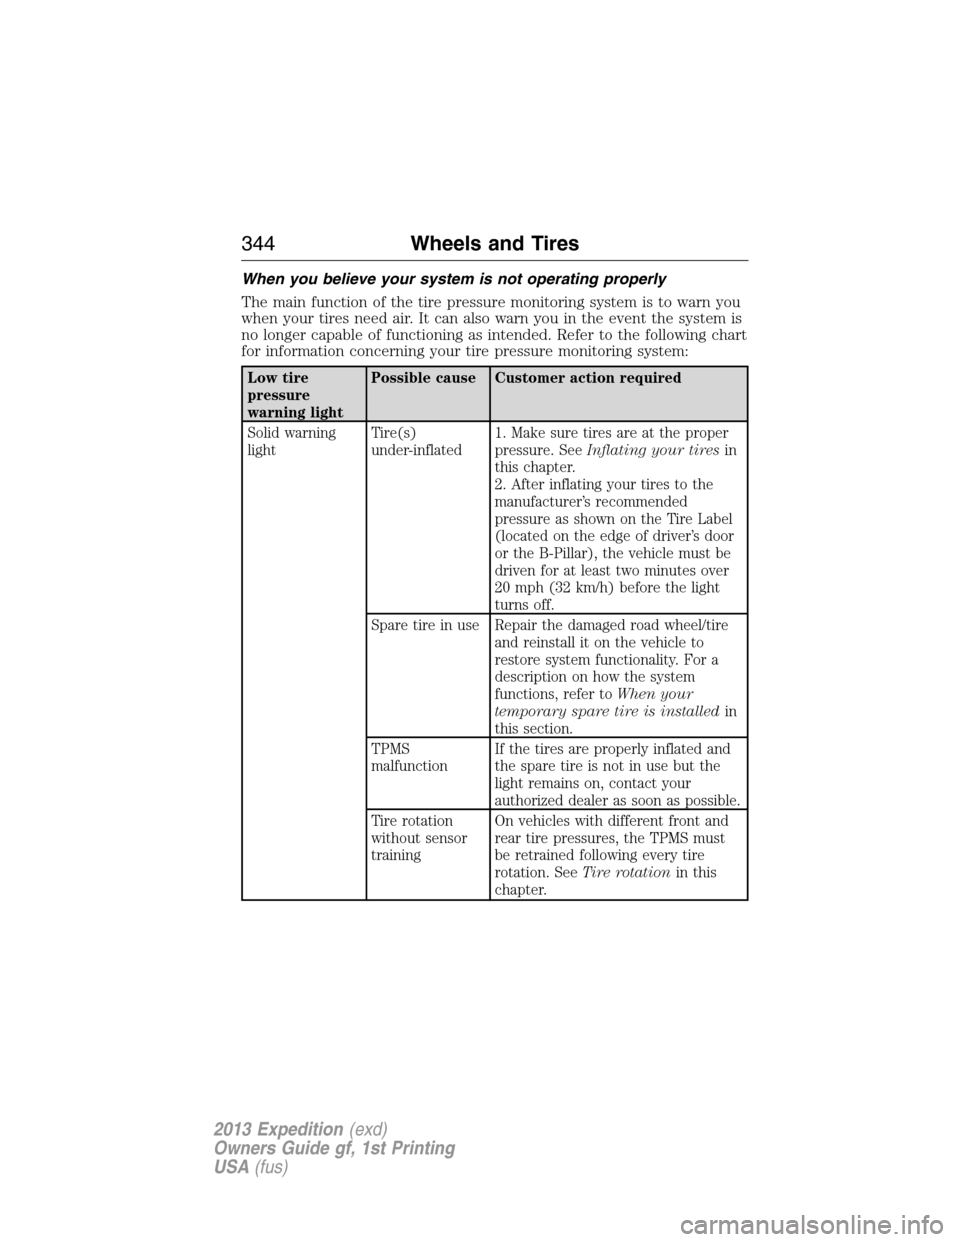
When you believe your system is not operating properly
The main function of the tire pressure monitoring system is to warn you
when your tires need air. It can also warn you in the event the system is
no longer capable of functioning as intended. Refer to the following chart
for information concerning your tire pressure monitoring system:
Low tire
pressure
warning lightPossible cause Customer action required
Solid warning
lightTire(s)
under-inflated1. Make sure tires are at the proper
pressure. SeeInflating your tiresin
this chapter.
2. After inflating your tires to the
manufacturer’s recommended
pressure as shown on the Tire Label
(located on the edge of driver’s door
or the B-Pillar), the vehicle must be
driven for at least two minutes over
20 mph (32 km/h) before the light
turns off.
Spare tire in use Repair the damaged road wheel/tire
and reinstall it on the vehicle to
restore system functionality. For a
description on how the system
functions, refer toWhen your
temporary spare tire is installedin
this section.
TPMS
malfunctionIf the tires are properly inflated and
the spare tire is not in use but the
light remains on, contact your
authorized dealer as soon as possible.
Tire rotation
without sensor
trainingOn vehicles with different front and
rear tire pressures, the TPMS must
be retrained following every tire
rotation. SeeTire rotationin this
chapter.
344Wheels and Tires
2013 Expedition(exd)
Owners Guide gf, 1st Printing
USA(fus)