2013 FORD EXPEDITION engine
[x] Cancel search: enginePage 252 of 497
This feature applies the vehicle brakes at individual wheels and, if
necessary, reduces engine power. If the trailer begins to sway, the
stability control light flashes and the messageTRAILER SWAY
REDUCE SPEEDappears in the information display. The first thing to
do is slow the vehicle down, then pull safely to the side of the road and
check for proper tongue load and trailer load distribution. See theLoad
Carryingchapter for specific loading information.
RECOMMENDED TOWING WEIGHTS
Note:Do not exceed the trailer weight for your vehicle configuration
listed in the chart below.
Note:Make sure to take into consideration trailer frontal area. Do not
exceed:
•36.5 feet
2(3.39 meters2) trailer frontal area for vehicles with the
standard towing package
•60.0 feet
2(5.57 meters2) trailer frontal area for vehicles with the
optional towing package
Note:For high altitude operation, reduce the gross combined weight by
2% per 1000 feet (300 meters) starting at the 1000 foot (300 meter)
elevation point.
Note:Certain states require electric trailer brakes for trailers over a
specified weight. Be sure to check state regulations for this specified
weight. The maximum trailer weights listed may be limited to this
specified weight, as the vehicle’s electrical system may not include the
wiring connector needed to activate electric trailer brakes.
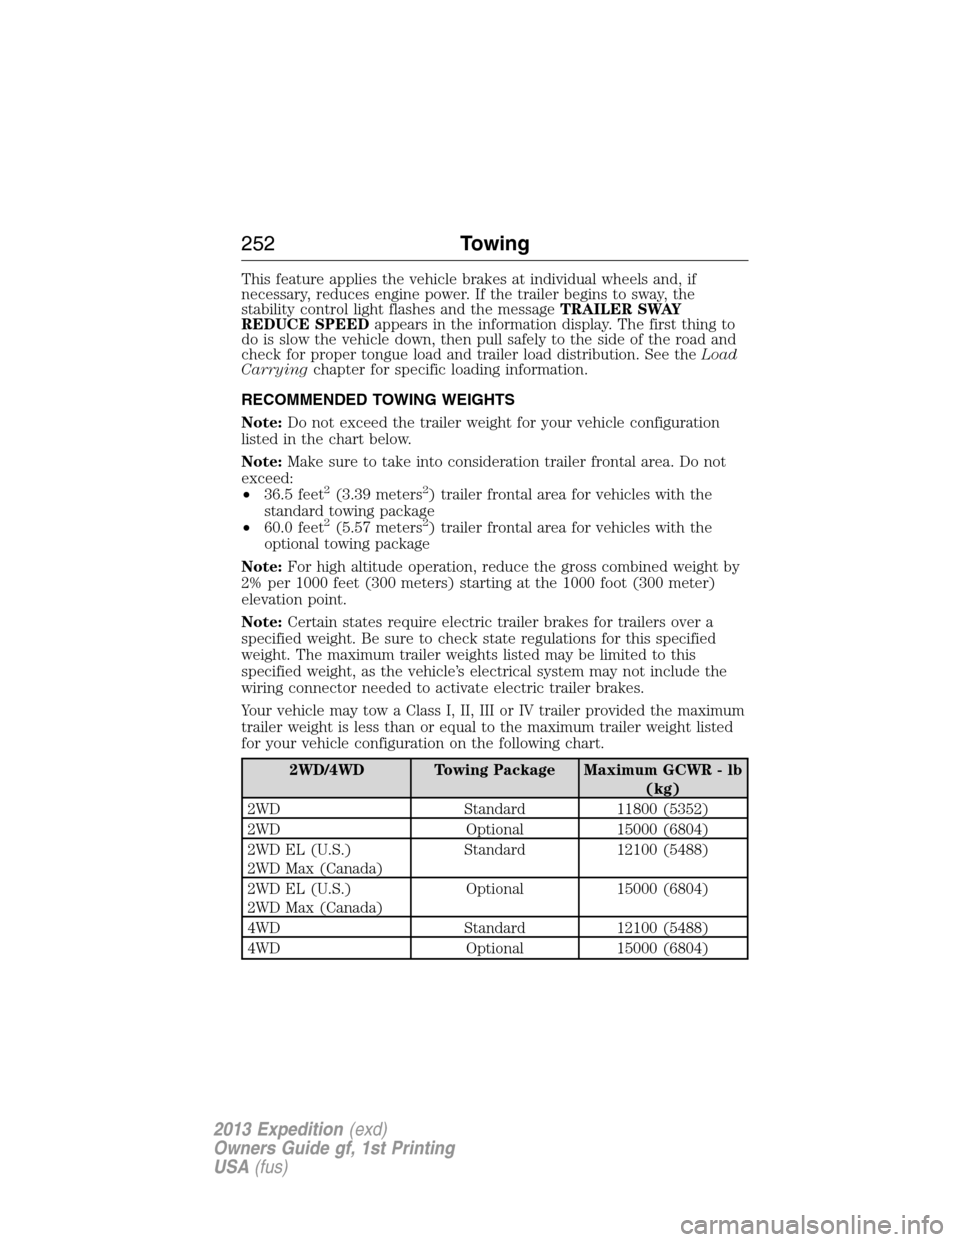
Your vehicle may tow a Class I, II, III or IV trailer provided the maximum
trailer weight is less than or equal to the maximum trailer weight listed
for your vehicle configuration on the following chart.
2WD/4WD Towing Package Maximum GCWR - lb
(kg)
2WD Standard 11800 (5352)
2WD Optional 15000 (6804)
2WD EL (U.S.)
2WD Max (Canada)Standard 12100 (5488)
2WD EL (U.S.)
2WD Max (Canada)Optional 15000 (6804)
4WD Standard 12100 (5488)
4WD Optional 15000 (6804)
252Towing
2013 Expedition(exd)
Owners Guide gf, 1st Printing
USA(fus)
Page 254 of 497
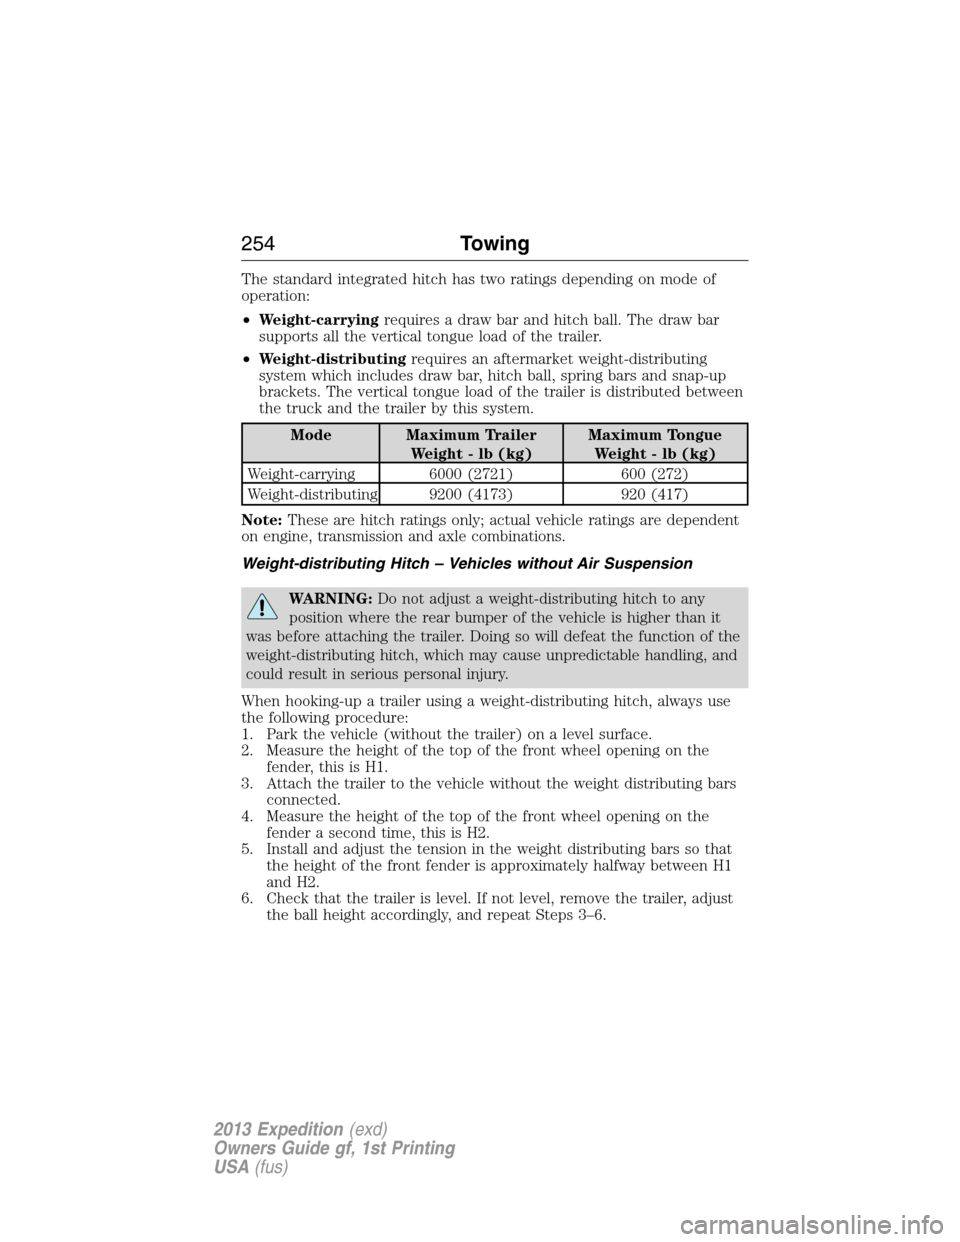
The standard integrated hitch has two ratings depending on mode of
operation:
•Weight-carryingrequires a draw bar and hitch ball. The draw bar
supports all the vertical tongue load of the trailer.
•Weight-distributingrequires an aftermarket weight-distributing
system which includes draw bar, hitch ball, spring bars and snap-up
brackets. The vertical tongue load of the trailer is distributed between
the truck and the trailer by this system.
Mode Maximum Trailer
Weight - lb (kg)Maximum Tongue
Weight - lb (kg)
Weight-carrying 6000 (2721) 600 (272)
Weight-distributing 9200 (4173) 920 (417)
Note:These are hitch ratings only; actual vehicle ratings are dependent
on engine, transmission and axle combinations.
Weight-distributing Hitch – Vehicles without Air Suspension
WARNING:Do not adjust a weight-distributing hitch to any
position where the rear bumper of the vehicle is higher than it
was before attaching the trailer. Doing so will defeat the function of the
weight-distributing hitch, which may cause unpredictable handling, and
could result in serious personal injury.
When hooking-up a trailer using a weight-distributing hitch, always use
the following procedure:
1. Park the vehicle (without the trailer) on a level surface.
2. Measure the height of the top of the front wheel opening on the
fender, this is H1.
3. Attach the trailer to the vehicle without the weight distributing bars
connected.
4. Measure the height of the top of the front wheel opening on the
fender a second time, this is H2.
5. Install and adjust the tension in the weight distributing bars so that
the height of the front fender is approximately halfway between H1
and H2.
6. Check that the trailer is level. If not level, remove the trailer, adjust
the ball height accordingly, and repeat Steps 3–6.
254Towing
2013 Expedition(exd)
Owners Guide gf, 1st Printing
USA(fus)
Page 260 of 497

•Your vehicle’s brake system and the trailer brake system work
independently of each other. Changing the GAIN setting on the TBC
does not affect the operation of your vehicle’s brakes whether a
trailer is attached or not.
•When the vehicle is turned off, the TBC output is disabled and the
display and module are shut down. The TBC module and display turn
on when the ignition is turned from the off position to the on
position.
•The TBC is only a factory-installed or dealer-installed item. Ford is
not responsible for warranty or performance of the TBC due to
misuse or customer installation.
Trailer Lamps
Trailer lamps are required on most towed vehicles. Make sure all running
lights, brake lights, turn signals and hazard lights are working. Contact
your authorized dealer or trailer rental agency for proper instructions
and equipment for hooking up the lamps.
Before Towing a Trailer
Practice turning, stopping and backing up to get the feel of the
vehicle-trailer combination before starting on a trip. When turning, make
wider turns so the trailer wheels will clear curbs and other obstacles.
When Towing a Trailer
•Do not drive faster than 70 mph (113 km/h) during the first 500 miles
(800 kilometers).
•Do not make full-throttle starts.
•Check your hitch, electrical connections and trailer wheel lug nuts
thoroughly after you have traveled 50 miles (80 kilometers).
•When stopped in congested or heavy traffic during hot weather, place
gearshift in positionPto aid engine and transmission cooling and to
help A/C performance.
•Turn off the speed control with heavy loads or in hilly terrain. The
speed control may turn off automatically when you are towing on
long, steep grades.
•Shift to a lower gear when driving down a long or steep hill. Do not
apply the brakes continuously, as they may overheat and become less
effective.
•If your transmission is equipped with a Grade Assist or Tow/Haul
feature, use this feature when towing. This provides engine braking
and helps eliminate excessive transmission shifting for optimum fuel
economy and transmission cooling.
260Towing
2013 Expedition(exd)
Owners Guide gf, 1st Printing
USA(fus)
Page 264 of 497
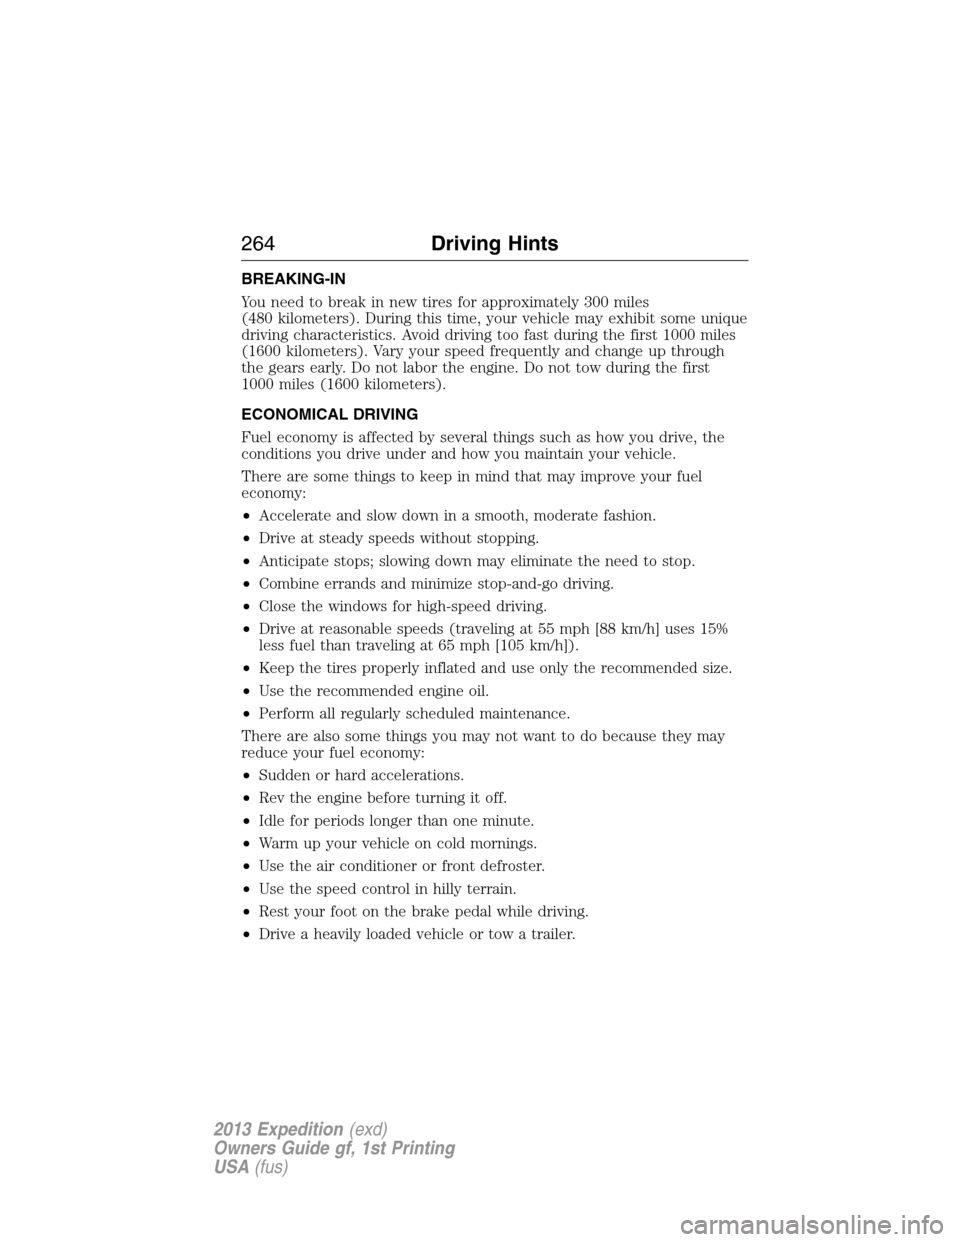
BREAKING-IN
You need to break in new tires for approximately 300 miles
(480 kilometers). During this time, your vehicle may exhibit some unique
driving characteristics. Avoid driving too fast during the first 1000 miles
(1600 kilometers). Vary your speed frequently and change up through
the gears early. Do not labor the engine. Do not tow during the first
1000 miles (1600 kilometers).
ECONOMICAL DRIVING
Fuel economy is affected by several things such as how you drive, the
conditions you drive under and how you maintain your vehicle.
There are some things to keep in mind that may improve your fuel
economy:
•Accelerate and slow down in a smooth, moderate fashion.
•Drive at steady speeds without stopping.
•Anticipate stops; slowing down may eliminate the need to stop.
•Combine errands and minimize stop-and-go driving.
•Close the windows for high-speed driving.
•Drive at reasonable speeds (traveling at 55 mph [88 km/h] uses 15%
less fuel than traveling at 65 mph [105 km/h]).
•Keep the tires properly inflated and use only the recommended size.
•Use the recommended engine oil.
•Perform all regularly scheduled maintenance.
There are also some things you may not want to do because they may
reduce your fuel economy:
•Sudden or hard accelerations.
•Rev the engine before turning it off.
•Idle for periods longer than one minute.
•Warm up your vehicle on cold mornings.
•Use the air conditioner or front defroster.
•Use the speed control in hilly terrain.
•Rest your foot on the brake pedal while driving.
•Drive a heavily loaded vehicle or tow a trailer.
264Driving Hints
2013 Expedition(exd)
Owners Guide gf, 1st Printing
USA(fus)
Page 265 of 497
![FORD EXPEDITION 2013 3.G Owners Manual •Carry unnecessary weight (approximately 1 mpg [0.4 km/L] is lost for
every 400 lb [180 kg] of weight carried).
•Add particular accessories to your vehicle (e.g. bug deflectors,
rollbars/light bar FORD EXPEDITION 2013 3.G Owners Manual •Carry unnecessary weight (approximately 1 mpg [0.4 km/L] is lost for
every 400 lb [180 kg] of weight carried).
•Add particular accessories to your vehicle (e.g. bug deflectors,
rollbars/light bar](/manual-img/11/4934/w960_4934-264.png)
•Carry unnecessary weight (approximately 1 mpg [0.4 km/L] is lost for
every 400 lb [180 kg] of weight carried).
•Add particular accessories to your vehicle (e.g. bug deflectors,
rollbars/light bars, running boards, ski racks).
•Drive with the wheels out of alignment.
DRIVING THROUGH WATER
Note:Driving through deep water may allow water into the transmission
and engine causing internal damage. Have the fluid checked and, if water
is found, replace the fluid.
Do not drive quickly through standing water, especially if the depth is
unknown. Traction or brake capability may be limited and if the ignition
system gets wet, your engine may stall. Water may also enter your
engine’s air intake and severely damage your engine.
If driving through deep or standing
water is unavoidable, proceed very
slowly. Never drive through water
that is higher than the bottom of
the hubs (for trucks) or the bottom
of the wheel rims (for cars).
Once through the water, always try the brakes. Wet brakes do not stop
the vehicle as effectively as dry brakes. Drying can be improved by
moving your vehicle slowly while applying light pressure on the brake
pedal.
Driving Hints265
2013 Expedition(exd)
Owners Guide gf, 1st Printing
USA(fus)
Page 269 of 497
U.S. Ford vehicle customers who require Roadside Assistance, call
1-800-241-3673.
If you need to arrange roadside assistance for yourself, Ford Motor
Company will reimburse a reasonable amount for towing to the nearest
dealership within 35 miles (56 kilometers). To obtain reimbursement
information, U.S. Ford vehicle customers call 1-800-241-3673. Customers
will be asked to submit their original receipts.
Vehicles Sold in Canada : Getting Roadside Assistance
Canadian customers who require roadside assistance, call 1–800–665–2006.
Vehicles Sold in Canada : Using Roadside Assistance
Complete the roadside assistance identification card and place it in your
wallet for quick reference. In Canada, the card is found in the warranty
information in the glove box.
Canadian Roadside coverage and benefits may differ from the U.S.
coverage. Please see your warranty information or visit our website at
www.ford.ca for information on Canadian services and benefits.
Canadian customers who need to obtain roadside information, call
1-800-665-2006 or visit our website at www.ford.ca.
HAZARD WARNING FLASHERS
The hazard flasher control is located on the instrument panel
by the radio. Use it when your vehicle is disabled and is
creating a safety hazard for other motorists.
•Press the flasher control and all front and rear direction signals will
flash.
•Press the flasher control again to turn them off.
Note:With extended use, the flashers may run down your 12 volt battery.
FUEL CUT-OFF SWITCH
WARNING:Failure to inspect and if necessary repair fuel leaks
after a collision may increase the risk of fire and serious injury.
Ford Motor Company recommends that the fuel system be inspected by
an authorized dealer after any collision.
In the event of a moderate to severe collision, this vehicle is equipped
with a fuel pump shut-off feature that stops the flow of fuel to the
engine. Not every impact will cause a shut-off.
Roadside Emergencies269
2013 Expedition(exd)
Owners Guide gf, 1st Printing
USA(fus)
Page 270 of 497
Should your vehicle shut off after a collision, you may restart your
vehicle by doing the following:
1. Turn the ignition off.
2. Turn the ignition on.
3. Repeat steps 1 and 2 to re-enable fuel pump.
Note:If your vehicle has the push button start system, press the
stop/start button twice to reactivate the fuel system.
JUMP-STARTING THE VEHICLE
WARNING:The gases around the battery can explode if exposed
to flames, sparks, or lit cigarettes. An explosion could result in
injury or vehicle damage.
WARNING:Batteries contain sulfuric acid which can burn skin,
eyes and clothing, if contacted.
Do not attempt to push-start your automatic transmission vehicle.
Automatic transmissions do not have push-start capability. Attempting to
push-start a vehicle with an automatic transmission may cause
transmission damage.
When the battery is disconnected or a new battery is installed, the
automatic transmission must relearn its shift strategy. As a result, the
transmission may exhibit a combination of firm and soft shifts. This
operation is considered normal and will not affect function or durability
of the transmission. Over time, the adaptive learning process will fully
update transmission operation.
Preparing Your Vehicle
Note:Use only a 12 volt supply to start your vehicle.
Note:Do not disconnect the battery of the disabled vehicle as this could
damage the vehicle’s electrical system.
1. Park the booster vehicle close to the hood of the disabled vehicle
making sure the two vehicles do not touch. Set the parking brake on
both vehicles and stay clear of the engine cooling fan and other moving
parts.
2. Check all battery terminals and remove any excessive corrosion before
you attach the battery cables. Ensure that vent caps are tight and level.
3. Turn the heater fan on in both vehicles to protect from any electrical
surges. Turn all other accessories off.
270Roadside Emergencies
2013 Expedition(exd)
Owners Guide gf, 1st Printing
USA(fus)
Page 271 of 497
Connecting the Jumper Cables
WARNING:Do not connect the end of the second cable to the
negative (-) terminal of the battery to be jumped. A spark may
cause an explosion of the gases that surround the battery.
Note:Do not attach the negative (-) cable to fuel lines, engine rocker
covers, the intake manifold or electrical components as grounding points.
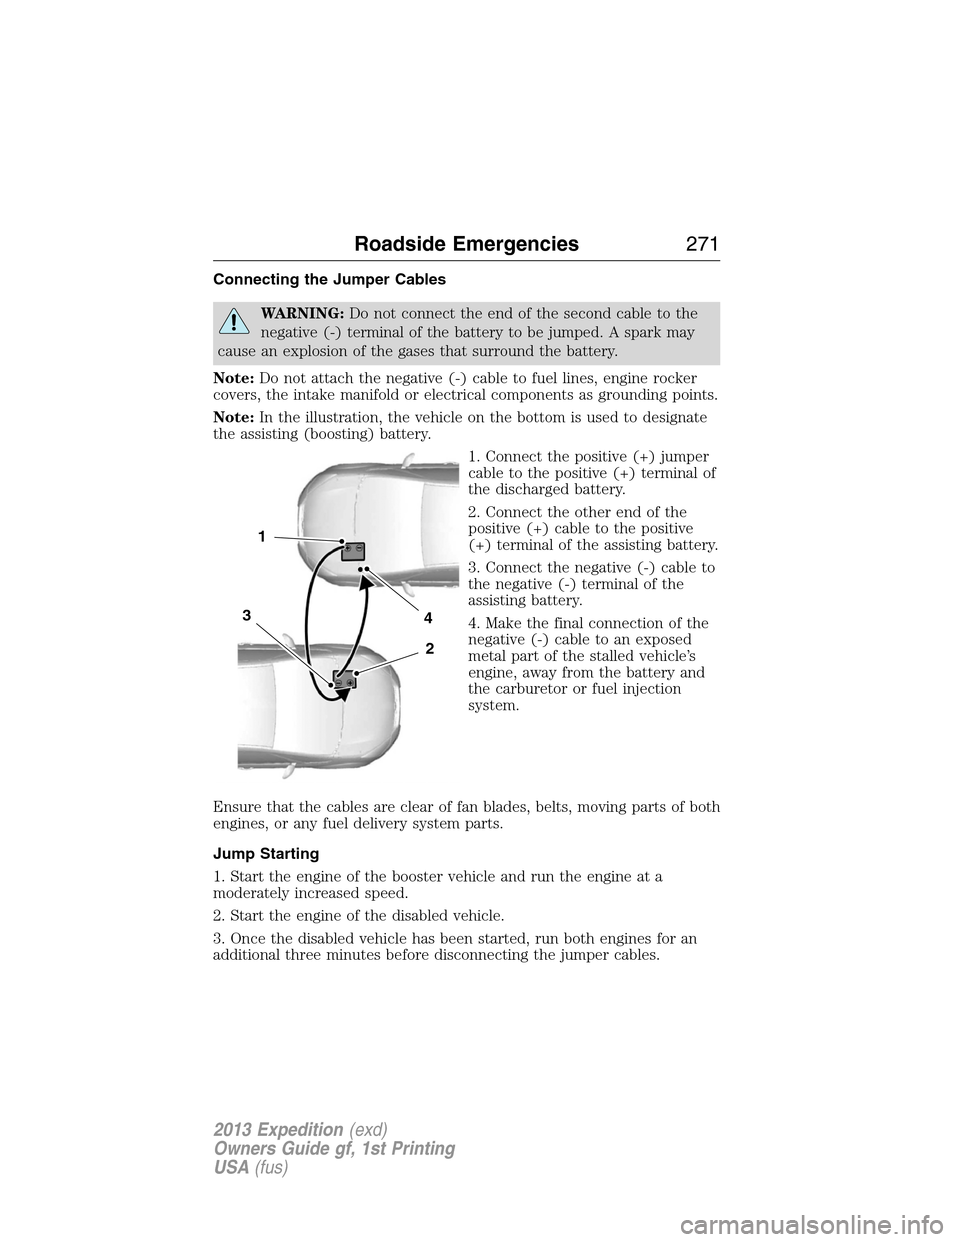
Note:In the illustration, the vehicle on the bottom is used to designate
the assisting (boosting) battery.
1. Connect the positive (+) jumper
cable to the positive (+) terminal of
the discharged battery.
2. Connect the other end of the
positive (+) cable to the positive
(+) terminal of the assisting battery.
3. Connect the negative (-) cable to
the negative (-) terminal of the
assisting battery.
4. Make the final connection of the
negative (-) cable to an exposed
metal part of the stalled vehicle’s
engine, away from the battery and
the carburetor or fuel injection
system.
Ensure that the cables are clear of fan blades, belts, moving parts of both
engines, or any fuel delivery system parts.
Jump Starting
1. Start the engine of the booster vehicle and run the engine at a
moderately increased speed.
2. Start the engine of the disabled vehicle.
3. Once the disabled vehicle has been started, run both engines for an
additional three minutes before disconnecting the jumper cables.
4
2
1
3
Roadside Emergencies271
2013 Expedition(exd)
Owners Guide gf, 1st Printing
USA(fus)