Page 199 of 423

Connecting the Jumper Cables
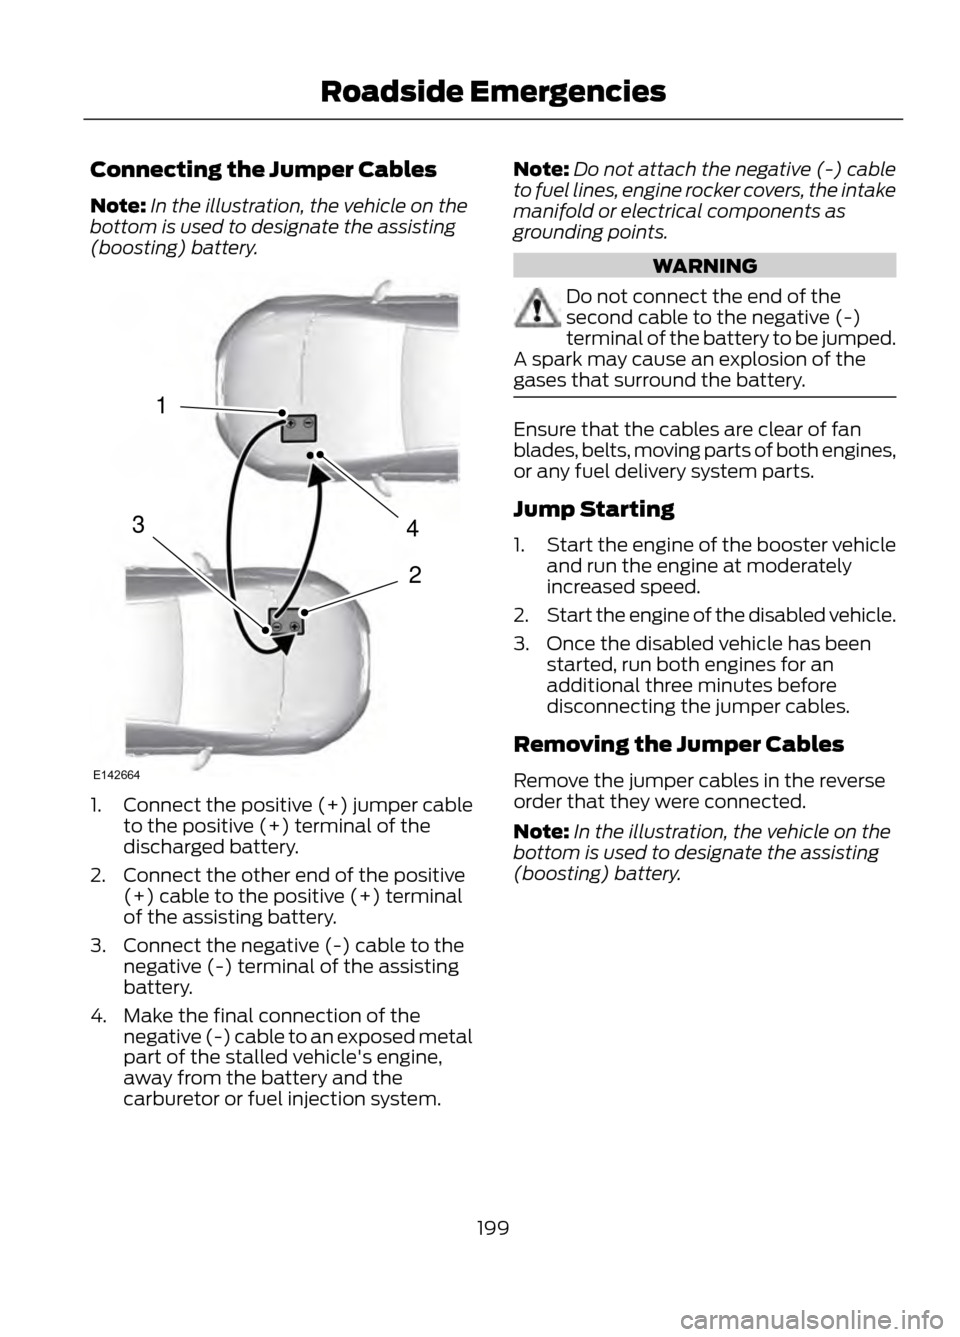
Note:In the illustration, the vehicle on the
bottom is used to designate the assisting
(boosting) battery.
1. Connect the positive (+) jumper cable
to the positive (+) terminal of the
discharged battery.
2. Connect the other end of the positive (+) cable to the positive (+) terminal
of the assisting battery.
3. Connect the negative (-) cable to the negative (-) terminal of the assisting
battery.
4. Make the final connection of the negative (-) cable to an exposed metal
part of the stalled vehicle's engine,
away from the battery and the
carburetor or fuel injection system. Note:
Do not attach the negative (-) cable
to fuel lines, engine rocker covers, the intake
manifold or electrical components as
grounding points.
WARNING
Do not connect the end of the
second cable to the negative (-)
terminal of the battery to be jumped.
A spark may cause an explosion of the
gases that surround the battery.
Ensure that the cables are clear of fan
blades, belts, moving parts of both engines,
or any fuel delivery system parts.
Jump Starting
1. Start the engine of the booster vehicle
and run the engine at moderately
increased speed.
2. Start the engine of the disabled vehicle.
3. Once the disabled vehicle has been started, run both engines for an
additional three minutes before
disconnecting the jumper cables.
Removing the Jumper Cables
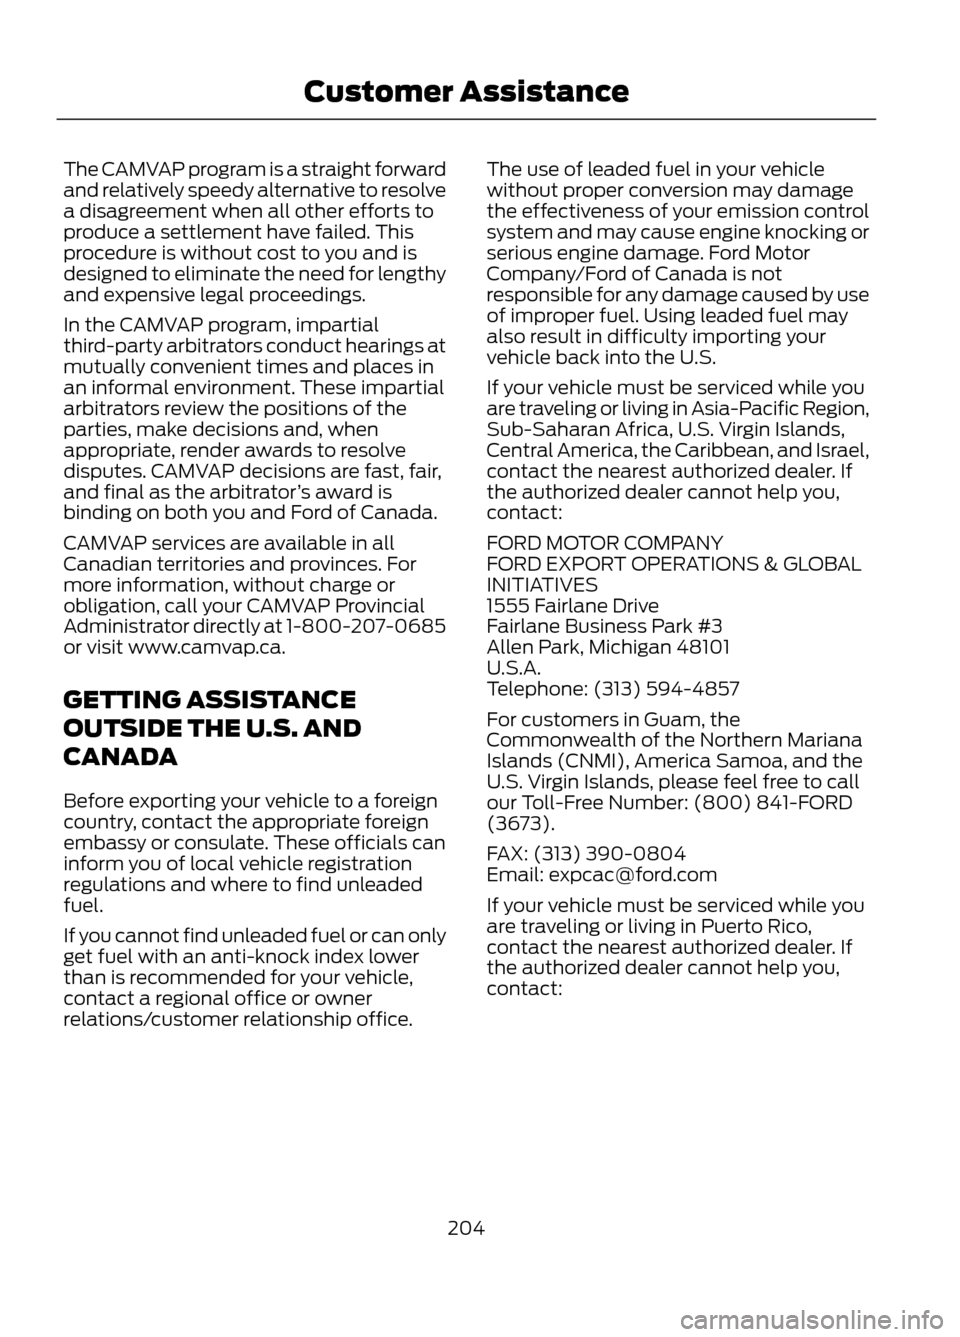
Remove the jumper cables in the reverse
order that they were connected.
Note: In the illustration, the vehicle on the
bottom is used to designate the assisting
(boosting) battery.
199
Roadside Emergencies
4
2
1
3
E142664
Page 200 of 423
1. Remove the jumper cable from theground metal surface.
2. Remove the jumper cable on the negative (-) terminal of the booster
vehicle's battery.
3. Remove the jumper cable from the positive (+) terminal of the booster
vehicle's battery.
4. Remove the jumper cable from the positive (+) terminal of the disabled
vehicle's battery.
After the disabled vehicle has been started
and the jumper cables removed, allow it
to idle for several minutes so the engine
computer can relearn its idle conditions.
200
Roadside Emergencies
4
1
3
2
E142665
Page 204 of 423

The CAMVAP program is a straight forward
and relatively speedy alternative to resolve
a disagreement when all other efforts to
produce a settlement have failed. This
procedure is without cost to you and is
designed to eliminate the need for lengthy
and expensive legal proceedings.
In the CAMVAP program, impartial
third-party arbitrators conduct hearings at
mutually convenient times and places in
an informal environment. These impartial
arbitrators review the positions of the
parties, make decisions and, when
appropriate, render awards to resolve
disputes. CAMVAP decisions are fast, fair,
and final as the arbitrator’s award is
binding on both you and Ford of Canada.
CAMVAP services are available in all
Canadian territories and provinces. For
more information, without charge or
obligation, call your CAMVAP Provincial
Administrator directly at 1-800-207-0685
or visit www.camvap.ca.
GETTING ASSISTANCE
OUTSIDE THE U.S. AND
CANADA
Before exporting your vehicle to a foreign
country, contact the appropriate foreign
embassy or consulate. These officials can
inform you of local vehicle registration
regulations and where to find unleaded
fuel.
If you cannot find unleaded fuel or can only
get fuel with an anti-knock index lower
than is recommended for your vehicle,
contact a regional office or owner
relations/customer relationship office. The use of leaded fuel in your vehicle
without proper conversion may damage
the effectiveness of your emission control
system and may cause engine knocking or
serious engine damage. Ford Motor
Company/Ford of Canada is not
responsible for any damage caused by use
of improper fuel. Using leaded fuel may
also result in difficulty importing your
vehicle back into the U.S.
If your vehicle must be serviced while you
are traveling or living in Asia-Pacific Region,
Sub-Saharan Africa, U.S. Virgin Islands,
Central America, the Caribbean, and Israel,
contact the nearest authorized dealer. If
the authorized dealer cannot help you,
contact:
FORD MOTOR COMPANY
FORD EXPORT OPERATIONS & GLOBAL
INITIATIVES
1555 Fairlane Drive
Fairlane Business Park #3
Allen Park, Michigan 48101
U.S.A.
Telephone: (313) 594-4857
For customers in Guam, the
Commonwealth of the Northern Mariana
Islands (CNMI), America Samoa, and the
U.S. Virgin Islands, please feel free to call
our Toll-Free Number: (800) 841-FORD
(3673).
FAX: (313) 390-0804
Email: [email protected]
If your vehicle must be serviced while you
are traveling or living in Puerto Rico,
contact the nearest authorized dealer. If
the authorized dealer cannot help you,
contact:
204
Customer Assistance
Page 208 of 423
FUSE SPECIFICATION CHART
Pre-Fuse Box
Your vehicle is equipped with a pre-fuse
box located in the engine compartment
attached to the positive battery post. This
box contains several high current fuses. If
replacement of these high current fuses is
required, see your authorized dealer.
Power Distribution Box
WARNINGS
Always disconnect the battery before
servicing high current fuses.
WARNINGS
To reduce risk of electrical shock,
always replace the cover to the
power distribution box before
reconnecting the battery or refilling fluid
reservoirs.
The power distribution box is located in
the engine compartment. It has
high-current fuses that protect your
vehicle's main electrical systems from
overloads.
If the battery has been disconnected and
reconnected, some features will need to
be reset. See Changing the Vehicle
Battery (page 226).
Lift the release lever at the rear of the cover
to remove it. The high-current fuses are coded as
follows:
208
Fuses
E129925
Page 210 of 423
Protected Components
Fuse Amp Rating
Fuse/Relay Number
Power exterior mirror (without door control
unit)
10A*
F25
Keep-alive power
5A*
F26
A/C clutch
15A*
F27
Vehicle power - fuel injector
10A*
F28
Rear window defroster
25A*
F29
Not used
-
F30
Power transfer unit oil cooling fan (Middle
East specification)
5A*
F31
Vehicle power
15A*
F32
Vehicle power 2
10A*
F33
Vehicle power 3
10A*
F34
Vehicle power 4
15A*
F35
Active grill shutters
5A*
F36
Occupant classification sensor / Passenger
airbag deactivation indicator feed
10A*
F37
Engine control module / Transmission
control module ignition feed
5A*
F38
Daytime running lamps / Headlamp control
module ignition feed
5A*
F39
Electronic power assist steering 15 feed
5A*
F40
Body control module 15 feed
20A*
F41
Rear wiper
15A*
F42
Headlamp control module supply
15A*
F43
Front fog daytime running lamps
15A*
F44
Not used
-
F45
Smart wiper motor modules
50A**
F46
Not used
-
F47
Keypad
5A*
F48
210
Fuses
Page 211 of 423
Protected Components
Fuse Amp Rating
Fuse/Relay Number
Not used
-
R1
Horn
Micro relay
R2
Power transfer unit oil cooling fan (Middle
East specification)
-
R3
Front fog daytime running lamps
-
R4
Not used
-
R5
Not used
-
R6
Not used
-
R7
Delayed accessory relay
Mini relay
R8
Not used
-
R9
Starter relay
Mini relay
R10
A/C clutch
Micro relay
R11
Cooling fan
Power relay
R12
Heater blower
Mini relay
R13
Engine control relay
Mini relay
R14
Heated rear window
Power relay
R15
Ignition 15
Power relay
R16
*Mini fuses **Cartridge fuses
Passenger Compartment Fuse
Panel
The fuse panel is located on the right side
below the glove box.
211
Fuses
Page 217 of 423

GENERAL INFORMATION
Have your vehicle serviced regularly to help
maintain its roadworthiness and resale
value. There is a large network of Ford
authorized dealers that are there to help
you with their professional servicing
expertise. We believe that their specially
trained technicians are best qualified to
service your vehicle properly and expertly.
They are supported by a wide range of
highly specialized tools developed
specifically for servicing your vehicle.
To help you service your vehicle, we
provide scheduled maintenance
information which makes tracking routine
service easy. See Scheduled
Maintenance (page 396).
If your vehicle requires professional service,
your authorized dealer can provide the
necessary parts and service. Check your
Warranty Guide to find out which parts and
services are covered.
Use only recommended fuels, lubricants,
fluids and service parts conforming to
specifications. Motorcraft® parts are
designed and built to provide the best
performance in your vehicle.
Precautions
•Do not work on a hot engine.
• Make sure that nothing gets caught in
moving parts.
• Do not work on a vehicle with the
engine running in an enclosed space,
unless you are sure you have enough
ventilation.
• Keep all open flames and other burning
material (such as cigarettes) away
from the battery and all fuel related
parts. Working with the Engine Off
1. Set the parking brake and shift to P
(Park).
2. Turn off the engine and remove the key
(if equipped).
3. Block the wheels.
Working with the Engine On
WARNING
To reduce the risk of vehicle damage
and/or personal burn injuries, do not
start your engine with the air cleaner
removed and do not remove it while the
engine is running.
1. Set the parking brake and shift to P (Park).
2. Block the wheels
OPENING AND CLOSING THE
HOOD
1. Inside the vehicle, pull the hood release
handle located under the instrument
panel.
217
Maintenance
E142457
Page 218 of 423
2. Go to the front of the vehicle andlocate the auxiliary latch located under
the front of the hood (left of center)
and then release it by pushing the
auxiliary latch to the right.
3. Open the hood and support it with the
prop rod.
To close the hood, lower the hood and
allow it to drop from under its own weight
for the last 8-11 inches (20-30
centimeters).
Note: Make sure that the hood is closed
properly.
UNDER HOOD OVERVIEW - 1.6L ECOBOOST®
Engine coolant reservoir
A
Engine oil filler cap
B
218
Maintenance
E142458
AB C D E
F
G
HE142459