2013 FIAT FREEMONT ECO mode
[x] Cancel search: ECO modePage 153 of 352

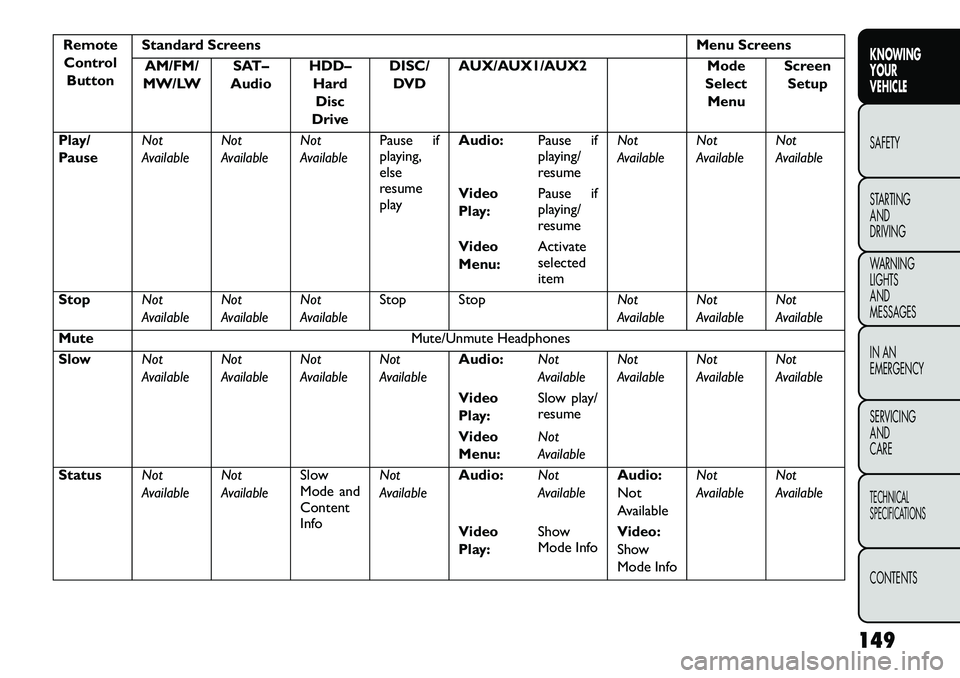
RemoteControl Button Standard Screens
Menu Screens
AM/FM/
MW/LW SAT–
Audio HDD–
HardDisc
Drive DISC/
DVD AUX/AUX1/AUX2
Mode
Select Menu Screen
Setup
Right
Arrow FF Tune Up* Next
Channel*Next
ChannelFast
ForwardAudio:
Fast
ForwardNot
AvailableSelection
Right
Selection
Right
Video
Play: Fast
Forward
Video
Menu: Selection
Right
Left
Arrow
RW Tune
Down*
Previous
Channel*Previous
ChannelFast
RewindAudio:
Fast
RewindNot
AvailableSelection
Left
Selection
Left
Video
Play: Fast
Rewind
Video
Menu: Selection
Left
Enter Show
Numeric
Entry
Menu*Show
Numeric
Entry
Menu*Not
Available
Show
Numeric
Entry
MenuAudio:
Show
Numeric
EntryNot
Available
Activate
Selected
ItemNot
Available
Video
Play: Not
Available
Video
Menu: Activate
Selected
Item
147
KNOWING
YOUR
VEHICLE
SAFETY
STARTING
AND
DRIVING
WARNING
LIGHTS
AND
MESSAGES
IN AN
EMERGENCY
SERVICING
AND
CARETECHNICAL
SPECIFICATIONSCONTENTS
Page 154 of 352

RemoteControl Button Standard Screens
Menu Screens
AM/FM/
MW/LW SAT–
Audio HDD–
HardDisc
Drive DISC/
DVD AUX/AUX1/AUX2
Mode
Select Menu Screen
Setup
Back Not
AvailableNot
AvailableNot
AvailableNot
AvailableAudio:
Not
AvailableNot
AvailableReturn to
Std
ScreenReturn to
Std Screen
Video
Play: Not
Available
Video
Menu: Previous
Menu
Setup Not
AvailableNot
AvailableShow/
Hide
Display
Settings
MenuNot
Available
Audio:
Not
AvailableAudio:
Not
AvailableNot
Available
Return to
Std Screen
Video
Play: Show/
Hide
SettingsVideo:Show/Hide
Display
Settings
Menu
Menu Not
AvailableNot
AvailableShow
Channel
Select
MenuShow
Disc
Options
MenuAudio:
Disc
Options
MenuNot
Available
Not
AvailableNot
Available
Video
Play: Show
Disc
Menu
148
KNOWING YOUR
VEHICLE
SAFETY
S
TARTING AND
DRIVING
WARNING LIGHTSAND
MESSAGES
IN AN
EMERGENCY
SERVICING AND
CARETECHNICAL
SPECIFICATIONSCONTENTS
Page 155 of 352

RemoteControl Button Standard Screens
Menu Screens
AM/FM/
MW/LW SAT–
Audio HDD–
HardDisc
Drive DISC/
DVD AUX/AUX1/AUX2
Mode
Select Menu Screen
Setup
Play/
Pause Not
AvailableNot
AvailableNot
AvailablePause if
playing,
else
resume
playAudio:
Pause if
playing/
resumeNot
Available
Not
AvailableNot
Available
Video
Play: Pause if
playing/
resume
Video
Menu: Activate
selected
item
Stop Not
AvailableNot
AvailableNot
AvailableStop Stop
Not
AvailableNot
AvailableNot
Available
Mute Mute/Unmute Headphones
Slow Not
AvailableNot
AvailableNot
AvailableNot
AvailableAudio:
Not
AvailableNot
AvailableNot
AvailableNot
Available
Video
Play: Slow play/
resume
Video
Menu: Not
Available
Status Not
AvailableNot
AvailableSlow
Mode and
Content
InfoNot
Available
Audio:
Not
AvailableAudio:
Not
AvailableNot
Available
Not
Available
Video
Play: Show
Mode Info
Video:
Show
Mode Info
149
KNOWING
YOUR
VEHICLE
SAFETY
STARTING
AND
DRIVING
WARNING
LIGHTS
AND
MESSAGES
IN AN
EMERGENCY
SERVICING
AND
CARETECHNICAL
SPECIFICATIONSCONTENTS
Page 156 of 352

RemoteControl Button Standard Screens
Menu Screens
AM/FM/
MW/LW SAT–
Audio HDD–
HardDisc
Drive DISC/
DVD AUX/AUX1/AUX2
Mode
Select Menu Screen
Setup
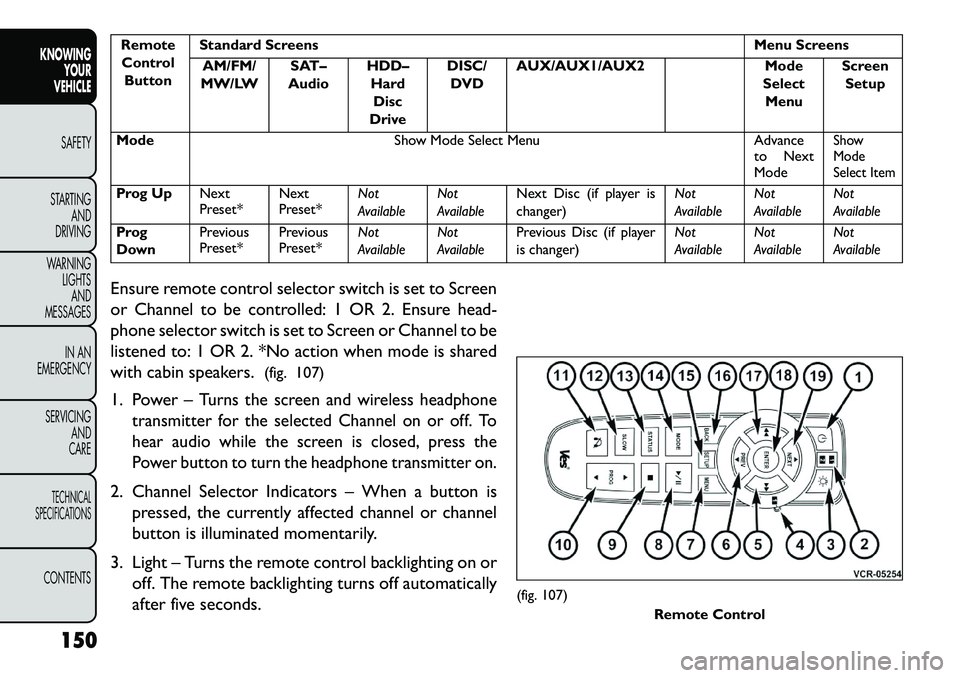
Mode Show Mode Select Menu Advance
to Next
Mode
Show
Mode
Select Item
Prog Up Next
Preset*Next
Preset*Not
AvailableNot
AvailableNext Disc (if player is
changer) Not
AvailableNot
AvailableNot
Available
Prog
Down Previous
Preset*
Previous
Preset*Not
AvailableNot
AvailablePrevious Disc (if player
is changer) Not
AvailableNot
AvailableNot
Available
Ensure remote control selector switch is set to Screen
or Channel to be controlled: 1 OR 2. Ensure head-
phone selector switch is set to Screen or Channel to be
listened to: 1 OR 2. *No action when mode is shared
with cabin speakers. (fig. 107)
1. Power –
Turns the screen and wireless headphone
transmitter for the selected Channel on or off. To
hear audio while the screen is closed, press the
Power button to turn the headphone transmitter on.
2. Channel Selector Indicators – When a button is
pressed, the currently affected channel or channel
button is illuminated momentarily.
3. Light – Turns the remote control backlighting on or off. The remote backlighting turns off automatically
after five seconds.
(fig. 107) Remote Control
150
KNOWING YOUR
VEHICLE
SAFETY
S
TARTING AND
DRIVING
WARNING LIGHTSAND
MESSAGES
IN AN
EMERGENCY
SERVICING AND
CARETECHNICAL
SPECIFICATIONSCONTENTS
Page 161 of 352

wear over time through normal use, are specifically not
covered (replacement foam is available for a nominal
charge). UNWIRED TECHNOLOGY IS NOT LIABLE
FOR ANY INJURIES OR DAMAGES TO PERSONS
OR PROPERTY RESULTING FROM THE USE OF, OR
ANY FAILURE OR DEFECT IN, THE PRODUCT,
NOR IS UNWIRED LIABLE FOR ANY GENERAL,
SPECIAL, DIRECT, INDIRECT, INCIDENTAL, CON-
SEQUENTIAL, EXEMPLARY, PUNITIVE OR OTHER
DAMAGES OF ANY KIND OR NATURE WHATSO-
EVER. Some states and jurisdictions may not allow the
exclusion or limitation of incidental or consequential
damages, so the above limitation may not apply to you.
This warranty gives you specific legal rights. You may
also have other rights, which vary from jurisdiction to
jurisdiction.
What Will Unwired
®Do?Unwired
®, at its option,
will repair or replace any defective Product. Unwired
®
reserves the right to replace any discontinued Product
with a comparable model. THIS WARRANTY IS THE
SOLE WARRANTY FOR THIS PRODUCT, SETS
FORTH YOUR EXCLUSIVE REMEDY REGARDING
DEFECTIVE PRODUCTS, AND IS IN LIEU OF ALL
OTHER WARRANTIES (EXPRESS OR IMPLIED), IN-
CLUDING ANY WARRANTY OR MERCHANTABIL-
ITY OR FITNESS FOR A PARTICULAR PURPOSE. Video Screen Operation
Displaying Video
The video screen has two different operating modes, a
video mode (when displaying video such as DVD video,
Aux video, etc.) and an information mode. Because the
VES™ is a dual channel system, Information Mode is
displayed in a split screen format. When in Information
Mode, the left side of the screen is referred to as
Channel 1 and the right side of the screen is referred to
as Channel 2.
Only Channel 1 displays video images. When in video
mode the image is displayed on the full screen, however
Channel 2’s functionality is still available. A popup
banner at the bottom of the screen is displayed mo-
mentarily over the video image. While in video mode
and Channel 2 is selected on the remote control
selector switch, the first remote control key press will
activate the popup banner indicating Channel 2’s sta-
tus. While the banner is still visible, any subsequent
remote control key press for Channel 2 shall initiate
the requested remote control command. (fig. 110)
In a two-screen system, the video for Channel 1 is
displayed on the first rear seat screen and the video for
Channel 2 is displayed on the second rear seat screen.
Information Mode is displayed in split screen, the left
side of the screen (Channel 1) shows the status/mode
of the first rear seat screen and the right side of the
155
KNOWING
YOUR
VEHICLE
SAFETY
S
TARTING
AND
DRIVING
WARNING
LIGHTS
AND
MESSAGES
IN AN
EMERGENCY
SERVICING
AND
CARETECHNICAL
SPECIFICATIONSCONTENTS
Page 162 of 352

screen (Channel 2) shows the status/mode of the
second rear seat screen.
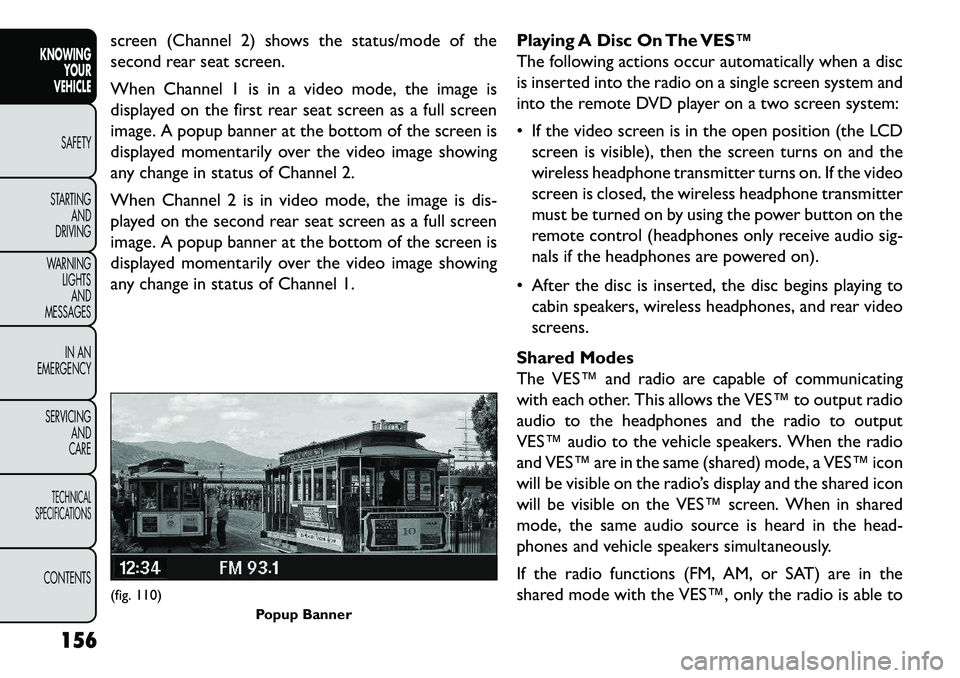
When Channel 1 is in a video mode, the image is
displayed on the first rear seat screen as a full screen
image. A popup banner at the bottom of the screen is
displayed momentarily over the video image showing
any change in status of Channel 2.
When Channel 2 is in video mode, the image is dis-
played on the second rear seat screen as a full screen
image. A popup banner at the bottom of the screen is
displayed momentarily over the video image showing
any change in status of Channel 1.Playing A Disc On The VES™
The following actions occur automatically when a disc
is inserted into the radio on a single screen system and
into the remote DVD player on a two screen system:
If the video screen is in the open position (the LCD
screen is visible), then the screen turns on and the
wireless headphone transmitter turns on. If the video
screen is closed, the wireless headphone transmitter
must be turned on by using the power button on the
remote control (headphones only receive audio sig-
nals if the headphones are powered on).
After the disc is inserted, the disc begins playing to cabin speakers, wireless headphones, and rear video
screens.
Shared Modes
The VES™ and radio are capable of communicating
with each other. This allows the VES™ to output radio
audio to the headphones and the radio to output
VES™ audio to the vehicle speakers. When the radio
and VES™ are in the same (shared) mode, a VES™ icon
will be visible on the radio’s display and the shared icon
will be visible on the VES™ screen. When in shared
mode, the same audio source is heard in the head-
phones and vehicle speakers simultaneously.
If the radio functions (FM, AM, or SAT) are in the
shared mode with the VES™, only the radio is able to(fig. 110) Popup Banner
156
KNOWING YOUR
VEHICLE
SAFETY
S
TARTING AND
DRIVING
WARNING LIGHTSAND
MESSAGES
IN AN
EMERGENCY
SERVICING AND
CARETECHNICAL
SPECIFICATIONSCONTENTS
Page 204 of 352

SAFETY TIPS
TRANSPORTING PASSENGERS
NEVER TRANSPORT PASSENGERS IN THE CARGO
AREA.
WARNING!
Do
not leave children or animals in-
side parked vehicles in hot weather. In-
terior heat build-up may cause serious injury or
death.
It is extremely dangerous to ride in a cargo
area, inside or outside of a vehicle. In a collision,
people riding in these areas are more likely to be
seriously injured or killed.
Do not allow people to ride in any area of your
vehicle that is not equipped with seats and seat
belts.
Be sure everyone in your vehicle is in a seat
and using a seat belt properly.
(Continued)(Continued)
On seven passenger models, do not drive the
vehicle with the second row passenger seat in the
easy entry/exit position (seat cushion flipped up-
ward and seat moved forward), as this position is
only intended for entering and exiting the third
row seats. Failure to follow this warning may
result in personal injury.
On seven passenger models, do not allow a
passenger to sit in a third row seat with the
second row seatback(s) folded flat . In a collision,
the passenger could slide underneath the seat
belt and be seriously or even fatally injured.
198
KNOWING YOUR
VEHICLE
SAFETY
STARTING AND
DRIVING
W
ARNING LIGHTS AND
MESSAGES
IN AN
EMERGENCY
SERVICING AND
CARETECHNICAL
SPECIFICATIONSCONTENTS
Page 205 of 352

EXHAUST GAS
WARNING!
Exhaust gases can injure or kill. They
c
ontain carbon monoxide (CO), which is
colorless and odorless. Breathing it can make you
unconscious and can eventually poison you. To
avoid breathing (CO), follow these safety tips:
Do not run the engine in a closed garage or in
confined areas any longer than needed to move your
vehicle in or out of the area.
If you are required to drive with the trunk/
liftgate open, make sure that all windows are
closed and the climate control BLOWER switch is
set at high speed. DO NOT use the recirculation
mode.
If it is necessary to sit in a parked vehicle with
the engine running, adjust your heating or cooling
controls to force outside air into the vehicle. Set
the blower at high speed.
The best protection against carbon monoxide entry
into the vehicle body is a properly maintained engine
exhaust system.
Whenever a change is noticed in the sound of the
exhaust system, when exhaust fumes can be detected
inside the vehicle, or when the underside or rear of the
vehicle is damaged, have a competent mechanic inspect the complete exhaust system and adjacent body areas
for broken, damaged, deteriorated, or mispositioned
parts. Open seams or loose connections could permit
exhaust fumes to seep into the passenger compart-
ment. In addition, inspect the exhaust system each time
the vehicle is raised for lubrication or oil change.
Replace as required.
SAFETY CHECKS YOU SHOULD MAKE
INSIDE THE VEHICLE
Seat Belts
Inspect the seat belt system periodically, checking for
cuts, frays, and loose parts. Damaged parts must be
replaced immediately. Do not disassemble or modify
the system.
Front seat belt assemblies must be replaced after a
collision. Rear seat belt assemblies must be replaced
after a collision if they have been damaged (i.e., bent
retractor, torn webbing, etc.). If there is any question
regarding belt or retractor condition, replace the seat
belt.
Air Bag Warning Light
The light should turn on and remain on for
four to six seconds as a bulb check when the
ignition switch is first turned ON. If the light
is not lit during starting, or if the light stays
199KNOWING
YOUR
VEHICLE
SAFETY
STARTING
AND
DRIVING
W
ARNING
LIGHTS
AND
MESSAGES
IN AN
EMERGENCY
SERVICING
AND
CARETECHNICAL
SPECIFICATIONSCONTENTS