Page 280 of 388
WARNING!
•Never have any smoking materials lit in or near the
vehicle when the gas cap is removed or the tank is
being filled.
•Never add fuel when the engine is running. It may
cause the MIL to turn on and could cause a fire.
•A fire may result if gasoline is pumped into a
portable container that is inside of a vehicle. You
could be burned. Always place gas containers on
the ground while filling.
NOTE:
•When the fuel nozzle “clicks” or shuts off, the fuel tank
is full.
•Tighten the gas cap about 1/4 turn until you hear one
click. This is an indication that the cap is properly
tightened.
•If the gas cap is not tightened properly, the MIL will
come on. Be sure the gas cap is tightened every time
the vehicle is refueled.
Loose Fuel Filler Cap Message
After fuel has been added, the vehicle diagnostic system
can determine if the fuel filler cap is possibly loose,
improperly installed, or damaged. If the system detects a
malfunction, the “gASCAP” message will display in the
odometer display. Tighten the gas cap until a#clicking#
sound is heard. This is an indication that the gas cap is
properly tightened. Press the odometer reset button to
turn the message off. If the problem persists, the message
will appear the next time the vehicle is started. This
might indicate a damaged cap. If the problem is detected
twice in a row, the system will turn on the MIL. Resolving
the problem will turn the MIL off.
TRAILER TOWING
Trailer towing with this vehicle is not recommended.
278 STARTING AND OPERATING
Page 281 of 388
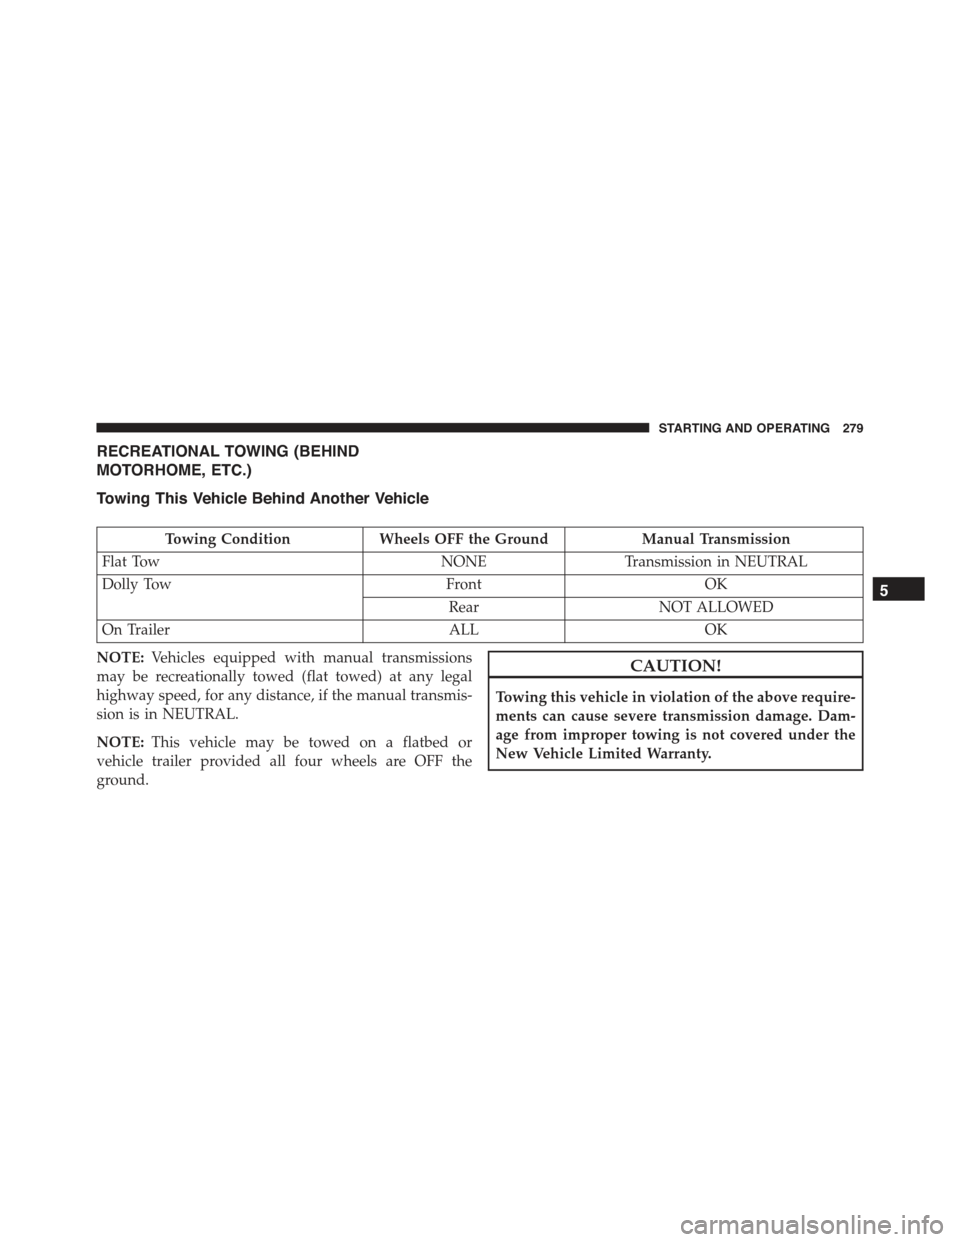
RECREATIONAL TOWING (BEHIND
MOTORHOME, ETC.)
Towing This Vehicle Behind Another Vehicle
Towing ConditionWheels OFF the GroundManual Transmission
Flat TowNONETransmission in NEUTRAL
Dolly TowFrontOK
RearNOT ALLOWED
On TrailerALLOK
NOTE:Vehicles equipped with manual transmissions
may be recreationally towed (flat towed) at any legal
highway speed, for any distance, if the manual transmis-
sion is in NEUTRAL.
NOTE:This vehicle may be towed on a flatbed or
vehicle trailer provided all four wheels are OFF the
ground.
CAUTION!
Towing this vehicle in violation of the above require-
ments can cause severe transmission damage. Dam-
age from improper towing is not covered under the
New Vehicle Limited Warranty.
5
STARTING AND OPERATING 279
Page 283 of 388
WHAT TO DO IN EMERGENCIES
CONTENTS
!HAZARD WARNING FLASHERS...........282
!IF YOUR ENGINE OVERHEATS............282
!TIREFIT KIT — IF EQUIPPED.............283
▫TIREFIT Storage......................284
▫TIREFIT Kit Components And Operation.....284
▫TIREFIT Usage Precautions...............285
▫Sealing A Tire With TIREFIT..............287
!JACKING AND TIRE CHANGING — IF
EQUIPPED...........................293
▫Jack Location........................294
▫Preparations For Jacking................294
▫Jacking Instructions...................295
!JUMP-STARTING PROCEDURE............299
▫Preparations For Jump-Start..............300
▫Jump-Starting Procedure................302
!FREEING A STUCK VEHICLE.............304
!TOWING A DISABLED VEHICLE...........305
▫Manual Transmission...................306
6
Page 288 of 388
Air Mode when inflating such items to avoid injecting
sealant into them. The TIREFIT Sealant is only in-
tended to seal punctures less than¼in (6 mm)
diameter in the tread of your vehicle.
•Do not lift or carry the TIREFIT kit by the hoses.
WARNING!
•Do not attempt to seal a tire on the side of the
vehicle closest to traffic. Pull far enough off the
road to avoid the danger of being hit when using
the TIREFIT kit.
•Do not use TIREFIT or drive the vehicle under the
following circumstances:
– If the puncture in the tire tread is approximately
1/4 in. (6 mm) or larger.
– If the tire has any sidewall damage.
(Continued)
WARNING!(Continued)
– If the tire has any damage from driving with
extremely low tire pressure.
– If the tire has any damage from driving on a flat
tire.
– If the wheel has any damage.
– If you are unsure of the condition of the tire or
the wheel.
•Keep TIREFIT away from open flames or heat
source.
•A loose TIREFIT kit thrown forward in a collision
or hard stop could endanger the occupants of the
vehicle. Always stow the TIREFIT kit in the place
provided. Failure to follow these warnings can
result in injuries that are serious or fatal to you,
your passengers, and others around you.
(Continued)
286 WHAT TO DO IN EMERGENCIES
Page 296 of 388
Jack Location
The jack and jack wrench tool are stowed in a bag under
the front driver ’s seat.
Preparations For Jacking
1. Park the vehicle on a firm level surface, avoiding ice or
slippery areas.
WARNING!
Do not attempt to change a tire on the side of the
vehicle close to moving traffic, pull far enough off
the road to avoid the danger of being hit when
operating the jack or changing the wheel.
2. Turn on the Hazard Warning flashers.
3. Set the parking brake.
4. Place the shift lever in REVERSE.
Jack And Jack-Handle Location
294 WHAT TO DO IN EMERGENCIES
Page 298 of 388
WARNING!(Continued)
•Do not let anyone sit in the vehicle when it is on a
jack.
•Do not get under the vehicle when it is on a jack. If
you need to get under a raised vehicle, take it to a
service center where it can be raised on a lift.
•Only use the jack in the positions indicated and for
lifting this vehicle during a tire change.
•If working on or near a roadway, be extremely
careful of motor traffic.
•To assure that spare tires, flat or inflated, are
securely stowed, spares must be stowed with the
valve stem facing the ground.
CAUTION!
Do not attempt to raise the vehicle by jacking on
locations other than those indicated in the Jacking
Instructions for this vehicle.
1. Remove the scissors jack and tool bag from under the
driver’s seat.
Jack Warning Label
296 WHAT TO DO IN EMERGENCIES
Page 301 of 388
WARNING!
To avoid the risk of forcing the vehicle off the jack,
do not fully tighten the wheel bolts until the vehicle
has been lowered. Failure to follow this warning may
result in personal injury.
6. Install the wheel and wheel bolts with the cone shaped
end of the bolts toward the wheel. Lightly tighten the
bolts. To avoid the risk of forcing the vehicle off the
jack, do not tighten the bolts fully until the vehicle has
been lowered.
7. Lower the vehicle by turning the jack screw to the left.
8. Finish tightening the bolts. Push down on the wrench
while tightening the wheel bolts. Alternate bolts until
each bolt has been tightened twice. The correct wheel
bolt torque is 63 ft lbs (85 N·m) for steel wheels and
75 ft lbs (100 N·m) for aluminum wheels. If you doubt
that you have tightened the bolts correctly, have them
checked with a torque wrench by your authorized
studio or service station.
9. Disassemble the jack and tools and place them in the
bag. Stow it under the driver’s seat and secure the bag
to the floor with the straps attached to the floor of the
vehicle.
10. Check the tire pressure as soon as possible. Correct
the tire pressure as required.
JUMP-STARTING PROCEDURE
If your vehicle has a discharged battery, it can be jump-
started using a set of jumper cables and a battery in
another vehicle or by using a portable battery booster
pack. Jump-starting can be dangerous if done improperly
so please follow the procedures in this section carefully.
6
WHAT TO DO IN EMERGENCIES 299
Page 307 of 388
WARNING!
Fast spinning tires can be dangerous. Forces gener-
ated by excessive wheel speeds may cause damage, or
even failure, of the axle and tires. A tire could
explode and injure someone. Do not spin your vehi-
cle’s wheels faster than 30 mph (48 km/h) or for
longer than 30 seconds continuously without stop-
ping when you are stuck and do not let anyone near
a spinning wheel, no matter what the speed.
TOWING A DISABLED VEHICLE
This section describes procedures for towing a disabled
vehicle using a commercial wrecker service.
Towing ConditionWheels OFF The Ground MANUAL TRANSMISSION
Flat TowNONEIf transmission is operable:
•Transmission inNEUTRAL
•65 mph (104 km/h)maxspeedWheel LiftRear
FrontOK
FlatbedALLBEST METHOD
6
WHAT TO DO IN EMERGENCIES 305