Page 165 of 388
Trip Functions
Both trip functions are resettable (reset — start of new
trip).
“Trip A” can be used to display the figures relating to:
•Range
•Trip distance A
•Average consumption A
•Instantaneous consumption
•Average speed A
•Travel time A (driving time).
“Trip B” can be used to display the figures relating to:
•Trip distance B
•Average consumption B
•Average speed B
•Travel time B (driving time).
NOTE:“Trip B” functions may be excluded (see “Trip B
Data”). “Range” and “Instantaneous consumption” can-
not be reset.
Values Displayed
Range
This indicates the distance which may be traveled with
the fuel remaining in the tank, assuming that driving
conditions will not change. The message “----” will
appear on the display in the following cases:
•Distance less than 30 miles (or 50 km).
•The vehicle is parked for a long time with the engine
running.
4
UNDERSTANDING YOUR INSTRUMENT PANEL 163
Page 166 of 388
NOTE:The range depends on several factors: driving
style, type of route (freeway, residential, mountain roads,
etc.), conditions of use of the car (load, tire pressure, etc.).
Trip planning must take into account the above notes.
Distance Traveled
This value shows the distance covered since the last reset.
Average Consumption
This value shows the approximate average consumption
since the last reset.
Instant Consumption
This indicates the fuel consumption. The value is con-
stantly updated. The message “----” will appear on the
display if the car is parked with the engine running.
Average Speed
This value shows the vehicle’s average speed as a func-
tion of the overall time elapsed since the last reset.
Travel Time
This value shows the time elapsed since the last reset.
Personal Settings (Customer-Programmable
Features)
Dimmer
The EVIC display is provided with a light sensor capable
of detecting environmental light conditions and adjust-
ing the brightness of the instruments accordingly.
NOTE:The brightness of the instrument panel may
change while travelling following an event that causes
switching from “day” to “night” conditions (or vice
versa) in the passenger compartment (e.g. in a tunnel, on
avenues in shadows, under bridges, etc.).
To adjust the brightness, proceed as follows:
1. Press the UPor DOWNbutton to set the
required brightness level.
164 UNDERSTANDING YOUR INSTRUMENT PANEL
Page 172 of 388
Units (Set Units)
This function may be used to set the measurement unit in
three submenus: “Distance,” “Temperature” and “Fuel
Economy.”
To set the required unit, proceed as follows:
1. Briefly press theSET ESCbutton to display the three
sub-menus.
2. Press the UPor DOWNbutton to navigate
the three sub-menus.
3. Select the required sub-menu and then briefly press
theSET ESCbutton.
4. When accessing the “Distance” submenu: briefly press
theSET ESCbutton. Either “mi” or “km” will appear
on the display (according to the previous setting).
5. Press the UPor DOWNbutton for setting.
6. Briefly press theSET ESCbutton to return to the
sub-menu.
7. When accessing the “Fuel Economy” submenu, briefly
press theSET ESCbutton. Either “mpg,” “km/l ” or
“l/100km” will appear on the display (according to
the previous setting).
If the distance unit set is “mi,” the fuel economy unit will
be displayed in “mpg.”
If the distance unit set is “km,” the fuel economy unit will
be displayed in either km/l or l/100km.
1. Press the UPor DOWNbutton for setting.
2. Briefly press theSET ESCbutton to return to the
sub-menu.
170 UNDERSTANDING YOUR INSTRUMENT PANEL
Page 210 of 388
require extra heat to the windshield. This setting is
good for maintaining comfort while reducing mois-
ture on the windshield.
•Defrost
Air is directed through the windshield and side
window demister outlets. Use this mode with
maximum blower and temperature settings for best
windshield and side window defrosting.
NOTE:The air conditioning compressor operates in Mix
or Defrost, even if the Air Conditioning (A/C) button is
not pressed. This dehumidifies the air to help dry the
windshield. To improve fuel economy, use these modes
only when necessary.
5. A/C Button
Press this button to engage the Air Conditioning. A light
will illuminate when the Air Conditioning system is
engaged.
MAX A/C
For maximum cooling, use the A/C and recirculation
modes at the same time.
ECONOMY MODE
If economy mode is desired, press the A/C button to turn
OFF the indicator light and the A/C compressor. Then,
move the temperature control to the desired temperature.
208 UNDERSTANDING YOUR INSTRUMENT PANEL
Page 225 of 388
▫Tire Spinning........................261
▫Tread Wear Indicators..................261
▫Life Of Tire.........................262
▫Replacement Tires.....................263
!TIRE CHAINS (TRACTION DEVICES).......265
!TIRE ROTATION RECOMMENDATIONS.....265
!TIRE PRESSURE MONITORING SYSTEM
(TPMS)..............................266
▫Base System.........................269
▫General Information...................271
!FUEL REQUIREMENTS..................272
▫Reformulated Gasoline.................272
▫Gasoline/Oxygenate Blends..............273
▫E-85 Usage In Non-Flex Fuel Vehicles.......273
▫MMT In Gasoline.....................274
▫Materials Added To Fuel................274
▫Fuel System Cautions...................275
▫Carbon Monoxide Warnings.............276
!ADDING FUEL........................277
▫Fuel Filler Cap (Gas Cap)...............277
▫Loose Fuel Filler Cap Message............278
!TRAILER TOWING.....................278
!RECREATIONAL TOWING (BEHIND
MOTORHOME, ETC.)...................279
▫Towing This Vehicle Behind Another Vehicle . .279
5
STARTING AND OPERATING 223
Page 228 of 388
3. If the engine fails to start within 10 seconds, turn the
ignition switch to the STOP (OFF/LOCK) position,
wait 5 seconds to allow the starter to cool, then repeat
the “Extended Park Starting” procedure.
4. If the engine fails to start after 8 attempts, allow the
starter to cool for at least 60 seconds, then repeat the
procedure.
If Engine Fails To Start
WARNING!
Never pour fuel or other flammable liquid into the
throttle body air inlet opening in an attempt to start
the vehicle. This could result in flash fire causing
serious personal injury.
CAUTION!
•Do not attempt to push or tow your vehicle to get it
started. Unburned fuel could enter the catalytic
converter and once the engine has started, ignite
and damage the converter and vehicle.
•To prevent damage to the starter, do not continu-
ously crank the engine for more than 15 seconds at
a time. Wait 10 to 15 seconds before trying again.
After Starting
The idle speed will automatically decrease as the engine
warms up.
Turbocharger “Cool Down”
This vehicle is equipped with an after-run pump to cool
the turbocharger after the engine is shut off. Depending
on the type of driving and the amount of cargo, the pump
will run for up to 10 minutes after the engine has been
226 STARTING AND OPERATING
Page 230 of 388
Use each gear in numerical order; do not skip a gear. Be
sure the transmission is in first gear, not third, when
starting from a standing position. Damage to the clutch
can result from starting in third gear.
For most city driving, you will find it easier to use only
the lower gears. For steady highway driving with light
accelerations, fifth gear is recommended.
Never drive with your foot resting on the clutch pedal,
and never try to hold the vehicle on a hill with the clutch
pedal partially engaged. This will cause abnormal wear
on the clutch.
Never shift into REVERSE until the vehicle has come to a
complete stop.
NOTE:During cold weather, until the transmission lu-
bricant is warm, you may experience slightly higher shift
efforts. This is normal and not harmful to the transmis-
sion.
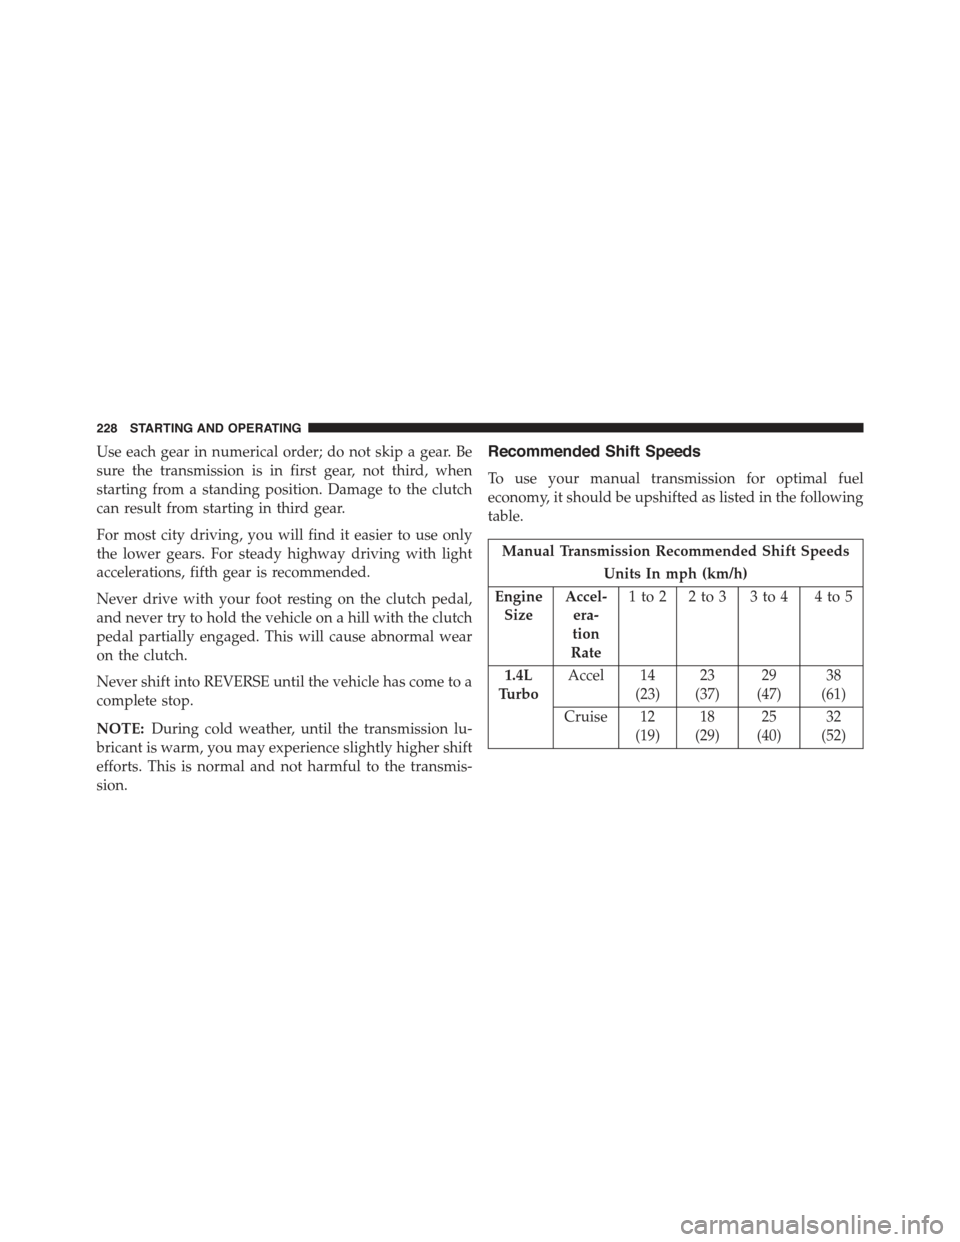
Recommended Shift Speeds
To use your manual transmission for optimal fuel
economy, it should be upshifted as listed in the following
table.
Manual Transmission Recommended Shift Speeds
Units In mph (km/h)
Engine
Size
Accel-
era-
tion
Rate
1to2 2to3 3to4 4to5
1.4L
Turbo
Accel 14
(23)
23
(37)
29
(47)
38
(61)
Cruise 12
(19)
18
(29)
25
(40)
32
(52)
228 STARTING AND OPERATING
Page 231 of 388

Downshifting
Proper downshifting will improve fuel economy and
prolong engine life.
CAUTION!
If you skip a gear while downshifting or downshift
at too high of a vehicle speed, these conditions may
cause the engine to overspeed if too low of a gear is
selected and the clutch pedal is released. Damage to
the clutch and the transmission can result from
skipping a gear while downshifting or downshifting
at too high of a vehicle speed even if the clutch pedal
is held pressed (i.e., not released).
To maintain a safe speed and prolong brake life, shift
down to second or first gear when descending a steep
grade.
When turning a corner or driving up a steep grade,
downshift early so that the engine will not be overbur-
dened.
DRIVING ON SLIPPERY SURFACES
Acceleration
Rapid acceleration on snow covered, wet, or other slip-
pery surfaces may cause the driving wheels to pull
erratically to the right or left. This phenomenon occurs
when there is a difference in the surface traction under
the front (driving) wheels.
WARNING!
Rapid acceleration on slippery surfaces is dangerous.
Unequal traction can cause sudden pulling of the
front wheels. You could lose control of the vehicle
(Continued)
5
STARTING AND OPERATING 229