2013 DODGE VIPER instrument cluster
[x] Cancel search: instrument clusterPage 3 of 100

INTRODUCTION/WELCOME
WELCOME FROM CHRYSLER
GROUP LLC..................2
CONTROLS AT A GLANCE
DRIVER COCKPIT ...............4
INSTRUMENT CLUSTER ...........6
GETTING STARTED
KEYFOB ....................8
ENGINE STARTING/STOPPING .......9
THEFT ALARM .................9
SEATBELT ...................10
SUPPLEMENTAL RESTRAINT
SYSTEM (SRS) — AIR BAGS ........10
CHILD RESTRAINTS .............11
FRONT SEATS ................14
ADJUSTABLE PEDALS ...........16
ADJUSTABLE FOOT REST ..........16
TILT / TELESCOPING STEERING
COLUMN ...................17
OPERATING YOUR VEHICLE
ENGINE BREAK-IN RECOMMENDATIONS —
SRT 10 VERSIONS .............18
TURN SIGNALS/WIPER/WASHER/HIGH
BEAMS LEVER ................19
HEADLIGHT SWITCH ............20
SPEED CONTROL ...............20
MANUAL TRANSMISSION 1 TO 4 SKIP
SHIFT .....................21
AUTOMATIC TEMPERATURE
CONTROL (ATC) ...............22
PARKVIEW
®REAR BACK-UP CAMERA . . 23
ELECTRONICS
YOUR VEHICLE'S SOUND SYSTEM ....24
IDENTIFYING YOUR RADIO .........26
Uconnect™ Access (Available on Uconnect™
8.4A and Uconnect™ 8.4AN) ........27
Uconnect™ 8.4A ...............30
Uconnect™ 8.4AN ..............43
STEERING WHEEL AUDIO CONTROLS . . 58
ELECTRONIC VEHICLE INFORMATION
CENTER (EVIC) ................58
PROGRAMMABLE FEATURES .......59
UNIVERSAL GARAGE DOOR OPENER
(HomeLink
®) .................61
POWER OUTLETS ..............63
UTILITY
TRAILER TOWING WEIGHTS
(MAXIMUM TRAILER WEIGHT
RATINGS)...................64
RECREATIONAL TOWING
(BEHIND MOTORHOME, ETC.) ......64
SRT
LAUNCH MODE................65
ELECTRONIC CONTROL DAMPING
SYSTEM ....................66
PERFORMANCE FEATURES ........67
SUMMER/THREE-SEASON TIRES .....67
WHAT TO DO IN EMERGENCIES
INSTRUMENT CLUSTER WARNING
LIGHTS....................68
IF YOUR ENGINE OVERHEATS .......71
TIREFIT KIT .................72
JUMP-STARTING ...............78
TOWING A DISABLED VEHICLE ......80
FREEING A STUCK VEHICLE ........80
EVENT DATA RECORDER (EDR) ......81
MAINTAINING YOUR VEHICLE
ENGINE COMPARTMENT..........82
FLUIDS AND CAPACITIES ..........83
MAINTENANCE CHART ...........84
SRT – MAINTENANCE RECORD ......85
FUSES .....................86
TIRE PRESSURES ..............89
WHEEL AND WHEEL TRIM CARE .....90
EXTERIOR BULBS ..............90
CONSUMER ASSISTANCE
CHRYSLER GROUP LLC
CUSTOMER CENTER ............91
CHRYSLER CANADA INC.
CUSTOMER CENTER ............91
ASSISTANCE FOR THE HEARING
IMPAIRED ...................91
PUBLICATIONS ORDERING ........91
REPORTING SAFETY DEFECTS IN
THE 50 UNITED STATES AND
WASHINGTON, D.C. .............92
MOPAR ACCESSORIES
AUTHENTIC ACCESSORIES
BY MOPAR®.................93
INDEX....................94
FAQ (How To?)
FREQUENTLY ASKED QUESTIONS ....96
TABLE OF CONTENTS
Page 8 of 100

INSTRUMENT CLUSTER
Warning Lights
- Low Fuel Warning Light
- Battery Charge Light**
- Oil Pressure Warning Light
- Anti-Lock Brake (ABS) Light**
- Air Bag Warning Light**
- Electronic Throttle Control (ETC) Light
- Tire Pressure Monitoring System (TPMS) Light
- Engine Temperature Warning Light
- Seat Belt Reminder Light
BRAKE- Brake Warning Light**
- Malfunction Indicator Light (MIL)**
- Electronic Stability Control (ESC) Activation/Malfunction Indicator Light*
(See page 68 for more information.)
CONTROLS AT A GLANCE
6
Page 9 of 100

Indicators
- Turn Signal Indicators
- High Beam Indicator
- Vehicle Security Indicator*
- Electronic Speed Control Set Indicator
- Electronic Stability Control (ESC) Off Indicator*
- Door Ajar Indicator***
- Trunk Ajar Indicator***
- Windshield Washer Fluid Low Indicator***
* If equipped
** Bulb Check with Ignition On
*** On vehicles equipped with a Premium Instrument Cluster, this display shows the
Electronic Vehicle Information Center (EVIC) messages when the appropriate conditions
exist.
CONTROLS AT A GLANCE
7
Page 22 of 100

HEADLIGHT SWITCH
Automatic Headlights/Parking Lights/Headlights
•Rotate the headlight switch, located on
the instrument panel to the left of the
steering wheel, to the first detent from the
off position for parking light
and to
the second detent for headlight
.
• Rotate the headlight switch to “AUTO” for AUTO headlights.
• When set to AUTO, the system automati- cally turns the headlights on or off based
on ambient light levels.
Instrument Panel Dimmer
• Rotate the dimmer control to the extreme bottom position to fully dim the instrument
panel lights and prevent the interior lights from illuminating when a door is opened.
• Rotate the dimmer control up to increase the brightness of the instrument panel when the parking lights or headlights are on.
• Rotate the dimmer control up to the next detent position to fully brighten the odometer and radio when the parking lights or headlights are on. Refer to your Uconnect™/Radio
User Manual on the DVD for display dimming.
•
Rotate the dimmer control up to the last detent position to turn on the interior lighting.
SPEED CONTROL
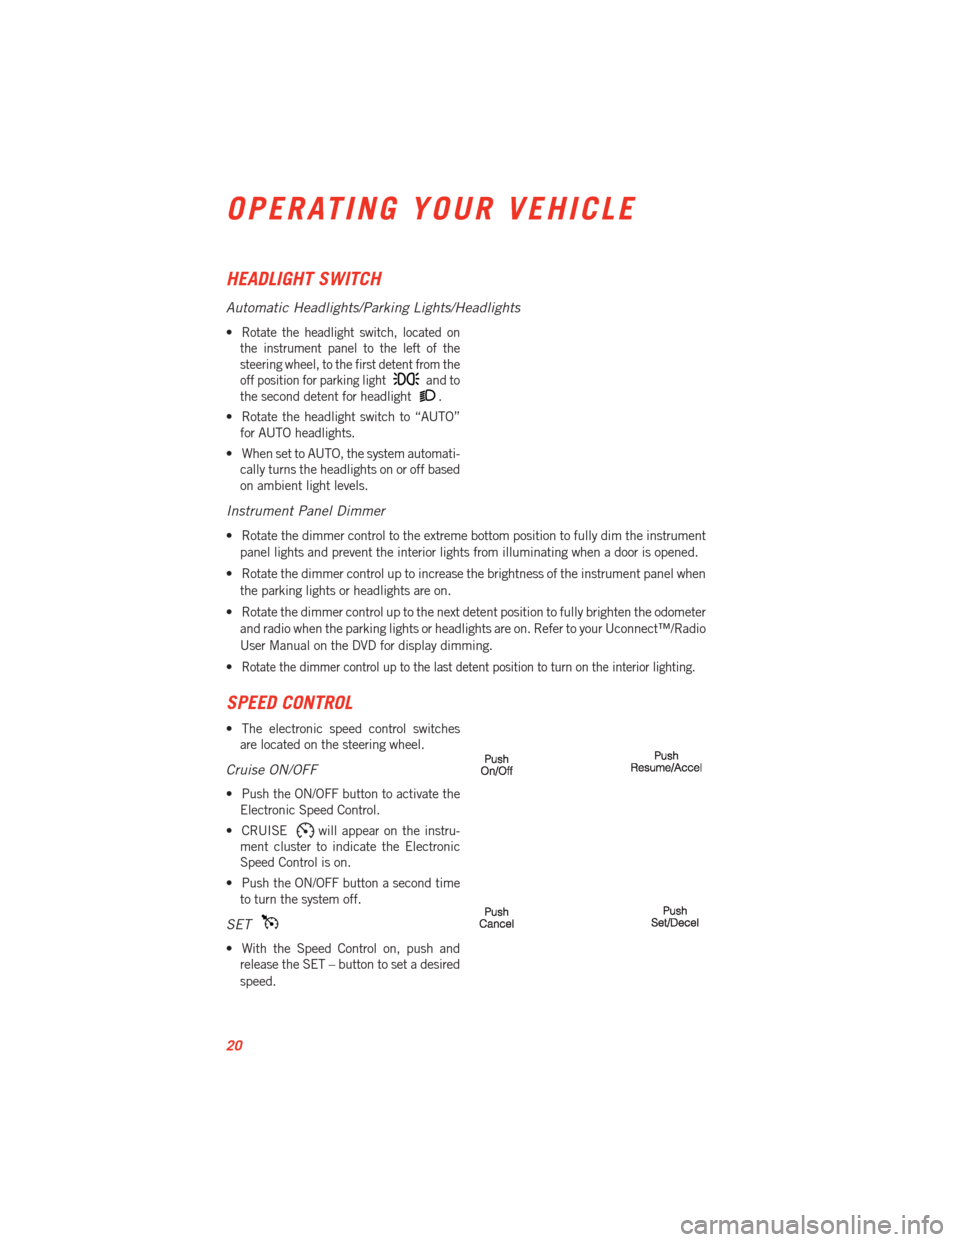
• The electronic speed control switches are located on the steering wheel.
Cruise ON/OFF
• Push the ON/OFF button to activate theElectronic Speed Control.
• CRUISE
will appear on the instru-
ment cluster to indicate the Electronic
Speed Control is on.
• Push the ON/OFF button a second time to turn the system off.
SET
• With the Speed Control on, push andrelease the SET – button to set a desired
speed.
OPERATING YOUR VEHICLE
20
Page 60 of 100

STEERING WHEEL AUDIO CONTROLS
• The steering wheel audio controls arelocated on the rear surface of the steering
wheel.
Right Switch
• Press the switch up or down to increase
or decrease the volume.
• Press the button in the center to change modes AM/FM/SAT.
Left Switch
• Press the switch up or down to search for
the next listenable station or select the next or previous track.
• Press the button in the center to select the next preset radio station.
ELECTRONIC VEHICLE INFORMATION CENTER (EVIC)
• The EVIC features a driver interactive display that is located in the instrument
cluster. Pressing the controls on the left
side of the steering wheel allows the
driver to select vehicle information and
Personal Settings. For additional infor-
mation, refer to Programmable Features
in this guide.
• Press and release the UP arrow
button to scroll upward through the main
menus (Fuel Economy, Trip A, Trip B,
Audio, Stored Messages, Screen Set Up)
and sub menus.
• Press and release the DOWN arrow
button to scroll downward through the main
menus and sub menus.
• Press and release the RIGHT arrow
button for access to main menus, sub menus
or to select a personal setting in the setup menu.
• Press the BACK/LEFT arrow
button to scroll back to a previous menu or sub menu.
Compass Calibration
• This compass is self-calibrating, which eliminates the need to set the compass manually. When the vehicle is new, the compass may appear erratic and the EVIC will
display “CAL” until the compass is calibrated.
• You may also calibrate the compass by completing one or more 360 degree turns (in an area free from large metal or metallic objects) until the “CAL” message displayed in the
EVIC turns off. The compass will now function normally.
ELECTRONICS
58
Page 68 of 100

ELECTRONIC CONTROL DAMPING SYSTEM
• This vehicle may be equipped with an electronic controlled dampening system. Thissystem reduces body roll and pitch in many driving situations including cornering,
acceleration and braking.
• This system allows for a street suspension damping setting or a firmer race suspension damping setting. There are two modes of operation:
STREET MODE
• This mode will give a sporty, but comfort-able ride. Within this mode, the suspen-
sion will adapt to the vehicle inputs,
including vehicle speed, braking and
acceleration.
• This mode is driver selectable when the vehicle is placed in STREET mode (press
the “STREET” button on the Instrument
Panel).
• This mode will set suspension for maxi- mum performance handling and is in-
tended for a smoother ride on the various
types of pavement and road conditions
while still providing damping levels ap-
propriate extreme capabilities.
RACE MODE
• Race mode is driver selectable when the vehicle is placed in RACE mode (press the“RACE” button on the Instrument Panel).
• This mode is for track use only and will supply maximum grip to the tires.
• When RACE mode is enabled, a Shock symbol with “RACE” next to it will light up in the instrument cluster.
NOTE:
The RACE setting will provide a firmer ride.
SRT
66
Page 70 of 100

INSTRUMENT CLUSTER WARNING LIGHTS
- Electronic Stability Control (ESC) Activation/Malfunction Indicator Light
• The “ESC Activation/Malfunction Indicator Light” in the instrument cluster will comeon when the ignition switch is turned to the ON/RUN position. It should go out with the
engine running. If the “ESC Activation/Malfunction Indicator Light” comes on continu-
ously with the engine running, a malfunction has been detected in the ESC system.
• If this light remains on after several ignition cycles, and the vehicle has been driven several miles (kilometers) at speeds greater than 30 mph (48 km/h), we recommend
you drive to the nearest service center and have the vehicle serviced immediately.
- Tire Pressure Monitoring System (TPMS) Light
• Each tire, including the spare (if provided), should be checked monthly, when cold andinflated to the inflation pressure recommended by the vehicle manufacturer on the
vehicle placard or tire inflation pressure label. (If your vehicle has tires of a different
size than the size indicated on the vehicle placard or tire inflation pressure label, you
should determine the proper tire inflation pressure for those tires.)
• As an added safety feature, your vehicle has been equipped with a Tire Pressure Monitoring System (TPMS) that illuminates a low tire pressure telltale when one or
more of your tires is significantly under-inflated. Accordingly, when the low tire pressure
telltale illuminates, you should stop and check your tires as soon as possible, and
inflate them to the proper pressure. Driving on a significantly under-inflated tire causes
the tire to overheat and can lead to tire failure. Under-inflation also reduces fuel
efficiency and tire tread life, and may affect the vehicle’s handling and stopping ability.
• IF THE LIGHT STARTS FLASHING INDICATING A LOW TIRE PRESSURE, ADJUST THE AIR
PRESSURE IN THE LOW TIRE TO THE AIR PRESSURE SHOWN ON THE VEHICLE PLACARD
OR TIRE INFLATION PRESSURE LABEL LOCATED ON THE DRIVER'S DOOR.
NOTE:
AFTER INFLATION, THE VEHICLE MAY NEED TO BE DRIVEN FOR 20 MINUTES BEFORE
THE FLASHING LIGHT WILL TURN OFF.
• Please note that the TPMS is not a substitute for proper tire maintenance, and it is the driver’s responsibility to maintain correct tire pressure, even if under-inflation has not
reached the level to trigger illumination of the TPMS low tire pressure telltale.
• Your vehicle has also been equipped with a TPMS malfunction indicator to indicate when the system is not operating properly. The TPMS malfunction indicator is
combined with the low tire pressure telltale. When the system detects a malfunction,
the telltale will flash for approximately one minute and then remain continuously
illuminated. This sequence will continue each time the vehicle is restarted as long as
the malfunction exists.
• When the malfunction indicator is illuminated, the system may not be able to detect or signal low tire pressure as intended. TPMS malfunctions may occur for a variety of
reasons, including the installation of replacement or alternate tires or wheels on the
vehicle that prevent the TPMS from functioning properly. Always check the TPMS
WHAT TO DO IN EMERGENCIES
68
Page 96 of 100

Adjustable Pedals............16
Airbag ..................10
Air Conditioning .............22
Arming Theft System (Security Alarm) ............9
Automatic Headlights ..........20
Automatic Temperature Control(ATC).............22
Automatic Transmission FluidType ..............83
AxleFluid ................83
Back-Up Camera ............23
Belts, Seat ................10
BrakeFluid ...............83
Break-In Recommendations, NewVehicle .............18
Bulb Replacement ............90
Calibration, Compass ..........58
Child Restraint Tether Anchors .....13
ClimateControl .............22
Compass Calibration ...........58
Cooling System Coolant Capacity ..........83
Cruise Control (Speed Control) .....20
CruiseLight ...............20
Customer Assistance ..........91
Customer Programmable Features . . .59
Defects, Reporting ............92
Dimmer Control .............20
Dimmer Switch, Headlight .......20
Electronics Your Vehicle's Sound System . . .24
Electronic Speed Control (CruiseControl)............20
Electronic Vehicle Information Center (EVIC) .............59
Emergency, In Case of BrakeWarningLight ........69
Freeing Vehicle When Stuck ....80
Overheating .............71
Emergency Key ..............8 Engine
Break-In Recommendations ....18
Compartment ............82
OilSelection ............83
Overheating .............71
Starting ................9
Stopping ...............9
Event Data Recorder ...........81
ExteriorLights..............90
Fluid Capacities .............83
Fluids ..................83
FogLights................20
FreeingAStuckVehicle.........80
Fuel Specifications ............83
Fuse ...................86
Fuses ...................86
Garage Door Opener (HomeLink
®)...61
Headlights Automatic ..............20
Dimmer Switch ...........20
High Beam .............19
High Beam/Low Beam Select (Dimmer) Switch ...........19
HomeLink
®(Garage Door Opener) . . .61
Instrument Cluster Indicators ...............7
Intermittent Wipers (Delay Wipers) . . .19
Introduction ................2
Jump Starting ..............78
KeyFob..................8
Key Fob Programmable Features ....60
Keyless Enter-N-Go Starting/Stopping ..........9
LATCH (Lower Anchors and Tether forCHildren).............13
Lights Tire Pressure Monitoring
(TPMS) ...............68
INDEX
94