2013 DODGE VIPER battery
[x] Cancel search: batteryPage 8 of 100

INSTRUMENT CLUSTER
Warning Lights
- Low Fuel Warning Light
- Battery Charge Light**
- Oil Pressure Warning Light
- Anti-Lock Brake (ABS) Light**
- Air Bag Warning Light**
- Electronic Throttle Control (ETC) Light
- Tire Pressure Monitoring System (TPMS) Light
- Engine Temperature Warning Light
- Seat Belt Reminder Light
BRAKE- Brake Warning Light**
- Malfunction Indicator Light (MIL)**
- Electronic Stability Control (ESC) Activation/Malfunction Indicator Light*
(See page 68 for more information.)
CONTROLS AT A GLANCE
6
Page 10 of 100

KEY FOB
Locking And Unlocking The Doors
• Press the LOCK button once to lock allthe doors. Press the UNLOCK button
once to unlock the driver’s door only and
twice within five seconds to unlock all
the doors.
• All doors can be programmed to unlock on the first press of the UNLOCK button.
Refer to Programmable Features in this
guide.
Opening The Trunk
• Press the TRUNK button two timeswithin five seconds to open the trunk.
Panic Alarm
• Press the PANIC button once to turn the panic alarm on.
• Wait approximately three seconds and press the button a second time to turn the panicalarm off.
Emergency Key
• Should the battery in the vehicle or the Key Fob transmitter go dead, there is anemergency key located in the Key Fob. To remove the emergency key, slide the button
at the back of the Key Fob sideways with your thumb and then pull the key out with your
other hand.
• The emergency key is also for locking the glove compartment.
WARNING!
• Always apply the parking brake fully when parked to guard against vehicle move- ment and possible injury or damage.
• When leaving the vehicle, always remove the key fob from the ignition and lock your
vehicle.
• Never leave children alone in a vehicle, or with access to an unlocked vehicle.
Allowing children to be in a vehicle unattended is dangerous for a number of
reasons. A child or others could be seriously or fatally injured. Children should be
warned not to touch the parking brake, brake pedal or the shift lever.
•
Do not leave the key fob in or near the vehicle, or in a location accessible to children,
and do not leave a vehicle equipped with Keyless Enter-N-Go™ in the ACC or ON/RUN
mode. A child could operate power windows, other controls, or move the vehicle
GETTING STARTED
8
Page 30 of 100

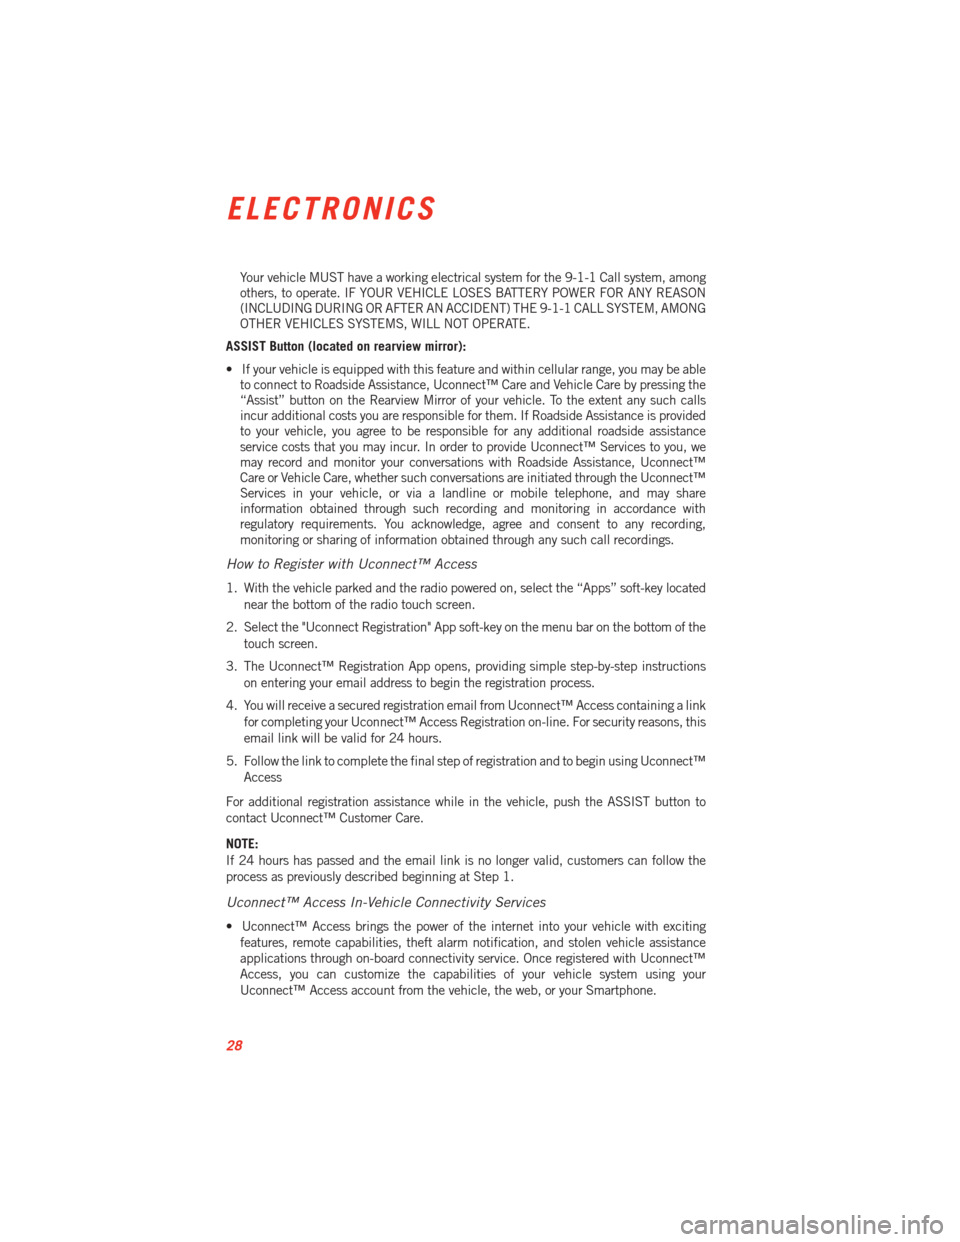
Your vehicle MUST have a working electrical system for the 9-1-1 Call system, among
others, to operate. IF YOUR VEHICLE LOSES BATTERY POWER FOR ANY REASON
(INCLUDING DURING OR AFTER AN ACCIDENT) THE 9-1-1 CALL SYSTEM, AMONG
OTHER VEHICLES SYSTEMS, WILL NOT OPERATE.
ASSIST Button (located on rearview mirror):
• If your vehicle is equipped with this feature and within cellular range, you may be able to connect to Roadside Assistance, Uconnect™ Care and Vehicle Care by pressing the
“Assist” button on the Rearview Mirror of your vehicle. To the extent any such calls
incur additional costs you are responsible for them. If Roadside Assistance is provided
to your vehicle, you agree to be responsible for any additional roadside assistance
service costs that you may incur. In order to provide Uconnect™ Services to you, we
may record and monitor your conversations with Roadside Assistance, Uconnect™
Care or Vehicle Care, whether such conversations are initiated through the Uconnect™
Services in your vehicle, or via a landline or mobile telephone, and may share
information obtained through such recording and monitoring in accordance with
regulatory requirements. You acknowledge, agree and consent to any recording,
monitoring or sharing of information obtained through any such call recordings.
How to Register with Uconnect™ Access
1. With the vehicle parked and the radio powered on, select the “Apps” soft-key located
near the bottom of the radio touch screen.
2. Select the "Uconnect Registration" App soft-key on the menu bar on the bottom of the touch screen.
3. The Uconnect™ Registration App opens, providing simple step-by-step instructions on entering your email address to begin the registration process.
4. You will receive a secured registration email from Uconnect™ Access containing a link for completing your Uconnect™ Access Registration on-line. For security reasons, this
email link will be valid for 24 hours.
5. Follow the link to complete the final step of registration and to begin using Uconnect™ Access
For additional registration assistance while in the vehicle, push the ASSIST button to
contact Uconnect™ Customer Care.
NOTE:
If 24 hours has passed and the email link is no longer valid, customers can follow the
process as previously described beginning at Step 1.
Uconnect™ Access In-Vehicle Connectivity Services
• Uconnect™ Access brings the power of the internet into your vehicle with exciting features, remote capabilities, theft alarm notification, and stolen vehicle assistance
applications through on-board connectivity service. Once registered with Uconnect™
Access, you can customize the capabilities of your vehicle system using your
Uconnect™ Access account from the vehicle, the web, or your Smartphone.
ELECTRONICS
28
Page 37 of 100

• When connected, the iPod®/compatible USB device can be controlled using voice
command, radio touch screen or Steering Wheel Audio controls to play, skip to the next
or previous track, browse, and list the contents.
• The iPod
®battery charges when plugged into the USB port (if supported by the specific
device).
NOTE:
• When connecting your iPod
®device for the first time, the system may take several
minutes to read your music, depending on the number of files. For example, the system
will take approximately 5 minutes for every 1000 songs loaded on the device. Also
during the reading process, the Shuffle and Browse functions will be disabled. This
process is needed to ensure the full use of your iPod
®features and only happens the
first time it is connected. After the first time, the reading process of your iPod®will take
considerably less time unless changes are made or new songs are added to the playlist.
• The USB port supports certain Mini, Classic, Nano, Touch, and iPhone
®devices. The
USB port also supports playing music from compatible external USB Mass Storage
Class memory devices. Some iPod
®software versions may not fully support the USB
port features. Please visit Apple’s website for iPod®software updates.
SD Card
• Play songs stored on an SD card inserted into the SD card slot.
• Song playback can be controlled using the radio or Steering Wheel Audio Controls to play, skip to the next or previous track, browse, and list the contents.
Bluetooth
®Streaming Audio
•
If equipped with Uconnect™ Voice Command, your Bluetooth-equipped iPod®devices,
cell phones or other media players, may also be able to stream music to your vehicle's
sound system. Your connected device must be Bluetooth-compatible, and paired with
your Uconnect™ system (see Uconnect™ Phone for pairing instructions). You can access
the music from your connected Bluetooth
®device by touching the Source soft-key while
in Player mode.
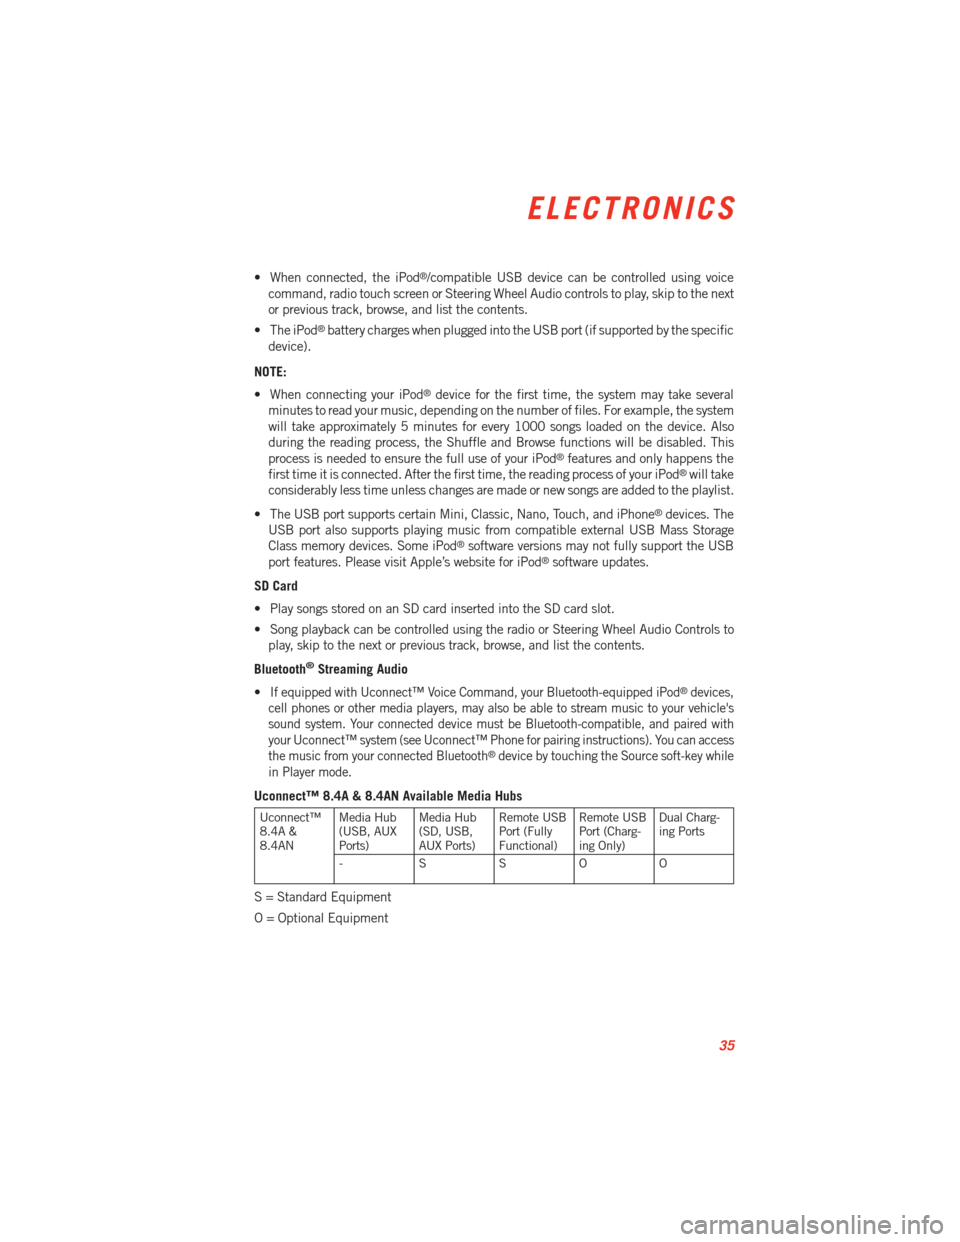
Uconnect™ 8.4A & 8.4AN Available Media Hubs
Uconnect™
8.4A &
8.4AN Media Hub
(USB, AUX
Ports) Media Hub
(SD, USB,
AUX Ports)Remote USB
Port (Fully
Functional)Remote USB
Port (Charg-
ing Only)Dual Charg-
ing Ports
- SSOO
S = Standard Equipment
O = Optional Equipment
ELECTRONICS
35
Page 50 of 100

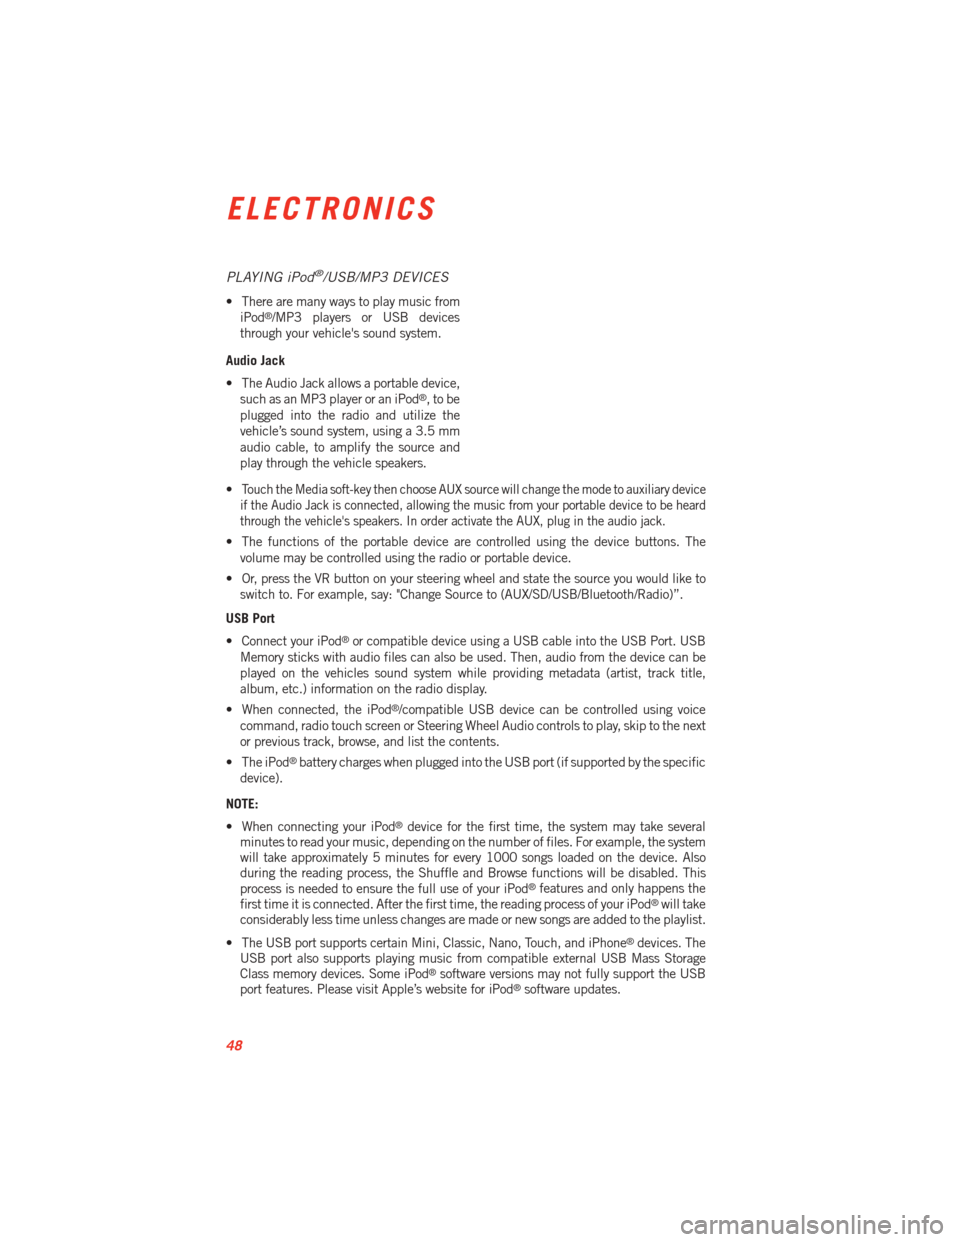
PLAYING iPod®/USB/MP3 DEVICES
• There are many ways to play music fromiPod®/MP3 players or USB devices
through your vehicle's sound system.
Audio Jack
• The Audio Jack allows a portable device, such as an MP3 player or an iPod
®,tobe
plugged into the radio and utilize the
vehicle’s sound system, using a 3.5 mm
audio cable, to amplify the source and
play through the vehicle speakers.
•
Touch the Media soft-key then choose AUX source will change the mode to auxiliary device
if the Audio Jack is connected, allowing the music from your portable device to be heard
through the vehicle's speakers. In order activate the AUX, plug in the audio jack.
• The functions of the portable device are controlled using the device buttons. The volume may be controlled using the radio or portable device.
• Or, press the VR button on your steering wheel and state the source you would like to switch to. For example, say: "Change Source to (AUX/SD/USB/Bluetooth/Radio)”.
USB Port
• Connect your iPod
®or compatible device using a USB cable into the USB Port. USB
Memory sticks with audio files can also be used. Then, audio from the device can be
played on the vehicles sound system while providing metadata (artist, track title,
album, etc.) information on the radio display.
• When connected, the iPod
®/compatible USB device can be controlled using voice
command, radio touch screen or Steering Wheel Audio controls to play, skip to the next
or previous track, browse, and list the contents.
• The iPod
®battery charges when plugged into the USB port (if supported by the specific
device).
NOTE:
• When connecting your iPod
®device for the first time, the system may take several
minutes to read your music, depending on the number of files. For example, the system
will take approximately 5 minutes for every 1000 songs loaded on the device. Also
during the reading process, the Shuffle and Browse functions will be disabled. This
process is needed to ensure the full use of your iPod
®features and only happens the
first time it is connected. After the first time, the reading process of your iPod®will take
considerably less time unless changes are made or new songs are added to the playlist.
• The USB port supports certain Mini, Classic, Nano, Touch, and iPhone
®devices. The
USB port also supports playing music from compatible external USB Mass Storage
Class memory devices. Some iPod
®software versions may not fully support the USB
port features. Please visit Apple’s website for iPod®software updates.
ELECTRONICS
48
Page 63 of 100

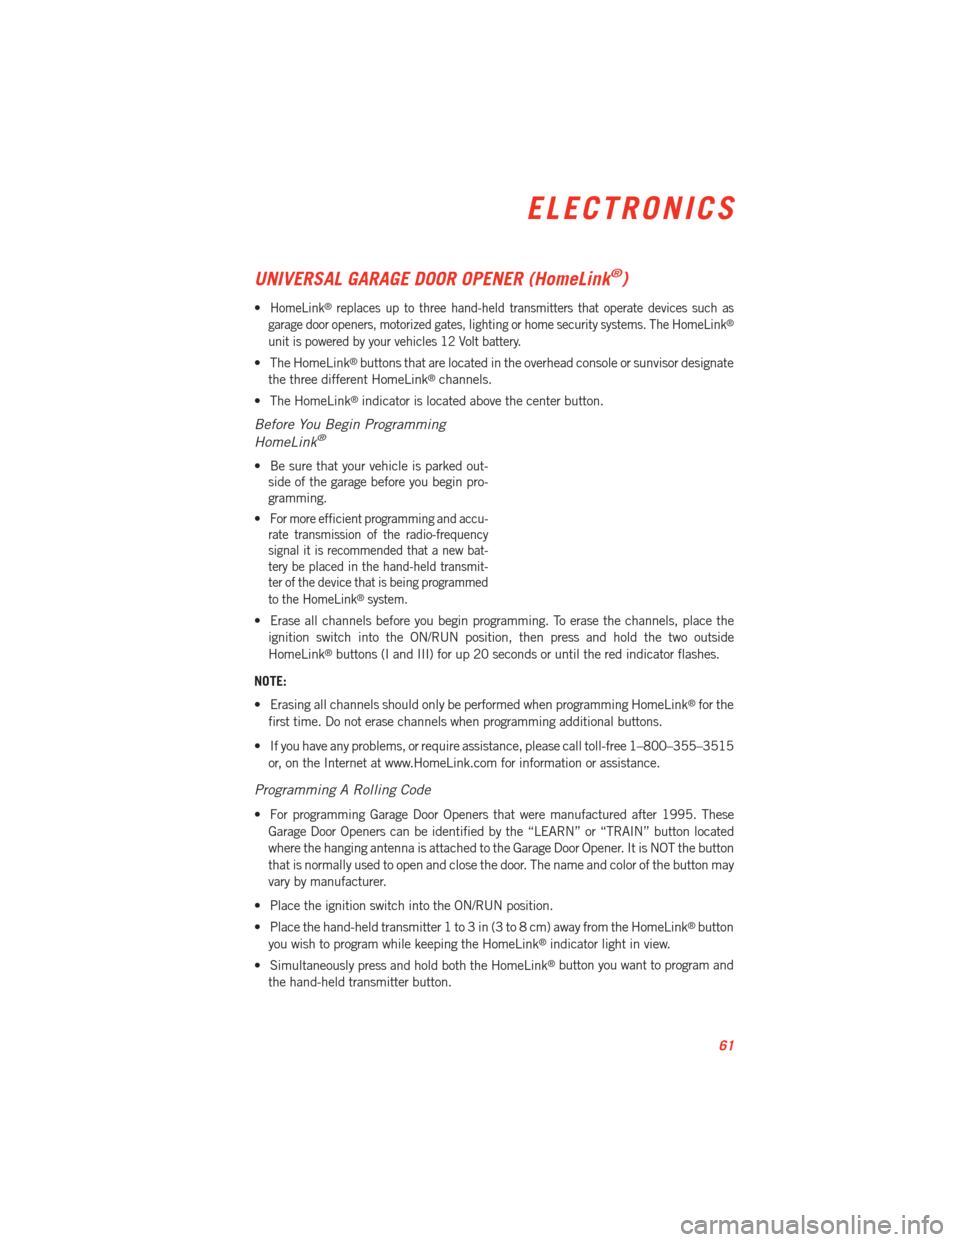
UNIVERSAL GARAGE DOOR OPENER (HomeLink®)
•HomeLink®replaces up to three hand-held transmitters that operate devices such as
garage door openers, motorized gates, lighting or home security systems. The HomeLink®
unit is powered by your vehicles 12 Volt battery.
• The HomeLink®buttons that are located in the overhead console or sunvisor designate
the three different HomeLink®channels.
• The HomeLink
®indicator is located above the center button.
Before You Begin Programming
HomeLink®
• Be sure that your vehicle is parked out- side of the garage before you begin pro-
gramming.
•
For more efficient programming and accu-
rate transmission of the radio-frequency
signal it is recommended that a new bat-
tery be placed in the hand-held transmit-
ter of the device that is being programmed
to the HomeLink
®system.
• Erase all channels before you begin programming. To erase the channels, place the
ignition switch into the ON/RUN position, then press and hold the two outside
HomeLink
®buttons (I and III) for up 20 seconds or until the red indicator flashes.
NOTE:
• Erasing all channels should only be performed when programming HomeLink
®for the
first time. Do not erase channels when programming additional buttons.
• If you have any problems, or require assistance, please call toll-free 1–800–355–3515 or, on the Internet at www.HomeLink.com for information or assistance.
Programming A Rolling Code
• For programming Garage Door Openers that were manufactured after 1995. TheseGarage Door Openers can be identified by the “LEARN” or “TRAIN” button located
where the hanging antenna is attached to the Garage Door Opener. It is NOT the button
that is normally used to open and close the door. The name and color of the button may
vary by manufacturer.
• Place the ignition switch into the ON/RUN position.
• Place the hand-held transmitter 1 to 3 in (3 to 8 cm) away from the HomeLink
®button
you wish to program while keeping the HomeLink®indicator light in view.
• Simultaneously press and hold both the HomeLink
®button you want to program and
the hand-held transmitter button.
ELECTRONICS
61
Page 65 of 100

Using HomeLink®
• To operate, press and release the programmed HomeLink®button. Activation will now
occur for the programmed device (i.e., garage door opener, gate operator, security
system, entry door lock, home/office lighting, etc.,). The hand-held transmitter of the
device may also be used at any time.
WARNING!
• Your motorized door or gate will open and close while you are programming the
universal transceiver. Do not program the transceiver if people or pets are in the
path of the door or gate.
• Do not run your vehicle in a closed garage or confined area while programming the
transceiver. Exhaust gas from your vehicle contains Carbon Monoxide (CO) which is
odorless and colorless. Carbon Monoxide is poisonous when inhaled and can cause
you and others to be severely injured or killed.
POWER OUTLETS
• The auxiliary 12 Volt (13 Amp) power outlets can provide power for in-vehicleaccessories designed for use with the standard “cigar lighter” plug. The 12 Volt power
outlets have a cap attached to the outlet indicating “12V DC”, together with either a key
symbol or a battery symbol.
• The auxiliary power outlets can be found in the following locations: • To the right of the shifter on the console
• Inside the upper lid of the center stor-
age compartment — if equipped.
• Rear area of the center console.
NOTE:
• Do not exceed the maximum power of 160 Watts (13 Amps) at 12 Volts. If the
160 Watt (13 Amp) power rating is ex-
ceeded, the fuse protecting the system
will need to be replaced.
• Power outlets are designed for accessory plugs only. Do not insert any other object
in the power outlet as this will damage
the outlet and blow the fuse. Improper
use of the power outlet can cause dam-
age not covered by your new vehicle
warranty.
ELECTRONICS
63
Page 80 of 100

JUMP-STARTING
• If your vehicle has a discharged battery itcan be jump-started using a set of
jumper cables and a battery in another
vehicle or by using a portable battery
booster pack.
• Jump-starting can be dangerous if done improperly so please follow the proce-
dures in this section carefully.
NOTE:
When using a portable battery booster pack
follow the manufacturer’s operating instruc-
tions and precautions.
Preparations for Jump-Start
• The battery is stored under an access cover in the trunk. Remote battery posts are located on the left side of the engine compartment for jump-starting.
NOTE:
The remote battery posts are viewed by standing on the left side of the vehicle looking over
the fender.
• Set the parking brake, shift the transmission into gear and turn the ignition to OFF.
• Turn off the heater, radio, and all unnecessary electrical accessories.
• If using another vehicle to jump-start the battery, park the vehicle within the jumper cables reach, set the parking brake and make sure the ignition is OFF.
Jump-Starting Procedure
• Connect the positive (+) end of the jumper cable to the remote positive (+) post of the discharged vehicle.
• Connect the opposite end of the positive (+) jumper cable to the positive (+) post of the booster battery.
• Connect the negative end (-) of the jumper cable to the negative (-) post of the booster battery.
• Connect the opposite end of the negative (-) jumper cable to the remote negative (-) post of the vehicle with the discharged battery.
• Start the engine in the vehicle that has the booster battery, let the engine idle a few minutes, and then start the engine in the vehicle with the discharged battery.
Once the engine is started, remove the jumper cables in the reverse sequence:
• Disconnect the negative (-) jumper cable from the remote negative (-) post of the vehicle with the discharged battery.
• Disconnect the negative end (-) of the jumper cable from the negative (-) post of the booster battery.
WHAT TO DO IN EMERGENCIES
78