2013 DODGE VIPER key
[x] Cancel search: keyPage 52 of 100
NOTE:
Uconnect™ Access will usually automatically switch to the appropriate mode when
something is first connected or inserted into the system.
NAVIGATION
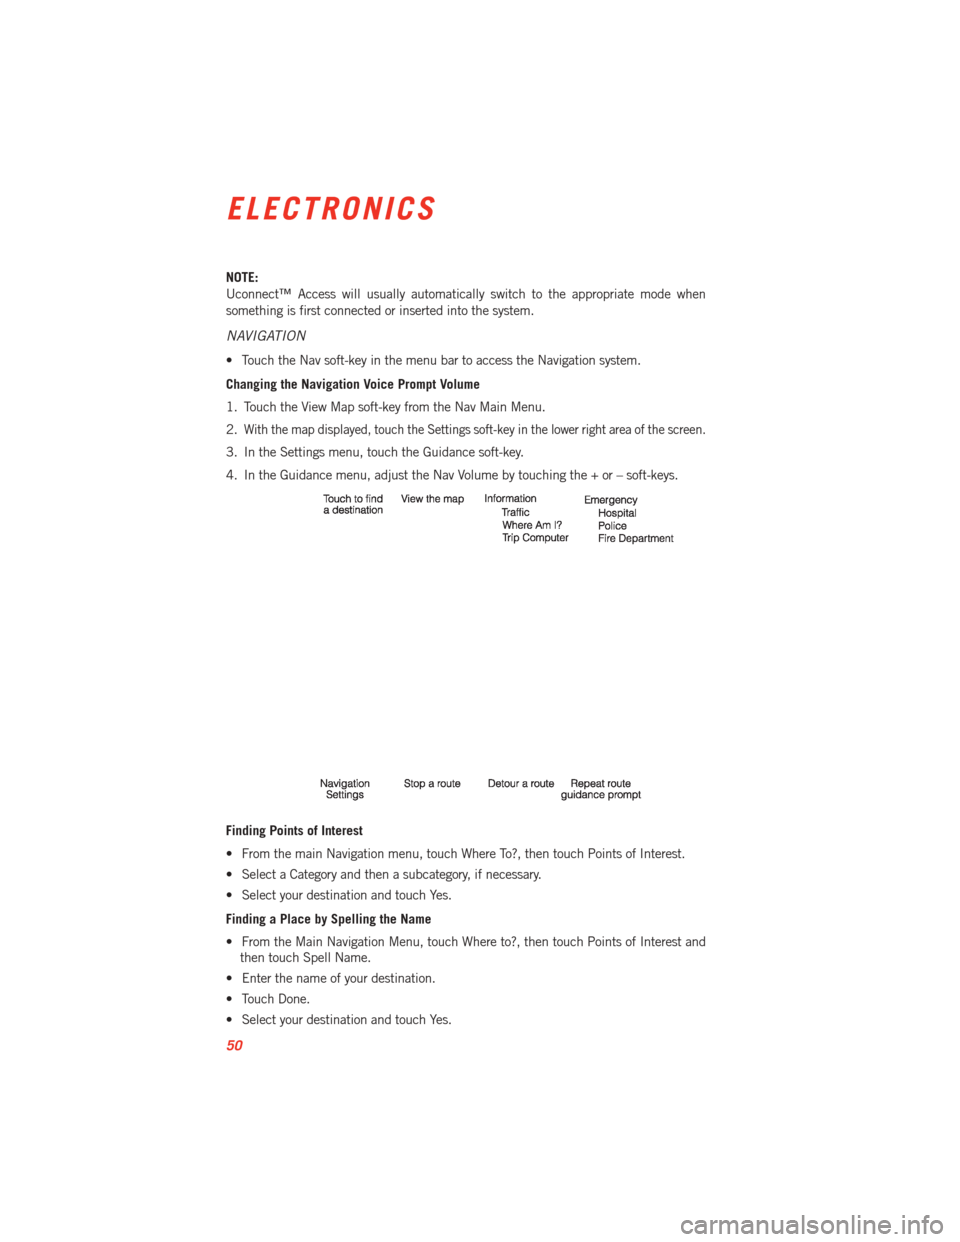
• Touch the Nav soft-key in the menu bar to access the Navigation system.
Changing the Navigation Voice Prompt Volume
1. Touch the View Map soft-key from the Nav Main Menu.
2.
With the map displayed, touch the Settings soft-key in the lower right area of the screen.
3. In the Settings menu, touch the Guidance soft-key.
4. In the Guidance menu, adjust the Nav Volume by touching the + or – soft-keys.
Finding Points of Interest
• From the main Navigation menu, touch Where To?, then touch Points of Interest.
• Select a Category and then a subcategory, if necessary.
• Select your destination and touch Yes.
Finding a Place by Spelling the Name
• From the Main Navigation Menu, touch Where to?, then touch Points of Interest andthen touch Spell Name.
• Enter the name of your destination.
• Touch Done.
• Select your destination and touch Yes.
ELECTRONICS
50
Page 53 of 100
Entering a Destination Address
• From the main Navigation menu, touch Where To?, then touch Address.
• Follow the on-screen prompts to enter the address and touch Yes.
NOTE:
Destination entry is not available while your vehicle is in motion. However, you can also
use Voice Commands to enter an address while moving. Refer to Common Navigation
Voice Commands in the Uconnect™ Voice Command section.
Setting Your Home Location
• Touch the NAV soft-key in the menu bar to access the Navigation system and the MainNavigation menu.
• Touch Where To?, then touch Go Home.
• You may enter your address directly, use your current location as your home address, or choose from recently found locations.
• To delete your Home location (or other saved locations) so you can save a new Home location, touch Where To? from the Main Navigation menu, then touch Go Home, and
in the Yes screen touch the Options soft-key. In the Options menu touch Clear Home.
Set a new Home location be following the previous instructions.
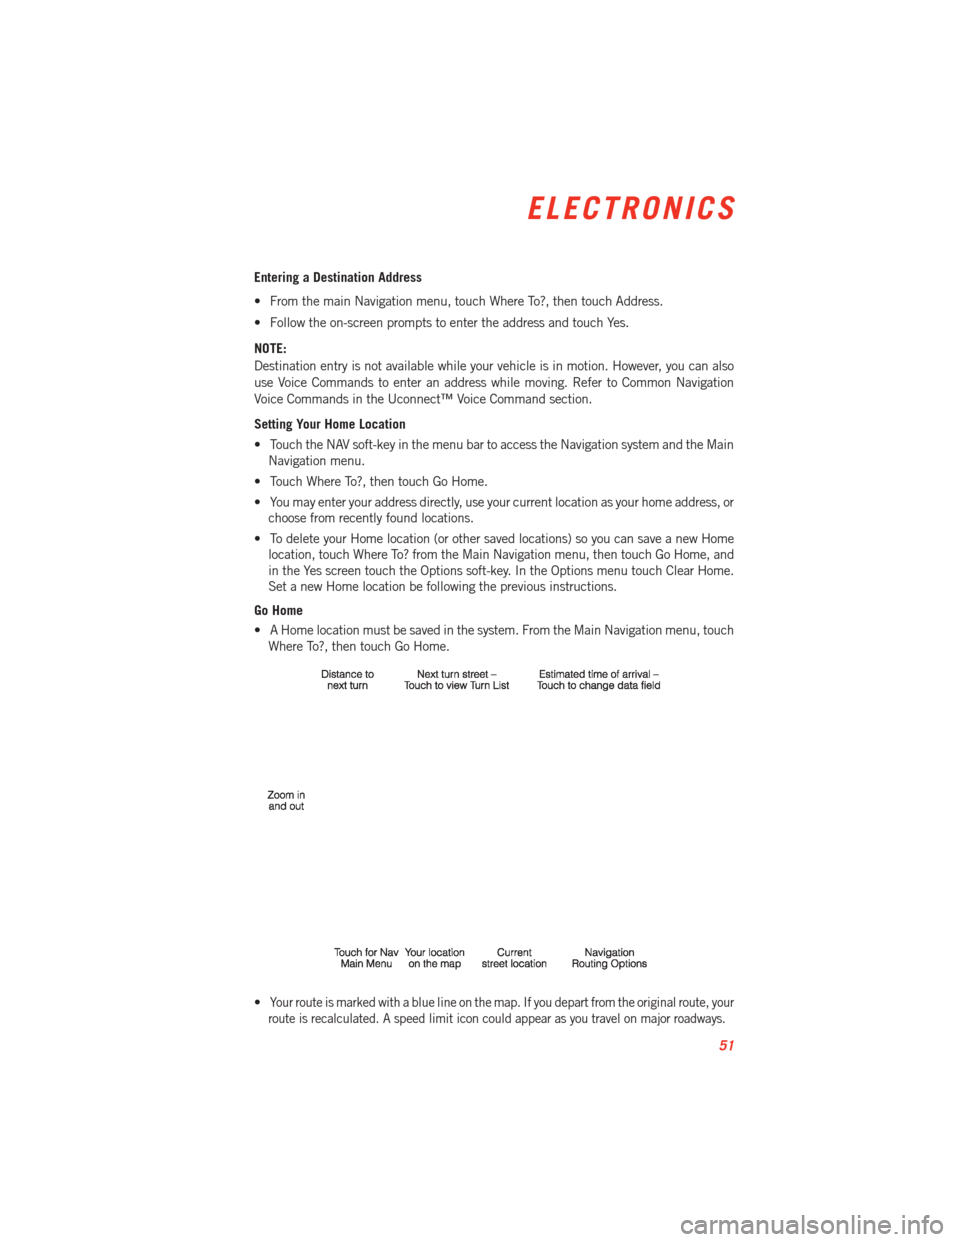
Go Home
• A Home location must be saved in the system. From the Main Navigation menu, touch Where To?, then touch Go Home.
•
Your route is marked with a blue line on the map. If you depart from the original route, your
route is recalculated. A speed limit icon could appear as you travel on major roadways.
ELECTRONICS
51
Page 54 of 100
Adding a Stop
• To add a stop you must be navigating a route.
• Touch the Menu soft-key to return to the Main Navigation menu.
• Touch Where To?, then search for the extra stop. When another location has beenselected, you can choose to cancel your previous route, add as the first destination or
add as the last destination.
• Touch the desired selection and touch Yes.
Taking a Detour
• To take a detour you must be navigating a route.
• Touch Detour.
NOTE:
• If the route you are currently taking is the only reasonable option, the device might not calculate a detour.
• For more information, see your Uconnect™ Access User's Manual.
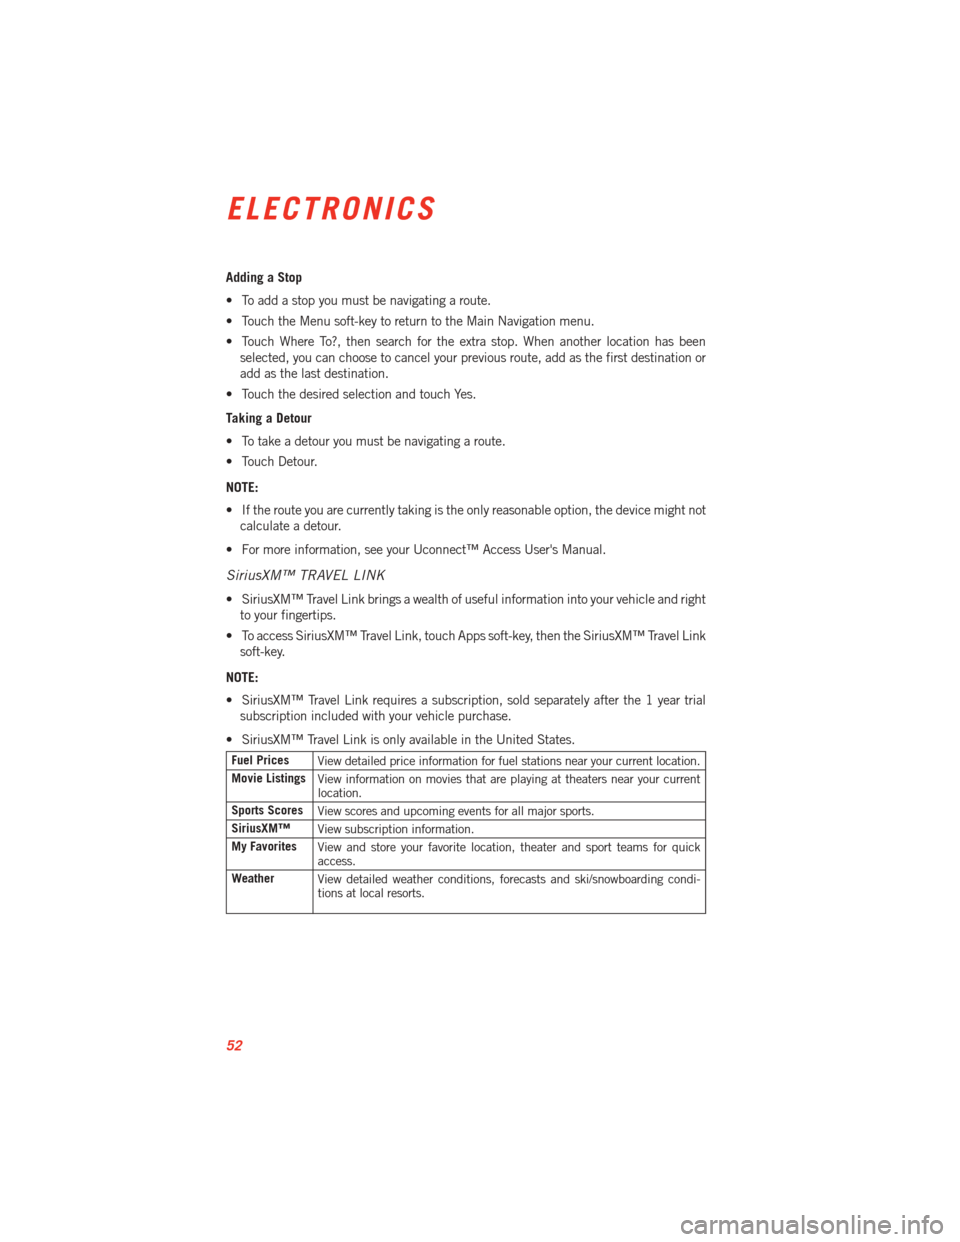
SiriusXM™ TRAVEL LINK
• SiriusXM™ Travel Link brings a wealth of useful information into your vehicle and right to your fingertips.
• To access SiriusXM™ Travel Link, touch Apps soft-key, then the SiriusXM™ Travel Link soft-key.
NOTE:
• SiriusXM™ Travel Link requires a subscription, sold separately after the 1 year trial subscription included with your vehicle purchase.
• SiriusXM™ Travel Link is only available in the United States.
Fuel Prices View detailed price information for fuel stations near your current location.
Movie Listings View information on movies that are playing at theaters near your current
location.
Sports Scores View scores and upcoming events for all major sports.
SiriusXM™ View subscription information.
My Favorites View and store your favorite location, theater and sport teams for quick
access.
Weather View detailed weather conditions, forecasts and ski/snowboarding condi-
tions at local resorts.
ELECTRONICS
52
Page 55 of 100
Uconnect™ PHONE (Bluetooth®HANDS FREE CALLING)
• If the Uconnect™ Phone Buttonexists on your steering wheel, then you have the
Uconnect™ Phone features.
• The Uconnect™ Phone is a voice-activated, hands-free, in-vehicle communications system with Voice Command Capability (see Voice Command section).
• The Uconnect™ Phone allows you to dial a phone number with your mobile phone using simple voice commands or using screen soft-keys.
• Refer to the Understand The Features Of Your Vehicle section of your vehicle's Owner's Manual on the DVD for further details.
• The Uconnect™ Phone requires a mobile phone equipped with the Bluetooth
®
Hands-Free Profile, Version 1.0 or higher. For Uconnect™ customer support, visit
www.Uconnect-Phone.com or call 1–877–855–8400. (U.S. Residents). Canadian
Residents call, 1-800-465–2001 (English) or 1-800-387-9983 (French).
Pairing a Phone
• To use the Uconnect™ Phone feature, you must first pair your Bluetooth®phone with
the Uconnect™ system.
Start pairing procedure on the radio
• Touch the Phone soft-key and then the Settings soft-key. Next, touch Add Device.
• Uconnect™ Phone will display an “In progress” screen while the system is connecting.
Start pairing procedure on mobile phone
•
Search for available devices on your Bluetooth®enabled mobile phone. This is usually
within Settings or Options under “Bluetooth”. See your mobile phone’s manual for details.
• When your phone finds the system, select “Uconnect” as the paired device.
Complete the pairing procedure
• A PIN code should appear on radio touch screen as well as on mobile device.
• Please ensure that these codes are the same, and if so accept the pairing on both.
• Pairing procedure is now complete.
Select the mobile phone's priority level
• When the pairing process has successfully completed, the system will prompt you to choose whether or not this is your favorite phone. Selecting Yes will make this phone the
highest priority. This phone will take precedence over other paired phones within range.
Only one phone can be paired at a time.
• You are now ready to make hands-free calls. Press the Uconnect™ Phone button on your steering wheel to begin.
ELECTRONICS
53
Page 56 of 100
Making A Phone Call
• Press the Uconnect™ Phone button.
• (After the BEEP), say “dial” then the number (or “call” then the name as listed in your phone; see Phonebook).
NOTE:
You can also initiate a call by using the touch-screen on the Phone main screen.
Receiving A Call – Accept (And End)
•When an incoming call rings/is announced on Uconnect™, press the Phone button.
• To end a call, press the Phone button.
Mute (Or Unmute) Microphone During Call
• During a call, touch the mute soft-key on the Phone main screen to mute and unmute the call.
Transfer Ongoing Call Between Handset And Vehicle
• During a call, touch the Transfer soft-key on the Phone main screen to transfer anon-going call between handset and vehicle.
Common Phone Commands (Examples)
• “Call John Smith”
• “Call John Smith mobile”
• “Dial 1 248 555 1212
• “Call Emergency”
• “Call Towing Assistance”
• “Redial”
Phonebook
• Uconnect™ radios will automatically download your phonebook from your pairedphone, if this feature is supported by your phone. Entries are updated each time that
the phone is connected. If your phone book entries do not appear, check the settings on
your phone. Some phones require you to enable this feature manually.
• Your phonebook can be browsed on your radio screen, but editing can only be done on your phone. To browse, touch the Phone soft-key, then the Phonebook soft-key.
• Favorite phonebook entries can be saved as Favorites for quicker access. Favorites are shown at the top of your main phone screen.
ELECTRONICS
54
Page 61 of 100
PROGRAMMABLE FEATURES
Electronic Vehicle Information Center (EVIC)
•The EVIC can be used to view or change the following settings. Press the UP or DOWN
button until System Setup displays, then press the RIGHT arrow button. Scroll through the
settings using the UP or DOWN buttons. Press the RIGHT arrow button to change the
setting. Press the BACK/LEFT arrow button to scroll back to a previous menu or sub menu.
• Select Language •
Headlamps With Wipers
• Nav-Turn By Turn •
Automatic High Beams
• Park Assist System •
Intermittent Wiper Options
• Auto Unlock Doors •
Easy Entry/Exit Seat
• Remote Unlock Sequence •
Key-Off Power Delay
• RKE Linked To Memory •
Illuminated Approach
• Remote Start Comfort Sys. •
Hill Start Assist (HSA)
• Horn With Remote Start •
Display Fuel Saver
• Sound Horn With Lock •
Compass Variance
• Flash Lamps With Lock •
Calibrate Compass
• Headlamp Off Delay
Uconnect™ Customer Programmable Features
• The Uconnect™ system allows you to access Customer Programmable feature settings
such as Display, Clock, Safety/Assistance, Lights, Doors & Locks, Heated Seats, Engine
Off Operation, Compass Settings, Audio, Phone/ Bluetooth and SiriusXM™ Setup
through soft-keys.
• Touch the Apps soft-key on the bottom of the screen, then touch the Settings soft-key to access the Settings screen. When making a selection, scroll up or down until the
preferred setting is highlighted, then press and release the preferred setting until a
check-mark appears next to the setting, showing that setting has been selected. The
following feature settings are available:
• Display • Clock
• Safety / Assistance • Doors & Locks
• Auto-On Comfort & Remote Start • Engine Off Options
• Compass • Audio
• Phone / Bluetooth • SiriusXM™ Setup
• Lights
ELECTRONICS
59
Page 62 of 100
Key Fob Programmable Features
• The following features may also be programmed by using the Key Fob transmitter or theignition switch and driver's door lock switch.
NOTE:
Pressing the LOCK button while you are inside the vehicle will activate the Vehicle
Security Alarm. Opening a door with the Vehicle Security Alarm activated will cause the
alarm to sound. Press the UNLOCK button to deactivate the Vehicle Security Alarm.
Unlock On First Press
• To unlock either the driver's side, or all doors, on the first press of the UNLOCK button: • Press and hold the LOCK button for at least 4 seconds, but no longer than10 seconds. Then, press and hold the UNLOCK button while still holding the LOCK
button.
• Release both buttons at the same time.
Auto Unlock Doors On Exit
• To have all of the vehicle doors unlock when any door is opened: • Enter your vehicle and close all the doors, and fasten your seat belt.
• Cycle the ignition switch between the LOCK and ON position four times, ending in
the LOCK position (do not start the engine).
• Press the power door UNLOCK switch to unlock the doors. A single chime will indicate that programming is complete.
Sound Horn With Lock
• To turn the horn chirp on or off when the doors are locked: • Press the LOCK button for at least 4 seconds, but no longer than 10 seconds. Then,
press the PANIC button while still holding the LOCK button.
• Release both buttons at the same time.
Flashing Lights With Lock
• The turn signal lights flashing, when the doors are locked or unlocked, feature can be turned on or off. To turn this feature on or off:• Press and hold the UNLOCK button for at least 4 seconds, but no longer than
10 seconds. Then, press and hold the LOCK button while still holding the UNLOCK
button.
• Release both buttons at the same time.
ELECTRONICS
60
Page 65 of 100

Using HomeLink®
• To operate, press and release the programmed HomeLink®button. Activation will now
occur for the programmed device (i.e., garage door opener, gate operator, security
system, entry door lock, home/office lighting, etc.,). The hand-held transmitter of the
device may also be used at any time.
WARNING!
• Your motorized door or gate will open and close while you are programming the
universal transceiver. Do not program the transceiver if people or pets are in the
path of the door or gate.
• Do not run your vehicle in a closed garage or confined area while programming the
transceiver. Exhaust gas from your vehicle contains Carbon Monoxide (CO) which is
odorless and colorless. Carbon Monoxide is poisonous when inhaled and can cause
you and others to be severely injured or killed.
POWER OUTLETS
• The auxiliary 12 Volt (13 Amp) power outlets can provide power for in-vehicleaccessories designed for use with the standard “cigar lighter” plug. The 12 Volt power
outlets have a cap attached to the outlet indicating “12V DC”, together with either a key
symbol or a battery symbol.
• The auxiliary power outlets can be found in the following locations: • To the right of the shifter on the console
• Inside the upper lid of the center stor-
age compartment — if equipped.
• Rear area of the center console.
NOTE:
• Do not exceed the maximum power of 160 Watts (13 Amps) at 12 Volts. If the
160 Watt (13 Amp) power rating is ex-
ceeded, the fuse protecting the system
will need to be replaced.
• Power outlets are designed for accessory plugs only. Do not insert any other object
in the power outlet as this will damage
the outlet and blow the fuse. Improper
use of the power outlet can cause dam-
age not covered by your new vehicle
warranty.
ELECTRONICS
63