Page 399 of 683
Listen To An Audio Source While A Video Is
Playing
Ensure the Remote Control and Headphone switch are on
the same channel. If watching a video on Screen 1
(second row), then Channel 2 could be used for audio. If
watching a video on Screen 2 (third row), then Channel 1
could be used for audio.
Using The Remote Control
1. Press the SOURCE button on the Remote Control and
the Mode Select Screen will display, unless a video is
playing then only a small banner will appear on the
bottom of the screen.
2. While looking at the video screen, either press Up/
Down/Left/Right on the Remote Control to highlight
the desired audio source or repeatedly press the
SOURCE button on the remote until the desired audio
source appears on the screen.
Select FM Mode On The VES Screen
4
UNDERSTANDING YOUR INSTRUMENT PANEL 397
Page 401 of 683
Important Notes For Dual Video Screen System
•VES is able to transmit two channels of stereo audio
and video simultaneously.
•The Blu-ray Disc Player can play CDs, DVDs and
Blu-ray Discs.
•The DVD Player can play CDs and DVDs.
•In split screen mode the left side equates to Channel 1
and the right side equates to Channel 2.
•Selecting a video source on Channel 1, the video
source will display on the second row screen or Screen
1 and can be heard on Channel 1.•Selecting a video source on Channel 2, the video
source will display on the third row screen or Screen 2
and can be heard on Channel 2.
•The 2nd row screen and 3rd row screen of the Video
Entertainment System can play two separate discs by
utilizing the touch-screen radio DVD player and Blu-
ray Disc Player.
•Audio can be heard through the headphones even
when the screen(s) are closed.
4
UNDERSTANDING YOUR INSTRUMENT PANEL 399
Page 402 of 683

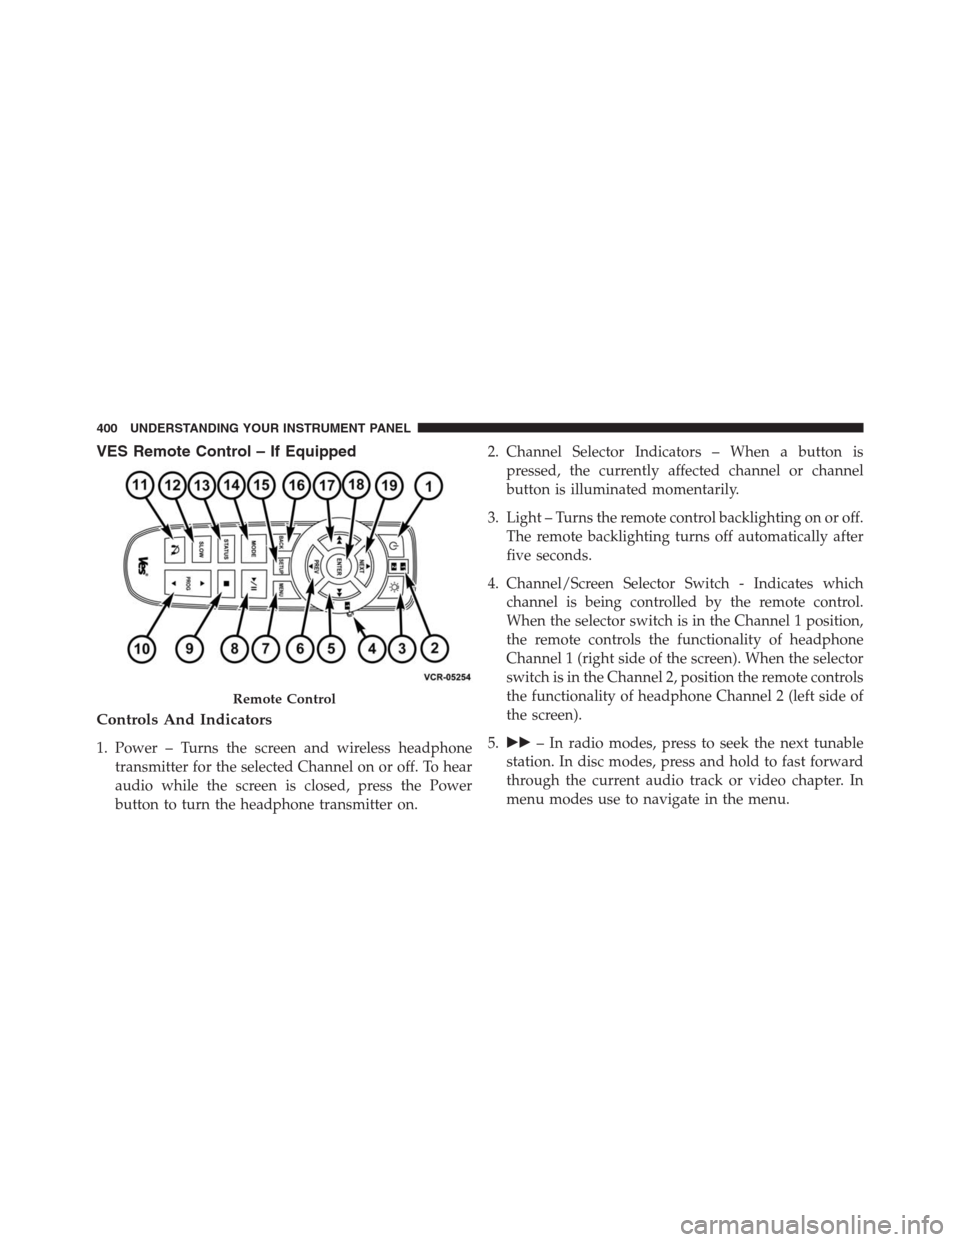
VES Remote Control – If Equipped
Controls And Indicators
1. Power – Turns the screen and wireless headphone
transmitter for the selected Channel on or off. To hear
audio while the screen is closed, press the Power
button to turn the headphone transmitter on.2. Channel Selector Indicators – When a button is
pressed, the currently affected channel or channel
button is illuminated momentarily.
3. Light – Turns the remote control backlighting on or off.
The remote backlighting turns off automatically after
five seconds.
4. Channel/Screen Selector Switch - Indicates which
channel is being controlled by the remote control.
When the selector switch is in the Channel 1 position,
the remote controls the functionality of headphone
Channel 1 (right side of the screen). When the selector
switch is in the Channel 2, position the remote controls
the functionality of headphone Channel 2 (left side of
the screen).
5.��– In radio modes, press to seek the next tunable
station. In disc modes, press and hold to fast forward
through the current audio track or video chapter. In
menu modes use to navigate in the menu.
Remote Control
400 UNDERSTANDING YOUR INSTRUMENT PANEL
Page 403 of 683

6.�/Prev – In radio modes, press to select to the
previous station. In disc modes, press to advance to the
start of the current or previous audio track or video
chapter. In menu modes, use to navigate in the menu.
7. POP UP/MENU – Press to return to the main menu of
a DVD disc, to select a satellite audio channel from the
Station list, or select playback modes (SCAN/
RANDOM for a CD).
8.�/�(Play/Pause) – Begin/resume or pause disc play.
9.▪(Stop) – Stops disc play
10. PROG Up/Down / Rewind/skip back and fast fwd/
skip forward – When listening to a radio mode,
pressing PROG Up selects the next preset and press-
ing PROG Down selects the previous preset stored in
the radio. When listening to compressed audio on adata disc, PROG Up selects the next directory and
PROG Down selects the previous directory. When
listening to a disc in a radio with a multiple-disc
changer, PROG Up selects the next disc and PROG
Down selects the previous disc.
11. MUTE – Press to mute the headphone audio output
for the selected channel.
12. SLOW – If Equipped – Press to slow playback of a
DVD disc. Press play (�) to resume normal play.
13. STATUS – If Equipped – Press to display the current
status.
14. MODE/SOURCE – Press to change the mode of the
selected channel. See the Mode Selection section of
this manual for details on changing modes.
4
UNDERSTANDING YOUR INSTRUMENT PANEL 401
Page 405 of 683
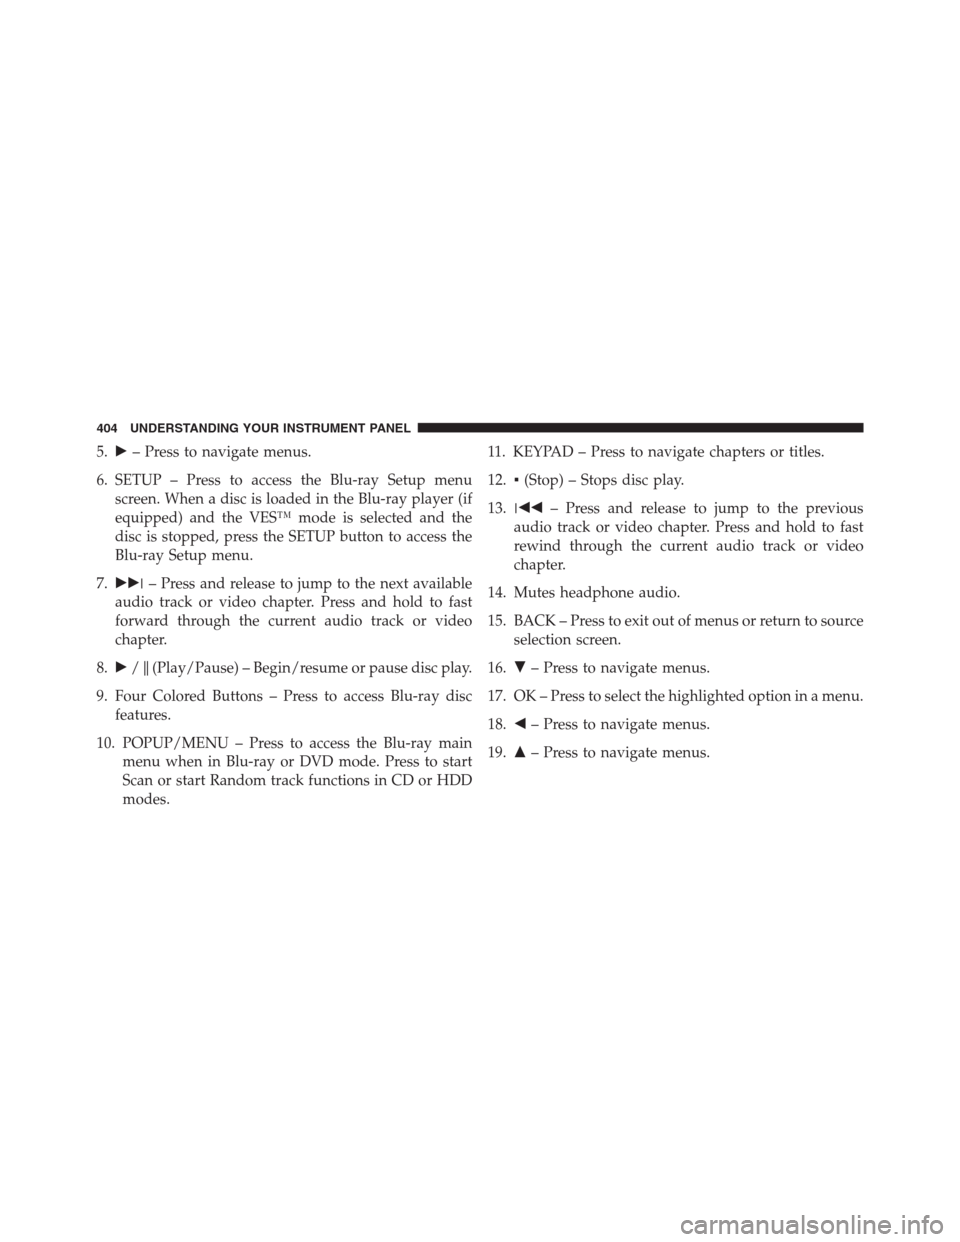
Blu-ray Player Remote Control – If EquippedControls And Indicators
1. Power – Turns the screen and wireless headphone
transmitter for the selected Channel on or off. To hear
audio while the screen is closed, press the Power
button to turn the headphone transmitter on.
2. Channel Selector Indicators – When a button is
pressed, the currently affected channel or channel
button is illuminated momentarily.
3. SOURCE – Press to enter Source Selection screen.
4. Channel/Screen Selector Switch - Indicates which
channel is being controlled by the remote control.
When the selector switch is in the Rear 1 position, the
remote controls the functionality of headphone Chan-
nel 1 (second row). When the selector switch is in the
Rear 2, position the remote controls the functionality
of headphone Channel 2 (third row).
Blu-ray Player Remote Control
4
UNDERSTANDING YOUR INSTRUMENT PANEL 403
Page 406 of 683

5.�– Press to navigate menus.
6. SETUP – Press to access the Blu-ray Setup menu
screen. When a disc is loaded in the Blu-ray player (if
equipped) and the VES™ mode is selected and the
disc is stopped, press the SETUP button to access the
Blu-ray Setup menu.
7.���– Press and release to jump to the next available
audio track or video chapter. Press and hold to fast
forward through the current audio track or video
chapter.
8.�/�(Play/Pause) – Begin/resume or pause disc play.
9. Four Colored Buttons – Press to access Blu-ray disc
features.
10. POPUP/MENU – Press to access the Blu-ray main
menu when in Blu-ray or DVD mode. Press to start
Scan or start Random track functions in CD or HDD
modes.11. KEYPAD – Press to navigate chapters or titles.
12.▪(Stop) – Stops disc play.
13.���– Press and release to jump to the previous
audio track or video chapter. Press and hold to fast
rewind through the current audio track or video
chapter.
14. Mutes headphone audio.
15. BACK – Press to exit out of menus or return to source
selection screen.
16.�– Press to navigate menus.
17. OK – Press to select the highlighted option in a menu.
18.�– Press to navigate menus.
19.�– Press to navigate menus.
404 UNDERSTANDING YOUR INSTRUMENT PANEL
Page 409 of 683
Headphones Operation
The headphones receive two separate channels of audio
using an infrared transmitter from the video screen.
Front seat occupants receive some headphone audio
coverage to allow them to adjust the headphone volume
for the young rear seat occupants that may not be able to
do so for themselves.
If no audio is heard after increasing the volume control,
verify that the screen is turned on and in the down
position and that the channel is not muted and the
headphone channel selector switch is on the desired
channel. If audio is still not heard, check that fully
charged batteries are installed in the headphones.
1. Volume Control
2. Power Button
3. Channel Selection Switch
4. Power Indicator
4
UNDERSTANDING YOUR INSTRUMENT PANEL 407
Page 410 of 683
Blu-ray Headphones Operation
The headphones receive two separate channels of audio
using an infrared transmitter from the video screen.
Front seat occupants receive some headphone audio
coverage to allow them to adjust the headphone volume
for the young rear seat occupants that may not be able to
do so for themselves.
If no audio is heard after increasing the volume control,
verify that the screen is turned on and in the down
position and that the channel is not muted and the
headphone channel selector switch is on the desired
channel. If audio is still not heard, check that fully
charged batteries are installed in the headphones.
1. Power Button
2. Volume Control
3. Channel Selection Switch 408 UNDERSTANDING YOUR INSTRUMENT PANEL