Page 136 of 683

Heated Mirrors — If Equipped
These mirrors are heated to melt frost or ice. This
feature can be activated whenever you turn on the
rear window defroster if equipped. Some vehicles may
not be equipped with rear window defroster, in this case
the heated mirrors will still function as intended. Refer to
“Rear Window Features” in “Understanding The Fea-
tures Of Your Vehicle” for further information.
Tilt Mirrors In Reverse (Available With Memory
Seat Only) — If Equipped
Tilt Mirrors in Reverse provides automatic outside mirror
positioning which will aid the drivers view of the ground
rearward of the front doors. The driver’s outside mirror
will move slightly downward from the present position
when the vehicle is shifted into REVERSE. The driver’s
outside mirror will then return to the original positionwhen the vehicle is shifted out of REVERSE position.
Each stored memory setting will have an associated Tilt
Mirrors in Reverse position.
NOTE:
The Tilt Mirrors in Reverse feature is not enabled
when delivered from the factory. The Tilt Mirrors in Reverse
feature can be enabled or disabled in the Electronic Vehicle
Information Center (EVIC). Refer to “Electronic Vehicle
Information Center (EVIC)/Customer-Programmable Fea-
tures” in “Understanding Your Instrument Panel” for fur-
ther information.
Power Folding Mirrors — If Equipped
The switch for the power folding mirrors is located
between the power mirror switches L (left) and R (right).
Press the switch once and the mirrors will fold in,
pressing the switch a second time will return the mirrors
to the normal driving position.
134 UNDERSTANDING THE FEATURES OF YOUR VEHICLE
Page 145 of 683

NOTE:In a parking lot situation, oncoming vehicles can
be obscured by vehicles parked on either side. If the
sensors are blocked by other structures or vehicles, the
system will not be able to alert the driver.
When RCP is on and the vehicle is in REVERSE, the
driver is alerted using both the visual and audible
alarms, including reducing the radio volume.
WARNING!
RCP is not a Back Up Aid system. It is intended to be
used to help a driver detect an oncoming vehicle in a
parking lot situation. Drivers must be careful when
backing up, even when using RCP. Always check
carefully behind your vehicle, look behind you, and be
sure to check for pedestrians, animals, other vehicles,
obstructions, and blind spots before backing up. Fail-
ure to do so can result in serious injury or death.
Modes Of Operation
Three selectable modes of operation are available in the
Electronic Vehicle Information Center (EVIC). Refer to
“Electronic Vehicle Information Center (EVIC)/Personal
Settings (Customer-Programmable Features)” in “Under-
standing Your Instrument Panel” for further information.
Blind Spot Alert
When operating in Blind Spot Alert mode, the BSM
system will provide a visual alert in the appropriate side
view mirror based on a detected object. However, when
the system is operating in RCP, the system will respond
with both visual and audible alerts when a detected
object is present. Whenever an audible alert is requested,
the radio is muted.
3
UNDERSTANDING THE FEATURES OF YOUR VEHICLE 143
Page 164 of 683

NOTE:
•You may not hear all of the tones due to mobile phone
network configurations. This is normal.
•Some paging and voice mail systems have system time
out settings that are too short and may not allow the
use of this feature.
Barge In — Overriding Prompts
The “Voice Command” button can be used when you
wish to skip part of a prompt and issue your voice
command immediately. For example, if a prompt is
asking “Would you like to pair a phone, clear a...,” you
could press the
button and say, “Pair a Phone” to
select that option without having to listen to the rest of
the voice prompt.
Turning Confirmation Prompts ON/OFF
Turning confirmation prompts off will stop the system
from confirming your choices (e.g., the Uconnect® Phone
will not repeat a phone number before you dial it).
•Press the
button to begin.
•After the “Ready” prompt and the following beep, say
one of the following:
– “Setup Confirmation Prompts On”
– “Setup Confirmation Prompts Off”
Phone And Network Status Indicators
If available on the radio and/or on a premium display such
as the instrument panel cluster, and supported by your
mobile phone, the Uconnect® Phone will provide notifica-
tion to inform you of your phone and network status when
you are attempting to make a phone call using Uconnect®
Phone. The status is given for network signal strength,
phone battery strength, etc.
162 UNDERSTANDING THE FEATURES OF YOUR VEHICLE
Page 219 of 683

11 .Select “Remote Linked to Memory” in the Electronic
Vehicle Information Center (EVIC) and enter “Yes”.
Refer to “Electronic Vehicle Information Center (EVIC)/
Customer-Programmable Features” in “Understanding
Your Instrument Panel” for further information.
12. Repeat the above steps to set the next Memory
position using the other numbered Memory button
or to link another RKE transmitter to memory.
Memory Position Recall
NOTE:The vehicle must be in PARK to recall memory
positions. If a recall is attempted when the vehicle is not
in PARK, a message will be displayed in the EVIC.
To recall the memory settings for driver one, press
MEMORY button 1 on the driver’s door or the UNLOCK
button on the RKE transmitter linked to memory position 1.To recall the memory setting for driver two, press MEMORY
button 2 on the driver’s door or the UNLOCK button on the
RKE transmitter linked to Memory Position 2.
A recall can be cancelled by pressing any of the
MEMORY buttons on the driver’s door during a recall (S,
1, or 2). When a recall is cancelled, the driver’s seat,
outside mirrors, and the pedals stop moving. A delay of
one second will occur before another recall can be
selected.
To Disable RKE Transmitter Linked To Memory
1. Turn the ignition switch to the OFF position and
remove the key.
2. Press and release MEMORY button 1. The system will
recall any memory settings stored in position 1. Wait
for the system to complete the memory recall before
continuing to Step 3.
3
UNDERSTANDING THE FEATURES OF YOUR VEHICLE 217
Page 220 of 683

3. Press and release the memory SET (S) button located
on the driver’s door. A chime will sound signaling that
you are in the memory set mode.
4. Within five seconds, press and release MEMORY
button 1 on the driver’s door. A chime will sound
signaling to you that the driver memory has been set.
5. Within five seconds, press and release the UNLOCK
button on the RKE transmitter. A chime will sound
signaling to you that the RKE transmitter link has been
successfully disabled.
To disable another RKE transmitter linked to either
Memory Position, repeat Steps 1 to 5 for each RKE
transmitter.
NOTE:
Once programmed, all RKE transmitters linked to
memory can be easily enabled or disabled at one time.
Refer to “Electronic Vehicle Information Center (EVIC)/
Customer-Programmable Features�in “Understanding
Your Instrument Panel” for further information.
Easy Entry/Exit Seat (Available With Memory Seat
ONLY)
This feature provides automatic driver seat positioning to
enhance driver mobility when entering and exiting the
vehicle.
The distance the driver seat moves depends on where
you have the driver seat positioned when you remove the
key from the ignition switch.
•When you remove the key from the ignition switch,
the driver seat will move about 2.4 in (60 mm) rear-
ward if the driver seat position is greater than or equal
to 2.7 in (67.7 mm) forward of the rear stop. The seat
will return to its previously set position when you
insert the key into the ignition switch and turn it out of
the LOCK position.
218 UNDERSTANDING THE FEATURES OF YOUR VEHICLE
Page 221 of 683

•When you remove the key from the ignition switch the
driver seat will move to a position 0.3 in (7.7 mm)
forward of the rear stop if the driver seat position is
between 0.9 – 2.7 in (22.7 – 67.7 mm) forward of the
rear stop. The seat will return to its previously set
position when you insert the key into the ignition
switch and turn it out of the LOCK position.
•The Easy Entry/Easy Exit feature is disabled when the
driver seat position is less than 0.9 in (22.7 mm)
forward of the rear stop. At this position, there is no
benefit to the driver by moving the seat for Easy Exit
or Easy Entry.Each stored memory setting will have an associated Easy
Entry and Easy Exit Position.
NOTE:The Easy Entry/Easy Exit feature can be enabled
or disabled through the programmable features in the
Electronic Vehicle Information Center (EVIC). If your
vehicle is not equipped with an EVIC, your dealership
can activate/deactivate this feature for you. For details,
refer to “Electronic Vehicle Information Center (EVIC)/
Customer-Programmable Features” in “Understanding
Your Instrument Panel” for further information.
3
UNDERSTANDING THE FEATURES OF YOUR VEHICLE 219
Page 222 of 683
TO OPEN AND CLOSE THE HOOD
To open the hood, two latches must be released.
1. Pull the hood release lever located on the instrument
panel, below the steering column.2. Move to the front of the vehicle and look inside the
center of the hood opening. Locate, then push the
safety catch downward while raising the hood at the
same time.
Hood Release Lever
Safety Lever Location
220 UNDERSTANDING THE FEATURES OF YOUR VEHICLE
Page 224 of 683

LIGHTS
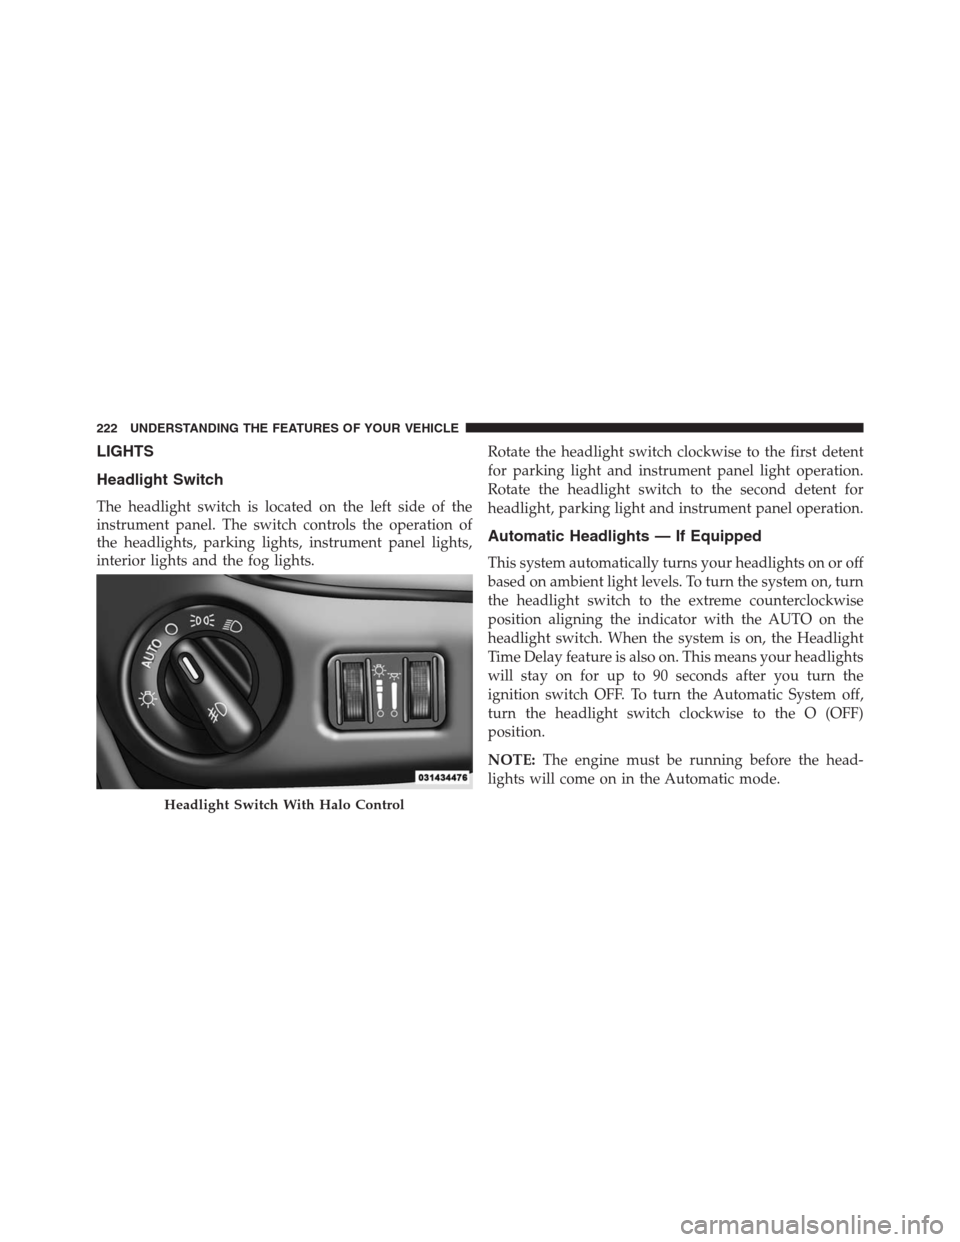
Headlight Switch
The headlight switch is located on the left side of the
instrument panel. The switch controls the operation of
the headlights, parking lights, instrument panel lights,
interior lights and the fog lights.Rotate the headlight switch clockwise to the first detent
for parking light and instrument panel light operation.
Rotate the headlight switch to the second detent for
headlight, parking light and instrument panel operation.
Automatic Headlights — If Equipped
This system automatically turns your headlights on or off
based on ambient light levels. To turn the system on, turn
the headlight switch to the extreme counterclockwise
position aligning the indicator with the AUTO on the
headlight switch. When the system is on, the Headlight
Time Delay feature is also on. This means your headlights
will stay on for up to 90 seconds after you turn the
ignition switch OFF. To turn the Automatic System off,
turn the headlight switch clockwise to the O (OFF)
position.
NOTE:The engine must be running before the head-
lights will come on in the Automatic mode.
Headlight Switch With Halo Control
222 UNDERSTANDING THE FEATURES OF YOUR VEHICLE