2013 DODGE DURANGO AUX
[x] Cancel search: AUXPage 47 of 140
Radio Operation
Seek Up/Down Buttons
• Press to seek through radio stations in AM or FM bands.
• Hold either button to bypass stations without stopping.
Store Radio Presets
• Press the “SET/RND” button once and SET 1 will show in the display. Then selectbutton (1–6).
• A second station may be added to each push button. Press the “SET/RND” button twice and SET 2 will show in the display. Then select button (1–6).
CD/DISC Operation
Seek Up/Down Buttons
• Press to seek through CD tracks.
• Hold either button to bypass tracks without stopping.
SET/RND Button (Random Play)
• Press this button while the CD is playing to activate Random Play.
• This feature plays the selections on the CD in random order to provide an interesting change of pace.
Audio Jack Operation
• The AUX/Audio Jack provides a means to connect a portable audio device, such as an MP3 player or an iPod®, to the vehicles sound system. This requires the use of a 3.5 mm
stereo audio patch cable.
• Pressing the AUX button will change the mode to auxiliary device if the Audio Jack is connected, allowing the music from your portable device to play through the vehicle's
speakers.
• The functions of the portable device are controlled using the device buttons, not the buttons on the radio. However, the volume may be controlled using the radio or portable
device.
ELECTRONICS
45
Page 50 of 140
LIST Button
• Press the “LIST” button to bring up a list of all folders on the CD. Scroll up or down the listby turning the “TUNE/SCROLL” control knob.
• To select a folder from the list, press the “TUNE/SCROLL” control knob and the radio will begin playing the files contained in that folder.
Audio Jack Operation
•
The AUX/Audio Jack provides a means to connect a portable audio device, such as an MP3
player or an iPod®, to the vehicles sound system. This requires the use of a 3.5 mm stereo
audio patch cable.
•Pressing the AUX button will change the mode to auxiliary device if the Audio Jack is con-
nected, allowing the music from your portable device to play through the vehicle's speakers.
•The functions of the portable device are controlled using the device buttons, not the buttons
on the radio. However, the volume may be controlled using the radio or portable device.
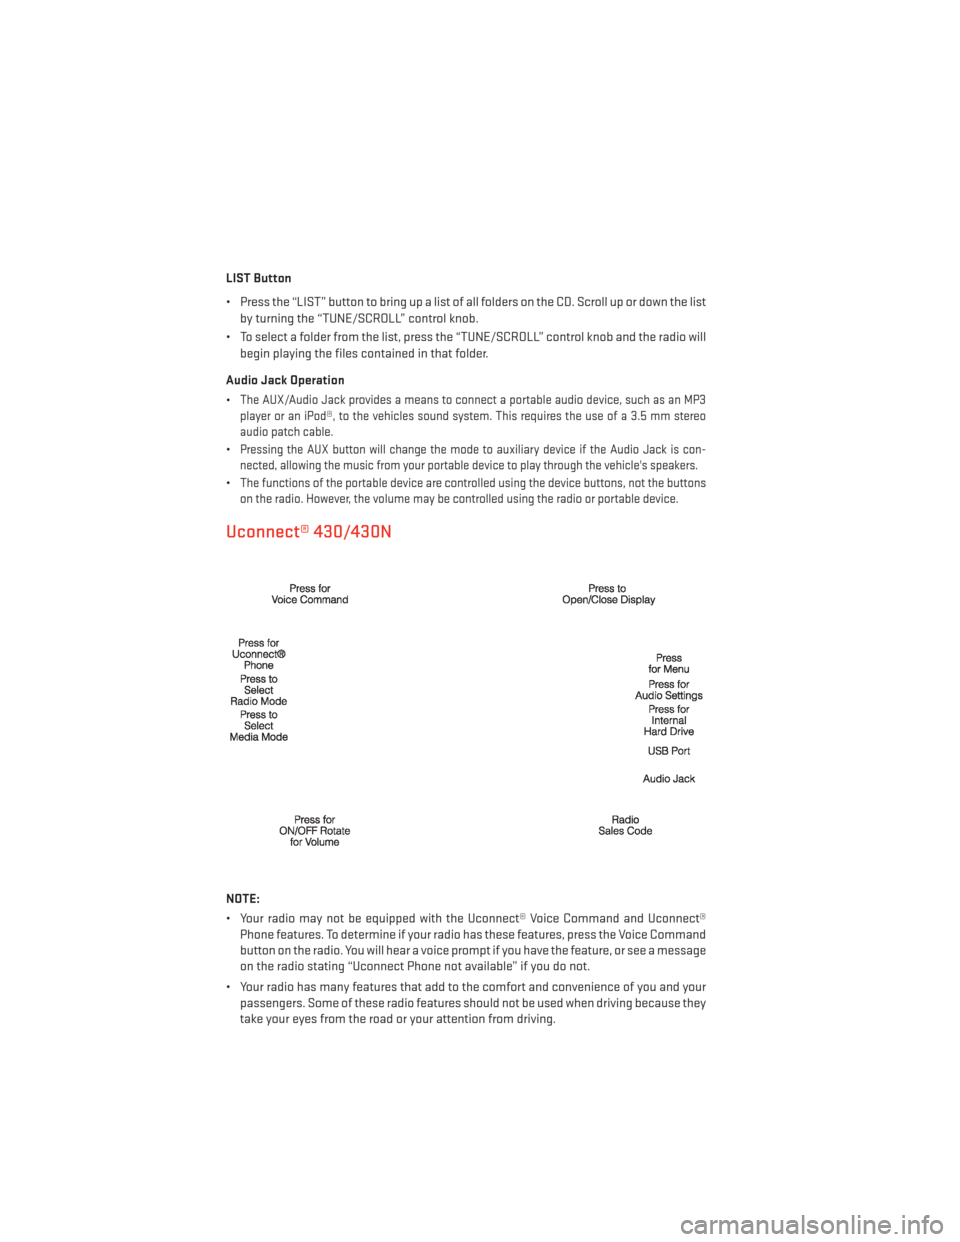
Uconnect® 430/430N
NOTE:
• Your radio may not be equipped with the Uconnect® Voice Command and Uconnect® Phone features. To determine if your radio has these features, press the Voice Command
button on the radio. You will hear a voice prompt if you have the feature, or see a message
on the radio stating “Uconnect Phone not available” if you do not.
• Your radio has many features that add to the comfort and convenience of you and your passengers. Some of these radio features should not be used when driving because they
take your eyes from the road or your attention from driving.
ELECTRONICS
48
Page 51 of 140
Clock Setting
• Turn the radio on, then touch the screen where the time is displayed.
• Touch the “USER CLOCK” soft-key (Navigation radio only).
• To adjust the hours, touch either the “HOUR FORWARD” or “HOUR BACKWARD” soft-key.
• To adjust the minutes, touch either the “MINUTE FORWARD” or “MINUTE BACKWARD”soft-key.
• To save the new time setting, touch the screen where the word “Save” is displayed.
Menu
• Press the “MENU” hard-key to access the System Setup menu and the My Files menu.
• Press the “MENU” hard-key in an active mode (SAT, CD, AUX, etc.) to change mode specific settings.
Equalizer, Balance And Fade
Audio Control Menu
• Press the “AUDIO” hard-key on the right side of the radio.
•
Use either the arrow soft-keys or the cross-
hair on the screen to change Balance and
Fade. The “CENTER” soft-key resets the set-
tings.
• Touch the “Equalizer” soft-key and use either the arrow soft-keys or the sliders on
the screen to adjust BASS, MID, and/or
TREBLE.
Display Settings
• Press the “MENU” hard-key and touch the “Display Settings” soft-key to access the
Display Settings menu.
• Select the “Daytime Colors” soft-key to switch to manual daytime mode and to
adjust the brightness of the display using
daytime colors.
• Select the “Nighttime Colors” soft-key to switch to manual nighttime mode and to
adjust the brightness of the display using nighttime colors.
• Select the “Auto Color Mode” soft-key to switch to automatic daytime/nighttime mode and to control the brightness of the display using the dimmer switch of the vehicle.
• Touch the “EXIT” soft-key to save your settings.
ELECTRONICS
49
Page 53 of 140

CD/DVD Disc Operation
• Press the “MEDIA” hard key to display the media source tabs at the top of the screen.Select the source by touching the “HDD,” “DISC,” or “AUX” media source soft-key tab.
NOTE:
Your Touch-Screen Radio will usually automatically switch to the appropriate mode when
something is first connected or inserted into the system.
Insert a CD/DVD Disc
• To insert a disc, press the “LOAD” hard-key.
• With the printed side upwards, insert the disc into the disc slot of the radio. The radio pulls the disc in automatically and closes the flip screen. The radio selects the appropri-
ate mode after the disc is recognized, and starts playing the first track. The display
shows “Reading...” during this process.
Seek Up/Seek Down
• Press the “Seek Up” or “Seek Down” soft-keys to seek through tracks in Disc Mode. Hold either Seek to bypass tracks without stopping.
ELECTRONICS
51
Page 54 of 140
Audio Jack Operation
• The AUX/Audio Jack provides a means to connect a portable audio device, such as anMP3 player or an iPod®, to the vehicles sound system. This requires the use of a 3.5 mm
stereo audio patch cable.
• Press the “MEDIA” hard-key then the “AUX” soft-key to change the mode to auxiliary device if the Audio Jack is connected, allowing the music from your portable device to
play through the vehicle's speakers.
•
The functions of the portable device are controlled using the device itself, not the buttons on
the radio. However, the volume may be controlled using the radio or portable device.
Hard Disk Drive (HDD) Operation
• The Hard Disk Drive (HDD) mode gives you access to the audio files on the internal hard disk drive. It functions similar to a CD player, with the exception that the internal HDD can
hold more tracks.
• It is also possible to import display pictures to the internal hard disk drive. The pictures can be displayed on the right half of the radio screen.
•
Before using the HDD mode, you will need to copy songs and pictures to the internal hard
drive. Songs and pictures can be added to the hard drive by using a CD or USB device (e.g.
thumb drive or memory stick).
NOTE:
• HDD supports only .jpg/JPEG formats for photos.
• WMA/MP3 Files and Selective Songs from a CD can also be added to the HDD. See the Uconnect® 430/430N User's Manual for more information.
Copying Music From CD
• Press the “LOAD” hard-key.
• Insert a disc, then press the “MY FILES” hard-key and then select the “MY MUSIC” soft-key.
• Touch the “Add Music Files to HDD” soft-key, then touch the “Disc” soft-key in the next screen to start the process.
NOTE:
• You might need to select the folder or title depending on the CD, then press “DONE”
to start the copy process.
• The copy progress is shown in the lower left corner of the screen.
ELECTRONICS
52
Page 61 of 140
Menu
• Press the “MENU” hard-key to access the System Setup menu and the My Files menu.
• Press the “MENU” hard-key in an active mode (SAT, CD, AUX, etc.) to change modespecific settings.
Equalizer, Balance And Fade
Audio Control Menu
•
Press the “MENU” hard-key on the right
side of the radio. Then press the “Audio
Control” soft-key to get to the audio control
menu.
•Use either the arrow soft-keys or the cross-
hair on the screen to change Balance and
Fade. The “CENTER” soft-key resets the
settings.
• Touch the “Equalizer” soft-key and use either the arrow soft-keys or the sliders on the screen to adjust BASS, MID, and/or
TREBLE.
Display Settings
• Press the “MENU” hard-key and touch the “Display Settings” soft-key to access the
Display Settings menu.
• Select the “Daytime Colors” soft-key to switch to manual daytime mode and to
adjust the brightness of the display using
daytime colors.
• Select the “Nighttime Colors” soft-key to switch to manual nighttime mode and to
adjust the brightness of the display using nighttime colors.
• Select the “Auto Color Mode” soft-key to switch to automatic daytime/ nighttime mode and to control the brightness of the display using the dimmer switch of the vehicle.
• Touch the “EXIT” soft-key to save your settings.
ELECTRONICS
59
Page 63 of 140

CD/DVD Disc Operation
• Press the “RADIO/MEDIA” hard-key until the media source tabs are displayed at the topof the screen. Select the source by touching the “HDD,” “DISC,” or “AUX” media source
soft-key tab.
NOTE:
Your Touch-Screen Radio will usually automatically switch to the appropriate mode when
something is first connected or inserted into the system.
Insert a CD/DVD Disc
• To insert a disc, press the “OPEN/CLOSE” hard-key.
• With the printed side upwards, insert the disc into the disc slot of the radio. The radio pulls the disc in automatically and closes the flip screen. The radio selects the appropri-
ate mode after the disc is recognized, and starts playing the first track. The display
shows “Reading...” during this process.
Seek Up/Seek Down
• Press the “Seek Up” or “Seek Down” hard-keys to seek through tracks in Disc Mode. Hold either Seek to bypass tracks without stopping.
ELECTRONICS
61
Page 64 of 140
Audio Jack Operation
• The AUX/Audio Jack provides a means to connect a portable audio device, such as anMP3 player or an iPod®, to the vehicles sound system. This requires the use of a 3.5 mm
stereo audio patch cable.
• Press the “RADIO/MEDIA” hard-key, then the “AUX” soft-key to change the mode to auxiliary device if the Audio Jack is connected, allowing the music from your portable
device to play through the vehicle's speakers.
• The functions of the portable device are controlled using the device itself, not the buttons on the radio. The volume may be controlled using the radio or portable device.
Hard Disk Drive (HDD) Operation
• The Hard Disk Drive (HDD) mode gives you access to the audio files on the internal hard disk drive. It functions similar to a CD player, with the exception that the internal HDD can
hold more tracks.
• It is also possible to import display pictures to the internal hard disk drive. The pictures can be displayed on the right half of the radio screen.
• Before using the HDD mode, you will need to copy songs and pictures to the internal hard drive. Songs and pictures can be added to the hard drive by using a CD or USB device
(e.g. thumb drive or memory stick).
NOTE:
• HDD supports only .jpg/JPEG formats for photos.
• WMA/MP3 Files and Selective Songs from a CD can also be added to the HDD. See the Uconnect® 730N User's Manual for more information.
Copying Music From CD
• Press the “OPEN/CLOSE” hard-key.
• Insert a disc, then press the “MENU” hard-key.
• Touch the “MY FILES” soft-key, then select “MY MUSIC.”
ELECTRONICS
62