Page 302 of 604
Two Button EVIC — If Equipped
This system allows the driver to select a variety of useful
information by pressing the switches mounted on the
steering wheel. The EVIC consists of the following:
•Odometer
•Digital Vehicle Speed
•Trip Info
•Range To Empty
•Fuel Economy Info
•Cruise Control Info
•Stored Messages
•Tire Pressure
•Settings
•Units
•LanguageThe system allows the driver to select information by
pressing the following buttons mounted on the steering
wheel:
EVIC Steering Wheel Buttons (Two–Button EVIC
Controls)
300 UNDERSTANDING YOUR INSTRUMENT PANEL
Page 306 of 604
•Settings
•Units
•Language
NOTE: For features in the EVIC that can be reset
(Average Fuel Economy), the EVIC prompts a reset with
a RIGHT arrow button graphic and the word RESET next
to it.
Trip Info
Press and release the UP arrow button until the Trip Info
icon is highlighted in the EVIC. Press and release the
RIGHT arrow button to display the following three trip
features in the next screen:
•Trip A
•Trip B
•Elapsed Time Press the UP buttons to cycle through all the Trip
Computer functions.
The Trip Functions mode displays the following
information:
Trip A
Shows the total distance traveled for Trip A since the last
reset.
Trip B
Shows the total distance traveled for Trip B since the last
reset.
Elapsed Time
Shows the total elapsed time of travel since the last reset.
Elapsed time will increment when the ignition is in the
ON or START position.
304 UNDERSTANDING YOUR INSTRUMENT PANEL
Page 309 of 604
Four Button EVIC — If Equipped
This system allows the driver to select a variety of useful
information by pressing the switches mounted on the
steering wheel. The EVIC consists of the following:
•Radio Info
•Fuel Economy Info
•Screen Setup
•Digital Vehicle Speed
•Analog Vehicle Speed
•Trip Info
•Tire Pressure
•Vehicle Info
•Stored Warning MessagesThe system allows the driver to select information by
pressing the following buttons mounted on the steering
wheel:
EVIC Steering Wheel Buttons (Four–Button EVIC
Controls)
4
UNDERSTANDING YOUR INSTRUMENT PANEL 307
Page 324 of 604
Press the UP/DOWN buttons to cycle through all the
Trip Computer functions or press the LEFT arrow button
to return to the main menu.The Trip Functions mode displays the following
information:
Trip A
Shows the total distance traveled for Trip A since the last
reset.
Trip B
Shows the total distance traveled for Trip B since the last
reset.
Elapsed Time
Shows the total elapsed time of travel since the last reset.
Elapsed time will increment when the ignition is in the
ON or START position.
Resetting A Trip Info Function
To Reset any of the three Trip Info functions, select the
function you want to reset using the UP or DOWN
buttons. Press the RIGHT arrow button until the feature
displays zero.
Trip Info Digital Display
322 UNDERSTANDING YOUR INSTRUMENT PANEL
Page 325 of 604

Stored Messages
Press and release the UP or DOWN arrow
button until the Messages display icon is high-
lighted in the EVIC. This feature shows the
number of stored warning messages. Pressing
the RIGHT arrow button will allow you to see what the
stored messages are. Press the LEFT arrow button to
return to the Main Menu.
Screen Setup
Screen Setup Display Analog Icon
Screen Setup Display Digital Icon
Press and release the UP or DOWN arrow button until
the Screen Setup display icon is highlighted in the EVIC. Press and release the RIGHT arrow button to enter the
Screen Setup sub-menu. The Screen Setup feature allows
you to change what information is displayed in the
instrument cluster as well as the location that information
is displayed.
Press and release the UP or DOWN arrow button until
the Screen Setup display icon is highlighted in the EVIC.
Press and release the RIGHT arrow button to enter the
Screen Setup sub-menu. The Screen Setup feature allows
you to change the location that information is displayed
within the instrument cluster. Use the UP and DOWN
buttons to highlight a screen setup location (i.e., Upper
Left, Upper Right, etc.) then press the RIGHT arrow
button to select the location and make changes. Press the
UP and DOWN buttons to select the information you
would like to display in that location (i.e., Date, Time,
Outside Temp, etc.) and press the RIGHT arrow button to
save the display setting. You can press the LEFT arrow
button at any time to back out of a sub-menu selection.
4
UNDERSTANDING YOUR INSTRUMENT PANEL 323
Page 336 of 604

grasped. With Passive Entry, if 1st Press Of Key Fob
Unlocks is programmed touching the handle more than
once will only result in the driver ’s door opening. If
driver door first is selected, once the driver door is
opened, the interior door lock/unlock switch can be used
to unlock all doors (or use RKE transmitter).
•Passive Entry
This feature allows you to lock and unlock the vehicle’s
door(s) without having to press the Remote Keyless
Entry (RKE) transmitter lock or unlock buttons. To make
your selection, touch the Passive Entry soft-key, until a
check-mark appears next to setting, showing that setting
has been selected. Touch the back arrow soft-key to
return to the previous menu. Refer to “Keyless Enter-N-
Go™” in “Things To Know Before Starting Your Vehicle”.
Auto-On Comfort & Remote Start
After pressing the Auto-On Comfort & Remote Start
soft-key the following settings will be available.
•Horn With Remote Start
When this feature is selected, the horn will sound when
the remote start is activated. To make your selection,
touch the Sound Horn With Remote Start soft-key, until a
check-mark appears next to setting, showing that setting
has been selected. Touch the back arrow soft-key to
return to the previous menu.
•Auto-On Driver Heated Seat & Steering Wheel With
Vehicle Start — If Equipped
When this feature is selected the driver’s heated seat and
heated steering wheel will automatically turn on when
temperatures are below 40° F (4.4° C). To make your
selection, touch the Auto Heated Seats soft-key, until a
check-mark appears next to setting, showing that setting
has been selected. Touch the back arrow soft-key to
return to the previous menu.
334 UNDERSTANDING YOUR INSTRUMENT PANEL
Page 341 of 604

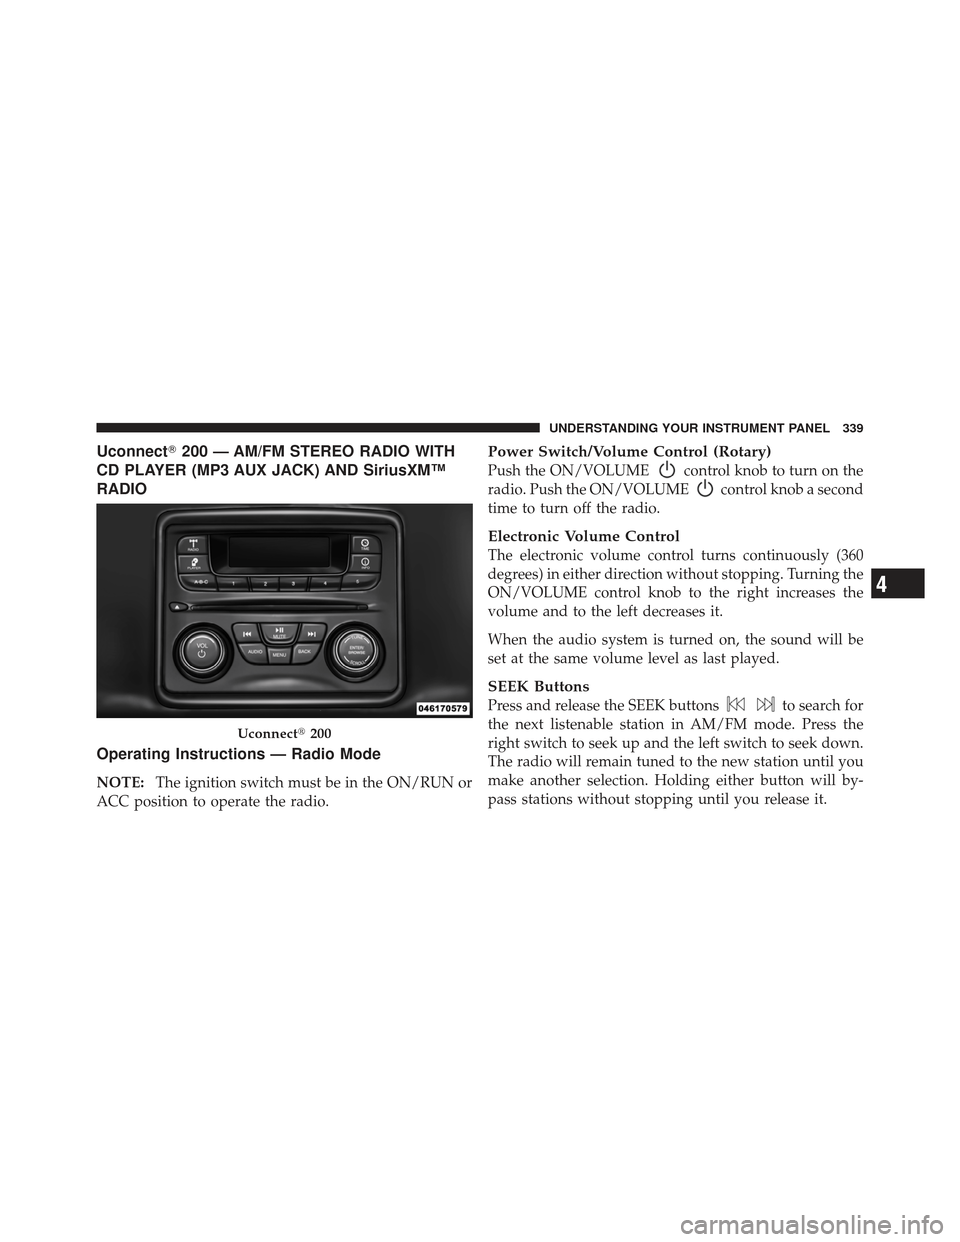
Uconnect�200 — AM/FM STEREO RADIO WITH
CD PLAYER (MP3 AUX JACK) AND SiriusXM™
RADIO
Operating Instructions — Radio Mode
NOTE: The ignition switch must be in the ON/RUN or
ACC position to operate the radio.
Power Switch/Volume Control (Rotary)
Push the ON/VOLUMEcontrol knob to turn on the
radio. Push the ON/VOLUME
control knob a second
time to turn off the radio.
Electronic Volume Control
The electronic volume control turns continuously (360
degrees) in either direction without stopping. Turning the
ON/VOLUME control knob to the right increases the
volume and to the left decreases it.
When the audio system is turned on, the sound will be
set at the same volume level as last played.
SEEK Buttons
Press and release the SEEK buttonsto search for
the next listenable station in AM/FM mode. Press the
right switch to seek up and the left switch to seek down.
The radio will remain tuned to the new station until you
make another selection. Holding either button will by-
pass stations without stopping until you release it.
Uconnect� 200
4
UNDERSTANDING YOUR INSTRUMENT PANEL 339
Page 342 of 604

TIME Button
Press the TIME button to alternate display of the time
and radio frequency.
Clock Setting Procedure
1. Press and hold the TIME button until the hours are
highlighted.
2. Adjust the hours by turning the right side TUNE/
SCROLL control knob.
3. After adjusting the hours, press the right side ENTER/
BROWSE control knob to set the minutes. The minutes
will highlight.
4. Adjust the minutes using the right side TUNE/
SCROLL control knob.
5. To exit, press the TIME button or press the BACK
button to return to the previous menu.The clock can also be set by pressing the MENU button.
For vehicles equipped with satellite radio, press the
MENU button until CLOCK appears in the display.
Using the ENTER/BROWSE button select SET TIME,
and then follow the above procedure, starting at Step 2.
NOTE:
Time format has the options of 12HR or 24HR.
Selecting one of these options will change the way the
clock is displayed.
INFO Button
Press the INFO button for an RDS station (one with call
letters displayed). The radio will return a Radio Text
message broadcast from an FM station (FM mode only).
RW/FF
Pressing the RW (Rewind) or FF (Fast Forward) buttons
causes the tuner to search for the next frequency in the
direction of the arrows. This feature operates in either
AM or FM frequencies.
340 UNDERSTANDING YOUR INSTRUMENT PANEL