2013 DODGE CHARGER display
[x] Cancel search: displayPage 58 of 132

Uconnect® Phone (Bluetooth® HANDS FREE CALLING)
• If the Uconnect® Phone Buttonexists on your steering wheel, then you have the
Uconnect® Phone features.
• The Uconnect® Phone is a voice-activated, hands-free, in-vehicle communications system with Voice Command Capability (see Voice Command section).
• The Uconnect® Phone allows you to dial a phone number with your mobile phone using simple voice commands or using screen soft-keys.
• Refer to the Understand The Features Of Your Vehicle section of your vehicle's Owner's Manual on the DVD for further details.
NOTE:
The Uconnect® Phone requires a mobile phone equipped with the Bluetooth® Hands-Free
Profile, Version 1.0 or higher. For Uconnect® customer support: U.S. residents - visit
www.UconnectPhone.com or call 1–877–855–8400. Canadian Residents - call 1-800-465–
2001 (English) or 1-800-387-9983 (French).
Pairing a Phone
• To use the Uconnect® Phone feature, you must first pair your Bluetooth® phone with the Uconnect® system.
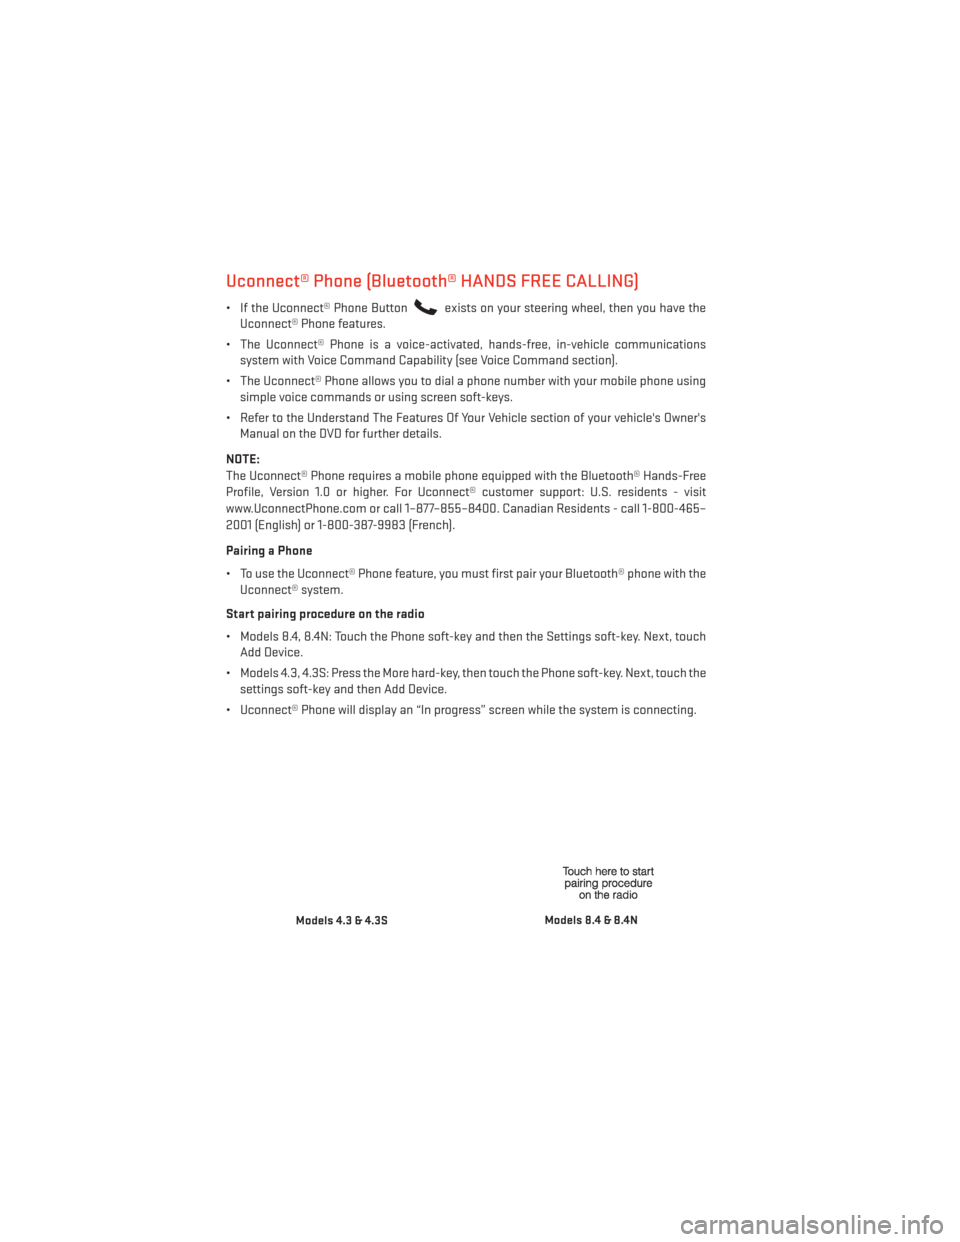
Start pairing procedure on the radio
• Models 8.4, 8.4N: Touch the Phone soft-key and then the Settings soft-key. Next, touch Add Device.
• Models 4.3, 4.3S: Press the More hard-key, then touch the Phone soft-key. Next, touch the settings soft-key and then Add Device.
• Uconnect® Phone will display an “In progress” screen while the system is connecting.
Models 4.3 & 4.3SModels 8.4 & 8.4N
ELECTRONICS
56
Page 62 of 132

Voice Command Tips
•
Using complete names (i.e; Call John Doe vs. Call John) will result in greater system accuracy.
• You can “chain” commands together for faster results. Say “Call John Doe, mobile”, forexample.
• If you are listening to available voice command options, you do not have to listen to the entire list. When you hear the command that you need, press the
button on the
steering wheel, wait for the beep and say your command.
Changing The Volume
• Start a dialogue by pressing the Phone button
, then say a command for example -
"Help".
• Use the radio ON/OFF VOLUME rotary knob to adjust the volume to a comfortable level while the Uconnect® system is speaking. Please note the volume setting for Uconnect®
is different than the audio system.
NOTE:
To access help, press the Uconnect® Phone
button on the steering wheel and say
"help." Touch the display or push either
orbutton and say "cancel" to cancel
the help session.
Voice Text Reply
• Uconnect® Phone can read or send new text messages on your mobile phone.
• Your mobile phone must support Voice Text Reply over Bluetooth® in order to use this feature. If the Uconnect® Phone determines your phone is not compatible with Voice Text
Reply messaging over Bluetooth® the “Messaging” button will be greyed out and the
feature will not be available for use.
NOTE:
• For mobile phone compatibility and pairing instructions, please visit www.UconnectPhone.com
• Uconnect® Phone Voice Text Reply is only available when the vehicle is not moving.
WARNING!
• Any voice commanded system should be used only in safe driving conditions follow- ing applicable laws regarding phone use. Your attention should be focused on safely
operating the vehicle. Failure to do so may result in a collision causing you and others
to be severely injured or killed.
• In an emergency, to use Uconnect® Phone, your mobile phone must be:
• turned on,
• paired to Uconnect® Phone,
• and have network coverage.
ELECTRONICS
60
Page 64 of 132

SiriusXM Travel Link“Show fuel prices”
“Show movie listings”
“Show current weather”
“Show extended weather”
“Show Travel Link favorites”
“Show NFL headlines”
“Show NBA rankings”
“Show NFL schedules”
“Show NBA scores”
SiriusXM Navigation “Navigate to (Address)”
“Navigate to (Point of Interest)”
NOTE:
•
For the shortened SiriusXM Satellite Radio mode commands to be recognized you must be
in that mode. For example, if you are in SiriusXM Satellite Radio mode you can say “39”, but
if you are not in SiriusXM mode, you would need to say “Tune to Satellite Channel 39.”
Common Navigation Voice Commands
• To access the navigation voice commands, press the Uconnect® Voice Command
button while in any mode and say “Navigation.”
• Once in the Navigation feature, you can simply Say What You Seeon the touch-screen to
give a navigation voice command.
• Locating an address can be given as a one shot entry. For example, after saying “Find
Address” and the system is ready, you can say the entire address in one command,
“1234 1st Street, Any Town, Michigan.” If you are searching for a particular address or
Point Of Interest, the available voice commands depend on what is displayed on the
touch-screen.
• When the Voice Command system is ready to be given a command, the green indicator is visible in the right corner of the touch-screen.
ELECTRONICS
62
Page 66 of 132

Compass Calibration
• This compass is self-calibrating, which eliminates the need to set the compass manu-ally. When the vehicle is new, the compass may appear erratic and the EVIC will display
“CAL” until the compass is calibrated.
• You may also calibrate the compass by completing one or more 360 degree turns (in an area free from large metal or metallic objects) until the “CAL” message displayed in the
EVIC turns off. The compass will now function normally.
ECO
• The ECO message will appear in your EVIC display when the Fuel Saver Technology is active and you are driving in a fuel efficient manner.
• This feature allows you to monitor when you are driving in a fuel efficient manner, and it can be used to modify driving habits in order to increase fuel economy.
PROGRAMMABLE FEATURES
Electronic Vehicle Information Center (EVIC)
•
The EVIC can be used to view or change the following settings. Press the UPor DOWN
button until System Setup displays, then press the SELECTbutton. Scroll through
the settings using the UP or DOWN buttons. Press the SELECT
button to change the
setting. Press the BACK button to scroll back to a previous menu or sub menu.
• Fuel Economy • Vehicle Info (Customer Information Features)
• Cruise • Tire PSI
• Vehicle Speed • Messages
• Trip Info • Turn Menu Off
• Units
ELECTRONICS
64
Page 67 of 132

Uconnect® 4.3 Customer Programmable Features
•
The Uconnect® 4.3 system allows you to access Customer Programmable feature settings
such as Display, Clock, Safety/Assistance, Lights, Doors & Locks, Heated Seats, Engine
Off Operation, Compass Settings, Audio, Phone/Bluetooth and SiriusXM Setup through
hard-keys and soft-keys.
• Press the Settings hard-key to on the right side of the unit to access the Settings screen, use the Page Up/Down soft-keys to scroll through the following settings. The following
feature settings are available:
• Display • Clock
• Safety / Assistance • Doors & Locks
• Heated Seats • Engine Off Options
• Compass Settings • Audio
• Phone / Bluetooth • SiriusXM Setup
• Auto-On Comfort & Remote Start • Lights
Uconnect® 8.4 Customer Programmable Features
• The Uconnect® 8.4 system allows you to access Customer Programmable feature set- tings such as Display, Clock, Safety/Assistance, Lights, Doors & Locks, Heated Seats,
Engine Off Operation, Compass Settings, Audio, Phone/Bluetooth and SiriusXM Setup
through soft-keys.
• Touch the More soft-key on the bottom of the screen, then touch the Settings soft-key to access the Settings screen. When making a selection, scroll up or down until the
preferred setting is highlighted, then press and release the preferred setting until a
check-mark appears next to the setting, showing that setting has been selected. The
following feature settings are available:
• Display • Clock
• Safety / Assistance • Doors & Locks
• Auto-On Comfort & Remote Start • Engine Off Options
• Compass Settings • Audio
• Phone / Bluetooth • SiriusXM Setup
ELECTRONICS
65
Page 73 of 132

AUTOSTICK®
Steering Wheel Mounted Paddle Shifters Or Console Mounted Shifter
• AutoStick® is a driver-interactive trans- mission feature that offers manual gear
shifting to provide you with more control
of the vehicle. AutoStick® allows you to
maximize engine braking, and improve
overall vehicle performance.
•
This system can also provide you with
more control during passing, city driving,
cold slippery conditions, mountain driving,
trailer towing, and many other situations.
Operation
• When the shift lever is in the DRIVE posi- tion, the transmission will operate auto-
matically, shifting between the five avail-
able gears. To engage AutoStick®, simply
move the shift lever to the right or left (+/-) while in the DRIVE position, or press one of the
steering wheel mounted shift paddles (+/-). When AutoStick® is active, the current
transmission gear is displayed in the Electronic Vehicle Information Center (EVIC) por-
tion of the instrument cluster. In AutoStick® mode, the transmission will shift when
manually selected by the driver (using the shift lever, or the shift paddles), unless an
engine lugging or overspeed condition would result. It will remain in the selected gear
until another upshift or downshift is chosen, except as described below:• The transmission will automatically downshift as the vehicle slows (to prevent engine
lugging) and will display the current gear.
• The transmission will automatically downshift to first gear when coming to a stop.
• You can start out in first or second gear. Tapping (+) (at a stop) will allow starting in second gear. Starting out in second gear is helpful in snowy or icy conditions.
• The system will ignore attempts to upshift at too low of a vehicle speed.
• Transmission shifting will be more noticeable when AutoStick® is engaged. To disen- gage AutoStick® mode, hold the shift lever to the right or press and hold the (+) shift
paddle until “D” is once again displayed in the instrument cluster. You can shift in or out
of the AutoStick® mode at any time without taking your foot off the accelerator pedal.
SRT8
71
Page 74 of 132

ELECTRONIC CONTROL DAMPING SYSTEM
• This vehicle may be equipped with an electronic controlled damping system. This systemreduces body roll and pitch in many driving situations including cornering, acceleration
and braking. There are three modes of operation:
Automatic (Auto) Mode
•
This is the default position when vehicle
ignition is first turned on. This mode will
give a sporty, but comfortable ride. Within
this mode, the suspension will adapt to the
vehicle inputs, including vehicle speed,
steering inputs, braking, and acceleration.
• If AutoStick® is engaged while in “Auto” mode, the transmission will automati-
cally shift up if maximum engine speed is
reached.
• Heavily pressing the accelerator pedal may generate an automatic downshift for
improved acceleration.
• This mode should be used for most driving situations.
Sport Mode
SPORT
• This mode is driver selectable when the vehicle is placed in SPORT mode (press
the CONTROLS button and then the
SPORT button on the display screen). This
mode will set suspension for maximum
performance handling and is intended for
spirited driving.
• When SPORT mode is enabled, a flag will light up in the instrument cluster.
NOTE:
The SPORT setting will provide a firmer ride.
Track Mode
• In track mode, the transmission has a sportier, more aggressive shift pattern.
•
This mode includes SPORT Suspension
and affects transmission shifting in either
Auto or Manual mode.
•If AutoStick (console shifter or paddle
shifters) is engaged while in “Track” mode,
the transmission will remain in the selected
gear even when maximum engine speed is
reached.
SRT8
72
Page 75 of 132

• Engine overspeed protection is achieved through fuel cut off at or near redline.
• This mode will provide aggressive shifting and is intended for spirited driving.
• The system will return to SPORT mode when the ignition switch is cycled from RUN toOFF, and back to RUN again, if this mode is selected.
PERFORMANCE FEATURES
Electronic Vehicle Information Center (EVIC)
• The EVIC can be used to view or changethe following Performance Features.
Press the UP
or DOWN button
until System Setup displays, then press
the SELECT
button. Scroll through
the settings using the UP or DOWN but-
tons. Press the SELECT
button to
change the setting. Press the BACK but-
ton to scroll back to a previous menu or
sub menu.
• 0-60 mph (0-100 km/h) • Instantaneous G-Force
• Braking Distance • Peak G-Force
• 1/8 Mile • Digital Speedometer
• 1/4 Mile
0-60 mph (0-100 km/h)
• When selected, this screen displays the time it takes for the vehicle to go from 0 to 60 mph (0 to 100 km/h) within 10 seconds.
Braking Distance
• When selected, this screen displays the vehicle's braking distance and the speed at which the brake pedal was depressed.
1/8 Mile, 1/4 Mile
• When selected, this screen displays the time it takes the vehicle to travel 1/8 mile (1/4 mile) within 30 seconds and the vehicle's speed when it reaches 1/8 mile (1/4 mile).
Instantaneous G-Force
• When selected, this screen displays the current G-Force (lateral and longitudinal) along with a friction circle that displays the directions of the forces.
Peak G-Force
•
When selected, this screen displays all four G-Force values (two lateral and two longitudinal).
SRT8
73