2013 DACIA SANDERO warning lights
[x] Cancel search: warning lightsPage 43 of 146
overspeed buzzer ..................................................(current page)control instruments ...............................(up to the end of the DU)instrument panel ...................................(up to the end of the DU)warning lights........................................(up to the end of the DU)
1.39
ENG_UD5560_1Tableau de bord : afficheur et indicateur (B90 - Dacia)ENG_NU_817-2_NU_Dacia_1
INSTRUMENT PANEL: displays and indicators
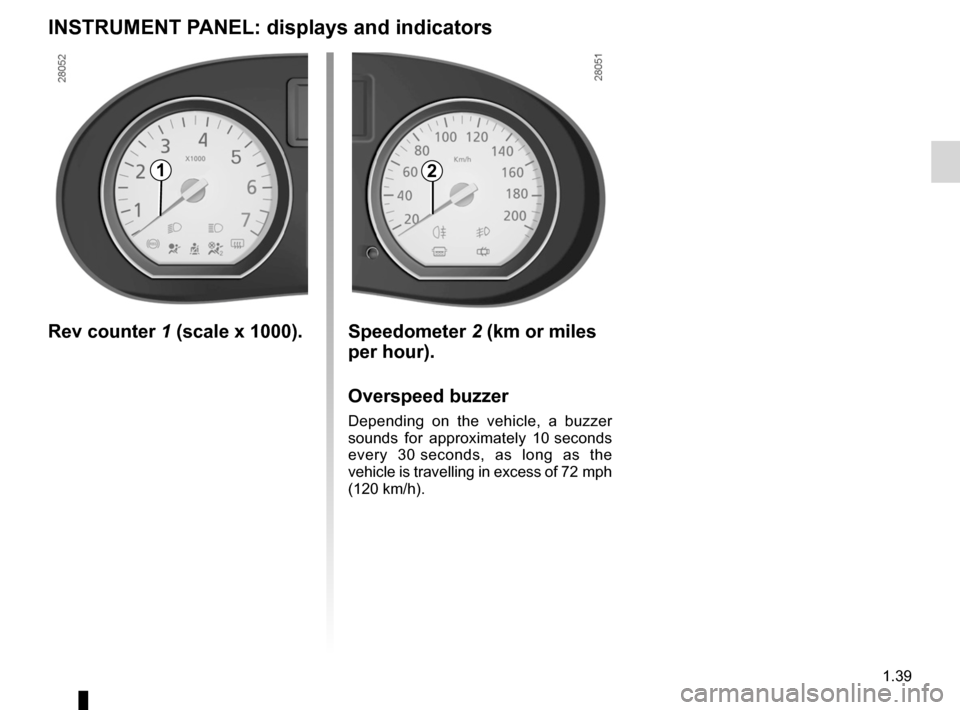
Rev counter 1 (scale x 1000). Speedometer 2 (km or miles
per hour).
Overspeed buzzer
Depending on the vehicle, a buzzer
sounds for approximately 10 seconds
every 30 seconds, as long as the
vehicle is travelling in excess of 72 mph
(120 km/h).
21
Page 45 of 146

control instruments ...............................(up to the end of the DU)trip computer and warning system........(up to the end of the DU)warning lights........................................(up to the end of the DU)
1.41
ENG_UD5561_1Ordinateur de bord (B90 - Dacia)ENG_NU_817-2_NU_Dacia_1
Ordinateur de bord
TRIP COMPUTER AND w ARNING SYSTEM
Display 1
General reset and trip
mileage recorder reset key
2
To reset the trip mileage recorder, the display must show the Trip mileometer function.
Press and hold button
2.
Display selection key 3
Keep pressing key 3 briefly to scroll through the following information (de- pending on the vehicle) in sequence:
a) total mileage recorder,b) trip mileage recorder,c) fuel used,d) average consumption,e) estimated range,f) distance travelled,g) average speed.
Refer to the table on the following pages showing display examples.
The information displayed DEPENDS ON THE VEHICLE EQUIPMENT AND COUNTRY.
1
23
Page 51 of 146

warning buzzer ......................................................(current page)fog lights ................................................................(current page)lights:fog lights ..........................................................(current page)
JauneNoirNoir texte
1.47
ENG_UD5563_1Éclairages et signalisations extérieures (B90 - Dacia)ENG_NU_817-2_NU_Dacia_1
EXTERIOR LIGHTING AND SIGNALS (continued)
When the exterior vehicle lights are ex- tinguished, the rear fog light is extin- guished or the equipment returns to the front lights position (if they are fitted).
Lights-on reminder buzzer
A warning buzzer will sound when a front door is opened and the lights are left on after the ignition has been switched off (to prevent discharge of the battery).
gFront fog lights
Turn the centre ring of stalk 3
until the symbol is opposite mark 4.
The fog lights only light up if the exterior lights have been switched on. An indi- cator light on the instrument panel then lights up.
Do not forget to switch off the fog lights when they are no longer needed, to avoid inconveniencing other road users.
hRear fog lights
Turn the centre ring of
stalk 3 until the symbol is opposite
mark 4.
The fog lights only light up if the exterior lights have been switched on. An indi- cator light on the instrument panel then lights up.
Remember to switch off the these lights when they are no longer required to avoid inconveniencing other road users.
343
Page 53 of 146
headlight flashers .................................(up to the end of the DU)horn ......................................................(up to the end of the DU)indicators ..............................................(up to the end of the DU)lights:direction indicators ..........................(up to the end of the DU)lights:hazard warning ...............................(up to the end of the DU)indicators:direction indicators ..........................(up to the end of the DU)hazard warning lights signal .................(up to the end of the DU)hazard warning lights signal .................(up to the end of the DU)
1.49
ENG_UD5565_1Avertisseurs sonore et lumineux (B90 - Dacia)ENG_NU_817-2_NU_Dacia_1
Avertisseurs sonores et lumineux
AUDIBLE AND vISUAL SIGNALS
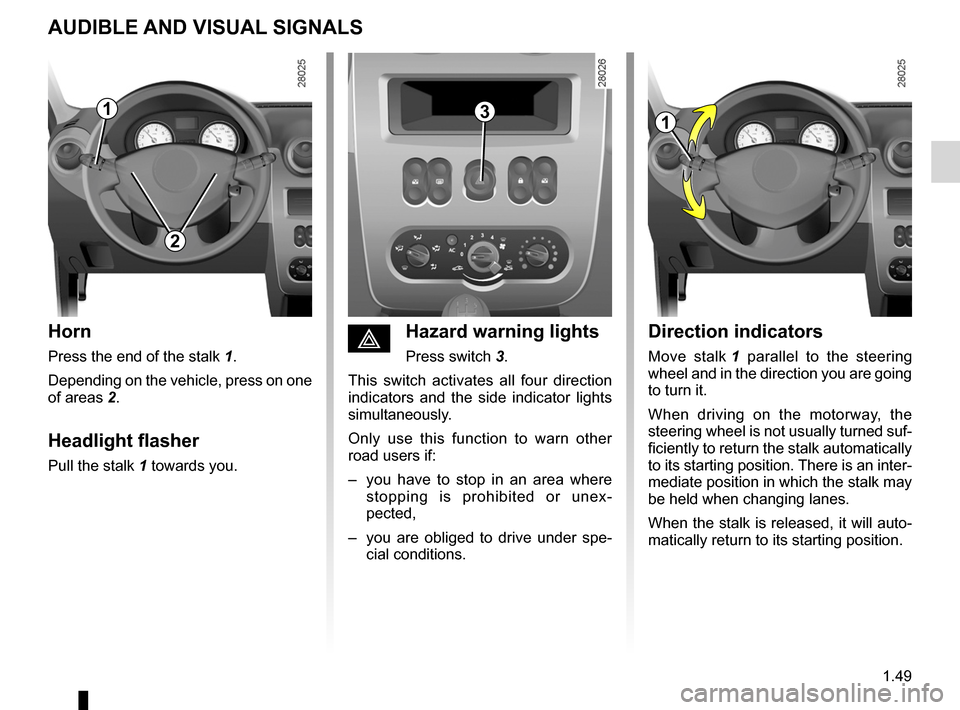
Horn
Press the end of the stalk 1.
Depending on the vehicle, press on one
of areas 2.
Headlight flasher
Pull the stalk 1 towards you.
Direction indicators
Move stalk 1 parallel to the steering wheel and in the direction you are going to turn it.
When driving on the motorway, the steering wheel is not usually turned suf- ficiently to return the stalk automatically to its starting position. There is an inter- mediate position in which the stalk may
be held when changing lanes.
When the stalk is released, it will auto- matically return to its starting position.
éHazard warning lights
Press switch 3.
This switch activates all four direction indicators and the side indicator lights simultaneously.
Only use this function to warn other road users if:
– you have to stop in an area where
stopping is prohibited or unex- pected,
– you are obliged to drive under spe
- cial conditions.
113
2
Page 57 of 146
fuelfilling .................................................................(current page)
JauneNoirNoir texte
1.53
ENG_UD5567_1Réservoir carburant (B90 - Dacia)ENG_NU_817-2_NU_Dacia_1
FUEL TANK (continued)
Diesel vehicle
When the vehicle is adapted (indicated
on the label A), you may use diesel containing a maximum of 30% bio ad- ditives (fatty acid methyl ester).Otherwise, use diesel containing a maximum of 10% bio additives.Special note: do not use fuel with more than 10% bio additives if the tempera- ture is below 0°C.
Filling with fuel
Petrol version
Only use unleaded petrol.
Using leaded petrol will damage the antipollution system and may lead to a loss of warranty.
To ensure the fuel tank is not filled with leaded petrol, the fuel tank filler neck contains a restrictor fitted with a valve which only allows the nozzle for unleaded petrol to be used (at the pump).
– Insert the nozzle as far as it will go so that the valve is opened.
– Keep the nozzle in this position throughout the entire filling opera- tion.
Petrol and diesel versions
When the pump cuts out automatically at the end of the filling procedure, a maximum of two further filling attempts may be made, as there must be suffi- cient space in the fuel tank to allow for expansion.
Persistent smell of fuel
If you notice a persistent smell of fuel you should:
– stop the vehicle as soon as traffic
conditions allow and switch off the ignition;
– switch on the hazard warning lights
and ask your passengers to leave the vehicle and stay clear of the traf- fic;
– refrain from working on or restart
-
ing the vehicle before it has been inspected by qualified staff from the approved dealer network.
No modifications what- soever are permitted on any part of the fuel supply system (computers, wiring, fuel circuit, injector, protection
covers, etc.) as this may be danger- ous (such work must be undertaken by qualified Network personnel).
Page 65 of 146
JauneNoirNoir texte
2.7
ENG_UD5485_1Conseils antipollution, économies de carburant, conduite (U90 - Daci\
a)ENG_NU_817-2_NU_Dacia_2
– Study the road ahead so that you are able to brake as little as possible, it can be sufficient just to lift off the ac- celerator.
– Avoid sudden acceleration.
– Do not overrev the engine in the in
- termediate gears. Always use the highest gear possible without labour- ing the engine.
– Do not try to maintain the same
speed up a hill, accelerate no more than you would on the level. Keep your foot in the same position on the accelerator pedal.
– Double declutching and accelerating
before switching off are unnecessary in modern vehicles.
– Bad weather, flooded roads.
Do not drive through floods if the water is above the lower edge of the wheel
rims.
Exhaust gas monitoring
system
The exhaust gas monitoring system will detect any operating faults in the vehicle’s antipollution system.
If this system malfunctions, toxic sub- stances may be released into the at- mosphere or damage may occur.
ÄThis warning light on the in- strument panel will indicate if there are any faults in the system:
T h i s c o m e s o n w h e n t h e i g n i- tion is switched on and goes out after three seconds.
– if it lights up continuously, consult
your approved dealer as soon as possible;
– if it flashes, reduce the engine speed
until the light stops flashing. Contact your approved dealer as soon as possible.
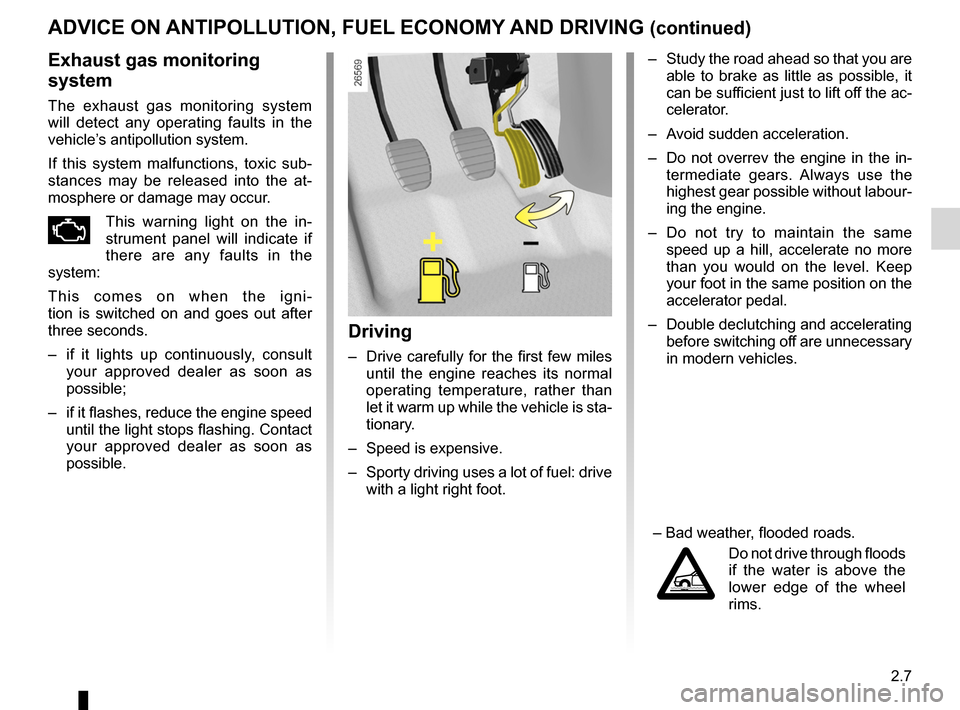
Driving
– Drive carefully for the first few miles until the engine reaches its normal operating temperature, rather than let it warm up while the vehicle is sta- tionary.
– Speed is expensive.
– Sporty driving uses a lot of fuel: drive
with a light right foot.
ADVICE ON ANTIPOLLUTION, FUEL ECONOMY AND DRIVING (continued)
Page 70 of 146
driving ...................................................(up to the end of the DU)ABS ......................................................(up to the end of the DU)anti-lock braking system: ABS ..............(up to the end of the DU)
2.12
ENG_UD5488_1Système antiblocage des routes : ABS (U90 - Dacia)ENG_NU_817-2_NU_Dacia_2
Operating faults
Two possible situations may occur:
1 – Warning light x is lit on the instrument panel.Braking is still performed, but with- out the ABS system. Contact an approved dealer as soon as pos- sible.
Although this system allows you to make maximum use of stopping dis- tances, even with the ABS you still have to take account of the actual condition of the road surface.
It is still essential to follow the rules of good driving practice (such as driv- ing at a safe distance from the vehicle in front). The fact that the vehicle’s safety has been increased should not encourage you to take risks.
You will feel a pulsation through the brake pedal each time the system is ac- tivated. These tangible signs will warn you that the adhesion between the tyres and the ground has reached its limit and enable you to adapt your driv- ing style to suit the road conditions.
2 – The x and D warning lights on the in- strument panel come on.
This indicates that both the brak- ing system and the ABS system are faulty. Your braking systems are only partially operational. However, it is dangerous to brake suddenly and it is essential to stop immedi- ately, as soon as traffic conditions allow. Contact an approved dealer as soon as possible.
Système antiblocage des roues (ABS)
ANTI-LOCK BRAKING SYSTEM (ABS)
Under heavy braking, the essential re- quirements are to limit the stopping distance and keep your vehicle under control. However, there is a risk that roadholding and directional control may be lost and the wheels may lock under braking, depending on the nature of the ground, weather conditions and your reactions. The Anti-lock Braking System (ABS) has been designed to combat this danger.
The safety enhancement is that the brake control system prevents the wheels from locking, even if the brakes are applied too sharply, and allows the vehicle to be steered and thus its direc- tion to be controlled. Under these cir- cumstances it is quite possible for the driver to steer the vehicle and to avoid an obstacle whilst at the same time applying the brake. This system also allows you to optimise stopping dis- tances, especially when roadholding becomes difficult (wet or slippery roads, varying road surfaces).
The braking modulation provided by the ABS is independent of the effort applied to the brake pedal. In an emergency, apply firm and continuous pressure to the brake pedal. There is no need to pump it repeatedly.
Page 106 of 146
changing a wheel..................................(up to the end of the DU)practical advice .....................................(up to the end of the DU)jack .......................................................(up to the end of the DU)puncture................................................(up to the end of the DU)lifting the vehiclechanging a wheel ............................(up to the end of the DU)
5.6
ENG_UD5600_1Changement de roue (B90 - Dacia)ENG_NU_817-2_NU_Dacia_5
Changement de roue
CHANGING A WHEEL
Park the vehicle away from traffic and on level ground which is not slippery (place a plank under the jack if necessary). Switch on the hazard warning lights.
Apply the hand brake and engage a gear (first or reverse).
Ask all the passengers to leave the vehicle and keep them away from traffic.
If you have a puncture, re-
place the wheel as soon as possible.
A tyre which has been punc- tured should always be inspected (and repaired, where possible) by a specialist.
Remove the wheel trim (refer to the in- formation on “Wheel trims”).
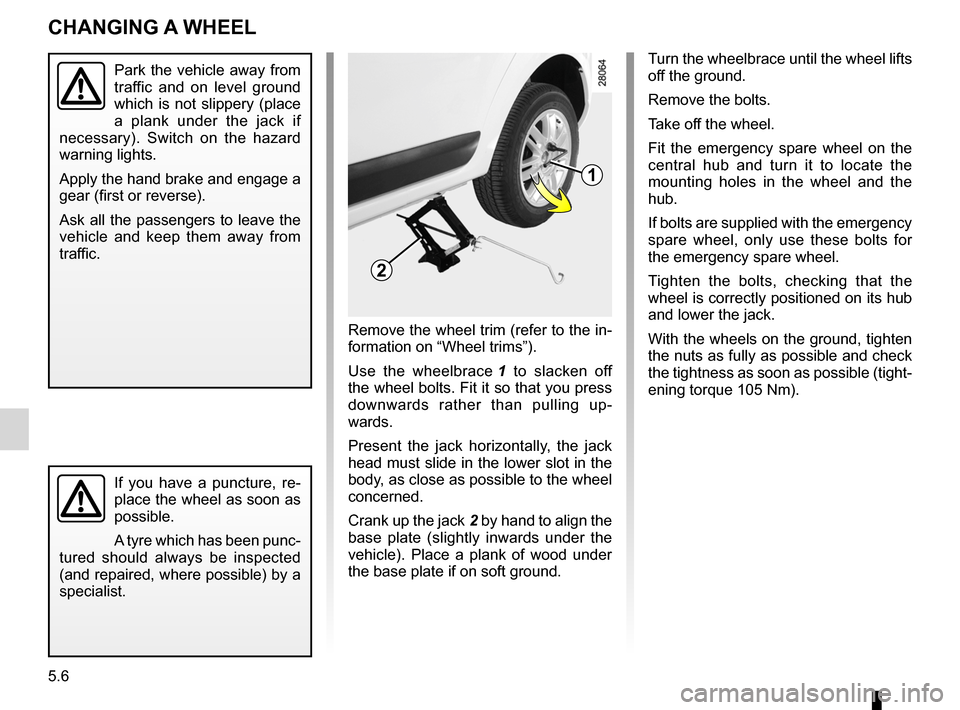
Use the wheelbrace
1 to slacken off the wheel bolts. Fit it so that you press downwards rather than pulling up- wards.
Present the jack horizontally, the jack head must slide in the lower slot in the body, as close as possible to the wheel concerned.
Crank up the jack
2 by hand to align the base plate (slightly inwards under the vehicle). Place a plank of wood under the base plate if on soft ground.
Turn the wheelbrace until the wheel lifts off the ground.
Remove the bolts.
Take off the wheel.
Fit the emergency spare wheel on the central hub and turn it to locate the mounting holes in the wheel and the hub.
If bolts are supplied with the emergency spare wheel, only use these bolts for the emergency spare wheel.
Tighten the bolts, checking that the wheel is correctly positioned on its hub and lower the jack.
With the wheels on the ground, tighten the nuts as fully as possible and check the tightness as soon as possible (tight- ening torque 105 Nm).
1
2