2013 Citroen JUMPY MULTISPACE battery
[x] Cancel search: batteryPage 91 of 260

89
Rear suspension
EASE OF USE and COMFOR
T
3
2 - Manual correction of the height of the rear sill
If your vehicle is fitted with this adjustment,
the control is located on the right-hand side
at the rear of the vehicle.
This manual adjustment permits "lowering"
or "raising" of the height of the sill of the rear
platform to facilitate operations in a parking
area.
This adjustment of the height of the sill is
restricted by a lower limit and an upper limit.
First use
To initialise the function, press the control
for approximately 2 seconds.
Malfunctions
If the load sill is not adjusted when the
control is pressed, "3 beeps" indicate a
malfunction for the following reasons:
- foot on the brake pedal with the key in
the ignition,
- excessive use of the manual correction,
- low battery charge,
- other.
If the audible signal persists, contact a
CITROËN dealer or a qualified workshop. Carry out these operations with the vehicle
still stationary and:
- with the front and side doors closed,
- with the parking brake applied,
- do not leave your foot on the brake
pedal.
Lower: downwards adjustment
of the platform sill
Press the control downwards
continuously.
Release the button to stop the movement,
"3 beeps" indicate that you have reached
the maximum limit, the movement stops
automatically.
Raise: upwards adjustment of
the platform sill
Press the control upwards
continuously.
Release the button to stop the movement,
"3 beeps" indicate that you have reached
the maximum limit, the movement stops
automatically.
Return to the optimum sill height
Press the control up or down twice in
succession, the opposite of the position of
the load sill.
Page 92 of 260

90
Rear suspension
Deactivation of manual height correction
Good practice
When stationary and with the ignition key
removed, excessive use of the system
consumes battery power.
Long term parking
Avoid parking for a long duration on ground
which could present a potential obstacle as
your vehicle could lower.
Following a long period out of use, the
height of the platform may change due to the
automatic height correction on unlocking or
on opening one of your vehicle's doors. With the vehicle stationary:
- press and hold,
- release the control.
Deactivation is confirmed by
the LED which is on. It remains on for
approximately 30 seconds.
Return to manual height correction
You must deactivate the manual height
correction in the following situations:
- when working underneath the vehicle,
- when changing a wheel,
- when the vehicle is being transported by
lorry, train, ferry, boat, ...
Driving with the height of the rear platform:
- too low, risks damaging the technical
components underneath the vehicle,
- too high, risks unstable driving.
If you start and the warning lamp flashes, to
switch it off:
- correct the position of the manual
control which is still at the lower or
upper limit,
- or drive slowly at above 6 mph
(10 km/h), until height correction returns
to automatic mode.
Warning lamp
Refer to the "Instruments and controls"
section of chapter 2.
With the vehicle stationary:
- press and hold,
- release the control.
Return to manual correction is
confirmed by the LED which goes off.
According to the configuration, a beep may
be heard during these operations.
Page 95 of 260

93
Mirrors and windows
EASE OF USE and COMFOR
T
3
ELECTRIC WINDOWS
1.
Driver's electric window control
2.
Passenger electric window control The electrical functions of the electric
windows are deactivated:
- approximately 45 seconds after the
ignition is switched off,
- after one of the front doors is opened, if
the ignition is off.
Reinitialisation
Following reconnection of the battery,
the safety anti-pinch function must be
reinitialised.
Lower the window fully, then raise it, it will
rise in steps of a few centimetres each time
the control is pressed. Repeat the operation
until the window is fully closed.
Continue to press the control for at least one
second after the window closed position has
been reached.
The safety anti-pinch does not operate
during these operations.
There are two operating modes:
Manual mode
Press or pull the control, without passing the
point of resistance. The window stops when
you release the control.
Automatic mode
Press or pull the control, beyond the point
of resistance. The window opens or closes
fully when the control is released. Pressing
the control again stops the movement of the
window.
Safety anti-pinch
If your vehicle is fitted with the safety anti-
pinch function, when the window rises and
meets an obstacle, it stops and partially
lowers.
In the event of unwanted opening of the
window on closing, press the control until
the window is fully open. Within the next
4 seconds, pull the control until the window
is fully closed.
The safety auto-reverse does not operate
during these operations.
Good practice
If the electric windows meet an obstacle
during operation, you must reverse the
movement of the window. To do this, press
the control concerned.
When the driver operates the passenger
electric window controls, he must ensure
that no one is preventing correct closing of
the windows.
The driver must ensure that the passengers
use the electric windows correctly.
Be aware of children when operating the
windows.
Page 127 of 260

Checks
CHECK
S
6
CHECKS
Battery
At the start of winter, have your battery
checked by a CITROËN dealer or a qualified
workshop.
Brake pads
Brake pad wear depends on the style of
driving, in particular for vehicles which are
used in town, over short distances. It may
be necessary to check the thickness of the
pads, even between services.
Unless there is a leak in the system, a drop
in the brake fluid level indicates that the
brake pads are worn.
Brake disc / drum wear
For any information on checking the brake
disc / drum wear, contact a CITROËN dealer
or a qualified workshop.
Parking brake
Where the parking brake travel is too great
or there is a reduction in the performance
of the system, the parking brake should be
adjusted, even between services.
Have the system checked by a CITROËN
dealer or a qualified workshop.
Oil filter
Change the filter regularly, in accordance
with the servicing schedule.
Carbon filter and passenger compartment filter
The carbon filter permits continuous and
effective filtering of dust.
If the passenger compartment filter becomes
clogged, this may reduce the performance
of the air conditioning system and generate
unpleasant odours.
We recommend the use of a combined
passenger compartment filter. By means of
its second special active filter, it contributes
to the purification of the air breathed by
the occupants and the cleanness of the
passenger compartment (reduction of
allergic symptoms, unpleasant odours and
greasy deposits).
Refer to the servicing and warranty booklet
to find out the replacement interval for these
components.
Depending on the environment (dusty
atmosphere...) and the use of the vehicle
(urban driving...), change them twice as
often if necessary.
Particle emission filter (Diesel)
This filter actively contributes
to the preservation of air quality
by trapping unburnt polluting
particles. It is controlled
completely and automatically by the engine
management system.
This warning lamp comes on if there is a risk
of blockage of the filter.
This alert signals the start of saturation of
the particle emissions filter (exceptionally
prolonged driving in urban conditions:
reduced speed, traffic jams…).
If this alert persists, contact a CITROËN
dealer or a qualified workshop.
On acceleration after the vehicle has been
running for a prolonged period at very low
speed or at idle, you may, in exceptional
circumstances, notice the emission of water
vapour at the exhaust. This water vapour
does not have any adverse effect on vehicle
handling or the environment.
To regenerate the filter, it is recommended
that as soon as driving conditions permit,
you drive at a speed of at least 36 mph
(60 km/h) for at least 5 minutes (until the
warning lamp goes off and/or the message
disappears).
Refer to "Under the bonnet" in section 6.
Page 133 of 260

131
Battery
QUICK HEL
P
7
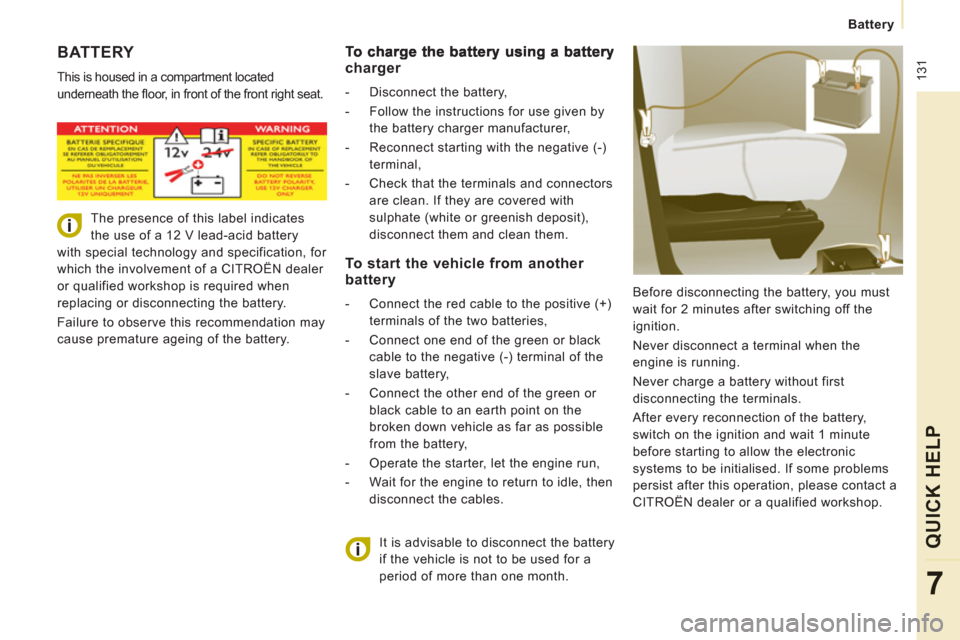
BATTERY
This is housed in a compartment located
underneath the fl oor, in front of the front right seat.
Before disconnecting the battery, you must
wait for 2 minutes after switching off the
ignition.
Never disconnect a terminal when the
engine is running.
Never charge a battery without first
disconnecting the terminals.
After every reconnection of the battery,
switch on the ignition and wait 1 minute
before starting to allow the electronic
systems to be initialised. If some problems
persist after this operation, please contact a
CITROËN dealer or a qualified workshop.
It is advisable to disconnect the battery
if the vehicle is not to be used for a
period of more than one month. charger
- Disconnect the battery,
- Follow the instructions for use given by
the battery charger manufacturer,
- Reconnect starting with the negative (-)
terminal,
- Check that the terminals and connectors
are clean. If they are covered with
sulphate (white or greenish deposit),
disconnect them and clean them.
To start the vehicle from another battery
- Connect the red cable to the positive (+)
terminals of the two batteries,
- Connect one end of the green or black
cable to the negative (-) terminal of the
slave battery,
- Connect the other end of the green or
black cable to an earth point on the
broken down vehicle as far as possible
from the battery,
- Operate the starter, let the engine run,
- Wait for the engine to return to idle, then
disconnect the cables.
The presence of this label indicates
the use of a 12 V lead-acid battery
with special technology and specification, for
which the involvement of a CITROËN dealer
or qualified workshop is required when
replacing or disconnecting the battery.
Failure to observe this recommendation may
cause premature ageing of the battery.
Page 134 of 260

132
Battery
ECONOMY MODE
After the engine has stopped, with the key
in the ignition position, certain functions
(windscreen wiper, electric windows, courtesy
lamps, audio equipment, etc.) can only
be used for a cumulative duration of thirty
minutes, to prevent discharging of the battery.
Once the thirty minutes are over, the active
functions are put on standby and the battery
warning lamp flashes accompanied by a
message in the screen.
To resume the use of these functions
immediately, start the engine and let it run
for a few minutes.
The time available will then be double the
time for which the engine was left running.
However, this time will always be between
five and thirty minutes.
A flat battery will prevent the engine from
starting.
Page 148 of 260

146
Changing a fuse
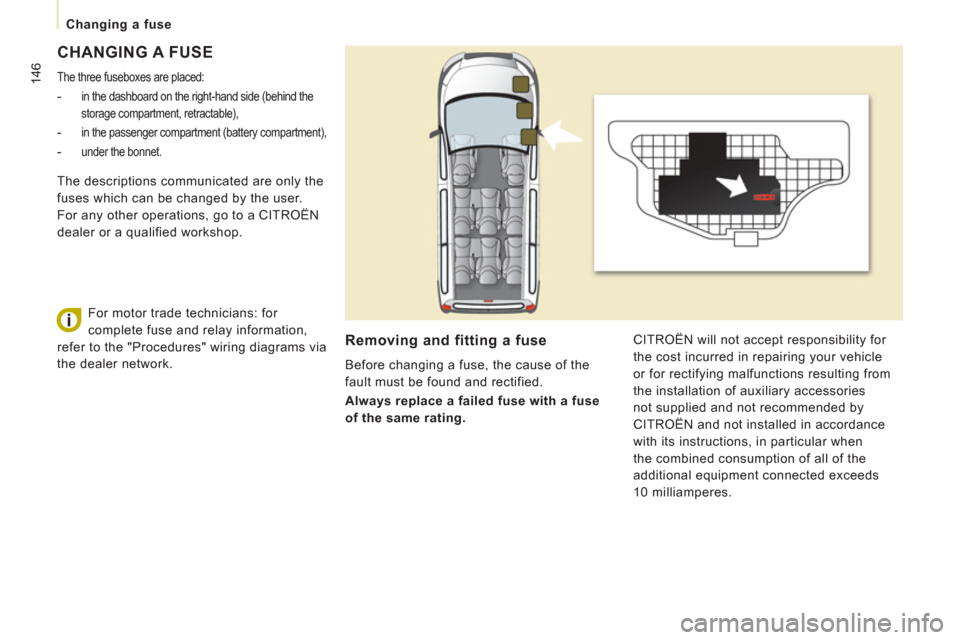
CHANGING A FUSE
The three fuseboxes are placed:
- in the dashboard on the right-hand side (behind the
storage compartment, retractable),
- in the passenger compartment (battery compartment),
-
under the bonnet.
Removing and fitting a fuse
Before changing a fuse, the cause of the
fault must be found and rectified.
Always replace a failed fuse with a fuse
of the same rating. CITROËN will not accept responsibility for
the cost incurred in repairing your vehicle
or for rectifying malfunctions resulting from
the installation of auxiliary accessories
not supplied and not recommended by
CITROËN and not installed in accordance
with its instructions, in particular when
the combined consumption of all of the
additional equipment connected exceeds
10 milliamperes. The descriptions communicated are only the
fuses which can be changed by the user.
For any other operations, go to a CITROËN
dealer or a qualified workshop.
For motor trade technicians: for
complete fuse and relay information,
refer to the "Procedures" wiring diagrams via
the dealer network.
Page 150 of 260

148
Changing a fuse
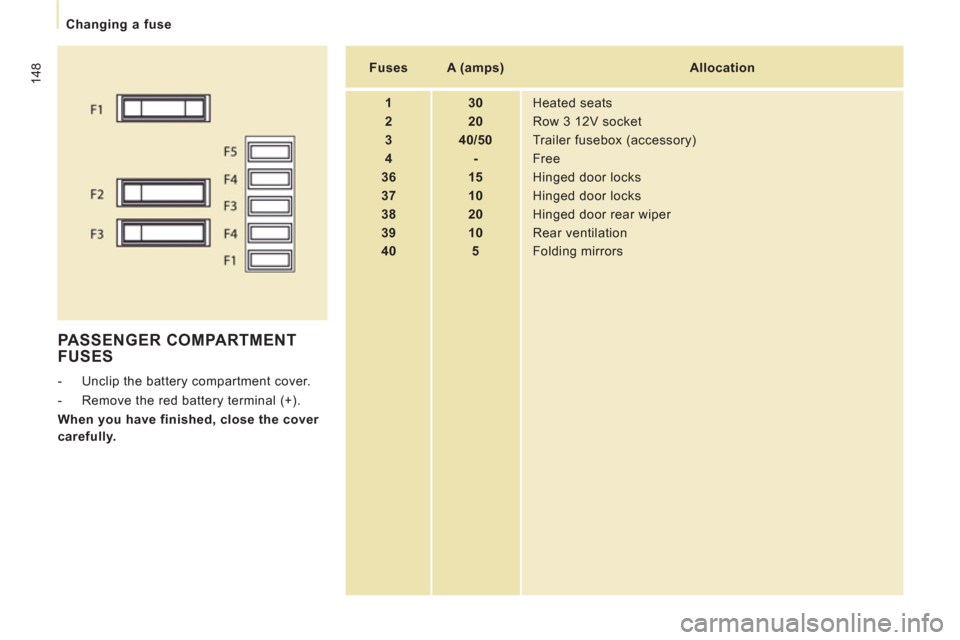
PASSENGER COMPARTMENT
FUSES
- Unclip the battery compartment cover.
- Remove the red battery terminal (+).
When you have finished, close the cover
carefully.
Fuses
A (amps)
Allocation
1
30
Heated seats
2
20
Row 3 12V socket
3
40/50
Trailer fusebox (accessory)
4
-
Free
36
15
Hinged door locks
37
10
Hinged door locks
38
20
Hinged door rear wiper
39
10
Rear ventilation
40
5
Folding mirrors