2013 CITROEN DS3 CABRIO USB port
[x] Cancel search: USB portPage 128 of 421

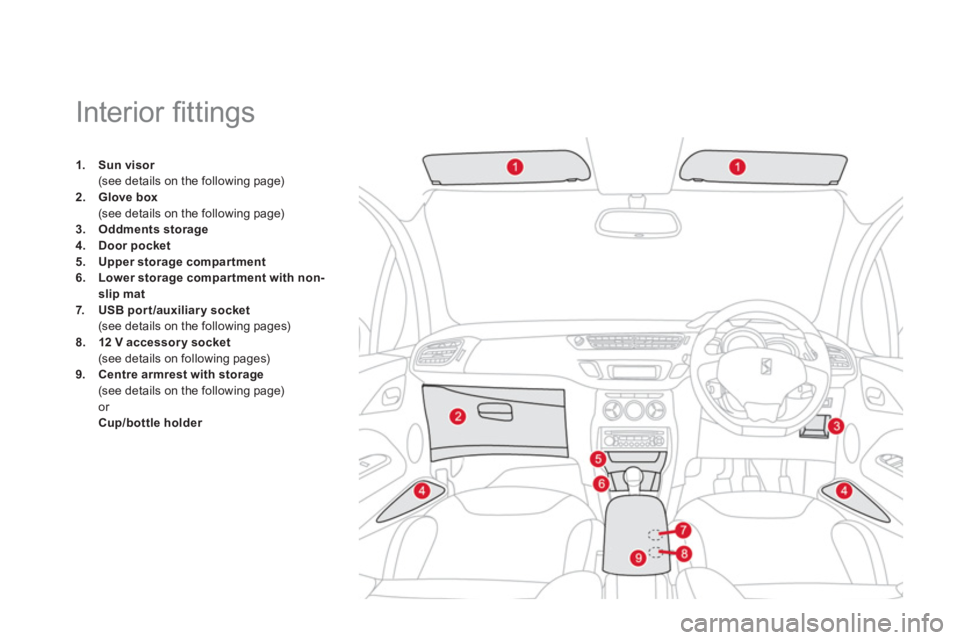
Interior fi ttings
1.Sun visorr(see details on the following page) 2.Glove box(see details on the following page)
3.Oddments storage4.Doorpocket5.
Upper storage compar tment6.Lower storage compar tment with non-
slip mat7.USB port/auxiliary socket(see details on the following pages) 8.12 Vaccessorysocket(see details on following pages)9.Centre armrest with storage(see details on the following page) or
Cup/bottle holder
Page 222 of 421

Fuse N°RatingFunctions
F
820 AMultifunction screen, audio system, navigation radio, alarm control unit, alarm siren.
F
930 A12 V socket, portable navigation suppor t supply.
F1
015 ASteering wheel controls.
F1
115 AIgnition, diagnostic socket, automatic gearbox control unit.
F12 15
ARain/brightness sensor, trailer relay unit.
F1
35 AMain stop switch, engine relay unit.
F1415 AParking sensors control unit, airbag control unit, instrument panel, digital air conditioning, USB Box, Hi-Fi amplifier.
F1
530 ALocking.
F16
-Not used.
F1740 ARear screen and door mirrors demisting/defrosting.
S
H-PA RC shunt.
Page 276 of 421

07
43 1
2
MUSIC MEDIA PLAYERS
Connect the portable device (MP3/
WMA player…) to the auxiliary JACK socket or to the USB port, using asuitable audio cable.
Press the M
USIC button then
press it again or select the Music Menu function and press the dial
to confi rm.
Select the AUX music source and
press the dial to confi rm. Play beginsautomatically.
Select the "External device" functionand press the dial to activate it.
External device
USING THE EXTERNAL INPUT (AUX)
Music Menu JACK/USB AUDIO CABLE NOT SUPPLIED
The displa
y and management of the controls is via the portabledevice.
Page 296 of 421

05
1
1
2
3
USB BOX
The system puts together playlists (temporary memory) createdover a period which depends on the capacity of the USB device.
The other sources are available durin
g this time.
The pla
ylists are updated each time the ignition is switched off or each time a USB memory stick is connected.
When connectin
g for the fi rst time, the classifi cation suggested
is by folder. When you reconnect, the classifi cation selected
previously is retained.
Connect the memory stick to the port, directly or using a lead. If the audio equipment is switched
on, the USB source is detected as soon as it
is connected. Pla
y begins automatically after a
delay which depends on the capacity of the USB memory stick.
The
fi le formats supported are .mp3 (mpeg1 layer 3 only), .wma (standard 9 only,
128 kbits/sec compression), .wav and .ogg.
Certain playlist formats are supported (m3u, ...).
On reconnection of the previous memory stickused, play is resumed automatically with the last
track played.
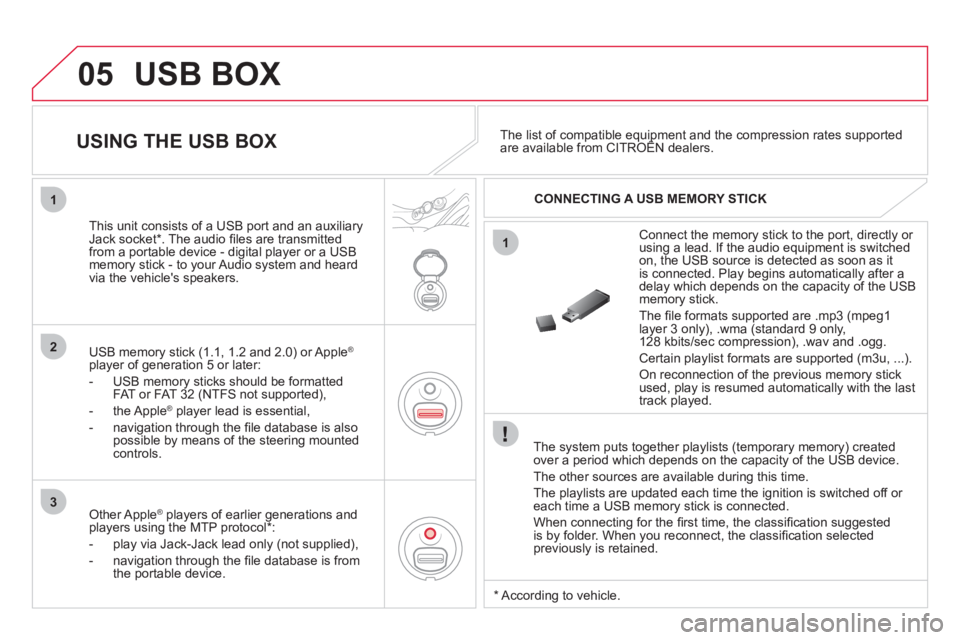
This unit consists o
f a USB port and an auxiliaryJack socket * . The audio fi les are transmitted
from a portable device - digital player or a USBmemory stick - to your Audio system and heard
via the vehicle's speakers.
USB memor
y stick (1.1, 1.2 and 2.0) or Apple®
player of generation 5 or later:
- U
SB memory sticks should be formattedFAT or FAT 32 (NTFS not supported),
- the Apple ®player lead is essential,
- navi
gation through the fi le database is also
possible by means of the steering mountedcontrols.
The list of compatible equipment and the compression rates supported are available from CITROËN dealers. pqpp
USING THE USB BOX
CONNECTING A USB MEMORY STICK
Other Apple®
players of earlier generations and®
players using the MTP protocol * :
- pla
y via Jack-Jack lead only (not supplied),
- navi
gation through the fi le database is from
the portable device.
*
Accordin
g to vehicle.
Page 297 of 421

295
3
4
05
2
1
LISTREFRESH
LISTREFRESH
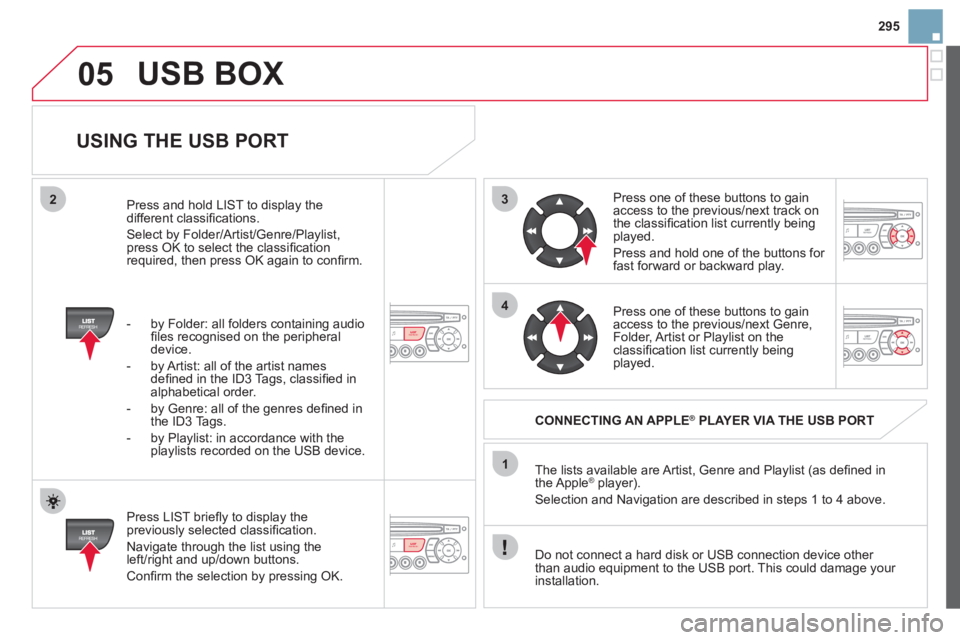
USING THE USB PORT
Press LIST briefl y to display thepreviously selected classifi cation.
Navigate through the list using the
left/right and up/down buttons.
Confi rm the selection by pressing OK. The lists available are Artist, Genre and Pla
ylist (as defi ned in
the Apple® player).®
Selection and Navigation are described in steps 1 to 4 above.
Do not connect a hard disk or
USB connection device other
than audio equipment to the USB port. This could damage your
installation.
CONNECTING AN APPLE®PLAYER VIA THE USB PORT®
Press one of these buttons to gain
access to the previous/next track on
the classifi cation list currently beingplayed.
Pr
ess and hold one of the buttons for fast forward or backward play.
Press one of these buttons to
gain
access to the previous/next Genre,
Folder, Artist or Playlist on theclassifi cation list currently being played.
Press and hold LI
ST to display the different classifi cations.
Select b
y Folder/Artist/Genre/Playlist, press OK to select the classifi cation required, then press OK again to confi rm.
- b
y Folder: all folders containing audio fi les recognised on the peripheraldevice.
- by Artist: all o
f the artist names
defi ned in the ID3 Tags, classifi ed in alphabetical order.
- b
y Genre: all of the genres defi ned in
the ID3 Tags.
- b
y Playlist: in accordance with the
playlists recorded on the USB device.
USB BOX
Page 298 of 421

05
1
21
2
SOURCE The display and control is via the portable device. First ad
just the volume of your portable device.
Then ad
just the volume of your audio system.
USING THE AUXILIARY INPUT (AUX)
ADJUSTING THE VOLUME OF
THE AUXILIARY SOURCE
JACK socket or USB port (according to vehicle)
Do not connect a device to both the
JACK socket and the USB port at the same time.
Connect the portable device (MP3 player…) to the JACK socket or to
the USB port, using a suitable cable(not supplied).
Pr
ess the SOURCE button several
times in succession and select AUX.
The auxiliar
y input, JACK or USB, allows the connection of a portable device (MP3 player...).
USB BOX
Page 321 of 421

319Alphabetical index
Paint colour code........................................248Paintwork, matt...........................................233Parcel shelf, rear.........................................r131Parking brake......................................162,195Parking sensors, rear..................................r182Particle emission filter........................r193, 194Passenger compartment filter....................r194Player, CD MP3...................................273,293Port, USB...........................128, 280,294, 296Priming the fuel system..............................188Protecting children...............132-142, 15 3, 15 6
Puncture......................................................198
Radio ...................................................271, 291Rear foglamp .......................................114, 215Rear screen (demisting) ................................76Recharging the battery............................... 226Reduction of electrical load........................228Regeneration of the particleemissions filter..........................................r194Reinitialising the electric windows..............101Reinitialising the remote control ...................94Remote control ........................................90-95Removing a wheel......................................207Removing the mat....................................... 129Repair kit, puncture ..................................... 198Replacing bulbs...................................211-217
R
Replacing fuses...................................218-224Replacing the air filter.................................r194Replacing the oil filter.................................r194
Replacing the passenger compartment filter....................................r194
Replacing wiper blades .......................121, 228Resetting the service indicator.....................r44Resetting the trip recorder............................r46Rev counter.............................................r28,30Reversing lamp...........................................215Risk areas (update).....................................268Routine checks...................................194, 195Running out of fuel (Diesel) ........................188
Serial number, vehicle................................248Ser vice indicator...........................................r43Servicing.......................................................24Setting the clock........................278, 300,301Shor t-cut menus .................................259, 260Sidelamps ...................................112,213, 215Side repeater...............................................213Spare wheel................................................204Speed limiter...............................................r178Speedometer..........................................r28, 30Stability control (ESP).................................149Starting the vehicle .......................92, 165,170Steering mounted controls, audio.......257,289Stopping the vehicle .....................92, 165,170Stop & Start.....50,73,106,174, 187, 194,225Storage................................................ 126, 127Storage box.................................................131Stowing rings..............................................130Sun visor.....................................................r127Synchronising the remote control.................94System, navigation ......................................261Systems, ASR and ESP ..............................149
P
Safety for children................132-142, 153, 156Scented air freshener...................................r77Screen, colour 16/9 .......................61, 258, 279Screen, monochrome ................ 290, 302,304Screen, multifunction (with audio equipment)...................54, 57, 61Screen-wash reservoir................................191Screen menu map......................279, 302,304Screenwash ................................................119Screenwash fluid level ................................192Seat, rear bench...........................................84Seat adjustment......................................79, 82Seat belts ............................................151,153Seats, rear.....................................................r84
S
Page 386 of 421

23
05TRAFFIC INFORMATION
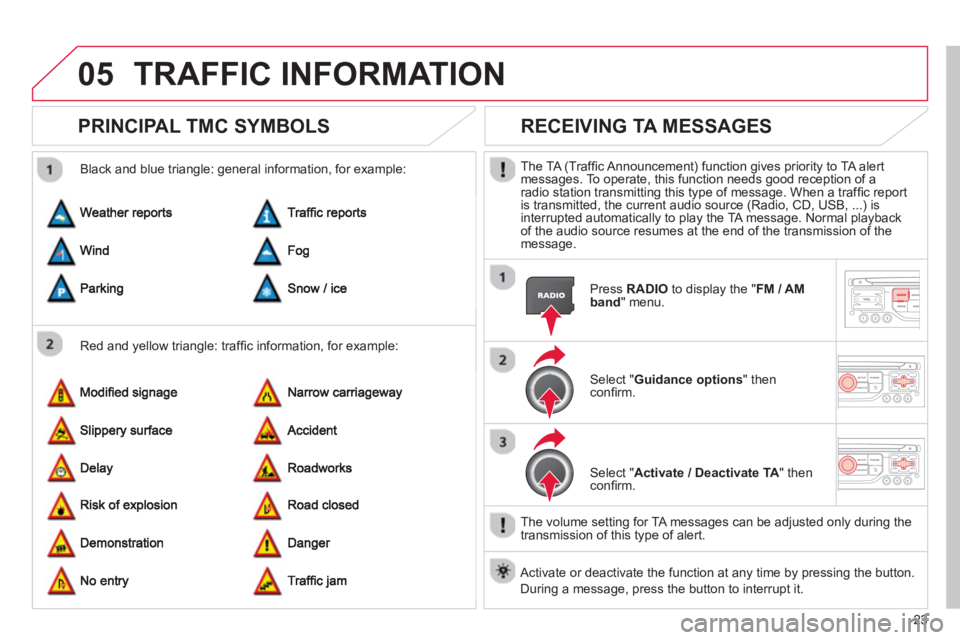
PRINCIPAL TMC SYMBOLS
Red and yellow triangle: traffi c information, for example:
Black and blue trian
gle: general information, for example:
RECEIVING TA MESSAGES
The TA (Traffi c Announcement) function gives priority to TA alert messages. To operate, this function needs good reception of a radio station transmitting this type of message. When a traffi c report
is transmitted, the current audio source (Radio, CD, USB, ...) isinterrupted automatically to play the TA message. Normal playbackof the audio source resumes at the end of the transmission of themessage.
Pr
ess RADIO
to display the "FM / AM
band
" menu.
Select " Guidance options " then confi rm.
Select " Activate / Deactivate TA" thenconfi rm.
The volume settin
g for TA messages can be adjusted only during the
transmission of this type of alert.
Activate or deactivate the function at any time by pressing the button.
Durin
g a message, press the button to interrupt it.