2013 CITROEN C4 DAG warning
[x] Cancel search: warningPage 197 of 340

11
PRACTICAL INFORMATION
195
Tyre under-infl ation detection
If the vehicle is fi tted with tyre under-
infl ation detection, the under-infl ation
warning lamp will remain on after the
wheel has been repaired until the
system is reinitialised by a CITROËN
dealer or a qualifi ed workshop.
If after around 5 to 7 minutes the
pressure is not attained, this in-
dicates that the tyre is not repair-
able; contact a CITROËN dealer
or a qualifi ed workshop for as-
sistance.
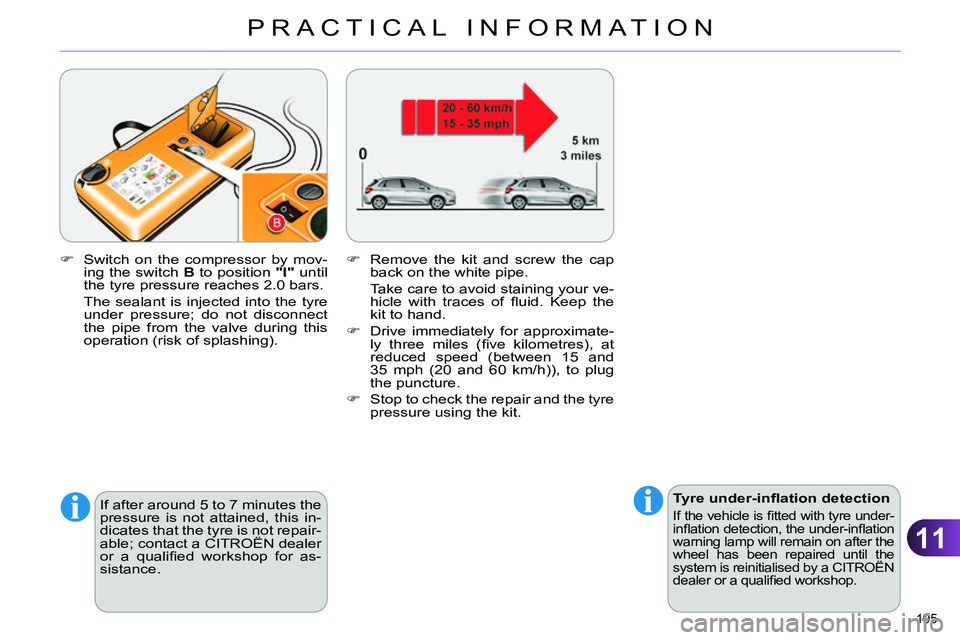
Switch on the compressor by mov-
ing the switch B
to position "I"
until
the tyre pressure reaches 2.0 bars.
The sealant is injected into the tyre
under pressure; do not disconnect
the pipe from the valve during this
operation (risk of splashing).
Remove the kit and screw the cap
back on the white pipe.
Take care to avoid staining your ve-
hicle with traces of fl uid. Keep the
kit to hand.
Drive immediately for approximate-
ly three miles (fi ve kilometres), at
reduced speed (between 15 and
35 mph (20 and 60 km/h)), to plug
the puncture.
Stop to check the repair and the tyre
pressure using the kit.
Page 202 of 340

11
PRACTICAL INFORMATION
200
Removing a wheel
Parking the vehicle
Immobilise the vehicle where it
does not block traffi c: the ground
must be level, stable and non-
slippery ground.
Apply the parking brake unless
it has been programmed to au-
tomatic mode, switch off the ig-
nition and engage fi rst gear * to
lock the wheels.
Check that the braking warning
lamps in the instrument panel
are on (not fl ashing).
The occupants must get out of
the vehicle and wait where they
are safe.
If necessary, place a chock un-
der the wheel diagonally oppo-
site the wheel to be changed.
Never go underneath a vehicle
raised using a jack; use an axle
stand.
*
position R
for an electronic gearbox; P
for an automatic gearbox.
List of operations
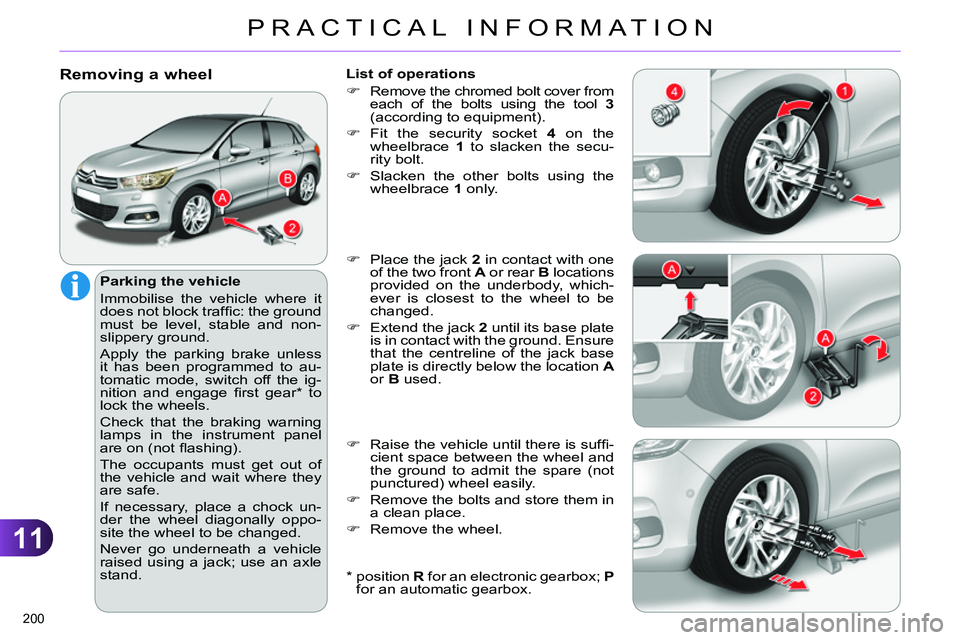
Remove the chromed bolt cover from
each of the bolts using the tool 3
(according to equipment).
Fit the security socket 4
on the
wheelbrace 1
to slacken the secu-
rity bolt.
Slacken the other bolts using the
wheelbrace 1
only.
Place the jack 2
in contact with one
of the two front A
or rear B
locations
provided on the underbody, which-
ever is closest to the wheel to be
changed.
Extend the jack 2
until its base plate
is in contact with the ground. Ensure
that the centreline of the jack base
plate is directly below the location A
or B
used.
Raise the vehicle until there is suffi -
cient space between the wheel and
the ground to admit the spare (not
punctured) wheel easily.
Remove the bolts and store them in
a clean place.
Remove the wheel.
Page 206 of 340

11
PRACTICAL INFORMATION
204
Amber coloured bulbs, such as
the direction indicators, must be
replaced with bulbs of identical
specifi cations and colour.
When refi tting, close the protec-
tive cover carefully to preserve
the sealing of the headlamp.
Changing direction indicator bulbs
Model with halogen headlamps
Rapid fl ashing of the direction
indicator warning lamp (right
or left) indicates the failure of a
bulb on that side.
Access to bulbs
Remove the air defl ector by unclip-
ping each of its three attachment
points.
Unclip the bonnet release cable at
its two fi xings.
Move the cable down.
After changing the failed bulb, remember
to put everything back in place (cable and
air defl ector). Depending on the engine and only on
the left hand side, you must fi rst carry
out the following operations for access
to the protective covers on the bulbs.
Turn the bulb holder a quarter of a
turn and extract it.
Pull out the bulb and change it.
To reassemble, carry out these opera-
tions in reverse order.
Model with Xenon headlamps
Remove the protective cover by
pulling on its tongue.
Disconnect the electrical connector.
Separate the springs to release the
bulb.
Pull the bulb out and replace it.
To reassemble, carry out these opera-
tions in reverse order.
Page 221 of 340

11
PRACTICAL INFORMATION
219
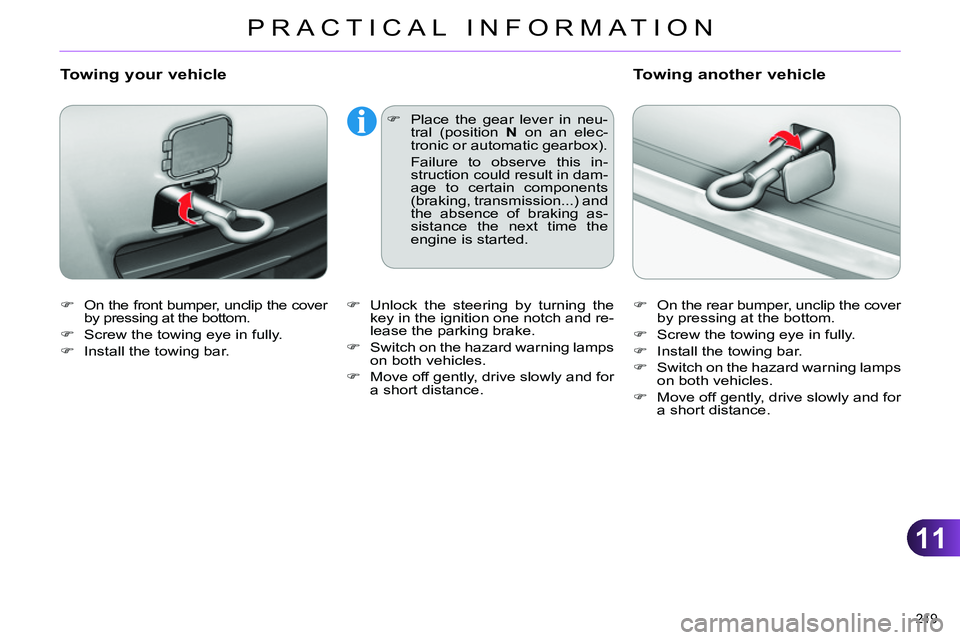
On the front bumper, unclip the cover
by pressing at the bottom.
Screw the towing eye in fully.
Install the towing bar.
Towing your vehicle
Place the gear lever in neu-
tral (position N
on an elec-
tronic or automatic gearbox).
Failure to observe this in-
struction could result in dam-
age to certain components
(braking, transmission...) and
the absence of braking as-
sistance the next time the
engine is started.
On the rear bumper, unclip the cover
by pressing at the bottom.
Screw the towing eye in fully.
Install the towing bar.
Switch on the hazard warning lamps
on both vehicles.
Move off gently, drive slowly and for
a short distance.
Towing another vehicle
Unlock the steering by turning the
key in the ignition one notch and re-
lease the parking brake.
Switch on the hazard warning lamps
on both vehicles.
Move off gently, drive slowly and for
a short distance.
Page 222 of 340

11
PRACTICAL INFORMATION
220
TOWING A TRAILER
We recommend the use of genu-
ine CITROËN towbars and their
harnesses that have been tested
and approved from the design
stage of your vehicle, and that
the fi tting of the towbar is en-
trusted to a CITROËN dealer or
a qualifi ed workshop.
If the towbar is not fi tted by a
CITROËN dealer, it is impera-
tive that it is fi tted in accordance
with the vehicle manufacturer's
instructions.
The rear parking sensors will
be deactivated automatically if
a genuine CITROËN towbar is
used.
Towbar suitable for the attachment of a
trailer or installation of a bicycle carrier,
with additional lighting and signalling.
Your vehicle is primarily designed for
transporting people and luggage, but it
may also be used for towing a trailer.
Driving with a trailer places greater de-
mands on the towing vehicle and the
driver must take particular care.
Driving advice
Distribution of loads
Distribute the load in the trailer so
that the heaviest items are as close
as possible to the axle and the nose
weight approaches the maximum
permitted without exceeding it.
Air density decreases with altitude, thus
reducing engine performance. Above
1 000 metres, the maximum towed load
must be reduced by 10 % for every
1 000 metres of altitude.
Side wind
Take into account the increased
sensitivity to side wind.
Cooling
Towing a trailer on a slope increases
the temperature of the coolant.
As the fan is electrically controlled, its
cooling capacity is not dependent on
the engine speed.
To lower the engine speed, reduce
your speed. The maximum towed load on a long in-
cline depends on the gradient and the
ambient temperature.
In all cases, keep a check on the cool-
ant temperature.
If the warning lamp and the
STOP
warning lamp come
on, stop the vehicle and
switch off the engine as
soon as possible.
Braking
Towing a trailer increases the braking
distance.
To avoid overheating of the brakes on a
long mountain type of descent, the use
of engine braking is recommended.
Tyres
Check the tyre pressures of the towing
vehicle and of the trailer, observing the
recommended pressures.
Lighting
Check the electrical lighting and sig-
nalling on the trailer.
Refer to the "Technical data" section for
details of the weights and towed loads
which apply to your vehicle.
Page 224 of 340

11
PRACTICAL INFORMATION
222
ACCESSORIES
A wide range of accessories and genu-
ine parts is available from the CITROËN
dealer network.
These accessories and parts have
been tested and approved for reliability
and safety.
They are all adapted to your vehicle
and benefi t from CITROËN's recom-
mendation and warranty.
Conversion kits
You can obtain an "Enterprise" kit to
convert a trade vehicle to a private car
and vice-versa.
"Comfort":
door defl ectors, side window blinds,
rear screen blind, insulated module,
coat hanger fi xed to head restraint,
reading lamp, mirror for caravan, cruise
control, scented air freshener and car-
tridges, parking sensors...
"Transport systems":
boot carpet, boot liner, boot net, boot
spacers, transverse roof bars, bicycle
carrier, ski carrier, roof boxes, towbars,
towbar wiring harnesses...
"Styling":
gear lever knobs, aluminium foot rest,
alloy wheels, wheel embellishers,
chrome mirror shells, chrome door ap-
erture fi nishers, door sill fi nishers, tail-
gate lower chrome fi nisher...
* To avoid any risk of jamming the
pedals:
- ensure that mats are correctly
positioned and secured,
- never fi t one mat on top of an-
other.
"Security and safety":
anti-intrusion alarm, microwave sensor,
anti-tilt sensor, stolen vehicle tracking
system, child seats and booster cush-
ions, breathalyser, fi rst aid kit, fi re extin-
guisher, warning triangle, high visibility
vest, dog guard, pet seat belt, wheel
security bolts, snow chains, non-slip
covers, front foglamp kit...
"Protection":
mats * , seat covers compatible with lat-
eral airbags, door sill protectors, mud
fl aps, door protective rubbing strips,
bumper protection strips, protective
covers for pets, vehicle cover...
If a towbar and wiring harness
are fi tted outside the CITROËN
dealer network, the installation
must be done using the vehicle's
electrical pre-equipment and in
line with the manufacturer's rec-
ommendations.
Page 225 of 340

11
PRACTICAL INFORMATION
223
Installation of radio
communication transmitters
Before installing any after-market
radio communication transmit-
ter, you can contact a CITROËN
dealer for the specifi cation of
transmitters which can be fi tted
(frequency, maximum power, aer-
ial position, specifi c installation re-
quirements), in line with the Vehicle
Electromagnetic Compatibility
Directive (2004/104/EC).
Depending on the legislation in
force in the country, it may be
compulsory to have a high vis-
ibility safety vest, warning tri-
angle, breathalyzers and spare
bulbs and fuses available in the
vehicle.
The fi tting of electrical equip-
ment or accessories which are
not recommended by CITROËN
may result in a failure of your ve-
hicle's electronic system and ex-
cessive electrical consumption.
Please note this precaution.
You are advised to contact a
CITROËN representative to be
shown the range of recommend-
ed equipment and accessories.
"Multimedia":
audio systems, steering mounted au-
dio controls, speakers, Hi-Fi module,
Bluetooth hands-free system, port-
able satellite navigation system, semi-
integral support bracket for portable
navigation system, mapping update
CD, driving assistant, portable video
screen, portable video support bracket,
230 V/50 Hz socket, 230 V/50 Hz adap-
tor, iPhone
® compatible mobile phone
charger, mobile phone/smartphone
bracket, Wi-Fi on board...
By going to a CITROËN dealer, you
can also obtain cleaning and mainte-
nance products (interior and exterior) -
including ecological products in the
"TECHNATURE" range -, products for
topping up (screenwash...), touch-up
pens and paint aerosols for the exact
colour of your vehicle, recharges (car-
tridge for the temporary puncture repair
kit...), ...
Page 227 of 340

12
TECHNICAL DATA
225
*
The weight of the braked trailer can be increased, within the GTW limit, if the GVW of the towing vehicle is reduced by an
equal amount. Warning: towing using a lightly loaded towing vehicle may have an adverse effect on its road holding.
The GTW and towed load values indicated are valid up to a maximum altitude of 1 000 metres; the towed load mentioned
must be reduced by 10 % for each additional 1 000 metres of altitude.
The speed of a towing vehicle must not exceed 60 mph (100 km/h) (comply with the legislation in force in your country).
High ambient temperatures may result in a reduction in the performance of the vehicle to protect the engine; if the ambient
temperature is above 37 °C, limit the towed load.
WEIGHTS AND TOWED LOADS (in kg)
Petrol engines
VTi 95
VTi 120
THP 155
Gearboxes
Manual
Manual
Automatic
Electronic
Model codes:
NC...
8FR0
5FS0
5FS9
5FS9/D
5FV8/P
- Unladen weight
1 200
1 205
1 270
1 275
- Kerb weight
1 275
1 280
1 345
1 350
- Gross vehicle weight (GVW)
1 720
1 765
1 755
1 805
- Gross train weight (GTW)
on a 12 % gradient
2 920
3 065
3 055
3 205
- Braked trailer (within the GTW limit)
on a 12 % gradient
1 200
1 300
1 300
1 400
- Braked trailer * (with load transfer
within the GTW limit)
1 450
1 550
1 550
1 560
- Unbraked trailer
635
640
670
675
- Recommended nose weight
75
75
75
75