2013 CITROEN C4 DAG key
[x] Cancel search: keyPage 3 of 340

Your vehicle is fi tted with only some of the
equipment described in this document,
depending on the trim level, version and the
specifi cations for the country in which it is
sold.
The fi tting of electrical equipment or
accessories which are not recommended
by CITROËN may result in a failure of your
vehicle's electronic system. Please note this
specifi c warning and contact a CITROËN
dealer to be shown the recommended
equipment and accessories.
CITROËN has a presence on every continent,
a complete product range,
bringing together technology and a permanent spirit of innovation,
for a modern and creative approach to mobility.
We thank you and congratulate you on your choice.
Happy motoring!
Key
safety warning We draw your attention to the following...
contributes to the protection of the
environment
programming a function with the
confi guration menu
At the wheel of your new vehicle,
getting to know each system,
each control, each setting,
makes your trips, your journeys
more comfortable and more enjoyable.
additional information
refer to the page indicated
Page 4 of 340

CONTENTS
2
Monochrome screen A 49
Monochrome screen C 51
Colour screen 55
Trip computer 57
2 - MULTIFUNCTION
SCREENS 49 60
Ventilation 61
Manual air conditioning 63
Dual-zone digital air conditioning 65
Front demist - defrost 69
Rear screen demist - defrost 69
Front seats 70
Rear seats 75
Mirrors 76
Steering wheel adjustment 78
3 - COMFORT 61 78
Remote control key 79
Alarm 88
Doors 90
Boot 91
Electric windows 92
Panoramic sunroof 94
Fuel tank 95
Misfuel prevention (Diesel) 97
4 - ACCESS 79 97
Lighting controls 98Automatic illumination of headlamps 102
Welcome lighting 103
Headlamp adjustment 104
Directional lighting 105
Wiper controls 107
Automatic rain sensitive wipers 108
Courtesy lamps 110
Interior mood lighting 111
Boot lamp 111
5 - VISIBILITY 98 111
Interior fi ttings 112
Centre consoles 115
Front armrest 116
Boot fi ttings 121
Luggage cover
(enterprise version) 124
6 - FITTINGS 112 124
Instrument panels 28
Rev counter 31
Warning and indicator lamps 32
Indicators 43
Time and units 46
Customisation 48
FAMILIARISATION 4 25
1 - MONITORING 28 48
Child seats 125
Deactivating the passenger's front
airbag 127
ISOFIX child seats 134
Child lock 138
7 - CHILD SAFETY 125 138 ECO-DRIVING 26 27
Page 8 of 340

6
OPENING
2-button remote control
3-button remote control
Welcome lighting
A.
Unfolding / Folding the key
(fi rst press this button).
79, 81
A.
Folding/unfolding the key
(fi rst press this button).
80, 81
When a sensor detects a low level of
light, the remote switching on of the
dipped beam headlamps, the side-
lamps and the side spotlamps makes
your approach to the vehicle easier. Complete or selective unlock-
ing of the vehicle
(rapid fl ashing of the direction
indicators).
Normal locking
(press once; fi xed lighting of
the direction indicators). Complete or selective unlocking
of the vehicle
(rapid fl ashing of the direction
indicators).
Opening the windows
(hold until the desired level is reached).
Selective unlocking of the boot.
Normal locking
(press once; fi xed lighting of
the direction indicators).
Closing the windows
(hold until the desired level is reached). In the same way, the passenger compart-
ment lighting, such as the courtesy lamps
and the footwell lamps, comes on.
103
Page 21 of 340

19
FAMILIARISATION
PASSENGER SAFETY - STARTING
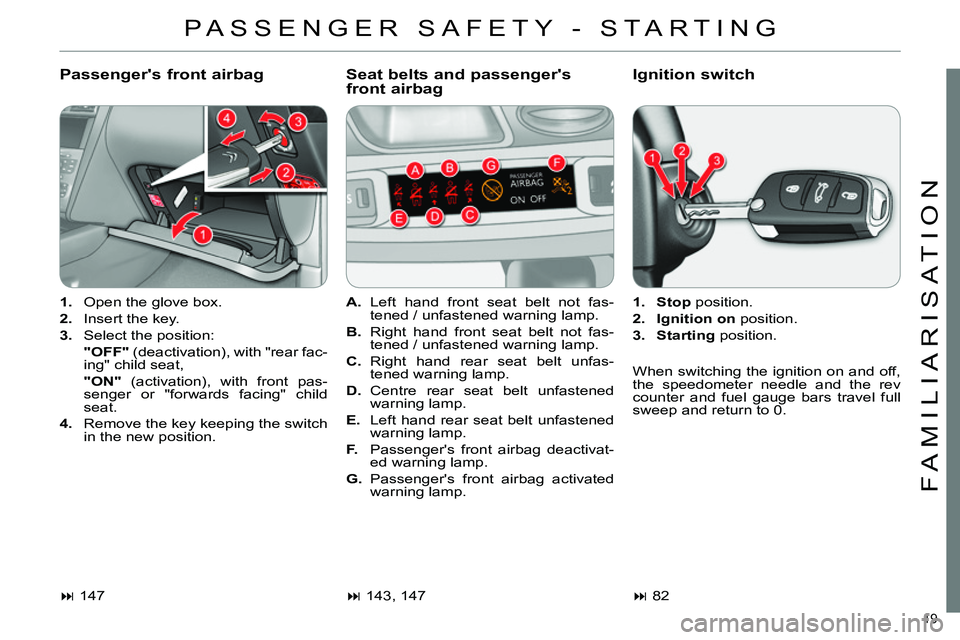
Passenger's front airbag
Seat belts and passenger's
front airbag
Ignition switch
1.
Open the glove box.
2.
Insert the key.
3.
Select the position:
"OFF"
(deactivation), with "rear fac-
ing" child seat,
"ON"
(activation), with front pas-
senger or "forwards facing" child
seat.
4.
Remove the key keeping the switch
in the new position.
147
A.
Left hand front seat belt not fas-
tened / unfastened warning lamp.
B.
Right hand front seat belt not fas-
tened / unfastened warning lamp.
C.
Right hand rear seat belt unfas-
tened warning lamp.
D.
Centre rear seat belt unfastened
warning lamp.
E.
Left hand rear seat belt unfastened
warning lamp.
F.
Passenger's front airbag deactivat-
ed warning lamp.
G.
Passenger's front airbag activated
warning lamp.
143, 147
1.
Stop
position.
2.
Ignition on
position.
3.
Starting
position.
82
When switching the ignition on and off,
the speedometer needle and the rev
counter and fuel gauge bars travel full
sweep and return to 0.
Page 25 of 340

23
FAMILIARISATION
DRIVING SAFELY
Stop & Start
Engine going into STOP mode
Engine going into START mode
Deactivation / Reactivation
In some circumstances the STOP mode
may not be available; the "ECO"
warn-
ing lamp fl ashes for a few seconds then
goes off.
- with a manual gearbox;
at speeds
below 12 mph (20 km/h), when you
put the gear lever into neutral and
release the clutch pedal,
- with an electronic gearbox;
at
speeds below 5 mph (8 km/h), when
you press the brake pedal or you
put the gear lever in position N
.
168
- with a manual gearbox;
when you
fully depress the clutch pedal,
- with an electronic gearbox;
●
with the gear lever in position A
or M
, when you release the brake
pedal,
●
or gear lever in position N
and
brake pedal released, when you
change to position A
or M
,
●
or when you engage reverse.
In some circumstances, START mode
may engage automatically; the "ECO"
warning lamp fl ashes then goes off.
169
You can deactivate the system at any
time by pressing the "ECO OFF"
button;
the button's warning lamp comes on.
169
The "ECO"
warning lamp goes
off and the engine restarts au-
tomatically:
The "ECO"
warning lamp comes on
in the instrument panel and the engine
is put into standby automatically:
The system is reactivated auto-
matically every time you start the
engine with the key.
Before refuelling or doing any-
thing under the bonnet, you
must switch off the ignition with
the key.
Page 50 of 340

1
MONITORING
48
In the instrument panel, you can change
the colour of its dials (button A
) indepen-
dently from that of the screens (button B
).
There are fi ve colour variants, from
white to blue.
press the appropriate button as
many times as needed to obtain the
desired colour.
This menu allows you to choose a fam-
ily of polyphonic sounds from the four
available. These sounds are grouped
together in a family and are adapted
to suit the situation and context (alert,
confi rmation, rejection, direction indica-
tors, lighting left on, key in ignition...).
Customising the instrument
panel colours
Customising the polyphonic
sounds
For the customisable colour
instrument panel with audio or
navigation system
Press the "MENU"
button for ac-
cess to the main menu.
Select the "Personalisation-confi -
guration" menu and confi rm.
Select the "Choice of sounds" line
and confi rm.
Select the desired family of sounds
and confi rm.
Save the modifi cations by confi rm-
ing "OK". For safety reasons, the driver
must only carry out these opera-
tion when stationary.
Page 56 of 340

2
MULTIFUNCTION SCREENS
54
Choice of language
Once this menu has been selected, you
can choose the language used by the
display from a pre-defi ned list.
For safety reasons, confi gura-
tion of the multifunction screen
by the driver must only be done
when stationary.
Display confi guration
This menu gives access to the following
settings:
- "Choice of units",
- "Date and time adjustment",
- "Display parameters",
- "Brightness".
Choice of sounds
This menu allows you to choose a fam-
ily of polyphonic sounds from the four
available. These sounds are grouped
together in a family and are adapted
to suit the situation and context (alert,
confi rmation, rejection, direction indica-
tors, lighting left on, key in ignition...).
Adjusting the date and time
Press the "
" or "
" button to
display the "Display confi guration"
menu, then press "OK"
.
Press the "
" or "
" button to se-
lect the "Date and time adjustment"
button, then press "OK"
.
Press the "
" or "
" button to se-
lect the setting to modify. Confi rm
by pressing "OK"
, then modify the
setting and confi rm again to save
the modifi cation.
Adjust the settings one by one, con-
fi rming with the "OK"
button.
Press the "
" or "
" button, then
the "OK"
button to select the "OK"
box and confi rm or the "Back"
but-
ton to cancel.
Page 58 of 340

2
MULTIFUNCTION SCREENS
56
Choice of sounds
This menu allows you to choose a
family of polyphonic sounds from four
available. These sounds are grouped
together in a family and are adapted
to suit the situation and context (alert,
confi rmation, rejection, direction indica-
tors, lighting left on, key in ignition...).
Display confi guration
This menu is used to select the col-
our scheme for the screen, adjust the
brightness, set the date and time and
to choose the units for distance (km
or miles), fuel consumption (l/100 km,
mpg or km/l) and temperature (°Celsius
or °Fahrenheit).
Adjusting the voice synthesiser
This menu is used to adjust the volume
setting for navigation instructions and
to choose the type of voice (male or fe-
male).
Adjusting the date and time
- Press on SETUP
.
- Select "Display confi guration" and
confi rm.
- Select "Set date and time and con-
fi rm.
Select "Minute adjustment via GPS" so
that the minutes are adjusted automati-
cally by satellite reception.
- Select the setting to modify. Confi rm
by pressing on OK
, then modify the
setting and confi rm again to save
the modifi cation.
- Adjust the settings one by one.
- Select " OK
" in the screen then con-
fi rm to save the setting.
Choice of language
This menu is used to choose the lan-
guage used by the screen from a de-
fi ned list.
Vehicle parameters
This menu is used to activate or deac-
tivate certain driving and comfort sys-
tems, classifi ed by category:
- "Driver aid":
●
"Electric brake * " (Automatic electric
parking brake; see "Driving" sec-
tion),
●
"Rear wiper" (Rear wiper coupled
to reverse gear; see "Visibility"
section),
●
"Speed limits" (Memorising speed
settings for the cruise control and
speed limiter; see "Driving" sec-
tion).
Alert log
This lists the active alerts by displaying
in turn the different messages associ-
ated with them.
- "Vehicle access" (see "Access" sec-
tion):
●
"Driver doors selectivity" (Se-
lective unlocking of the driver's
door),
●
"Rear doors selectivity" (Selective
unlocking of the boot using the
centre button on the remote con-
trol; see "Access section).
- "Driving lights" (see "Visibility" sec-
tion):
●
"Day lights * " (Daytime running
lamps),
●
"Directional headlights" (Main /
additional directional lighting).
- "Comfort lighting" (see "Visibility"
section):
●
"Welcome lights" (Interior welcome
lighting),
●
"Running lights" (Automatic timed
operation of headlamps).
*
Depending on country.