2013 Citroen C3 RHD window
[x] Cancel search: windowPage 60 of 288

Comfort
58
4. Air conditioning on/off
Press this button to switch off the air conditioning.
Stoppin
g the air conditioning may cause some problems (humidity, misting).
Automatic operation of the air conditioning is resumed when the button is pressed again.
The symbol
"A/C"is displayed.
5. Air intake / Air recirculation
Press this button for recirculation of
the interior air. The air recirculation
s
ymbol 5is displayed.
Air recirculation enables the passenger compartment
to be isolated from exterior odours and smoke.
6. Air distribution adjustment
Pressing this button several times in succession enables the air flow to bedirected in turn towards:
- t
he windscreen and the side windows (demisting or defrosting),
- the windscreen, side windows and air
vents,
- the windscreen, the side windows, the air
vents and the footwells,
- the windscreen
, the side windows and thefootwells,
- the footwells,
- the air vents and the footwells,
- the air vents.
7. Air fl ow adjustment
Press the "full fan"button to
in
crease the air flow.
The air
flow symbol, the fan, fills progressivelyaccording to the value requested.
Switching the system off
Press the air flow "empty fan"
button 7until the fan symbol disappears.
Thi
s action switches off all of the functions of
the air conditioning system.
Thermal com
for t is no longer controlled. A slight flow of air resulting from the movement
of the vehicle, remains perceptible however.
Pressin
g the air flow "full fan"
button 7or on "AUTO"
reactivates the system with the values set before it was switched off.
Press the "empty fan"button todecrease the air flow. Press this button again or press the
"AUTO"button to resume automatic management of
the intake of air. The air recirculation s
ymbol 5goes off.
Avoid driving for long periods with the air conditioning switched off (risk of mistingand reduction of the air quality in the cabin).
For maximum cooling or heating of the cabin, it is possible to go beyond the minimum 14 or maximum 28 values.)Press the blue button 2
until "LO"is displayed or the red button 2
until"HI"
is displayed.
Avoid prolonged recirculation of interior air (risk of condensation or deterioration of the air quality).
Page 73 of 288

4
Access
71
Alarm
Do not make any modifications tothe alarm system, this could cause malfunctions.
If an opening - door or boot - is not closed fully, the vehicle is not locked, but the exterior perimeter protectionwill be activated after 45 seconds at the same time as the interior volumetric protection. S
ystem which protects and provides a deterrent against the theft of your vehicle. It provides two types of protection, exterior and interior, as well as a self-protection function.
Exterior perimeter protection
The system detects opening of the vehicle.
The alarm is triggered if anyone tries to enter
the vehicle by forcing a door, the boot or thebonnet.
Interior volumetric protection
The system detects any variation in the volume
in the passenger compar tment.
The alarm is tri
ggered if anyone breaks a
window or moves inside the vehicle.
If you wish to leave a pet in the vehicle or a
window partially open, deactivate the interior
volumetric protection.
Self-protection function
The system detects the putting out of ser vice of
its components.
The alarm is triggered if anyone tries to put
the wires of the siren, the central control or the
batter
y out of ser vice.
Locking the vehicle with full
alarm
Activation
) Switch off the ignition and get out of the
vehicle. ) Lock or deadlock the vehicle using the locking button on the remote control.
The alarm is activated; the indicator lamp inbutton A
flashes once per second.
The exterior perimeter protection is activated,
5 seconds after the locking button on theremote control is pressed.
The interior volumetric protection is activated,
45 seconds a
fter the locking button on the remote control is pressed.
Deactivation
)
Unlock the vehicle using the unlockingbutton on the remote control.
The alarm is deactivated; the indicator lamp in button Agoes off.
Page 75 of 288

4
Access
73
Window controls System which opens or closes a window manually or automatically. It is fitted with a system which provides protection if an obstacle is detected on the
one-touch models and a deactivation system to prevent misuse of the rear switches on all models.
1.Driver's electric window.2.Passenger's electric window.3.Rear right electric window.4.Rear left electric window.5. Deactivating the rear electric windowand door switches.Electric windows ) Press or pull the switch. The
window stops as soon as theswitch is released.
One-touch electric
windows
There are two methods of
operation:
-
manual mode)Press or pull the switch gently.
The window stops as soon as the switch
i
s released.-automatic mode)Press or pull the switch fully. The window
opens or closes completely when the switch is released.)Pressing the switch again stops themovement of the window.
The electric window switches
remain operational for approximately 45 seconds after the ignition is switchedoff or until a front door is opened.During this period of 45 seconds, if youopen a door while opening a window, the window stops. The ignition must then be switched on again to operatethe windows.
Page 76 of 288

Access
74
Safety anti-pinch
The one-touch front electric windows are fittedwith a safety anti-pinch function.When the window rises and meets an obstacle, it stops and partially lowers again.
Deactivating the rear window and door switches
)
For the safety of your children, press switch 5to prevent operation of the rear
windows irrespective of their position.
With the lamp on, the rear controls aredeactivated.
With the lamp off, the rear controls are
activated.
Reinitialisation
In the event of a malfunction you have to
reinitialise the operation of the electric windows: )release the switch and pull it again until the
window closes completely,
)hold the switch for approximately
one second after closing,)press the switch to lower the windowautomatically. The safety anti-pinch function is not active
during these operations. In the event of unwanted opening of thewindow on closing (for example in the presence of frost): )press the switch beyond the point of resistance and then release it: thewindow opens completely,)then pull it immediately withoutpassing the point of resistance until
the window closes completely,)continue to hold the switch for approximately one second after thewindow has closed.The safety anti-pinch function is not active during these operations.
Always remove the key from the ignition when leaving the vehicle, even for a short time.
In the event of contact during operationof the windows, reverse the movement of the window. To do this, press theswitch concerned. When the driver operates the passenger electric window switches, they should ensure that no one is preventing correct closing of the windows.
The driver should ensure that passengers use the electric windows
correctly.
Be aware of children when operating the windows.
This control also deactivates the interior rear door controls (see "Childsafety - § Electric child lock").
Page 105 of 288

7
Child safety
103
As a safety precaution, do not leave: - a child or children alone and unsuper vised in a vehicle, - a child or an animal in a vehicle which is exposed to the sun, with the windowsclosed, - the keys within reach of children inside the vehicle. To prevent accidental opening of the doors and rear windows, use the "Child lock". Take care not to open the rear windows bymore than one third.To protect young children from the rays of the sun, fit side blinds on the rear windows.
For optimum installation of the "forwards-facing" child seat, ensure that the back of the child seat is in contact with the back of thevehicle's seat and remove the head restraint.Ensure that the head restraint is stored or attached securely to prevent it from beingthrown around the vehicle in the event of sharp braking. Refit it if an adult uses theseating position.Children under the age of 10 must not travelin the "for wards-facing" position on the front passenger seat, unless the rear seats are already occupied by other children, cannotbe used or are absent. Deactivate the passenger airbag when a"rearwards-facing" child seat is installed onthe front seat. Other wise, the child would risk beingseriously injured or killed if the airbag wereto inflate.
Installing a booster seat
The chest par t of the seat belt must be
positioned on the child's shoulder without touching the neck.Ensure that the lap part of the seat belt passes correctly over the child's thighs.CITROËN recommends the use of a booster seat which has a back, fitted with a seat beltguide at shoulder level.
The incorrect installation of a child seat in a vehicle compromises the child's protection inthe event of an accident.Ensure that there is no seat belt or seat belt buckle under the child seat, as this could destabilise it. Remember to fasten the seat belts or the child seat harnesses keeping the slackrelative to the child's body to a minimum,even for short journeys.When installing a child seat using the seat belt, ensure that the seat belt is tightenedcorrectly on the child seat and that it securesthe child seat firmly on the seat of your vehicle. If your passenger seat is adjustable,move it for wards if necessary. At rear seating positions, always leave sufficient space between the front seat and: - a "rear wards facing" child seat, - the child's feet for a child seat fitted"forwards facing". To do this, move the front seat for wardsand, if necessary, move its backrest into theupright position.
Advice on child seats
Page 109 of 288

7
Child safety
107
Electric child lock
Activation
)
Press this button.
The indicator lamp on the button comes on,
accompanied by a message in the multifunction screen.This indicator lamp remains on until the childlock is deactivated.
Deactivation
)
Press the button again.The indicator lamp on the button goes off, accompanied
by a message in the multifunction screen.
This indicator lamp remains off until the child lock is
activated.
Remote control system to prevent opening of the rear doors using their interior controls and use of the rear electric windows * .
Th
e control is located:
- either on the dashboard, driver's side,
for
versions without rear electric windows,
- or on the driver's door, with the electric
window controls
, for versions fitted with rear electric windows.
This system is independent and in nocircumstances does it take the place of the central locking control. Check the status of the child lock eachtime you switch on the ignition.
* Accordin
g to version.
Always remove the key from the ignition when leaving the vehicle, even for a short time.
Page 118 of 288
Safety
116
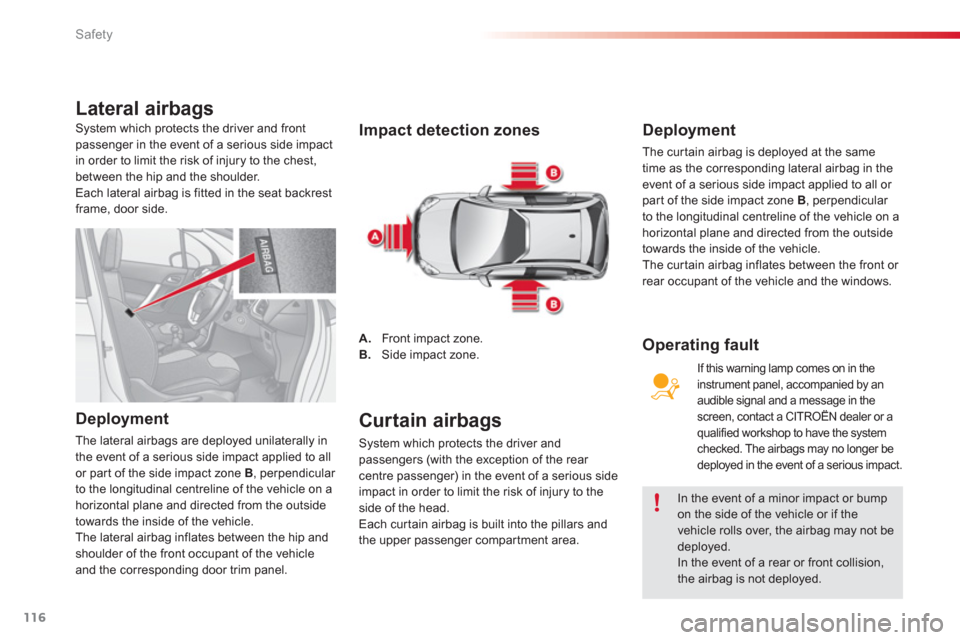
Lateral airbags
Deployment
The lateral airbags are deployed unilaterally in
the event of a serious side impact applied to all
or par t o
f the side impact zone B, perpendicular
to the longitudinal centreline of the vehicle on a horizontal plane and directed from the outside
towards the inside of the vehicle.
The lateral airba
g inflates between the hip andshoulder of the front occupant of the vehicle and the corresponding door trim panel.
Impact detection zones
A.
Front impact zone.
B. Side impact zone.
Curtain airbags
System which protects the driver and
passengers (with the exception of the rear centre passenger) in the event of a serious side
impact in order to limit the risk of injury to the side of the head.
Each cur tain airbag is built into the pillars and
the upper passen
ger compar tment area.
Deployment
The cur tain airbag is deployed at the same
time as the corresponding lateral airbag in the event of a serious side impact applied to all or par t of the side impact zone B, perpendicular
to the longitudinal centreline of the vehicle on a horizontal plane and directed from the outside
towards the inside of the vehicle.
The cur tain airbag inflates between the front or
rear occupant of the vehicle and the windows.
Operating fault
If this warning lamp comes on in the instrument panel, accompanied by anaudible signal and a message in thescreen, contact a CITROËN dealer or a
qualified workshop to have the systemchecked. The airbags may no longer be
deployed in the event of a serious impact.
In the event of a minor impact or bump on the side of the vehicle or if the vehicle rolls over, the airbag may not be
deployed.
In the event of a rear or front collision, the airbag is not deployed.
System which protects the driver and frontpassenger in the event of a serious side impact
in order to limit the risk of in
jury to the chest,
between the hip and the shoulder.
Each lateral airba
g is fitted in the seat backrest frame, door side.
Page 170 of 288

Practical information
168
Dashboard fusebox
The fusebox is placed in the lower dashboard (left-hand side).
Access to the fuses
)Refer to the paragraph "Access to the
tools".
Fuse tables
Fuse N°RatingFunctions
FH365 ATr a i l e r r e l ay unit.
FH37
-Not used.
FH3
820 AHiFi amplifier.
FH3
9-Not used.
FH40
40 ATr a i l e r r e l ay unit.
Fuse N°RatingFunctions
F1-Not used.
F
2-Not used.
F
35 A Airbags and pretensioners control unit.
F410 A Air conditioning, clutch switch, electrochromatic mirror, par ticle
filter pump (Diesel), diagnostic socket, air flow sensor (Diesel).
F530 AElectric windows panel, passenger's electric window control,
front electric window motor.
F
630 ARear electric windows motors and driver's electric window motor.
F75 ACourtesy lamp, side reading lamps.