2013 CHRYSLER TOWN AND COUNTRY display
[x] Cancel search: displayPage 9 of 140

A. Headlight Switch pg. 30
B. Turn Signal/Wiper/Washer/High BeamsLever (behind steering wheel) pg. 28
C. Electronic Vehicle Information Center (EVIC) Controls pg. 82
D. Electronic Vehicle Information Center (EVIC) Display pg. 82
E. Instrument Cluster pg. 8
F. Transmission Gear Selector G. Audio System (touch-screen-radio shown)
pg. 42
H. Climate Controls pg. 34
I. SWITCH PANEL • Economy Mode
• Hazard Switch
• Power Inverter pg. 86
• Electronic Stability Control
J. VES/DVD Player pg. 80 K. Power Outlets pg. 87
L. Speed Control pg. 31
M. Hood Release pg. 110
N. Parking Brake Release
O. Power Mirrors
P. Power Windows
Q. Power Door Locks
R. Power Vent Windows
CONTROLS AT A GLANCE
7
Page 32 of 140

HEADLIGHT SWITCH AND HALO LIGHT SWITCH
Automatic Headlights/Parking
Lights/Headlights
• Rotate the headlight switch, located on theinstrument panel to the left of the steering
wheel, to the first detent for parking lights
and to the second detent for head-
lights
.
• With the parking lights or low beam head- lights on, push the headlight switch once for
fog lights.
• Rotate the headlight switch to “AUTO” for AUTO headlights.
• When set to AUTO, the system automati- cally turns the headlights on or off based on
ambient light levels.
SmartBeams™
• The SmartBeam™ system provides increased forward lighting at night by automating highbeam control through the use of a digital camera mounted on the inside rearview mirror. This
camera detects vehicle specific light and automatically switches from high beams to low
beams until the approaching vehicle is out of view.
Instrument Panel Dimmer
• Rotate the dimmer control to the extreme bottom position to fully dim the instrument panellights and prevent the interior lights from illuminating when a door is opened.
• Rotate the dimmer control up to increase the brightness of the instrument panel when the parking lights or headlights are on.
• Rotate the dimmer control up to the next detent position to fully brighten the odometer and radio when the parking lights or headlights are on. Refer to your Uconnect®/Radio User
Manual on the DVD for display dimming.
• Rotate the dimmer control up to the last detent position to turn on the interior lighting.
Overhead (Halo) Light
• To activate the Halo lights, rotate the Halo switch control upward or downward to increase or decrease the lighting.
OPERATING YOUR VEHICLE
30
Page 34 of 140

ELECTRONIC RANGE SELECTION (ERS)
•Electronic Range Select (ERS) allows you to
limit the highest available transmission gear,
and can be activated during any driving con-
dition. When towing a trailer or operating the
vehicle in off-road conditions, using ERS shift
control will help you maximize both perfor-
mance and engine braking.
•To shift from DRIVE mode to ERS mode,
move the shift lever to the left (-) once. The
current gear will be maintained as the top
gear. To disable ERS, simply press and hold
the shift lever to the right (+) until “D” is
displayed in the instrument cluster odometer.
• Switching between ERS and DRIVE mode can be done at any vehicle speed.
• Refer to your Owner's Manual on the DVD for further details.
OPERATING YOUR VEHICLE
32
Page 39 of 140

Air Conditioning (A/C)
• If the air conditioning button is pressed while in AUTO mode, the system will exit AUTOmode and stay in A/C. The mode and blower will go to the previous user setting.
SYNC Temperature Button
• Push the SYNC button once to control driver and passenger temperatures simultaneously.Push the SYNC button a second time to control the temperatures individually.
Air Recirculation
• Use Recirculation for maximum A/C operation.
• For window defogging, turn the recirculation button off.
• If the Recirculation button is pressed when the system is in Defrost mode the RecirculationLED indicator will flash three times to indicate Recirculation mode is not allowed.
Heated Mirrors
• The mirrors are heated to melt frost or ice. This feature is activated whenever you turn on therear window defroster.
Rear Window Defroster
•Pressing the rear window defroster button will turn on the defroster for approximately 10 minutes.
An indicator in the button will illuminate when the rear window defroster is on. For an additional
10 minutes of operation, press the button a second time.
Activating Rear Automatic Temperature Control
• Pressing the REAR LOCK button for the Rear Automatic Temperature Control (ATC) System from the front lower ATC panel, illuminates a LOCK symbol in the rear display. The
rear temperature and air source are controlled from the front lower ATC panel.
• Rear second row occupants can only adjust the rear ATC control when the REAR LOCK button is turned off.
• The Rear ATC system is located in the headliner, near the center of the vehicle.
OPERATING YOUR VEHICLE
37
Page 40 of 140

PARKSENSE® REAR PARK ASSIST
• If an object is detected behind the rear bumper while the vehicle is in REVERSE, a warning willdisplay in the instrument cluster and a tone will sound, (closer the object the faster the tone)
that changes speed depending on the distance of the object from the bumper, will sound.
• When the Instrument Cluster reads either “Clean Sensor” or “Blinded”, clean off the bumper sensors to see if the condition is corrected.
PARKVIEW® REAR BACK-UP CAMERA
• You can see an on-screen image of the rear of your vehicle whenever the shift lever is put intoREVERSE. The ParkView® Rear Back-Up Camera image will be displayed on the radio display
screen, located on the center stack of the instrument panel.
• If the radio display screen appears foggy, clean the camera lens located on the liftgate.
WARNING!
Drivers must be careful when backing up; even when using the ParkView® Rear Back-Up
Camera. Always check carefully behind your vehicle, and be sure to check for pedestrians,
animals, other vehicles, obstructions, or blind spots before backing up. You must continue to
pay attention while backing up. Failure to do so can result in serious injury or death.
BLIND SPOT MONITORING WITH REAR
CROSS PATH
• The Blind Spot Monitoring (BSM) system uses two radar-based sensors, located inside the rear bumper fascia, to detect Highway licensable vehicles (automobiles, trucks, motorcycles
etc.) that enter the blind spot zones from the rear/front/side of the vehicle.
• The Blind Spot Monitoring (BSM) system warning light, located in the outside mirrors, will illuminate if a vehicle moves into a blind spot zone.
• The BSM system can also be configured to sound an audible (chime) alert and mute the radio to notify you of objects that have entered the detection zones.
• Refer to your Owner's Manual on the DVD for further details.
OPERATING YOUR VEHICLE
38
Page 47 of 140

Equalizer, Balance And Fade
• Press the “TUNE/SCROLL” control knob and BASS, MID, TREBLE, BALANCE and FADEwill display. Rotate the “TUNE/SCROLL” control knob to select the desired setting.
Radio Operation
Seek Up/Down Buttons
• Press to seek through radio stations in AM or FM bands.
• Hold either button to bypass stations without stopping.
Store Radio Presets
• Press the “SET/RND” button once and SET 1 will show in the display. Then select button (1–6).
• A second station may be added to each push button. Press the “SET/RND” button twice andSET 2 will show in the display. Then select button (1–6).
CD/DISC Operation
Seek Up/Down Buttons
• Press to seek through CD tracks.
• Hold either button to bypass tracks without stopping.
SET/RND Button (Random Play)
• Press this button while the CD is playing to activate Random Play.
• This feature plays the selections on the CD in random order to provide an interesting changeof pace.
Audio Jack Operation
• The AUX/Audio Jack provides a means to connect a portable audio device, such as an MP3player or an iPod®, to the vehicles sound system. This requires the use of a 3.5 mm stereo audio
patch cable.
•
Pressing the AUX button will change the mode to auxiliary device if the Audio Jack is connected,
allowing the music from your portable device to play through the vehicle's speakers.
• The functions of the portable device are controlled using the device buttons, not the buttons on the radio. However, the volume may be controlled using the radio or portable device.
ELECTRONICS
45
Page 49 of 140

Equalizer, Balance And Fade
• Press the “TUNE/SCROLL” control knob and BASS, MID, TREBLE, BALANCE and FADEwill display. Rotate the “TUNE/SCROLL” control knob to select the desired setting.
Radio Operation
Seek Up/Down Buttons
• Press to seek through radio stations in AM, FM, or SAT bands.
• Hold either button to bypass stations without stopping.
Store Radio Presets
• Press the “SET/RND” button once and SET 1 will show in the display. Then select button (1–6).
• A second station may be added to each push button. Press the “SET/RND” button twice andSET 2 will show in the display. Then select button (1–6).
Music Type
• Press the “MUSIC TYPE” button to activate this mode. Press the “MUSIC TYPE” button again or turn the “TUNE/SCROLL” control knob to select the desired music type (Adult Hits,
Country, Jazz, Oldies, Rock, etc.).
• Once a music type is chosen and the icon is displayed, press either “SEEK” button and the radio will only search for stations with the selected music type.
NOTE:
The Music Type function only operates when in FM mode.
SETUP Button
• Pressing the “SETUP” button allows you to select between items that are available in that particular mode.
• Turn the “TUNE/SCROLL” control knob to scroll through the entries. Push the “AUDIO/ SELECT” button to select an entry and make changes.
ELECTRONICS
47
Page 51 of 140

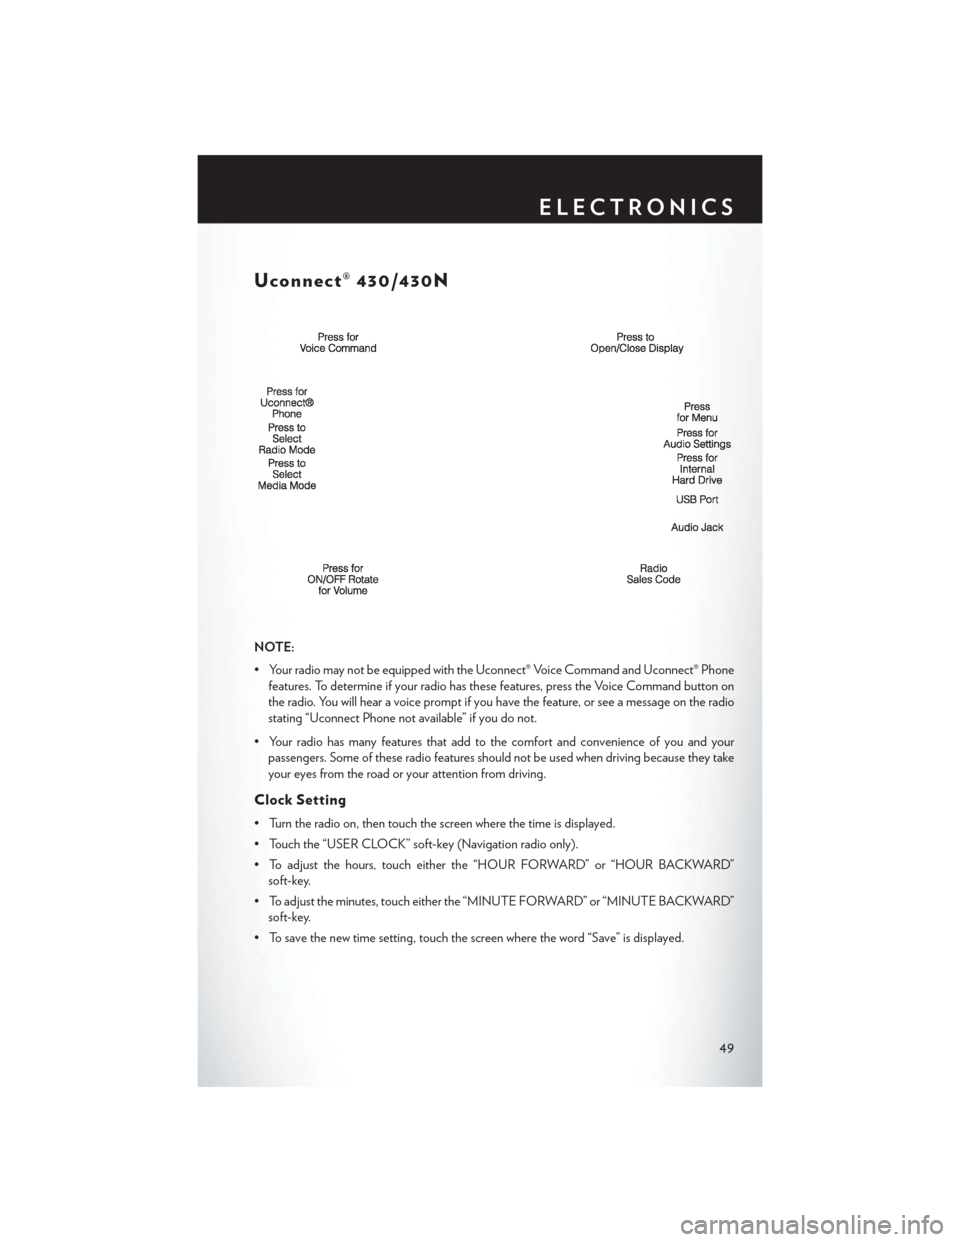
Uconnect® 430/430N
NOTE:
• Your radio may not be equipped with the Uconnect® Voice Command and Uconnect® Phonefeatures. To determine if your radio has these features, press the Voice Command button on
the radio. You will hear a voice prompt if you have the feature, or see a message on the radio
stating “Uconnect Phone not available” if you do not.
• Your radio has many features that add to the comfort and convenience of you and your passengers. Some of these radio features should not be used when driving because they take
your eyes from the road or your attention from driving.
Clock Setting
• Turn the radio on, then touch the screen where the time is displayed.
• Touch the “USER CLOCK” soft-key (Navigation radio only).
• To adjust the hours, touch either the “HOUR FORWARD” or “HOUR BACKWARD”soft-key.
• To adjust the minutes, touch either the “MINUTE FORWARD” or “MINUTE BACKWARD” soft-key.
• To save the new time setting, touch the screen where the word “Save” is displayed.
ELECTRONICS
49