2013 CHRYSLER 300 manual radio set
[x] Cancel search: manual radio setPage 28 of 132

High Beam Operation
• Push the lever forward to activate the high beams. Pull the lever toward you for flash to pass.
NOTE:
For safe driving, turn off the high beams when oncoming traffic is present to prevent headlight
glare and as a courtesy to other motorists.
HEADLIGHT SWITCH
Automatic Headlights/Parking Lights/Headlights
• Rotate the headlight switch, located on theinstrument panel to the left of the steering
wheel, to the first detent from the off posi-
tion for parking light
and to the sec-
ond detent for headlight
.
• With the parking lights or low beam head- lights on, press the headlight switch for fog
lights. Press the switch a second time for
front and rear fog lights. Pressing the switch
a third time will deactivate the rear fog lights,
and a fourth time will deactivate the front
fog lights. Turning the headlight switch off
will also deactivate the fog lights.
• Rotate the headlight switch to “AUTO” for AUTO headlights.
• When set to AUTO, the system automatically turns the headlights on or off based on ambient light levels.
SmartBeams™
• This system automatically controls the use of the headlight high beams. Refer to Program-mable Features in Electronics for further details.
Instrument Panel Dimmer
• Rotate the dimmer control to the extreme bottom position to fully dim the instrument panellights and prevent the interior lights from illuminating when a door is opened.
• Rotate the dimmer control up to increase the brightness of the instrument panel and cupholders when the parking lights or headlights are on.
• Rotate the dimmer control up to the next detent position to fully brighten the odometer and radio when the parking lights or headlights are on. Refer to your Uconnect®/Radio User
Manual on the DVD for display dimming.
• Rotate the dimmer control up to the last detent position to turn on the interior lighting.
Ambient Light Dimmer
• Rotate the ambient light control up or down to increase or decrease the brightness of the release handle, map pocket (if equipped), overhead and floor lighting when the parking lights
or headlights are on.
OPERATING YOUR VEHICLE
26
Page 37 of 132

Automatic Operation
• Press the AUTO button.
• Select the desired temperature by pressing the Temperature Control buttons.
• The system will maintain the set temperature automatically.
Air Conditioning (A/C)
• If the air conditioning button is pressed while in the AUTO mode, the system will enter manualmode with the air conditioning on.
Air Recirculation
• Use recirculation for maximum A/C operation.
• For window defogging, turn the recirculation button off.
• If the recirculation button is pressed while in the AUTO mode, the indicator light may flashthree times to indicate the cabin air is being controlled automatically.
Heated Mirrors
• The mirrors are heated to melt frost or ice. This feature is activated whenever you turn on therear window defroster.
BLIND SPOT MONITORING
• The Blind Spot Monitoring (BSM) system uses two radar-based sensors, located inside therear bumper fascia, to detect Highway licensable vehicles (automobiles, trucks, motorcycles
etc.) that enter the blind spot zones from the rear/front/side of the vehicle.
• The Blind Spot Monitoring (BSM) system warning light, located in the outside mirrors, will illuminate if a vehicle moves into a blind spot zone.
• The BSM system can also be configured to sound an audible (chime) alert and mute the radio to notify you of objects that have entered the detection zones.
• Refer to your owner's manual on the DVD for further details.
OPERATING YOUR VEHICLE
35
Page 43 of 132

Setting the Time
•
Model 8.4N synchronizes time automatically via GPS, so should not require any time adjustment.
If you do need to set the time manually, follow the instructions below for Model 8.4.
• For Model 8.4, turn the unit on, then touch the time display at the top of the screen. Touch the Yes soft-key.
• If the time is not displayed at the top of the screen, touch the More soft-key and then touch the Settings soft-key. In the Settings screen, touch the Clock soft-key, then check or uncheck this
option.
• Touch + or – next to Set Time Hours and Set Time Minutes to adjust the time.
• If these features are not available, uncheck the Sync with GPS box.
• Touch the X soft-key to save your settings and exit out of the Clock Setting screen.
Audio Settings
Touch of the Audio soft-key to activate the Audio settings screen to adjust Balance\Fade, Equalizer,
and Speed Adjusted Volume.
You can return to the Radio screen by touching the X soft-key located at the top right.
Balance/Fade
Touch the Balance/Fade soft-key to Balance audio between the front speakers or fade the audio
between the rear and front speakers.
Touching the Front, Rear, Left, or Right soft-keys or touch and drag the blue Speaker Icon to adjust the
Balance/Fade.
Equalizer
Touch the Equalizer soft-key to activate the Equalizer screen.
Touch the + or - soft-keys, or by touching and dragging over the level bar for each of the equalizer
bands. The level value, which spans between plus or minus 9, is displayed at the bottom of each of the
Bands.
Speed Adjusted Volume
Touch the Speed Adjusted Volume soft-key to activate the Speed Adjusted Volume screen. The Speed
Adjusted Volume is adjusted by touching the + and - buttons or by touching and dragging over the level
bar. This alters the automatic adjustment of the audio volume with variation to vehicle speed.
ELECTRONICS
41
Page 55 of 132

NOTE:
The Uconnect® Phone requires a mobile phone equipped with the Bluetooth® Hands-Free
Profile, Version 1.0 or higher. For Uconnect® customer support, call 1–877–855–8400 or visit
www.UconnectPhone.com.
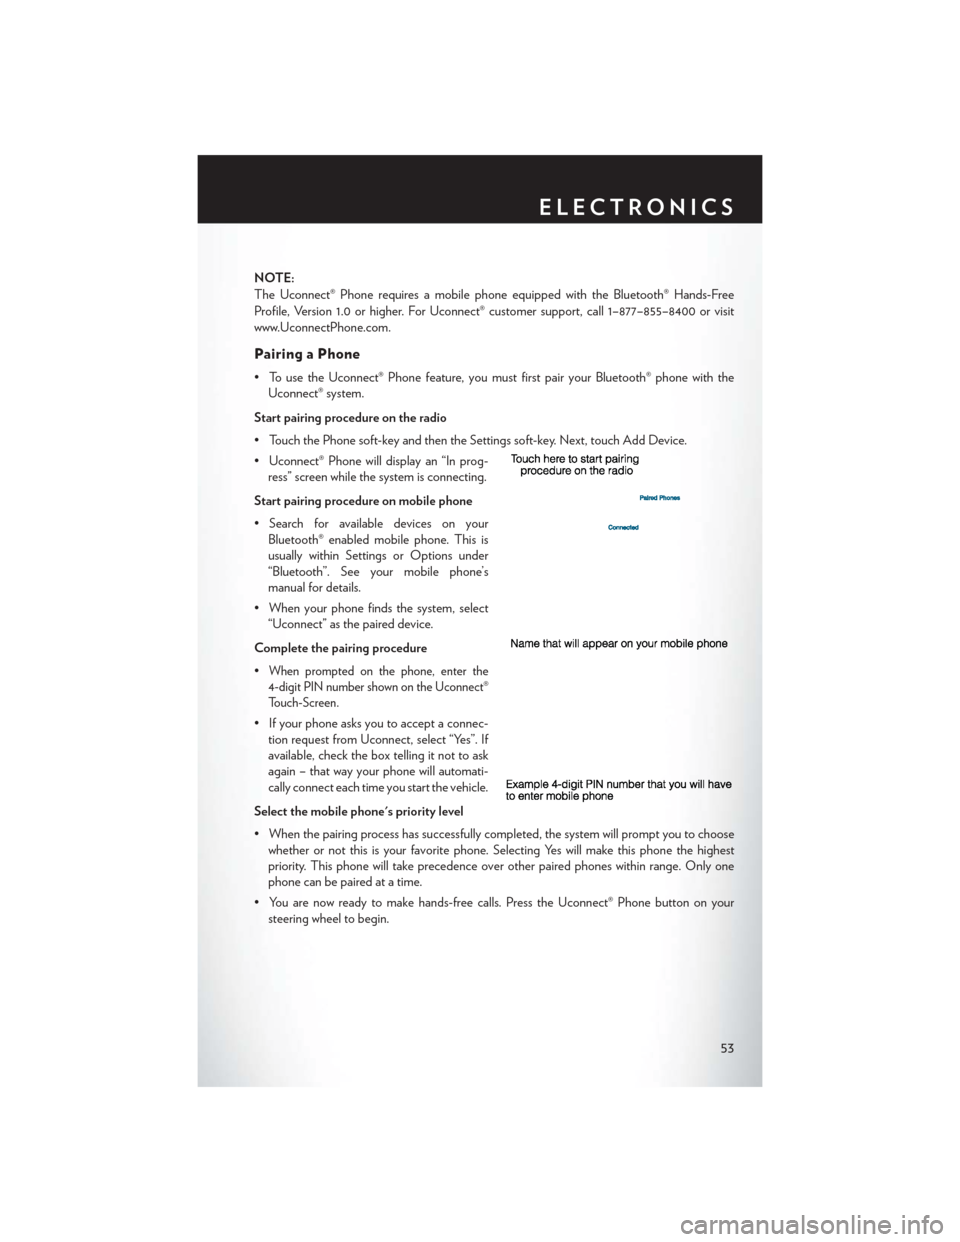
Pairing a Phone
• To use the Uconnect® Phone feature, you must first pair your Bluetooth® phone with theUconnect® system.
Start pairing procedure on the radio
• Touch the Phone soft-key and then the Settings soft-key. Next, touch Add Device.
• Uconnect® Phone will display an “In prog- ress” screen while the system is connecting.
Start pairing procedure on mobile phone
• Search for available devices on your Bluetooth® enabled mobile phone. This is
usually within Settings or Options under
“Bluetooth”. See your mobile phone’s
manual for details.
• When your phone finds the system, select “Uconnect” as the paired device.
Complete the pairing procedure
•
When prompted on the phone, enter the
4-digit PIN number shown on the Uconnect®
Touch-Screen.
• If your phone asks you to accept a connec- tion request from Uconnect, select “Yes”. If
available, check the box telling it not to ask
again – that way your phone will automati-
cally connect each time you start the vehicle.
Select the mobile phone's priority level
• When the pairing process has successfully completed, the system will prompt you to choose whether or not this is your favorite phone. Selecting Yes will make this phone the highest
priority. This phone will take precedence over other paired phones within range. Only one
phone can be paired at a time.
• You are now ready to make hands-free calls. Press the Uconnect® Phone button on your steering wheel to begin.
ELECTRONICS
53
Page 57 of 132

Common Phone Commands (Examples)
• “Call John Smith”
• “Call John Smith mobile”
• “Dial 1 248 555 1212
• “Call Emergency”
• “Call Towing Assistance”
• “Redial”
Phonebook
• Uconnect® radios will automatically download your phonebook from your paired phone, if thisfeature is supported by your phone. Entries are updated each time that the phone is
connected. If your phone book entries do not appear, check the settings on your phone. Some
phones require you to enable this feature manually.
• Your phonebook can be browsed on your radio screen, but editing can only be done on your phone. To browse, touch the Phone soft-key, then the Phonebook soft-key.
• Favorite phonebook entries can be saved as Favorites for quicker access. Favorites are shown at the top of your main phone screen.
Voice Command Tips
• Using complete names (i.e; Call John Doe vs. Call John) will result in greater system accuracy.
• You can “chain” commands together for faster results. Say “Call John Doe, mobile”, forexample.
• If you are listening to available voice command options, you do not have to listen to the entire list. When you hear the command that you need, press the
button on the steering
wheel, wait for the beep and say your command.
Changing The Volume
• Start a dialogue by pressing the Phone button, then say a command for example -
"Help".
• Use the radio ON/OFF VOLUME rotary knob to adjust the volume to a comfortable level while the Uconnect® system is speaking. Please note the volume setting for Uconnect® is
different than the audio system.
NOTE:
To access help, press the Uconnect® Phone
button on the steering wheel and say "help."
Touch the display or push either
orbutton and say "cancel" to cancel the help
session.
ELECTRONICS
55
Page 59 of 132

Changing The Volume
• Start a dialogue by pressing the Voice Command button, then say a command
(for example, “help”).
• Use the radio ON/OFF VOLUME rotary knob to adjust the volume to a comfortable level while the Voice Command system is speaking. The volume setting for Voice Command is
different than the audio system.
• Refer to the Understand The Features Of Your Vehicle section of your vehicle's Owner's Manual on the DVD for further details.
Common Voice Commands (Examples)
Switch Modes “FM”
“Satellite” “AM”
“Change Source to iPod”
“Change Source to SD Card”
Radio (FM, AM) “95.5”
“95.5 FM”
“Go to preset 5”
Player “Play Album 'Greatest Hits”
“Play Artist 'Scott Joplin” “Play Genre 'Rock”
“Play Song 'Maple Leaf Rag”
SiriusXM Satellite Radio “39”
“Foxxhole”
SiriusXM Travel Link “Show fuel prices”
“Show movie listings”
“Show current weather”
“Show extended weather”
“Show Travel Link favorites”
“Show NFL headlines”
“Show NBA rankings”
“Show NFL schedules”
“Show NBA scores”
SiriusXM Navigation “Navigate to (Address)”
“Navigate to (Point of Interest)”
NOTE:
• For the shortened SiriusXM Satellite Radio mode commands to be recognized you must be
in that mode. For example, if you are in SiriusXM Satellite Radio mode you can say “39”, but if
you are not in SiriusXM mode, you would need to say “Tune to Satellite Channel 39.”
ELECTRONICS
57