2013 CHRYSLER 300 display
[x] Cancel search: displayPage 35 of 132

AUTOSTICK®
• When the transmission is in DRIVE, it willoperate automatically, shifting between the
eight available gears. While in SPORT
mode, the transmission will only shift be-
tween seven of the eight available gears.
• To engage AutoStick®, simply tap one of the steering wheel-mounted shift paddles (+/-).
• In AutoStick® mode, the transmission will only shift up or down when (+/-) is manually
selected by the driver, except as described
below. It will remain in the selected gear until
another upshift or downshift is chosen.
• When AutoStick® is active, the current transmission gear is displayed in the EVIC.
• If AutoStick® is engaged while in DRIVE mode, lack of accelerator pedal activity will cause the transmission to revert to automatic
operation. The transmission will also upshift automatically once redline, (where the tachom-
eter needle points to the red portion of the gauge) is reached. If the accelerator is pressed to
the floor, the transmission will downshift when possible (based on current vehicle speed and
gear).
• When AutoStick® is used in SPORT mode, the transmission will only shift up or down when commanded by the driver, except as noted below.
• In either DRIVE or SPORT mode, the transmission will automatically downshift as the vehicle slows to a stop (to prevent engine lugging) and will display the current gear. Tapping the (+)
paddle (at a stop) will allow starting in second gear. After a stop, the driver should manually
upshift (+) the transmission as the vehicle accelerates.
NOTE:
To disengage AutoStick® mode, press and hold the (+) shift paddle until “D” or “S” is once again
displayed in the EVIC. You can shift in or out of the AutoStick® mode at any time without taking
your foot off the accelerator pedal.
OPERATING YOUR VEHICLE
33
Page 42 of 132
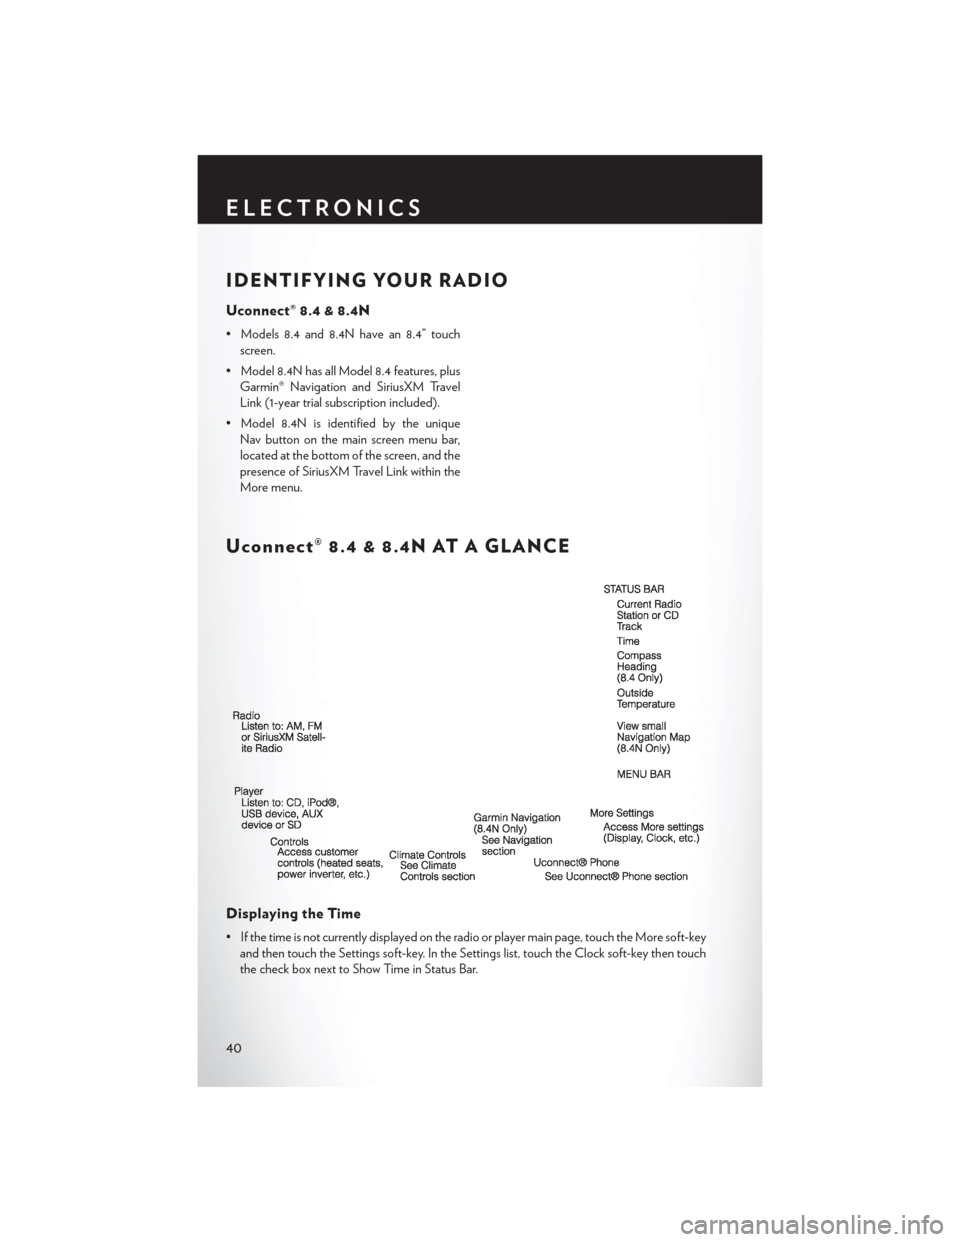
IDENTIFYING YOUR RADIO
Uconnect® 8.4 & 8.4N
• Models 8.4 and 8.4N have an 8.4” touchscreen.
• Model 8.4N has all Model 8.4 features, plus Garmin® Navigation and SiriusXM Travel
Link (1-year trial subscription included).
• Model 8.4N is identified by the unique Nav button on the main screen menu bar,
located at the bottom of the screen, and the
presence of SiriusXM Travel Link within the
More menu.
Uconnect® 8.4 & 8.4N AT A GLANCE
Displaying the Time
• If the time is not currently displayed on the radio or player main page, touch the More soft-keyand then touch the Settings soft-key. In the Settings list, touch the Clock soft-key then touch
the check box next to Show Time in Status Bar.
ELECTRONICS
40
Page 43 of 132
Setting the Time
•
Model 8.4N synchronizes time automatically via GPS, so should not require any time adjustment.
If you do need to set the time manually, follow the instructions below for Model 8.4.
• For Model 8.4, turn the unit on, then touch the time display at the top of the screen. Touch the Yes soft-key.
• If the time is not displayed at the top of the screen, touch the More soft-key and then touch the Settings soft-key. In the Settings screen, touch the Clock soft-key, then check or uncheck this
option.
• Touch + or – next to Set Time Hours and Set Time Minutes to adjust the time.
• If these features are not available, uncheck the Sync with GPS box.
• Touch the X soft-key to save your settings and exit out of the Clock Setting screen.
Audio Settings
Touch of the Audio soft-key to activate the Audio settings screen to adjust Balance\Fade, Equalizer,
and Speed Adjusted Volume.
You can return to the Radio screen by touching the X soft-key located at the top right.
Balance/Fade
Touch the Balance/Fade soft-key to Balance audio between the front speakers or fade the audio
between the rear and front speakers.
Touching the Front, Rear, Left, or Right soft-keys or touch and drag the blue Speaker Icon to adjust the
Balance/Fade.
Equalizer
Touch the Equalizer soft-key to activate the Equalizer screen.
Touch the + or - soft-keys, or by touching and dragging over the level bar for each of the equalizer
bands. The level value, which spans between plus or minus 9, is displayed at the bottom of each of the
Bands.
Speed Adjusted Volume
Touch the Speed Adjusted Volume soft-key to activate the Speed Adjusted Volume screen. The Speed
Adjusted Volume is adjusted by touching the + and - buttons or by touching and dragging over the level
bar. This alters the automatic adjustment of the audio volume with variation to vehicle speed.
ELECTRONICS
41
Page 46 of 132
Browse
• Lets you browse the SiriusXM channel listing, Favorites, Genres, Game Zone, and Weatherchannels. Jump setting, and also provides the SiriusXM channel list. Browse contains many
sub-menus.
Browse Sub-Menu Sub-Menu Description
All Shows the channel listing.
Genre Provides a list of all genres, and lets you jump to a channel within the
selected genre.
Presets Lets you scroll the list of Preset satellite channels. Touch the channel, or
press Enter on the Tune knob, to go to that channel. Touch the trash can
icon to delete a preset. Your presets are also shown at the top of the main
Satellite Radio screen.
Favorites Lets you manage artists and songs in the Favorites list and configure Alert
Settings to let you know when favorite songs or artists are playing on other
channels). Also, view a list of channels airing any of your Favorites.
Game Zone Provides alerts when your favorite sports teams are starting a game which is being aired on other SiriusXM channels, or when their game score is
announced. You can select and manage your Teams list here, and configure
alerts.
Jump Lets you select your favorite cities for Traffic & Weather information,
which is used by the Jump feature on the main satellite radio screen.
Replay
• Lets you replay up to 44 minutes of the content of the current SiriusXM channel.
Replay Option Option Description
Play/Pause Touch to Pause content playback. Touch Pause/Play again to resume playback.
Rewind/RW Rewinds the channel content in steps of five seconds. Touch and hold to rewind continuously, then release to begin playing content at that point.
Fast Forward/FW Forwards the content, and works similarly to Rewind/RW. However, Fast Forward/FW can only be used when content has been previously rewound.
Replay Time Displays the amount of time in the upper center of the screen by which your content lags the Live channel.
Live Resumes playback of Live content at any time while replaying rewound content.
ELECTRONICS
44
Page 48 of 132
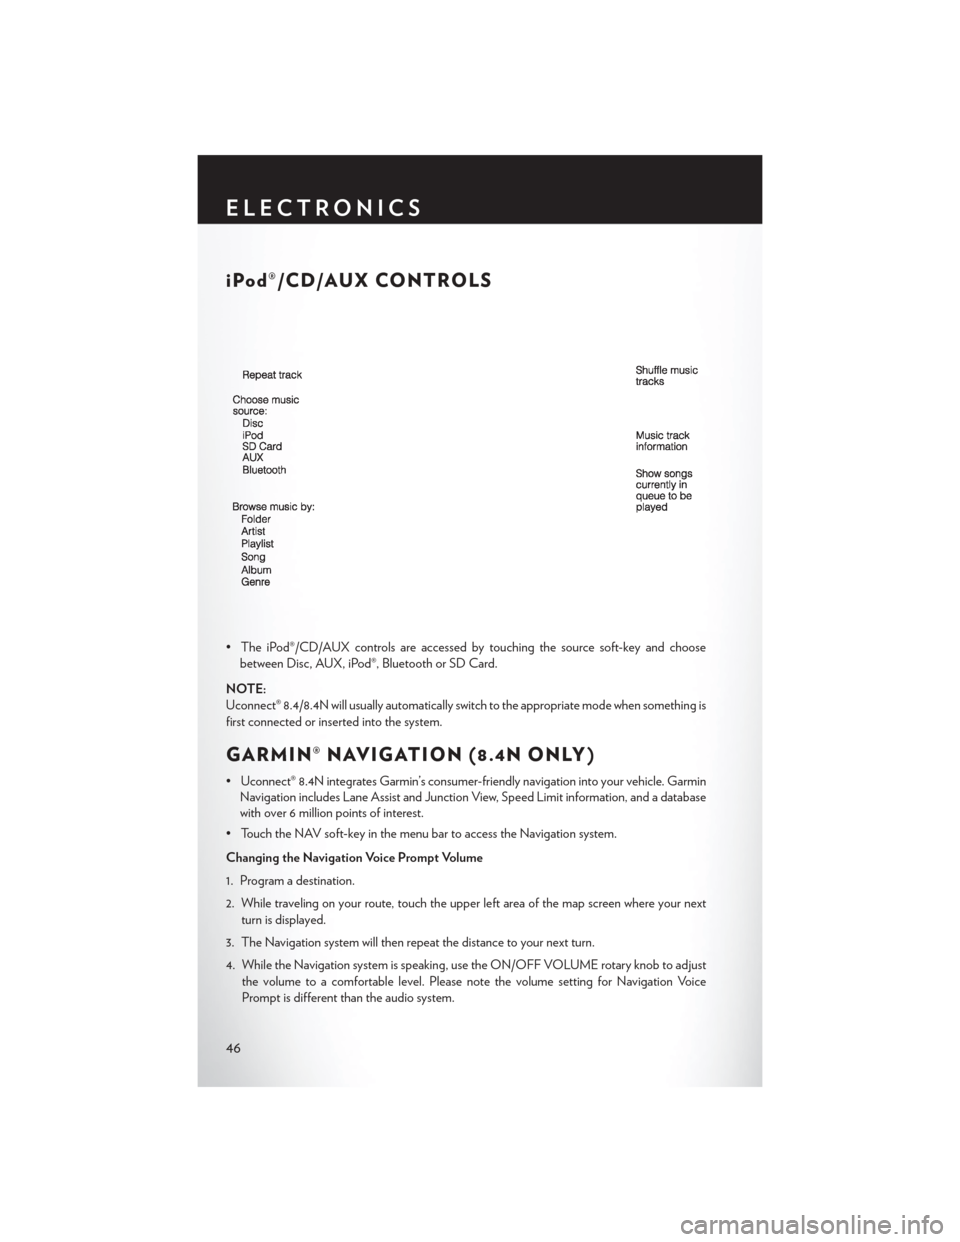
iPod®/CD/AUX CONTROLS
• The iPod®/CD/AUX controls are accessed by touching the source soft-key and choosebetween Disc, AUX, iPod®, Bluetooth or SD Card.
NOTE:
Uconnect® 8.4/8.4N will usually automatically switch to the appropriate mode when something is
first connected or inserted into the system.
GARMIN® NAVIGATION (8.4N ONLY)
• Uconnect® 8.4N integrates Garmin’s consumer-friendly navigation into your vehicle. Garmin Navigation includes Lane Assist and Junction View, Speed Limit information, and a database
with over 6 million points of interest.
• Touch the NAV soft-key in the menu bar to access the Navigation system.
Changing the Navigation Voice Prompt Volume
1. Program a destination.
2. While traveling on your route, touch the upper left area of the map screen where your next turn is displayed.
3. The Navigation system will then repeat the distance to your next turn.
4. While the Navigation system is speaking, use the ON/OFF VOLUME rotary knob to adjust the volume to a comfortable level. Please note the volume setting for Navigation Voice
Prompt is different than the audio system.
ELECTRONICS
46
Page 53 of 132
PLAYING iPod/USB/MP3 DEVICES
• There are many ways to play music from iPod®/MP3 players or USB devices through yourvehicle's sound system.
1. Audio Jack
• The Audio Jack allows a portable device, such as an MP3 player or a cassette player, to be plugged into the radio and utilize the vehicle’s sound system, using a 3.5 mm audio cable, to
amplify the source and play through the vehicle speakers.
• Touching the Player soft-key then choosing the AUX source soft-key will change the mode to auxiliary device if the Audio Jack is connected, allowing the music from your portable device
to be heard through the vehicle's speakers. In order activate the AUX, plug in the audio jack.
• The functions of the portable device are controlled using the device buttons. The volume may be controlled using the radio or portable device.
• To route the audio cable out of the center console, use the access cut out in the front of the console.
2. USB Port
• Connect your iPod® or compatible device using a USB cable into the USB Port. USB Memory sticks with audio files can also be used. Then, audio from the device can be played on the
vehicles sound system while providing metadata (artist, track title, album, etc.) information on
the radio display.
• When connected, the iPod®/compatible USB device can be controlled using the radio or Steering Wheel Audio Controls to play, skip to the next or previous track, browse, and list the
contents.
ELECTRONICS
51
Page 55 of 132
NOTE:
The Uconnect® Phone requires a mobile phone equipped with the Bluetooth® Hands-Free
Profile, Version 1.0 or higher. For Uconnect® customer support, call 1–877–855–8400 or visit
www.UconnectPhone.com.
Pairing a Phone
• To use the Uconnect® Phone feature, you must first pair your Bluetooth® phone with theUconnect® system.
Start pairing procedure on the radio
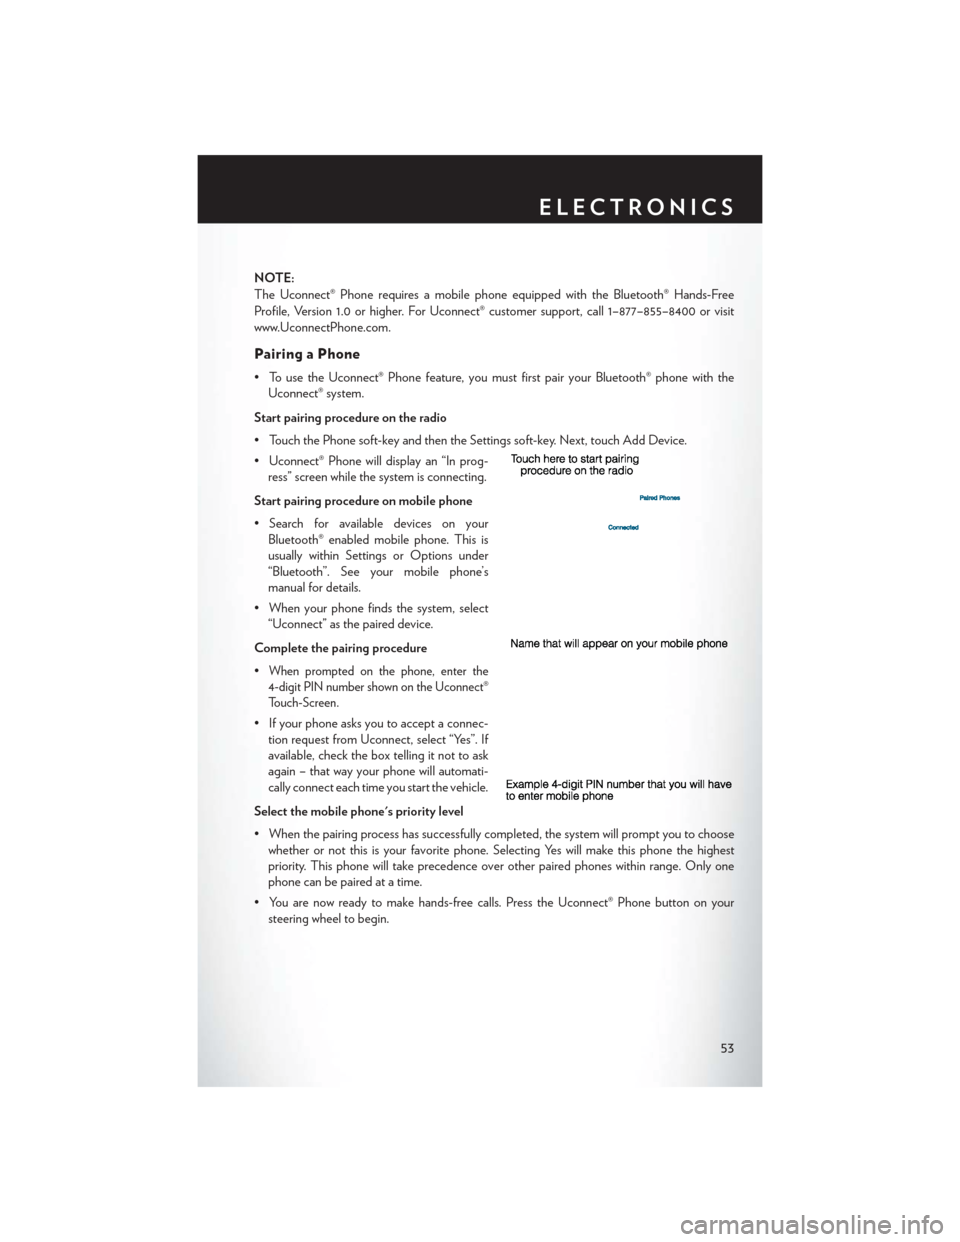
• Touch the Phone soft-key and then the Settings soft-key. Next, touch Add Device.
• Uconnect® Phone will display an “In prog- ress” screen while the system is connecting.
Start pairing procedure on mobile phone
• Search for available devices on your Bluetooth® enabled mobile phone. This is
usually within Settings or Options under
“Bluetooth”. See your mobile phone’s
manual for details.
• When your phone finds the system, select “Uconnect” as the paired device.
Complete the pairing procedure
•
When prompted on the phone, enter the
4-digit PIN number shown on the Uconnect®
Touch-Screen.
• If your phone asks you to accept a connec- tion request from Uconnect, select “Yes”. If
available, check the box telling it not to ask
again – that way your phone will automati-
cally connect each time you start the vehicle.
Select the mobile phone's priority level
• When the pairing process has successfully completed, the system will prompt you to choose whether or not this is your favorite phone. Selecting Yes will make this phone the highest
priority. This phone will take precedence over other paired phones within range. Only one
phone can be paired at a time.
• You are now ready to make hands-free calls. Press the Uconnect® Phone button on your steering wheel to begin.
ELECTRONICS
53
Page 57 of 132

Common Phone Commands (Examples)
• “Call John Smith”
• “Call John Smith mobile”
• “Dial 1 248 555 1212
• “Call Emergency”
• “Call Towing Assistance”
• “Redial”
Phonebook
• Uconnect® radios will automatically download your phonebook from your paired phone, if thisfeature is supported by your phone. Entries are updated each time that the phone is
connected. If your phone book entries do not appear, check the settings on your phone. Some
phones require you to enable this feature manually.
• Your phonebook can be browsed on your radio screen, but editing can only be done on your phone. To browse, touch the Phone soft-key, then the Phonebook soft-key.
• Favorite phonebook entries can be saved as Favorites for quicker access. Favorites are shown at the top of your main phone screen.
Voice Command Tips
• Using complete names (i.e; Call John Doe vs. Call John) will result in greater system accuracy.
• You can “chain” commands together for faster results. Say “Call John Doe, mobile”, forexample.
• If you are listening to available voice command options, you do not have to listen to the entire list. When you hear the command that you need, press the
button on the steering
wheel, wait for the beep and say your command.
Changing The Volume
• Start a dialogue by pressing the Phone button, then say a command for example -
"Help".
• Use the radio ON/OFF VOLUME rotary knob to adjust the volume to a comfortable level while the Uconnect® system is speaking. Please note the volume setting for Uconnect® is
different than the audio system.
NOTE:
To access help, press the Uconnect® Phone
button on the steering wheel and say "help."
Touch the display or push either
orbutton and say "cancel" to cancel the help
session.
ELECTRONICS
55