Page 204 of 592

Rear Fog Lights — If EquippedThe rear fog light switch is built into the head-
light switch. To activate the rear fog lights, turn
the headlamp switch to the park lamp or head-
lamp position. Press the headlight switch once for front
fog lights, press the switch a second time for front and
rear fog lights. Pressing the switch a third time will
deactivate the rear fog lights, and a fourth time will
deactivate the front fog lights. Turning the headlight
switch off will also deactivate the fog lights.
An indicator light in the instrument cluster illuminates
when the fog lights are turned on.
NOTE: The fog lights will operate with the low beam
headlights or parking lights on. However, selecting the
high beam headlights will turn off the fog lights.Multifunction Lever
The multifunction lever controls the operation of the turn
signals, headlight beam selection and passing lights. The
multifunction lever is located on the left side of the
steering column.
Multifunction Lever
202 UNDERSTANDING THE FEATURES OF YOUR VEHICLE
Page 496 of 592
▫All Wheel Drive (AWD) – If Equipped ......524
▫ Rear Axle .......................... .524
▫ Appearance Care And Protection From
Corrosion .......................... .525
� FUSES ............................. .530
▫ Front Power Distribution Center ..........530
▫ Rear Power Distribution Center ...........534
� VEHICLE STORAGE ....................542
� REPLACEMENT BULBS .................542 �
BULB REPLACEMENT ..................543
▫ Low Beam And High Beam Headlamp ......543
▫ Rear Backup Lamp And Turn Signal Lamps . . .545
▫ License Lamp ....................... .546
� FLUID CAPACITIES ....................547
� FLUIDS, LUBRICANTS AND GENUINE
PARTS ............................. .548
▫ Engine ............................ .548
▫ Chassis ........................... .549
494 MAINTAINING YOUR VEHICLE
Page 535 of 592
Cavity Car-tridgeFuse Mini-
Fuse Description
18 50 Amp Red — Radiator Fan #2
19 50 Amp Red — Power Steering #2
20 30 Amp Pink — Wiper Motor
21 30 Amp Pink — Headlamp Washers
22 — — Fuse – Spare
23 — — Fuse – Spare
24 — — Fuse – Spare
28 — 25 Amp NaturalFuel PumpCavity Car-
tridgeFuse Mini-
Fuse Description
29 — 15 Amp BlueTransmission
Shifter
30 — — Fuse – Spare
31 — 25 Amp NaturalEngine Module
32 — — Fuse – Spare
33 — — Fuse – Spare
34 — 25 Amp NaturalPowertrain #1
35 — 20 Amp YellowPowertrain #2
36 — 10 Amp RedAnti-Lock Brake
Module
7
MAINTAINING YOUR VEHICLE 533
Page 545 of 592

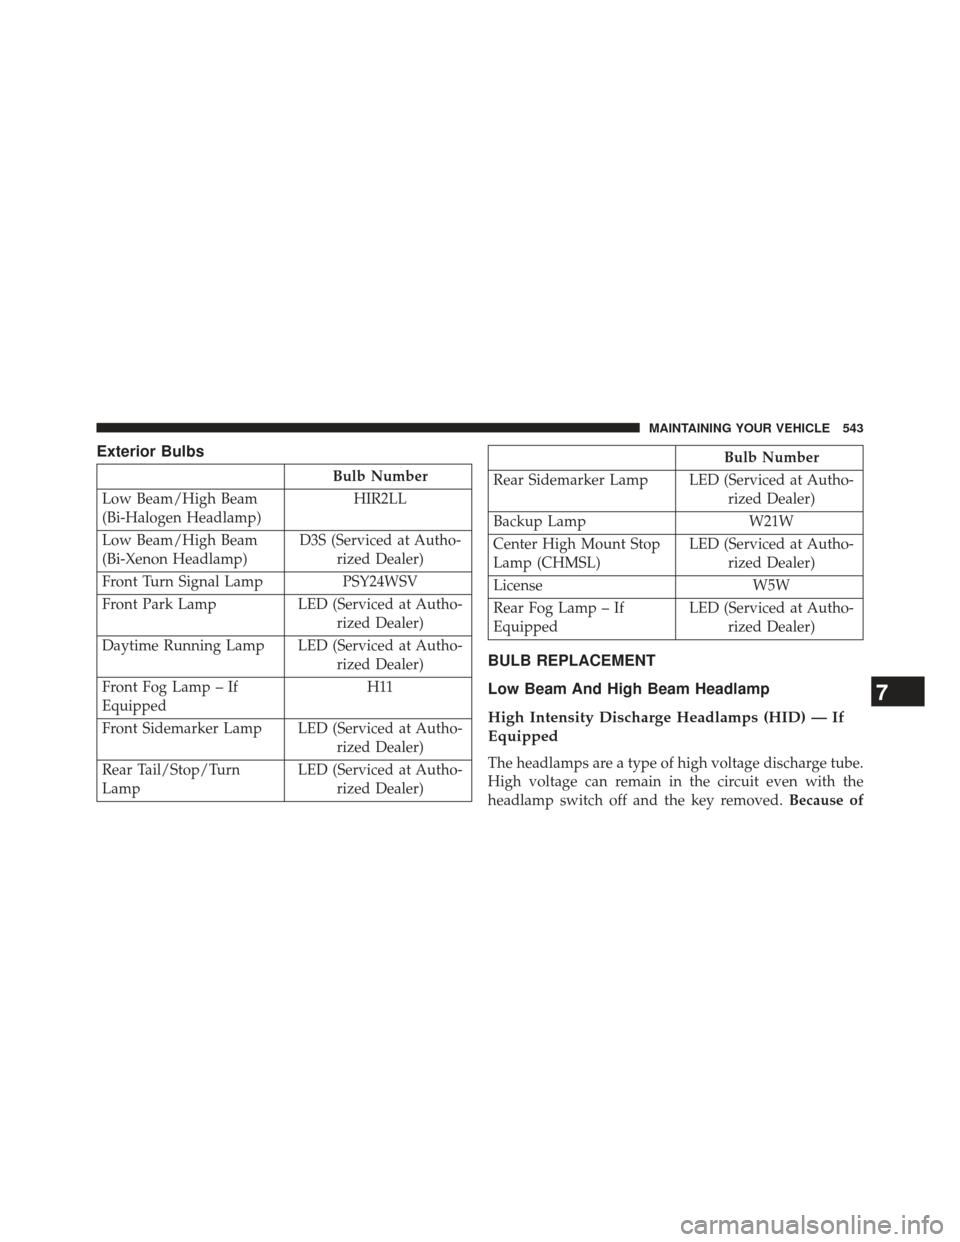
Exterior Bulbs
Bulb Number
Low Beam/High Beam
(Bi-Halogen Headlamp) HIR2LL
Low Beam/High Beam
(Bi-Xenon Headlamp) D3S (Serviced at Autho-
rized Dealer)
Front Turn Signal Lamp PSY24WSV
Front Park Lamp LED (Serviced at Autho- rized Dealer)
Daytime Running Lamp LED (Serviced at Autho- rized Dealer)
Front Fog Lamp – If
Equipped H11
Front Sidemarker Lamp LED (Serviced at Autho- rized Dealer)
Rear Tail/Stop/Turn
Lamp LED (Serviced at Autho-
rized Dealer)
Bulb Number
Rear Sidemarker Lamp LED (Serviced at Autho- rized Dealer)
Backup Lamp W21W
Center High Mount Stop
Lamp (CHMSL) LED (Serviced at Autho-
rized Dealer)
License W5W
Rear Fog Lamp – If
Equipped LED (Serviced at Autho-
rized Dealer)
BULB REPLACEMENT
Low Beam And High Beam Headlamp
High Intensity Discharge Headlamps (HID) — If
Equipped
The headlamps are a type of high voltage discharge tube.
High voltage can remain in the circuit even with the
headlamp switch off and the key removed. Because of
7
MAINTAINING YOUR VEHICLE 543
Page 546 of 592

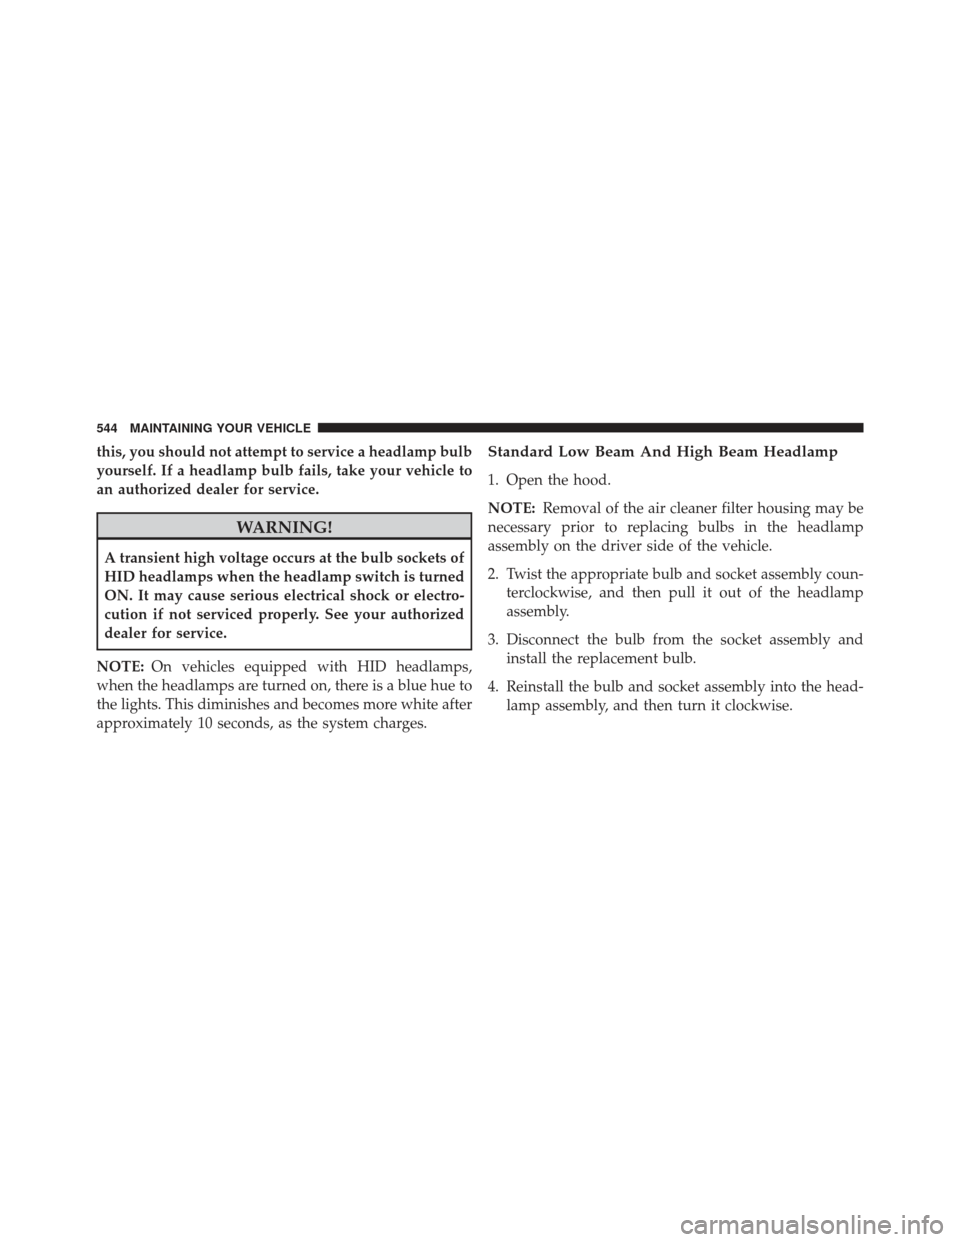
this, you should not attempt to service a headlamp bulb
yourself. If a headlamp bulb fails, take your vehicle to
an authorized dealer for service.
WARNING!
A transient high voltage occurs at the bulb sockets of
HID headlamps when the headlamp switch is turned
ON. It may cause serious electrical shock or electro-
cution if not serviced properly. See your authorized
dealer for service.
NOTE: On vehicles equipped with HID headlamps,
when the headlamps are turned on, there is a blue hue to
the lights. This diminishes and becomes more white after
approximately 10 seconds, as the system charges.
Standard Low Beam And High Beam Headlamp
1. Open the hood.
NOTE: Removal of the air cleaner filter housing may be
necessary prior to replacing bulbs in the headlamp
assembly on the driver side of the vehicle.
2. Twist the appropriate bulb and socket assembly coun- terclockwise, and then pull it out of the headlamp
assembly.
3. Disconnect the bulb from the socket assembly and install the replacement bulb.
4. Reinstall the bulb and socket assembly into the head- lamp assembly, and then turn it clockwise.
544 MAINTAINING YOUR VEHICLE