2013 CHEVROLET TRAVERSE sunroof
[x] Cancel search: sunroofPage 7 of 444

Black plate (1,1)Chevrolet Traverse Owner Manual - 2013 - CRC 2nd Edition - 11/13/12
In Brief 1-1
In Brief
Instrument Panel
Instrument Panel . . . . . . . . . . . . . . 1-2
Initial Drive Information
Initial Drive Information . . . . . . . . 1-4
Remote Keyless Entry (RKE)System . . . . . . . . . . . . . . . . . . . . . . 1-4
Remote Vehicle Start . . . . . . . . . 1-5
Door Locks . . . . . . . . . . . . . . . . . . . 1-5
Liftgate . . . . . . . . . . . . . . . . . . . . . . . . 1-6
Windows . . . . . . . . . . . . . . . . . . . . . . 1-7
Seat Adjustment . . . . . . . . . . . . . . 1-7
Memory Features . . . . . . . . . . . . . 1-8
Second Row Seats . . . . . . . . . . . 1-8
Third Row Seats . . . . . . . . . . . . . . 1-9
Heated and Ventilated Seats . . . . . . . . . . . . . . . . . . . . . . . . 1-9 Head Restraint
Adjustment . . . . . . . . . . . . . . . . . 1-10
Safety Belts . . . . . . . . . . . . . . . . . . 1-10
Passenger Sensing System . . . . . . . . . . . . . . . . . . . . . 1-10
Mirror Adjustment . . . . . . . . . . . . 1-11
Steering Wheel Adjustment . . . . . . . . . . . . . . . . . 1-12
Interior Lighting . . . . . . . . . . . . . . 1-12
Exterior Lighting . . . . . . . . . . . . . 1-13
Windshield Wiper/Washer . . . . 1-14
Climate Controls . . . . . . . . . . . . . 1-15
Transmission . . . . . . . . . . . . . . . . 1-16
Vehicle Features
Radio(s) . . . . . . . . . . . . . . . . . . . . . 1-17
Satellite Radio . . . . . . . . . . . . . . . 1-20
Portable Audio Devices . . . . . . 1-20
Bluetooth
®. . . . . . . . . . . . . . . . . . . 1-21
Steering Wheel Controls . . . . . 1-21 Cruise Control . . . . . . . . . . . . . . . 1-22
Infotainment System . . . . . . . . . 1-22
Driver Information Center
(DIC) (With DIC Buttons) . . . 1-22
Ultrasonic Parking Assist . . . . 1-23
Power Outlets . . . . . . . . . . . . . . . 1-23
Universal Remote System . . . 1-23
Sunroof . . . . . . . . . . . . . . . . . . . . . . 1-23
Performance and Maintenance
StabiliTrak®System . . . . . . . . . 1-24
Tire Pressure Monitor . . . . . . . . 1-24
Engine Oil Life System . . . . . . 1-25
Driving for Better Fuel Economy . . . . . . . . . . . . . . . . . . . 1-25
Roadside Assistance Program . . . . . . . . . . . . . . . . . . . . 1-26
OnStar
®. . . . . . . . . . . . . . . . . . . . . 1-26
Page 29 of 444

Black plate (23,1)Chevrolet Traverse Owner Manual - 2013 - CRC 2nd Edition - 11/13/12
In Brief 1-23
on vehicles with this feature, and
compass calibration and zone
setting on vehicles with this feature.
3:Press this button to display
the odometer, trip odometers, fuel
range, average economy, timer, fuel
used, and average speed.
Some vehicles do not have the
buttons shown, however some of
the menus can be viewed by using
the trip odometer reset stem.
See Driver Information Center (DIC)
(Without DIC Buttons) on page 5‑29
or Driver Information Center (DIC)
(With DIC Buttons) on page 5‑24.
Ultrasonic Parking Assist
If available, this system uses
sensors on the rear bumper to
assist with parking and avoiding
objects while in R (Reverse).
It operates at speeds less than
8 km/h (5 mph). URPA uses audible
beeps to provide distance and
system information. Keep the sensors on the vehicle's
rear bumper clean to ensure proper
operation.
See
Ultrasonic Parking Assist on
page 9‑31.
Power Outlets
The vehicle has 12-volt accessory
power outlets which can be used to
plug in electrical equipment, such as
a cell phone or MP3 player.
The power outlets are located:
.On the instrument panel below
the climate controls.
.Inside the center floor console.
.At the rear of the center floor
console.
.In the rear cargo area.
To use the outlets, remove the
cover.
See Power Outlets on page 5‑8.
Universal Remote System
The Universal Home Remote
System allows for garage door
openers, security systems, and
home automation devices to be
programmed to work with these
buttons in the vehicle.
SeeUniversal Remote System on
page 5‑48.
Sunroof
The ignition must be in ON/RUN,
ACC/ACCESSORY, or Retained
Accessory Power (RAP) must be
active to operate the sunroof and
power sunshade. See Retained
Accessory Power (RAP) on
page 9‑18.
Page 30 of 444

Black plate (24,1)Chevrolet Traverse Owner Manual - 2013 - CRC 2nd Edition - 11/13/12
1-24 In Brief
Vent:Press the front or rear of the
switch to vent or close the sunroof.
Express-open/Express-close:
From the closed position, press and
release the rear or front of the
switch to express-open or
express-close the sunroof.
For more information see Sunroof
on page 2‑21.
Performance and
Maintenance
StabiliTrak®System
The vehicle has a traction control
system that limits wheel spin, and
the StabiliTrak system that assists
with directional control of the vehicle
in difficult driving conditions. Both
systems turn on automatically every
time the vehicle is started.
.To turn off traction control, press
and release
tlocated on the
instrument panel, and the
appropriate DIC message
displays. See Ride Control
System Messages on page 5‑37.
.Press and releasetagain to
turn on the traction control
system. The StabiliTrak system
remains on.
For more information, see
StabiliTrak
®System on page 9‑27.
Tire Pressure Monitor
This vehicle may have a Tire
Pressure Monitor System (TPMS).
The low tire pressure warning light
alerts to a significant loss in
pressure of one of the vehicle's
tires. If the warning light comes on,
stop as soon as possible and inflate
the tires to the recommended
pressure shown on the Tire and
Loading Information label. See
Vehicle Load Limits on page 9‑9.
The warning light will remain on until
the tire pressure is corrected.
The low tire pressure warning light
may come on in cool weather when
the vehicle is first started, and then
turn off as the vehicle is driven. This
may be an early indicator that the
Page 33 of 444

Black plate (1,1)Chevrolet Traverse Owner Manual - 2013 - CRC 2nd Edition - 11/13/12
Keys, Doors, and Windows 2-1
Keys, Doors, and
Windows
Keys and Locks
Keys . . . . . . . . . . . . . . . . . . . . . . . . . . 2-1
Remote Keyless Entry (RKE)System . . . . . . . . . . . . . . . . . . . . . . 2-2
Remote Keyless Entry (RKE) System Operation . . . . . . . . . . . 2-2
Remote Vehicle Start . . . . . . . . . 2-4
Door Locks . . . . . . . . . . . . . . . . . . . 2-6
Power Door Locks . . . . . . . . . . . . 2-7
Delayed Locking . . . . . . . . . . . . . . 2-7
Automatic Door Locks . . . . . . . . . 2-8
Lockout Protection . . . . . . . . . . . . 2-8
Safety Locks . . . . . . . . . . . . . . . . . . 2-8
Doors
Liftgate . . . . . . . . . . . . . . . . . . . . . . . . 2-9
Vehicle Security
Vehicle Security . . . . . . . . . . . . . . 2-12
Vehicle Alarm System . . . . . . . 2-12
Immobilizer . . . . . . . . . . . . . . . . . . 2-13
Immobilizer Operation . . . . . . . 2-13
Exterior Mirrors
Convex Mirrors . . . . . . . . . . . . . . 2-15
Power Mirrors . . . . . . . . . . . . . . . . 2-15
Folding Mirrors . . . . . . . . . . . . . . . 2-16
Heated Mirrors . . . . . . . . . . . . . . . 2-16
Blind Spot Mirrors . . . . . . . . . . . 2-16
Park Tilt Mirrors . . . . . . . . . . . . . . 2-17
Interior Mirrors
Manual Rearview Mirror . . . . . . 2-18
Automatic Dimming Rearview Mirror . . . . . . . . . . . . . . . . . . . . . . . 2-18
Windows
Windows . . . . . . . . . . . . . . . . . . . . . 2-18
Power Windows . . . . . . . . . . . . . 2-19
Sun Visors . . . . . . . . . . . . . . . . . . . 2-21
Roof
Sunroof . . . . . . . . . . . . . . . . . . . . . . 2-21
Keys and Locks
Keys
{WARNING
Leaving children in a vehicle with
the ignition key is dangerous and
children or others could be
seriously injured or killed. They
could operate the power windows
or other controls or make the
vehicle move. The windows will
function with the keys in the
ignition, and children or others
could be caught in the path of a
closing window. Do not leave
children in a vehicle with the
ignition key.
Page 51 of 444

Black plate (19,1)Chevrolet Traverse Owner Manual - 2013 - CRC 2nd Edition - 11/13/12
Keys, Doors, and Windows 2-19
The vehicle aerodynamics are
designed to improve fuel economy
performance. This may result in a
pulsing sound when either rear
window is down and the front
windows are up. To reduce the
sound, open either a front window
or the sunroof, if equipped.Power Windows
{WARNING
Children could be seriously
injured or killed if caught in the
path of a closing window. Never
leave keys in a vehicle with
children. When there are children
in the rear seat, use the window
lockout button to prevent
operation of the windows. See
Keys on page 2‑1.
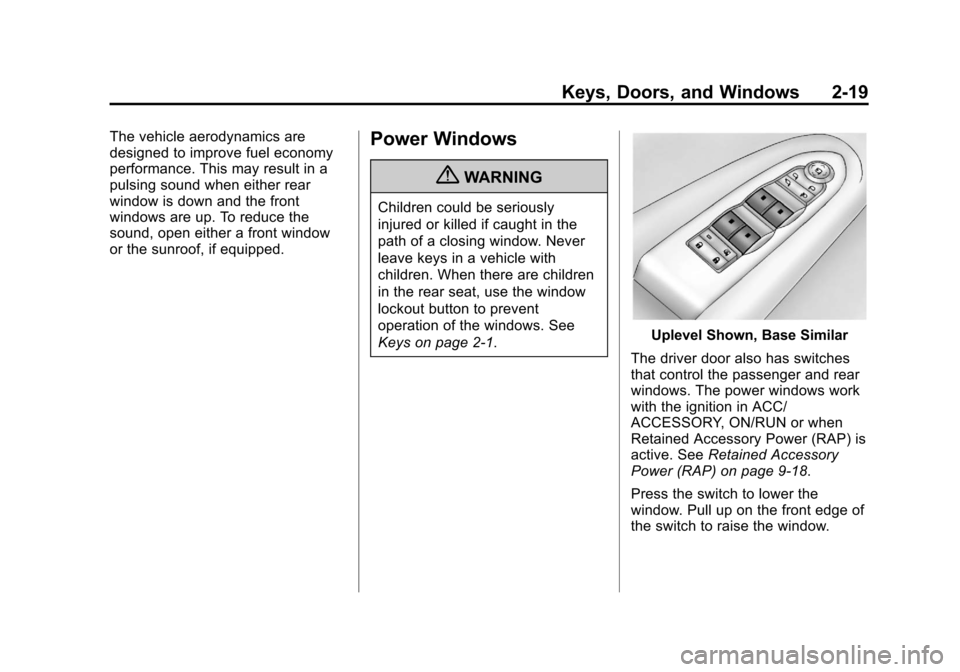
Uplevel Shown, Base Similar
The driver door also has switches
that control the passenger and rear
windows. The power windows work
with the ignition in ACC/
ACCESSORY, ON/RUN or when
Retained Accessory Power (RAP) is
active. See Retained Accessory
Power (RAP) on page 9‑18.
Press the switch to lower the
window. Pull up on the front edge of
the switch to raise the window.
Page 53 of 444

Black plate (21,1)Chevrolet Traverse Owner Manual - 2013 - CRC 2nd Edition - 11/13/12
Keys, Doors, and Windows 2-21
The rear window lockout feature
prevents the rear passenger
windows from operating, except
from the driver position.
Press
vto activate the rear
window lockout switch. The
indicator light comes on when
activated.
Press
vagain to deactivate the
lockout switch.
Sun Visors
Pull the sun visor down to block
glare. If equipped, detach the sun
visor from the center mount to pivot
to the side window or to extend
along the rod.
Roof
Sunroof
The ignition must be in ON/RUN,
ACC/ACCESSORY, or Retained
Accessory Power (RAP) must be
active to operate the sunroof and
power sunshade. See Retained
Accessory Power (RAP) on
page 9‑18.
The vehicle may have a sunroof
over the front seats and a rear
sunroof over the second row seats.
The rear sunroof does not open.
Page 54 of 444

Black plate (22,1)Chevrolet Traverse Owner Manual - 2013 - CRC 2nd Edition - 11/13/12
2-22 Keys, Doors, and Windows
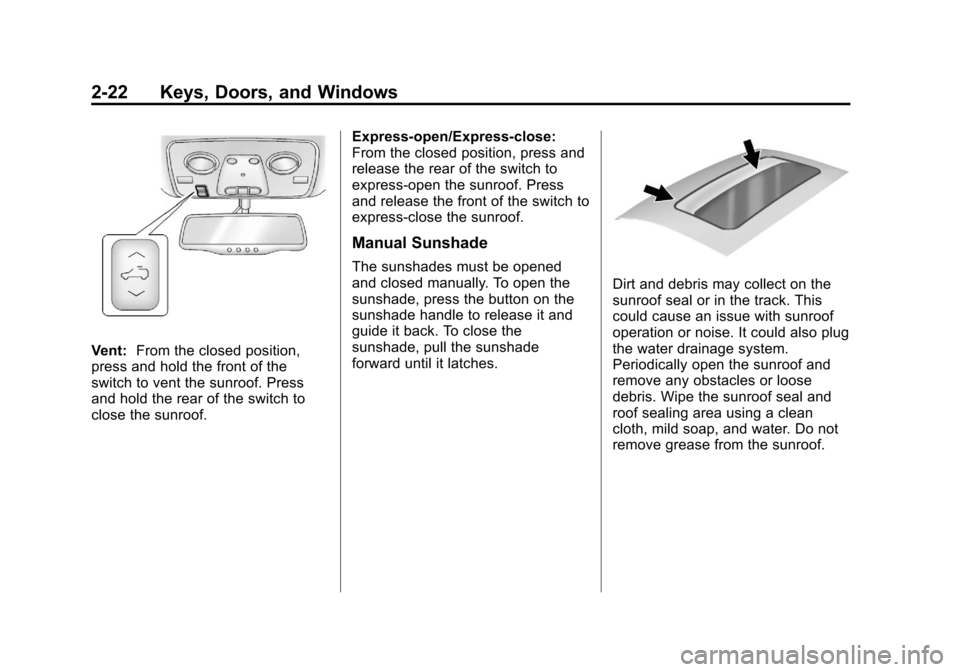
Vent:From the closed position,
press and hold the front of the
switch to vent the sunroof. Press
and hold the rear of the switch to
close the sunroof. Express-open/Express-close:
From the closed position, press and
release the rear of the switch to
express-open the sunroof. Press
and release the front of the switch to
express-close the sunroof.
Manual Sunshade
The sunshades must be opened
and closed manually. To open the
sunshade, press the button on the
sunshade handle to release it and
guide it back. To close the
sunshade, pull the sunshade
forward until it latches.
Dirt and debris may collect on the
sunroof seal or in the track. This
could cause an issue with sunroof
operation or noise. It could also plug
the water drainage system.
Periodically open the sunroof and
remove any obstacles or loose
debris. Wipe the sunroof seal and
roof sealing area using a clean
cloth, mild soap, and water. Do not
remove grease from the sunroof.
Page 125 of 444

Black plate (7,1)Chevrolet Traverse Owner Manual - 2013 - CRC 2nd Edition - 11/13/12
Instruments and Controls 5-7
To calibrate the compass, use the
following procedure:
Compass Calibration Procedure
1. Before calibrating the compass,make sure the compass zone is
set to the variance zone in which
the vehicle is located. See
“Compass Variance (Zone)
Procedure” earlier in this
section.
Do not operate any switches
such as window, sunroof,
climate controls, seats, etc.
during the calibration procedure.
2. Press the vehicle information button until PRESS
VTO
CALIBRATE COMPASS
displays.
3. Press the set/reset button to start the compass calibration.
4. The DIC will display CALIBRATING: DRIVE IN
CIRCLES. Drive the vehicle in
tight circles at less than 8 km/h
(5 mph) to complete the
calibration. The DIC will display CALIBRATION COMPLETE for a
few seconds when the
calibration is complete. The DIC
display will then return to the
previous menu.
Clock (Radio without
Touchscreen)
To adjust the time and date:
1. Turn the ignition key to ACC/
ACCESSORY or ON/RUN, then
press
Oto turn the radio on.
2. Press
Gto display HR, MIN,
MM, DD, YYYY (hour, minute,
month, day, and year).
3. Press the pushbutton located under any one of the labels to be
changed.
4. To increase the time or date, do one of the following:
.Press the pushbutton below
the selected label.
.Press¨SEEK.
.Press\FWD.
.Turnfclockwise.
5. To decrease the time or date, do one of the following:
.Press©SEEK.
.PresssREV.
.Turnfcounterclockwise.
To change the time default setting
from 12 hour to 24 hour or to
change the date default setting from
month/day/year to day/month/year:
1. Press
Gand then the
pushbutton located under the
forward arrow that displays on
the radio screen until the time
12H (hour) and 24H (hour), and
the date MM/DD (month and
day) and DD/MM (day and
month) display.
2. Press the pushbutton located under the desired option.