Page 355 of 444
Black plate (57,1)Chevrolet Traverse Owner Manual - 2013 - CRC 2nd Edition - 11/13/12
Vehicle Care 10-57
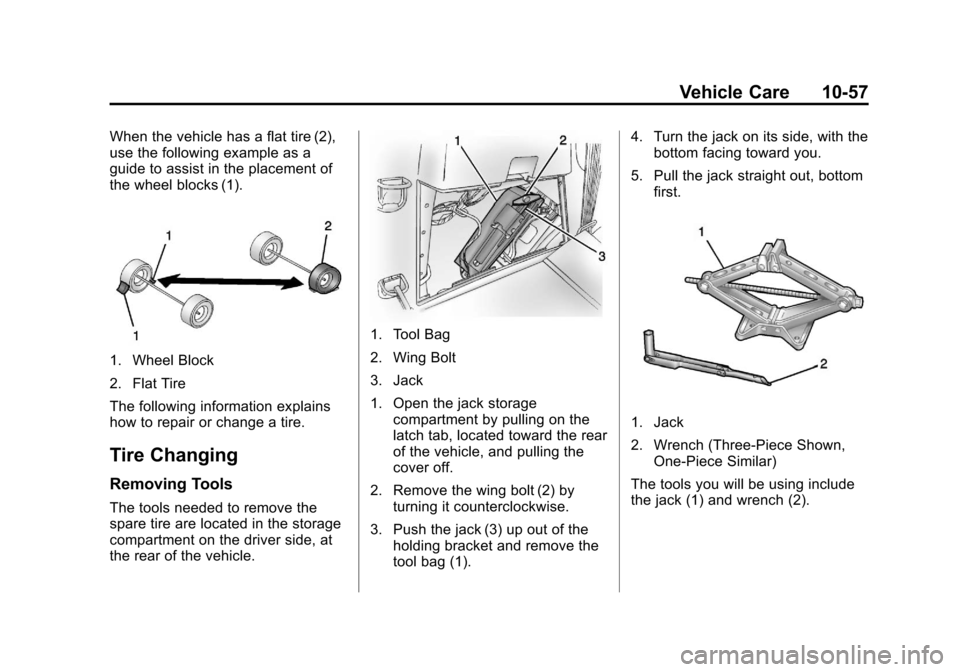
When the vehicle has a flat tire (2),
use the following example as a
guide to assist in the placement of
the wheel blocks (1).
1. Wheel Block
2. Flat Tire
The following information explains
how to repair or change a tire.
Tire Changing
Removing Tools
The tools needed to remove the
spare tire are located in the storage
compartment on the driver side, at
the rear of the vehicle.
1. Tool Bag
2. Wing Bolt
3. Jack
1. Open the jack storagecompartment by pulling on the
latch tab, located toward the rear
of the vehicle, and pulling the
cover off.
2. Remove the wing bolt (2) by turning it counterclockwise.
3. Push the jack (3) up out of the holding bracket and remove the
tool bag (1). 4. Turn the jack on its side, with the
bottom facing toward you.
5. Pull the jack straight out, bottom first.
1. Jack
2. Wrench (Three-Piece Shown,One-Piece Similar)
The tools you will be using include
the jack (1) and wrench (2).
Page 356 of 444
Black plate (58,1)Chevrolet Traverse Owner Manual - 2013 - CRC 2nd Edition - 11/13/12
10-58 Vehicle Care
Removing the Spare Tire
The compact spare tire is located
under the vehicle, in front of the rear
bumper. SeeCompact Spare Tire
on page 10‑65 for more information.
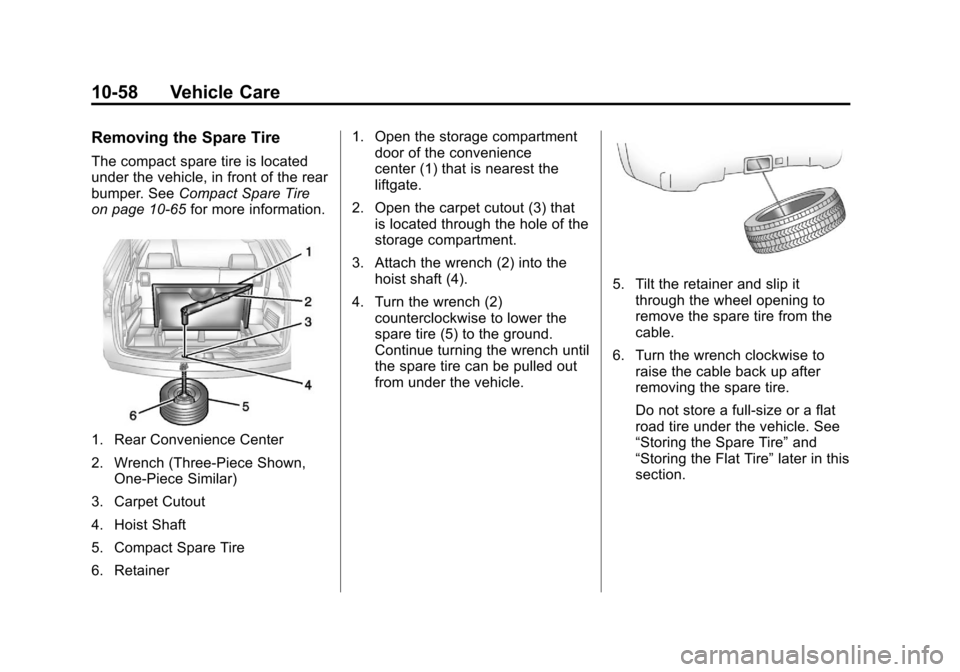
1. Rear Convenience Center
2. Wrench (Three-Piece Shown,
One-Piece Similar)
3. Carpet Cutout
4. Hoist Shaft
5. Compact Spare Tire
6. Retainer 1. Open the storage compartment
door of the convenience
center (1) that is nearest the
liftgate.
2. Open the carpet cutout (3) that is located through the hole of the
storage compartment.
3. Attach the wrench (2) into the hoist shaft (4).
4. Turn the wrench (2) counterclockwise to lower the
spare tire (5) to the ground.
Continue turning the wrench until
the spare tire can be pulled out
from under the vehicle.
5. Tilt the retainer and slip itthrough the wheel opening to
remove the spare tire from the
cable.
6. Turn the wrench clockwise to raise the cable back up after
removing the spare tire.
Do not store a full-size or a flat
road tire under the vehicle. See
“Storing the Spare Tire” and
“Storing the Flat Tire” later in this
section.
Page 357 of 444

Black plate (59,1)Chevrolet Traverse Owner Manual - 2013 - CRC 2nd Edition - 11/13/12
Vehicle Care 10-59
Removing the Flat Tire and
Installing the Spare Tire
1. Do a safety check beforeproceeding. See If a Tire Goes
Flat on page 10‑55 for more
information.
2. If the vehicle has a wheel cover, loosen the plastic nut caps with
the wheel wrench. They will not
come off. Then, using the flat
end of the wheel wrench, pry
along the edge of the cover until
it comes off. Be careful; the
edges may be sharp. Do not try
to remove the cover with your
bare hands.
Store the wheel cover securely
in the rear of the vehicle until
you have the flat tire repaired or
replaced.
If the vehicle has aluminum
wheels, remove the wheel nut
caps using the wheel wrench.
3. Loosen the wheel nuts —but do
not remove them —using the
wrench. For wheels with a wheel
lock key, use the wheel lock key
between the lock nut and
wrench. The key is supplied in
the front passenger door pocket. Notice:
If this vehicle has wheel
locks and an impact wrench is
used to remove the wheel nuts,
the lock nut or wheel lock key
could be damaged. Do not use an
impact wrench to remove the
wheel nuts if this vehicle has
wheel locks.
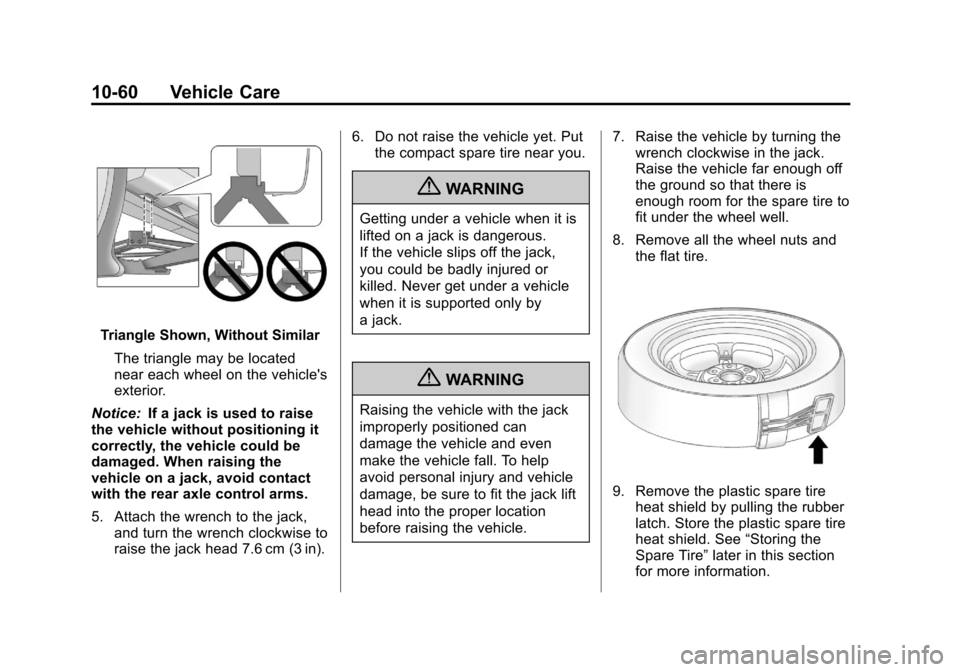
4. To identify the appropriate
jacking location, find the triangle
or rectangular notch about
30.5 cm (12 in) from the front tire
or about 27 cm (10.5 in) from the
rear tire.
Page 358 of 444
Black plate (60,1)Chevrolet Traverse Owner Manual - 2013 - CRC 2nd Edition - 11/13/12
10-60 Vehicle Care
Triangle Shown, Without SimilarThe triangle may be located
near each wheel on the vehicle's
exterior.
Notice: If a jack is used to raise
the vehicle without positioning it
correctly, the vehicle could be
damaged. When raising the
vehicle on a jack, avoid contact
with the rear axle control arms.
5. Attach the wrench to the jack, and turn the wrench clockwise to
raise the jack head 7.6 cm (3 in). 6. Do not raise the vehicle yet. Put
the compact spare tire near you.
{WARNING
Getting under a vehicle when it is
lifted on a jack is dangerous.
If the vehicle slips off the jack,
you could be badly injured or
killed. Never get under a vehicle
when it is supported only by
a jack.
{WARNING
Raising the vehicle with the jack
improperly positioned can
damage the vehicle and even
make the vehicle fall. To help
avoid personal injury and vehicle
damage, be sure to fit the jack lift
head into the proper location
before raising the vehicle. 7. Raise the vehicle by turning the
wrench clockwise in the jack.
Raise the vehicle far enough off
the ground so that there is
enough room for the spare tire to
fit under the wheel well.
8. Remove all the wheel nuts and the flat tire.
9. Remove the plastic spare tireheat shield by pulling the rubber
latch. Store the plastic spare tire
heat shield. See “Storing the
Spare Tire” later in this section
for more information.
Page 361 of 444
Black plate (63,1)Chevrolet Traverse Owner Manual - 2013 - CRC 2nd Edition - 11/13/12
Vehicle Care 10-63
4. When the compact spare tire isalmost in the stored position,
turn the tire so the valve is
toward the rear of the vehicle.
This position helps when
checking the air pressure in the
compact spare tire.
5. Raise the tire fully against the underside of the vehicle.
Continue turning the wrench until
you feel more than two clicks.
This indicates that the compact
spare tire is secure and the
cable is tight. The spare tire
hoist cannot be overtightened.
6. Make sure the tire is stored
securely. Push, pull, and then try
to turn the tire. If the tire moves,
use the wrench to tighten the
cable.
Storing the Flat Tire
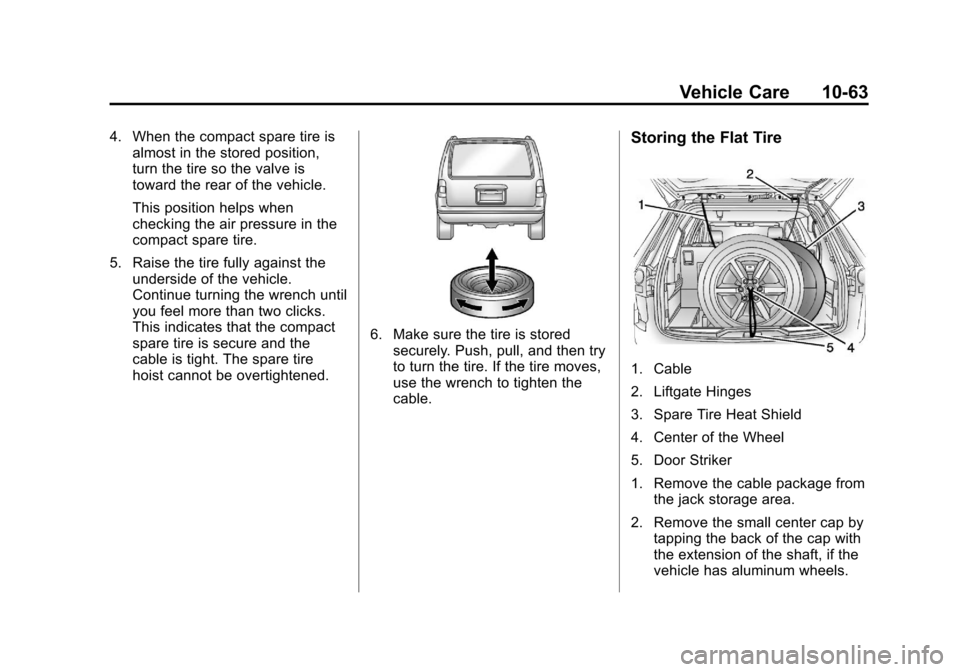
1. Cable
2. Liftgate Hinges
3. Spare Tire Heat Shield
4. Center of the Wheel
5. Door Striker
1. Remove the cable package fromthe jack storage area.
2. Remove the small center cap by tapping the back of the cap with
the extension of the shaft, if the
vehicle has aluminum wheels.
Page 362 of 444
Black plate (64,1)Chevrolet Traverse Owner Manual - 2013 - CRC 2nd Edition - 11/13/12
10-64 Vehicle Care
3. Put the flat tire in the rearstorage area with the valve stem
pointing toward the rear of the
vehicle.
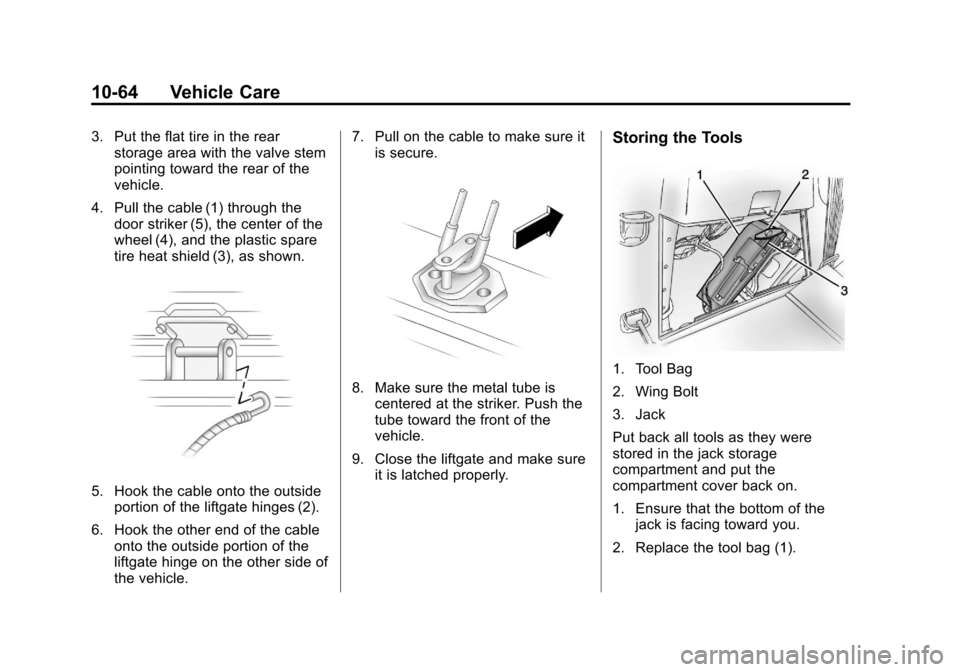
4. Pull the cable (1) through the door striker (5), the center of the
wheel (4), and the plastic spare
tire heat shield (3), as shown.
5. Hook the cable onto the outside
portion of the liftgate hinges (2).
6. Hook the other end of the cable onto the outside portion of the
liftgate hinge on the other side of
the vehicle. 7. Pull on the cable to make sure it
is secure.
8. Make sure the metal tube iscentered at the striker. Push the
tube toward the front of the
vehicle.
9. Close the liftgate and make sure it is latched properly.
Storing the Tools
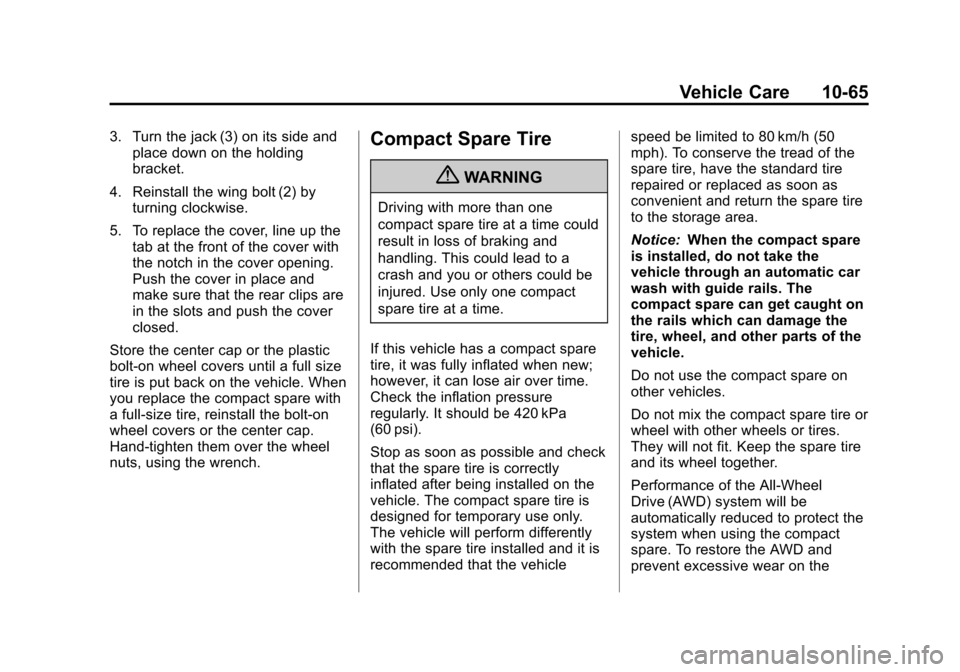
1. Tool Bag
2. Wing Bolt
3. Jack
Put back all tools as they were
stored in the jack storage
compartment and put the
compartment cover back on.
1. Ensure that the bottom of thejack is facing toward you.
2. Replace the tool bag (1).
Page 363 of 444
Black plate (65,1)Chevrolet Traverse Owner Manual - 2013 - CRC 2nd Edition - 11/13/12
Vehicle Care 10-65
3. Turn the jack (3) on its side andplace down on the holding
bracket.
4. Reinstall the wing bolt (2) by turning clockwise.
5. To replace the cover, line up the tab at the front of the cover with
the notch in the cover opening.
Push the cover in place and
make sure that the rear clips are
in the slots and push the cover
closed.
Store the center cap or the plastic
bolt-on wheel covers until a full size
tire is put back on the vehicle. When
you replace the compact spare with
a full-size tire, reinstall the bolt-on
wheel covers or the center cap.
Hand-tighten them over the wheel
nuts, using the wrench.Compact Spare Tire
{WARNING
Driving with more than one
compact spare tire at a time could
result in loss of braking and
handling. This could lead to a
crash and you or others could be
injured. Use only one compact
spare tire at a time.
If this vehicle has a compact spare
tire, it was fully inflated when new;
however, it can lose air over time.
Check the inflation pressure
regularly. It should be 420 kPa
(60 psi).
Stop as soon as possible and check
that the spare tire is correctly
inflated after being installed on the
vehicle. The compact spare tire is
designed for temporary use only.
The vehicle will perform differently
with the spare tire installed and it is
recommended that the vehicle speed be limited to 80 km/h (50
mph). To conserve the tread of the
spare tire, have the standard tire
repaired or replaced as soon as
convenient and return the spare tire
to the storage area.
Notice:
When the compact spare
is installed, do not take the
vehicle through an automatic car
wash with guide rails. The
compact spare can get caught on
the rails which can damage the
tire, wheel, and other parts of the
vehicle.
Do not use the compact spare on
other vehicles.
Do not mix the compact spare tire or
wheel with other wheels or tires.
They will not fit. Keep the spare tire
and its wheel together.
Performance of the All-Wheel
Drive (AWD) system will be
automatically reduced to protect the
system when using the compact
spare. To restore the AWD and
prevent excessive wear on the
Page 367 of 444

Black plate (69,1)Chevrolet Traverse Owner Manual - 2013 - CRC 2nd Edition - 11/13/12
Vehicle Care 10-69
9. Connect the other end of thenegative (−) cable at least 45 cm
(18 in) away from the dead
battery, but not near engine
parts that move.
The electrical connection is just
as good there, and the chance
of sparks getting back to the
battery is much less.
Your vehicle has a remote
negative (−) terminal for this
purpose.
10. Now start the vehicle with the good battery and run the
engine for a while. 11. Try to start the vehicle that had
the dead battery. If it will not
start after a few tries, it
probably needs service.
Notice: If the jumper cables are
connected or removed in the
wrong order, electrical shorting
may occur and damage the
vehicle. The repairs would not be
covered by the vehicle warranty.
Always connect and remove the
jumper cables in the correct
order, making sure that the
cables do not touch each other or
other metal.
Jumper Cable Removal
Reverse the sequence exactly when
removing the jumper cables.
Towing
Towing the Vehicle
Notice: Incorrectly towing a
disabled vehicle may cause
damage. The damage would not
be covered by the vehicle
warranty. Do not lash or hook to
the chassis components
including the front and rear
subframes, suspension control
arms and links during towing and
recovery of a disabled vehicle or
to secure the vehicle to a flatbed
car carrier. Use the proper nylon
strap harnesses around the tires
to secure the flatbed car carrier.
Have the vehicle towed on a flatbed
car carrier or a wheel lift tow truck.
If a wheel lift tow truck is used, the
drive wheels cannot contact the
road while the vehicle is being
towed. A wheel dolly must be used
to lift all drive wheels off the ground.
Consult your dealer or a
professional towing service if the
disabled vehicle must be towed.