2013 CHEVROLET TRAVERSE turn signal
[x] Cancel search: turn signalPage 220 of 444

Black plate (40,1)Chevrolet Traverse Owner Manual - 2013 - CRC 2nd Edition - 11/13/12
7-40 Infotainment System
Notice:Avoid directly touching
the video screen, as damage may
occur. See “Cleaning the Video
Screens” later in this section for
more information.
Remote Control
To use the remote control, aim it at
the transmitter window at the rear of
the overhead console and press the
desired button. Direct sunlight or
very bright light could affect the
ability of the RSE transmitter to
receive signals from the remote
control. If the remote control does not seem to be working, the
batteries might need to be replaced.
See
“Battery Replacement” later in
this section. Objects blocking the
line of sight could also affect the
function of the remote control.
If a CD or DVD is in the Radio DVD
slot, the remote control
Obutton
can be used to turn on the video
screen display and start the disc.
The radio can also turn on the video
screen display. See Operation
(Radio without Touchscreen) on
page 7‑6 orOperation (Radio with
Touchscreen) on page 7‑8 for more
information.
Notice: Storing the remote
control in a hot area or in direct
sunlight can damage it, and the
repairs will not be covered by the
warranty. Storage in extreme cold
can weaken the batteries. Keep
the remote control stored in a
cool, dry place. Remote Control Buttons
O(Power):
Press to turn the video
screen on and off.
P(Illumination): Press to turn the
remote control backlight on. The
backlight automatically times out
after seven to 10 seconds if no
other button is pressed while the
backlight is on.
v(Title): Press to return the DVD
to the main menu of the DVD. This
function could vary for each disc.
y(Main Menu): Press to access
the DVD menu. The DVD menu is
different on every DVD. Use the
navigation arrows to move the
cursor around the DVD menu. After
making a selection press the enter
button. This button only operates
when using a DVD.
n,q,p,o(Menu Navigation
Arrows): Use the arrow buttons to
navigate through a menu.
r(Enter): Press to select the
choice that is highlighted in
any menu.
Page 256 of 444

Black plate (8,1)Chevrolet Traverse Owner Manual - 2013 - CRC 2nd Edition - 11/13/12
9-8 Driving and Operating
Turn off cruise control on slippery
surfaces.
Blizzard Conditions
Being stuck in snow can be a
serious situation. Stay with the
vehicle unless there is help nearby.
If possible, use Roadside
Assistance. SeeRoadside
Assistance Program (Mexico) on
page 13‑7 orRoadside Assistance
Program (U.S. and Canada) on
page 13‑11. To get help and keep
everyone in the vehicle safe:
.Turn on the hazard warning
flashers.
.Tie a red cloth to an outside
mirror.
{WARNING
Snow can trap engine exhaust
under the vehicle. This may
cause exhaust gases to get
inside. Engine exhaust contains
carbon monoxide (CO) which
(Continued)
WARNING (Continued)
cannot be seen or smelled. It can
cause unconsciousness and even
death.
If the vehicle is stuck in the snow:
.Clear away snow from around
the base of your vehicle,
especially any that is blocking
the exhaust pipe.
.Check again from time to
time to be sure snow does
not collect there.
.Open a window about 5 cm
(2 in) on the side of the
vehicle that is away from the
wind to bring in fresh air.
.Fully open the air outlets on
or under the instrument
panel.
.Adjust the climate control
system to a setting that
circulates the air inside the
vehicle and set the fan speed(Continued)
WARNING (Continued)
to the highest setting. See
“Climate Control Systems” in
the Index.
For more information about
carbon monoxide, see Engine
Exhaust on page 9‑20.
To save fuel, run the engine for only
short periods as needed to warm
the vehicle and then shut the engine
off and close the window most of
the way to save heat. Repeat this
until help arrives but only when you
feel really uncomfortable from the
cold. Moving about to keep warm
also helps.
If it takes some time for help to
arrive, now and then when you run
the engine, push the accelerator
pedal slightly so the engine runs
faster than the idle speed. This
keeps the battery charged to restart
the vehicle and to signal for help
with the headlamps. Do this as little
as possible to save fuel.
Page 281 of 444

Black plate (33,1)Chevrolet Traverse Owner Manual - 2013 - CRC 2nd Edition - 11/13/12
Driving and Operating 9-33
WARNING (Continued)
or vehicle damage. Before
making a lane change, always
check mirrors, glance over your
shoulder, and use the turn
signals.
SBZA Detection Zones
The SBZA sensor covers a zone of
approximately one lane over from
both sides of the vehicle, 3.5 m
(11 ft). This zone starts at each side
mirror and goes back approximately5.0 m (16 ft). The height of the zone
is approximately between
0.5 m (1.5 ft) and 2.0 m (6 ft) off the
ground.
Use caution while changing lanes
when towing a trailer, as the SBZA
detection zones that extend back
from the sides of the vehicle do not
move further back when a trailer is
towed.
How the System Works
The SBZA symbol lights up in the
side mirrors when the system
detects a vehicle in the side blind
zone, indicating it may be unsafe to
change lanes. Before making a lane
change, check the SBZA display,
check all mirrors, glance over your
shoulder, and use the turn signals.
Left Side Mirror
DisplayRight Side Mirror Display When the vehicle is started, both
outside mirror SBZA displays will
briefly come on to indicate the
system is operating. When the
vehicle is moving forward, the left or
right side mirror display will light up
if a vehicle is detected in that blind
zone. If the turn signal is activated
and a vehicle is also detected on
the same side, the display will flash
to give you extra warning not to
change lanes.
At speeds greater then 32 km/h
(20 mph), SBZA displays may come
on when approaching or passing
other vehicles. SBZA displays may
come on when a passed vehicle
remains in or drops back into the
detection zone. SBZA can be
disabled through the Driver
Information Center (DIC). See
Driver
Information Center (DIC) (Without
DIC Buttons) on page 5‑29 orDriver
Information Center (DIC) (With DIC
Buttons) on page 5‑24. If SBZA is
disabled by the driver, the SBZA
mirror displays will not light up.
Page 285 of 444

Black plate (37,1)Chevrolet Traverse Owner Manual - 2013 - CRC 2nd Edition - 11/13/12
Driving and Operating 9-37
The following illustrations show the
field of view that the camera
provides.
1. View displayed by the camera.
1. View displayed by the camera.2. Corner of the rear bumper.
When the System Does Not
Seem To Work Properly
The rear vision camera system
might not work properly or display a
clear image if:
.The RVC is turned off. See
“Turning the Rear Camera
System On or Off”
earlier in this
section.
.It is dark.
.The sun or the beam of
headlights is shining directly into
the camera lens.
.Ice, snow, mud, or anything else
builds up on the camera lens.
Clean the lens, rinse it with
water, and wipe it with a soft
cloth.
.The back of the vehicle is in an
accident. The position and
mounting angle of the camera
can change or the camera can
be affected. Be sure to have the camera and its position and
mounting angle checked at your
dealer.
.There are extreme temperature
changes.
The rear vision camera system
display in the rearview mirror may
turn off or not appear as expected
due to one of the following
conditions. If this occurs the left
indicator light on the mirror will
flash.
.A slow flash may indicate a loss
of video signal, or no video
signal present during the reverse
cycle.
.A fast flash may indicate that the
display has been on for the
maximum allowable time during
a reverse cycle, or the display
has reached an Over
Temperature limit.
The fast flash conditions are
used to protect the video device
from high temperature
conditions. Once conditions
Page 292 of 444

Black plate (44,1)Chevrolet Traverse Owner Manual - 2013 - CRC 2nd Edition - 11/13/12
9-44 Driving and Operating
Before starting, check all trailer hitch
parts and attachments, safety
chains, electrical connectors, lamps,
tires and mirrors. If the trailer has
electric brakes, start the
combination moving and then apply
the trailer brake controller by hand
to be sure the brakes work.
During the trip, check occasionally
to be sure that the load is secure
and the lamps and any trailer
brakes still work.
Towing with a Stability Control
System
When towing, the sound of the
stability control system might be
heard. The system is reacting to the
vehicle movement caused by the
trailer, which mainly occurs during
cornering. This is normal when
towing heavier trailers.
Following Distance
Stay at least twice as far behind the
vehicle ahead as you would when
driving the vehicle without a trailer.This can help to avoid situations
that require heavy braking and
sudden turns.
Passing
More passing distance is needed
when towing a trailer. Because the
rig is longer, it is necessary to go
farther beyond the passed vehicle
before returning to the lane.
Backing Up
Hold the bottom of the steering
wheel with one hand. To move the
trailer to the left, move your hand to
the left. To move the trailer to the
right, move your hand to the right.
Always back up slowly and,
if possible, have someone
guide you.
Making Turns
Notice:
Making very sharp turns
while trailering could cause the
trailer to come in contact with the
vehicle. The vehicle could be
damaged. Avoid making very
sharp turns while trailering. When turning with a trailer, make
wider turns than normal so the
trailer will not strike soft shoulders,
curbs, road signs, trees or other
objects. Use the turn signal well in
advance and avoid jerky or sudden
maneuvers.
Turn Signals When Towing a
Trailer
The turn signal indicators on the
instrument cluster flash whenever
signaling a turn or lane change.
Properly hooked up, the trailer
lamps also flash, telling other
drivers the vehicle is turning,
changing lanes or stopping.
When towing a trailer, the arrows on
the instrument cluster flash for turns
even if the bulbs on the trailer are
burned out. Check occasionally to
be sure the trailer bulbs are still
working.
Page 297 of 444
Black plate (49,1)Chevrolet Traverse Owner Manual - 2013 - CRC 2nd Edition - 11/13/12
Driving and Operating 9-49
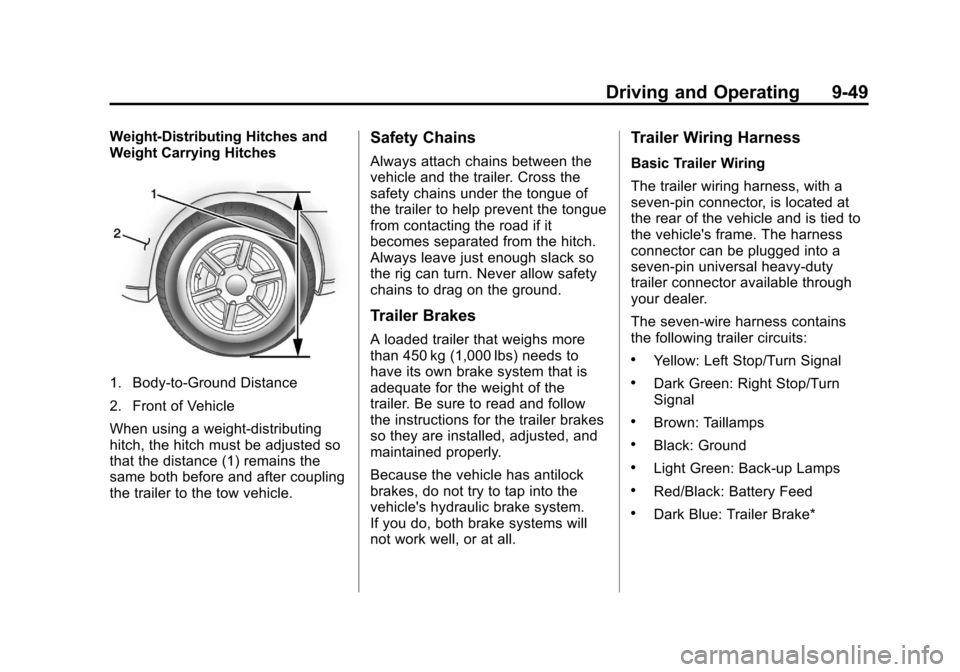
Weight-Distributing Hitches and
Weight Carrying Hitches
1. Body-to-Ground Distance
2. Front of Vehicle
When using a weight-distributing
hitch, the hitch must be adjusted so
that the distance (1) remains the
same both before and after coupling
the trailer to the tow vehicle.
Safety Chains
Always attach chains between the
vehicle and the trailer. Cross the
safety chains under the tongue of
the trailer to help prevent the tongue
from contacting the road if it
becomes separated from the hitch.
Always leave just enough slack so
the rig can turn. Never allow safety
chains to drag on the ground.
Trailer Brakes
A loaded trailer that weighs more
than 450 kg (1,000 lbs) needs to
have its own brake system that is
adequate for the weight of the
trailer. Be sure to read and follow
the instructions for the trailer brakes
so they are installed, adjusted, and
maintained properly.
Because the vehicle has antilock
brakes, do not try to tap into the
vehicle's hydraulic brake system.
If you do, both brake systems will
not work well, or at all.
Trailer Wiring Harness
Basic Trailer Wiring
The trailer wiring harness, with a
seven-pin connector, is located at
the rear of the vehicle and is tied to
the vehicle's frame. The harness
connector can be plugged into a
seven-pin universal heavy-duty
trailer connector available through
your dealer.
The seven-wire harness contains
the following trailer circuits:
.Yellow: Left Stop/Turn Signal
.Dark Green: Right Stop/Turn
Signal
.Brown: Taillamps
.Black: Ground
.Light Green: Back-up Lamps
.Red/Black: Battery Feed
.Dark Blue: Trailer Brake*
Page 298 of 444

Black plate (50,1)Chevrolet Traverse Owner Manual - 2013 - CRC 2nd Edition - 11/13/12
9-50 Driving and Operating
*The fuse for this circuit is installed
in the underhood electrical center,
but the wires are not connected.
They should be connected by your
dealer or a qualified service center.
If the back-up lamp circuit is not
functional, contact your dealer.
If a remote (non-vehicle) battery is
being charged, press the Tow/Haul
mode switch located on the center
console near the climate controls.
This will boost the vehicle system
voltage and properly charge the
battery. If the trailer is too light for
Tow/Haul mode, turn on the
headlamps (non-HID only) as a
second way to boost the vehicle
system and charge the battery.Electric Trailer Brake Control
Wiring Provisions
These wiring provisions for an
electric trailer brake controller are
included with the vehicle as part of
the trailer wiring package. The
instrument panel contains blunt cut
wires above the parking brake
assembly for the electric trailer
brake controller. The harness
contains the following wires:
.Red/Black: Power Supply
.White: Brake Switch Signal
.Gray: Illumination
.Dark Blue: Trailer Brake Signal
.Black: Ground
The electric trailer brake controller
should be installed by your dealer or
a qualified service center.
Conversions and
Add-Ons
Add-On Electrical
Equipment
Notice: Some electrical
equipment can damage the
vehicle or cause components to
not work and would not be
covered by the warranty. Always
check with your dealer before
adding electrical equipment.
Add-on equipment can drain the
vehicle's 12-volt battery, even if the
vehicle is not operating.
The vehicle has an airbag system.
Before attempting to add anything
electrical to the vehicle, see
Servicing the Airbag-Equipped
Vehicle on page 3‑34 andAdding
Equipment to the Airbag-Equipped
Vehicle on page 3‑35.
Page 299 of 444

Black plate (1,1)Chevrolet Traverse Owner Manual - 2013 - CRC 2nd Edition - 11/13/12
Vehicle Care 10-1
Vehicle Care
General Information
General Information . . . . . . . . . . 10-2
California Proposition65 Warning . . . . . . . . . . . . . . . . . 10-2
California Perchlorate Materials Requirements . . . . 10-2
Accessories and Modifications . . . . . . . . . . . . . . . 10-2
Vehicle Checks
Doing Your OwnService Work . . . . . . . . . . . . . . . 10-3
Hood . . . . . . . . . . . . . . . . . . . . . . . . 10-4
Engine Compartment Overview . . . . . . . . . . . . . . . . . . . 10-5
Engine Cover . . . . . . . . . . . . . . . . 10-6
Engine Oil . . . . . . . . . . . . . . . . . . . 10-7
Engine Oil Life System . . . . . . 10-9
Automatic Transmission Fluid . . . . . . . . . . . . . . . . . . . . . . 10-10
Engine Air Cleaner/Filter . . . . 10-11
Cooling System . . . . . . . . . . . . 10-12
Engine Coolant . . . . . . . . . . . . . 10-13
Engine Overheating . . . . . . . . 10-16 Overheated Engine
Protection
Operating Mode . . . . . . . . . . . 10-18
Power Steering Fluid . . . . . . . 10-18
Washer Fluid . . . . . . . . . . . . . . . 10-19
Brakes . . . . . . . . . . . . . . . . . . . . . 10-20
Brake Fluid . . . . . . . . . . . . . . . . . 10-21
Battery . . . . . . . . . . . . . . . . . . . . . 10-22
All-Wheel Drive . . . . . . . . . . . . . 10-22
Starter Switch Check . . . . . . . 10-22
Automatic Transmission Shift Lock Control Function
Check . . . . . . . . . . . . . . . . . . . . . 10-23
Ignition Transmission Lock Check . . . . . . . . . . . . . . . . . . . . . 10-23
Park Brake and P (Park) Mechanism Check . . . . . . . . 10-23
Wiper Blade Replacement . . . . . . . . . . . . . . 10-24
Headlamp Aiming
Headlamp Aiming . . . . . . . . . . 10-25
Bulb Replacement
Bulb Replacement . . . . . . . . . . 10-26
Taillamps, Turn Signal, andStoplamps . . . . . . . . . . . . . . . . 10-26
License Plate Lamp . . . . . . . . 10-27
Replacement Bulbs . . . . . . . . . 10-27
Electrical System
High Voltage Devices and Wiring . . . . . . . . . . . . . . . . . . . . . 10-28
Electrical System Overload . . . . . . . . . . . . . . . . . . 10-28
Fuses and Circuit
Breakers . . . . . . . . . . . . . . . . . . 10-29
Engine Compartment Fuse Block . . . . . . . . . . . . . . . . . . . . . 10-29
Instrument Panel Fuse Block . . . . . . . . . . . . . . . . . . . . . 10-32
Wheels and Tires
Tires . . . . . . . . . . . . . . . . . . . . . . . . 10-35
All-Season Tires . . . . . . . . . . . . 10-36
Winter Tires . . . . . . . . . . . . . . . . 10-36
Summer Tires . . . . . . . . . . . . . . 10-37
Tire Sidewall Labeling . . . . . . 10-37
Tire Designations . . . . . . . . . . . 10-39
Tire Terminology andDefinitions . . . . . . . . . . . . . . . . 10-40
Tire Pressure . . . . . . . . . . . . . . . 10-42
Tire Pressure Monitor System . . . . . . . . . . . . . . . . . . . 10-44
Tire Pressure Monitor Operation . . . . . . . . . . . . . . . . . 10-45
Tire Inspection . . . . . . . . . . . . . . 10-48
Tire Rotation . . . . . . . . . . . . . . . 10-48