2013 CHEVROLET TRAVERSE ad blue
[x] Cancel search: ad bluePage 228 of 444

Black plate (48,1)Chevrolet Traverse Owner Manual - 2013 - CRC 2nd Edition - 11/13/12
7-48 Infotainment System
3. Say“Pair.”The system responds
with instructions and a four-digit
Personal Identification Number
(PIN). The PIN is used in Step 5.
4. Start the pairing process on the cell phone that you want to pair.
For help with this process, see
the cell phone manufacturer's
user guide.
5. Locate the device named “Your
Vehicle” in the list on the cell
phone. Follow the instructions
on the cell phone to enter the
PIN provided in Step 3. After the
PIN is successfully entered, the
system prompts you to provide a
name for the paired cell phone.
This name will be used to
indicate which phones are
paired and connected to the
vehicle. The system responds
with “
successfully paired” after the
pairing process is complete.
6. Repeat Steps 1–5 to pair additional phones. Listing All Paired and Connected
Phones
The system can list all cell phones
paired to it. If a paired cell phone is
also connected to the vehicle, the
system responds with
“is connected”
after that phone name.
1. Press and hold
b/gfor
two seconds.
2. Say “Bluetooth.”
3. Say “List.”
Deleting a Paired Phone
If the phone name you want to
delete is unknown, see “Listing All
Paired and Connected Phones.”
1. Press and hold
b/gfor
two seconds.
2. Say “Bluetooth.”
3. Say “Delete.” The system asks
which phone to delete.
4. Say the name of the phone you want to delete. Connecting to a Different Phone
To connect to a different cell phone,
the Bluetooth system looks for the
next available cell phone in the
order in which all the available cell
phones were paired. Depending on
which cell phone you want to
connect to, you may have to use
this command several times.
1. Press and hold
b/gfor
two seconds.
2. Say “Bluetooth.”
3. Say “Change phone.”
.If another cell phone is
found, the response will be
“
connected.”
.If another cell phone is not
found, the original phone
remains connected.
Page 229 of 444

Black plate (49,1)Chevrolet Traverse Owner Manual - 2013 - CRC 2nd Edition - 11/13/12
Infotainment System 7-49
Storing and Deleting Phone
Numbers
The system can store up to 30
phone numbers as name tags in the
Hands-Free Directory that is shared
between the Bluetooth and OnStar
systems, if equipped.
The following commands are used
to delete and store phone numbers.
Store:This command will store a
phone number, or a group of
numbers as a name tag.
Digit Store: This command allows
a phone number to be stored as a
name tag by entering the digits one
at a time.
Delete: This command is used to
delete individual name tags.
Delete All Name Tags: This
command deletes all stored name
tags in the Hands-Free Calling
Directory and the OnStar
Turn-by-Turn Destinations Directory,
if equipped. Using the
“Store”Command
1. Press and holdb/gfor
two seconds.
2. Say “Store.”
3. Say the phone number or group of numbers you want to store all
at once with no pauses, then
follow the directions given by the
system to save a name tag for
this number.
Using the “Digit Store” Command
If an unwanted number is
recognized by the system, say
“Clear” at any time to clear the last
number.
To hear all of the numbers
recognized by the system, say
“Verify” at any time.
1. Press and hold
b/gfor
two seconds.
2. Say “Digit Store.”
3. Say each digit, one at a time, that you want to store. After
each digit is entered, the system repeats back the digit it heard
followed by a tone. After the last
digit has been entered, say
“Store,”
and then follow the
directions given by the system to
save a name tag for this number.
Using the “Delete”Command
1. Press and hold
b/gfor
two seconds.
2. Say “Delete.”
3. Say the name tag you want to delete.
Using the “Delete All Name Tags”
Command
This command deletes all stored
name tags in the Hands-Free
Calling Directory and the OnStar
Turn-by-Turn Destinations Directory,
if equipped.
To delete all name tags:
1. Press and hold
b/gfor
two seconds.
2. Say “Delete all name tags.”
Page 231 of 444

Black plate (51,1)Chevrolet Traverse Owner Manual - 2013 - CRC 2nd Edition - 11/13/12
Infotainment System 7-51
Once connected, the person called
will be heard through the audio
speakers.
Receiving a Call
When an incoming call is received,
the audio system mutes and a ring
tone is heard in the vehicle.
.Pressb/gto answer the call.
.Pressc/xto ignore a call.
Call Waiting
Call waiting must be supported on
the cell phone and enabled by the
wireless service carrier.
.Pressb/gto answer an
incoming call when another call
is active. The original call is
placed on hold.
.Pressb/gagain to return to
the original call.
.To ignore the incoming call, no
action is required.
.Pressc/xto disconnect the
current call and switch to the call
on hold.
Three-Way Calling
Three-way calling must be
supported on the cell phone and
enabled by the wireless service
carrier.
1. While on a call, press
b/g.
2. Say “Three-way call.”
3. Use the dial or call command to dial the number of the third party
to be called.
4. Once the call is connected, press
b/gto link all callers
together.
Ending a Call
Pressc/xto end a call.
Muting a Call
During a call, all sounds from inside
the vehicle can be muted so that the
person on the other end of the call
cannot hear them.
.To mute a call, pressb/g, and
then say “Mute call.”
.To cancel mute, pressb/g,
and then say “Un-mute call.”
Transferring a Call
Audio can be transferred between
the Bluetooth system and the cell
phone.
The cell phone must be paired and
connected with the Bluetooth
system before a call can be
transferred. The connection process
can take up to two minutes after the
ignition is turned to ON/RUN.
Page 232 of 444

Black plate (52,1)Chevrolet Traverse Owner Manual - 2013 - CRC 2nd Edition - 11/13/12
7-52 Infotainment System
Transferring Audio from the
Bluetooth System to a Cell Phone
During a call with the audio in the
vehicle:
1. Press
b/g.
2. Say “Transfer Call.”
Transferring Audio to the
Bluetooth System from a Cell
Phone
During a call with the audio on the
cell phone, press
b/g. The audio
transfers to the vehicle. If the audio
does not transfer to the vehicle, use
the audio transfer feature on the cell
phone. See your cell phone
manufacturer's user guide for more
information.
Voice Pass-Thru
Voice pass-thru allows access to the
voice recognition commands on the
cell phone. See your cell phone
manufacturer's user guide to see if
the cell phone supports this feature.
To access contacts stored in the cell
phone:
1. Press and hold
b/gfor
two seconds.
2. Say “Bluetooth.” This command
can be skipped.
3. Say “Voice.” The system
responds “OK, accessing
The cell phone's normal prompt
messages will go through their cycle
according to the phone's operating
instructions.
Dual Tone Multi-Frequency
(DTMF) Tones
The Bluetooth system can send
numbers and the numbers stored as
name tags during a call. You can
use this feature when calling a
menu-driven phone system.
Account numbers can also be
stored for use.
Sending a Number or Name Tag
During a Call
1. Press
b/g. The system
responds “Ready,”followed by
a tone.
2. Say “Dial.”
3. Say the number or name tag to send.
Page 233 of 444

Black plate (53,1)Chevrolet Traverse Owner Manual - 2013 - CRC 2nd Edition - 11/13/12
Infotainment System 7-53
Clearing the System
Unless information is deleted out of
the in-vehicle Bluetooth system, it
will be retained indefinitely. This
includes all saved name tags in the
phone book and phone pairing
information. For information on how
to delete this information, see the
previous section“Deleting a Paired
Phone” and the previous sections
on deleting name tags.
Other Information
The Bluetooth®word mark and
logos are owned by the Bluetooth®
SIG, Inc. and any use of such marks
by General Motors is under license.
Other trademarks and trade names
are those of their respective owners.
See Radio Frequency Statement on
page 13‑21 for information
regarding Part 15 of the Federal
Communications Commission (FCC)
rules and Industry Canada
Standards RSS-GEN/210/220/310.
Settings
Press Settings on the Home Page
to adjust features and preferences,
such as Time, Date, Bluetooth
Device List, Voice Recognition,
Favorite Pages, Display Settings,
Navigation Settings, etc.
1. Press the Settings screen button
on the Home Page.
2. Touch-tap the scroll bar until the desired option displays. Select
the desired settings to change.
A few of the setting options change
the way the navigation system
displays or reacts while in use.
From the Settings menu, press the
Set Time or Set Date settings
screen button to display the different
options for setting the time
and date.
Bluetooth Device List: Press to
display paired bluetooth devices.
Voice Recognition: Press to
display voice recognition options.
.Voice Prompt Volume: Press to
adjust the prompt volume.
.Prompt Length: Press to select
short or long prompts.
Page 235 of 444

Black plate (55,1)Chevrolet Traverse Owner Manual - 2013 - CRC 2nd Edition - 11/13/12
Infotainment System 7-55
SeeSatellite Radio (Radio without
Touchscreen) on page 7‑15 or
Satellite Radio (Radio with
Touchscreen) on page 7‑19 (if
equipped), for more information
about XM Categories.
The Radio Settings are:
Phone Settings
See Bluetooth on page 7‑46 in the
“Phone” section for more
information on phone settings.
Vehicle Settings
See Vehicle Personalization (With
DIC Buttons) on page 5‑41.
Display
Mode: Press Mode to change the
screen background. This setting
controls map colors.
Calibrate Touchscreen: Press to
display the Touchscreen Calibration
Screen.
Turn Display Off: Press to turn the
Display option off.
Rear Vision Camera (If
Equipped)
The rear vision camera can assist
the driver when backing up by
displaying a view of the area behind
the vehicle.
An image appears on the system’s
screen so that the driver can check
the surroundings for safety.
Press the Config button to access
the Display settings. Adjust the
brightness of the screen by pressing
the −or + screen button. See Rear
Vision Camera (RVC) on page 9‑35.
Page 297 of 444

Black plate (49,1)Chevrolet Traverse Owner Manual - 2013 - CRC 2nd Edition - 11/13/12
Driving and Operating 9-49
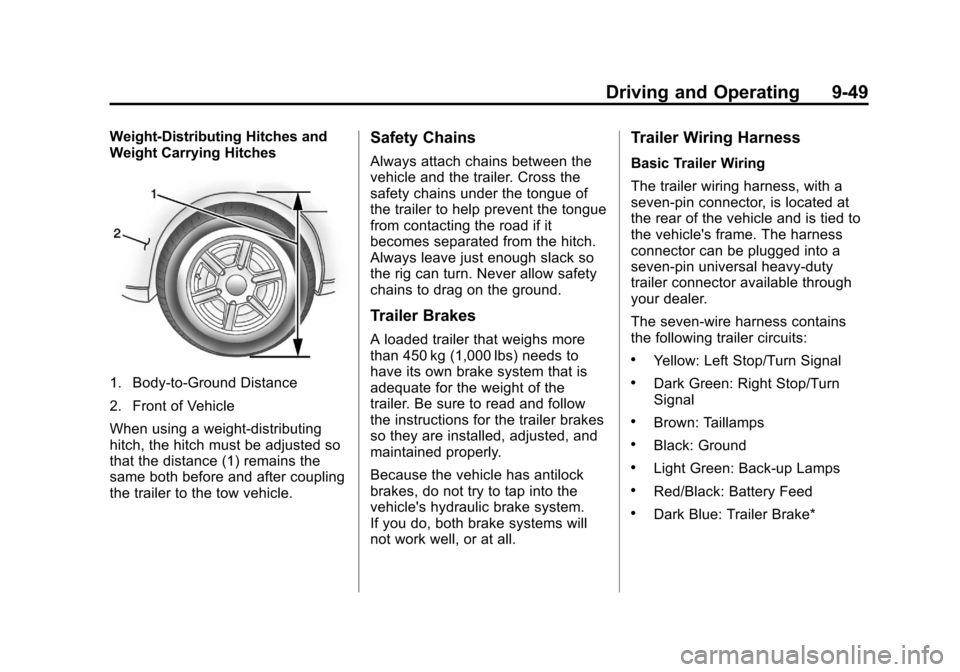
Weight-Distributing Hitches and
Weight Carrying Hitches
1. Body-to-Ground Distance
2. Front of Vehicle
When using a weight-distributing
hitch, the hitch must be adjusted so
that the distance (1) remains the
same both before and after coupling
the trailer to the tow vehicle.
Safety Chains
Always attach chains between the
vehicle and the trailer. Cross the
safety chains under the tongue of
the trailer to help prevent the tongue
from contacting the road if it
becomes separated from the hitch.
Always leave just enough slack so
the rig can turn. Never allow safety
chains to drag on the ground.
Trailer Brakes
A loaded trailer that weighs more
than 450 kg (1,000 lbs) needs to
have its own brake system that is
adequate for the weight of the
trailer. Be sure to read and follow
the instructions for the trailer brakes
so they are installed, adjusted, and
maintained properly.
Because the vehicle has antilock
brakes, do not try to tap into the
vehicle's hydraulic brake system.
If you do, both brake systems will
not work well, or at all.
Trailer Wiring Harness
Basic Trailer Wiring
The trailer wiring harness, with a
seven-pin connector, is located at
the rear of the vehicle and is tied to
the vehicle's frame. The harness
connector can be plugged into a
seven-pin universal heavy-duty
trailer connector available through
your dealer.
The seven-wire harness contains
the following trailer circuits:
.Yellow: Left Stop/Turn Signal
.Dark Green: Right Stop/Turn
Signal
.Brown: Taillamps
.Black: Ground
.Light Green: Back-up Lamps
.Red/Black: Battery Feed
.Dark Blue: Trailer Brake*
Page 298 of 444

Black plate (50,1)Chevrolet Traverse Owner Manual - 2013 - CRC 2nd Edition - 11/13/12
9-50 Driving and Operating
*The fuse for this circuit is installed
in the underhood electrical center,
but the wires are not connected.
They should be connected by your
dealer or a qualified service center.
If the back-up lamp circuit is not
functional, contact your dealer.
If a remote (non-vehicle) battery is
being charged, press the Tow/Haul
mode switch located on the center
console near the climate controls.
This will boost the vehicle system
voltage and properly charge the
battery. If the trailer is too light for
Tow/Haul mode, turn on the
headlamps (non-HID only) as a
second way to boost the vehicle
system and charge the battery.Electric Trailer Brake Control
Wiring Provisions
These wiring provisions for an
electric trailer brake controller are
included with the vehicle as part of
the trailer wiring package. The
instrument panel contains blunt cut
wires above the parking brake
assembly for the electric trailer
brake controller. The harness
contains the following wires:
.Red/Black: Power Supply
.White: Brake Switch Signal
.Gray: Illumination
.Dark Blue: Trailer Brake Signal
.Black: Ground
The electric trailer brake controller
should be installed by your dealer or
a qualified service center.
Conversions and
Add-Ons
Add-On Electrical
Equipment
Notice: Some electrical
equipment can damage the
vehicle or cause components to
not work and would not be
covered by the warranty. Always
check with your dealer before
adding electrical equipment.
Add-on equipment can drain the
vehicle's 12-volt battery, even if the
vehicle is not operating.
The vehicle has an airbag system.
Before attempting to add anything
electrical to the vehicle, see
Servicing the Airbag-Equipped
Vehicle on page 3‑34 andAdding
Equipment to the Airbag-Equipped
Vehicle on page 3‑35.