Page 297 of 382
Black plate (63,1)Chevrolet Sonic Owner Manual - 2013 - 2nd PrintReady - 10/11/12
Vehicle Care 10-63
There is only enough sealant to seal
one tire. After usage, the tire sealant
canister must be replaced.
Using the Tire Sealant and
Compressor Kit to Temporarily
Seal and Inflate a
Punctured Tire
When using the tire sealant and
compressor kit during cold
temperatures, warm the kit in a
heated environment for five minutes.
This will help to inflate the tire
faster.
If a tire goes flat, avoid further tire
and wheel damage by driving slowly
to a level place. Turn on the hazard
warning flashers. SeeHazard
Warning Flashers on page 6‑3.
See If a Tire Goes Flat on
page 10‑59 for other important
safety warnings.
Do not remove any objects that
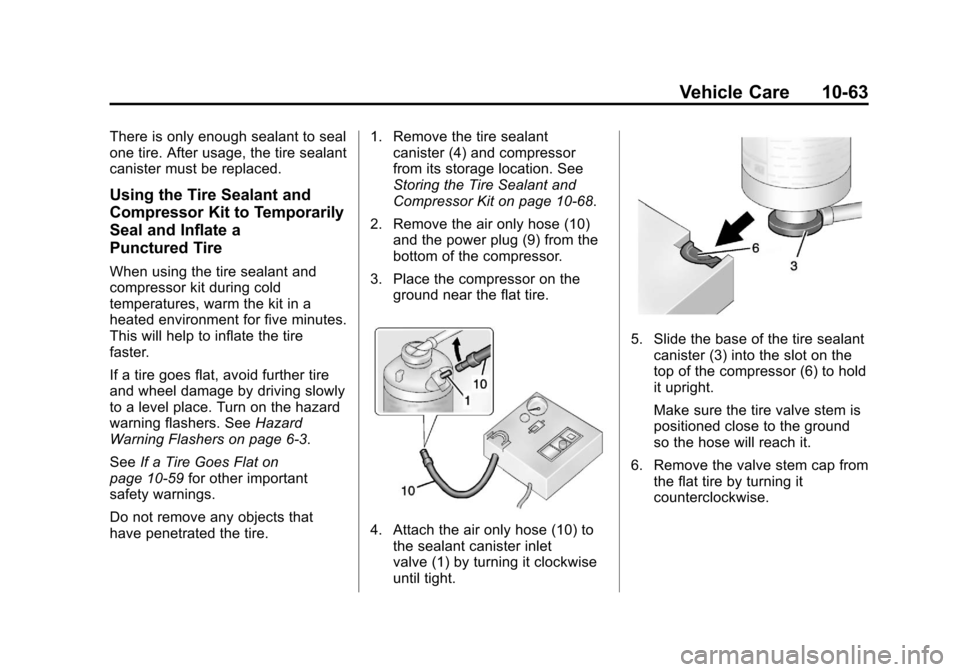
have penetrated the tire. 1. Remove the tire sealant
canister (4) and compressor
from its storage location. See
Storing the Tire Sealant and
Compressor Kit on page 10‑68.
2. Remove the air only hose (10) and the power plug (9) from the
bottom of the compressor.
3. Place the compressor on the ground near the flat tire.
4. Attach the air only hose (10) tothe sealant canister inlet
valve (1) by turning it clockwise
until tight.
5. Slide the base of the tire sealant
canister (3) into the slot on the
top of the compressor (6) to hold
it upright.
Make sure the tire valve stem is
positioned close to the ground
so the hose will reach it.
6. Remove the valve stem cap from the flat tire by turning it
counterclockwise.
Page 300 of 382

Black plate (66,1)Chevrolet Sonic Owner Manual - 2013 - 2nd PrintReady - 10/11/12
10-66 Vehicle Care
24. Wipe off any sealant from thewheel, tire, or vehicle.
25. Dispose of the used tire sealant canister (4) at a local
dealer or in accordance with
local state codes and practices.
26. Replace it with a new canister available from your dealer.
27. After temporarily sealing a tire using the tire sealant and
compressor kit, take the
vehicle to an authorized dealer
within 161 km (100 mi) of
driving to have the tire repaired
or replaced.Using the Tire Sealant and
Compressor Kit without
Sealant to Inflate a Tire (Not
Punctured)
The kit includes:
1. Sealant Canister Inlet Valve
2. Sealant/Air Hose
3. Base of Sealant Canister
4. Tire Sealant Canister
5. On/Off Button
6. Slot on Top of Compressor
7. Pressure Deflation Button 8. Pressure Gauge
9. Power Plug
10. Air Only Hose
If a tire goes flat, avoid further tire
and wheel damage by driving slowly
to a level place. Turn on the hazard
warning flashers. See
Hazard
Warning Flashers on page 6‑3.
See If a Tire Goes Flat on
page 10‑59 for other important
safety warnings.
Page 302 of 382
Black plate (68,1)Chevrolet Sonic Owner Manual - 2013 - 2nd PrintReady - 10/11/12
10-68 Vehicle Care
12. Turn the air only hose (10)counterclockwise to remove it
from the tire valve stem.
13. Replace the tire valve stem cap.
14. Return the air only hose (10) and power plug (9) back to
their original storage location.
15. Return the equipment to its original storage location in the
vehicle.
The tire sealant and compressor kit
has accessory adapters located in a
compartment on the bottom of its
housing that can be used to inflate
air mattresses, balls, etc.
Storing the Tire Sealant
and Compressor Kit
The tire sealant and compressor kit
is located in the rear storage area.
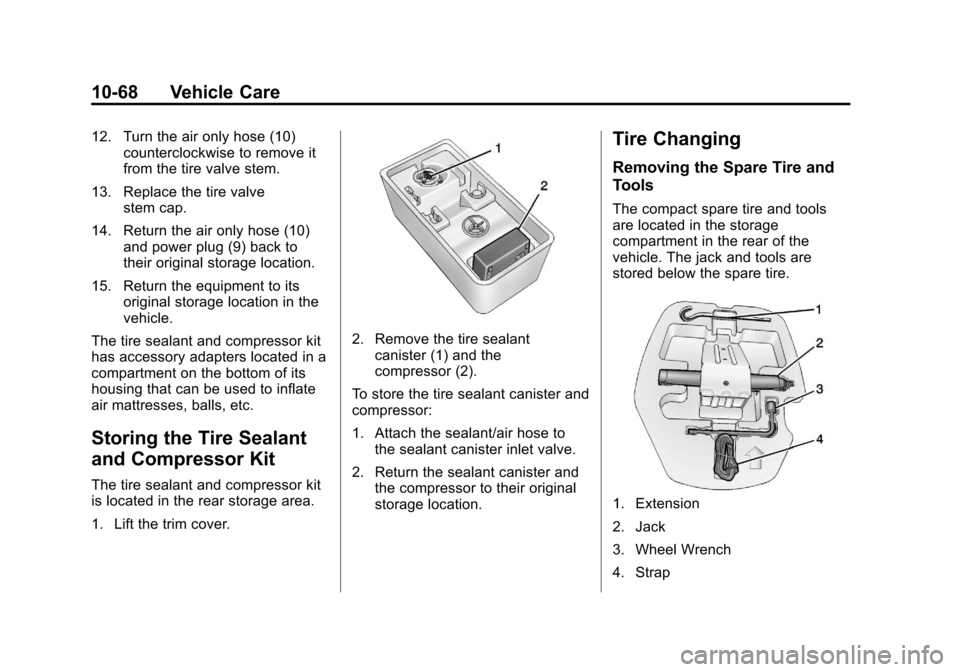
1. Lift the trim cover.
2. Remove the tire sealant canister (1) and the
compressor (2).
To store the tire sealant canister and
compressor:
1. Attach the sealant/air hose to the sealant canister inlet valve.
2. Return the sealant canister and the compressor to their original
storage location.
Tire Changing
Removing the Spare Tire and
Tools
The compact spare tire and tools
are located in the storage
compartment in the rear of the
vehicle. The jack and tools are
stored below the spare tire.
1. Extension
2. Jack
3. Wheel Wrench
4. Strap
Page 303 of 382
Black plate (69,1)Chevrolet Sonic Owner Manual - 2013 - 2nd PrintReady - 10/11/12
Vehicle Care 10-69
To access the spare tire and tools:
1. Open the trunk or liftgate. SeeTrunk (Sedan) on page 2‑8 or
Liftgate (Hatchback) on
page 2‑9.
2. Lift the trim cover.
3. Turn the retainer counterclockwise and remove it
from the compact spare.
4. Remove the compact spare tire. See Compact Spare Tire on
page 10‑73 for more information. 5. Remove the jack and tools from
their container and place them
near the tire being changed.
Removing the Flat Tire and
Installing the Spare Tire
1. Do a safety check before
proceeding. See If a Tire Goes
Flat on page 10‑59.
2. Remove the wheel cover, if the vehicle has one, to reach the
wheel bolts.
3. Turn the wheel nutscounterclockwise to loosen
them. Do not remove them yet.
Page 304 of 382
Black plate (70,1)Chevrolet Sonic Owner Manual - 2013 - 2nd PrintReady - 10/11/12
10-70 Vehicle Care
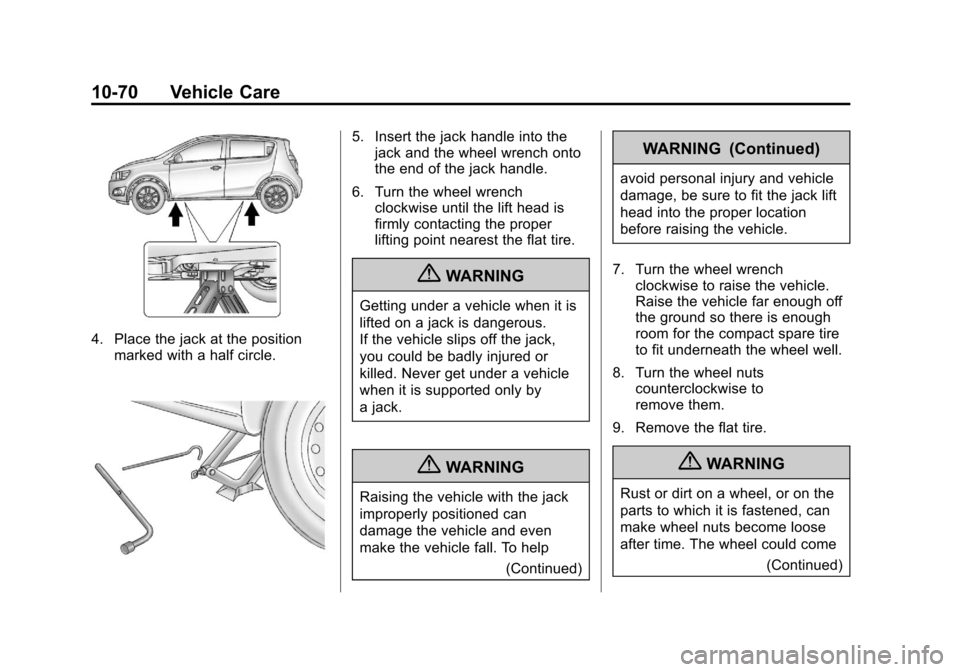
4. Place the jack at the positionmarked with a half circle.
5. Insert the jack handle into thejack and the wheel wrench onto
the end of the jack handle.
6. Turn the wheel wrench clockwise until the lift head is
firmly contacting the proper
lifting point nearest the flat tire.
{WARNING
Getting under a vehicle when it is
lifted on a jack is dangerous.
If the vehicle slips off the jack,
you could be badly injured or
killed. Never get under a vehicle
when it is supported only by
a jack.
{WARNING
Raising the vehicle with the jack
improperly positioned can
damage the vehicle and even
make the vehicle fall. To help
(Continued)
WARNING (Continued)
avoid personal injury and vehicle
damage, be sure to fit the jack lift
head into the proper location
before raising the vehicle.
7. Turn the wheel wrench clockwise to raise the vehicle.
Raise the vehicle far enough off
the ground so there is enough
room for the compact spare tire
to fit underneath the wheel well.
8. Turn the wheel nuts counterclockwise to
remove them.
9. Remove the flat tire.
{WARNING
Rust or dirt on a wheel, or on the
parts to which it is fastened, can
make wheel nuts become loose
after time. The wheel could come (Continued)
Page 305 of 382
Black plate (71,1)Chevrolet Sonic Owner Manual - 2013 - 2nd PrintReady - 10/11/12
Vehicle Care 10-71
WARNING (Continued)
off and cause an accident. When
changing a wheel, remove any
rust or dirt from places where the
wheel attaches to the vehicle. In
an emergency, a cloth or a paper
towel can be used; however, use
a scraper or wire brush later to
remove all rust or dirt.
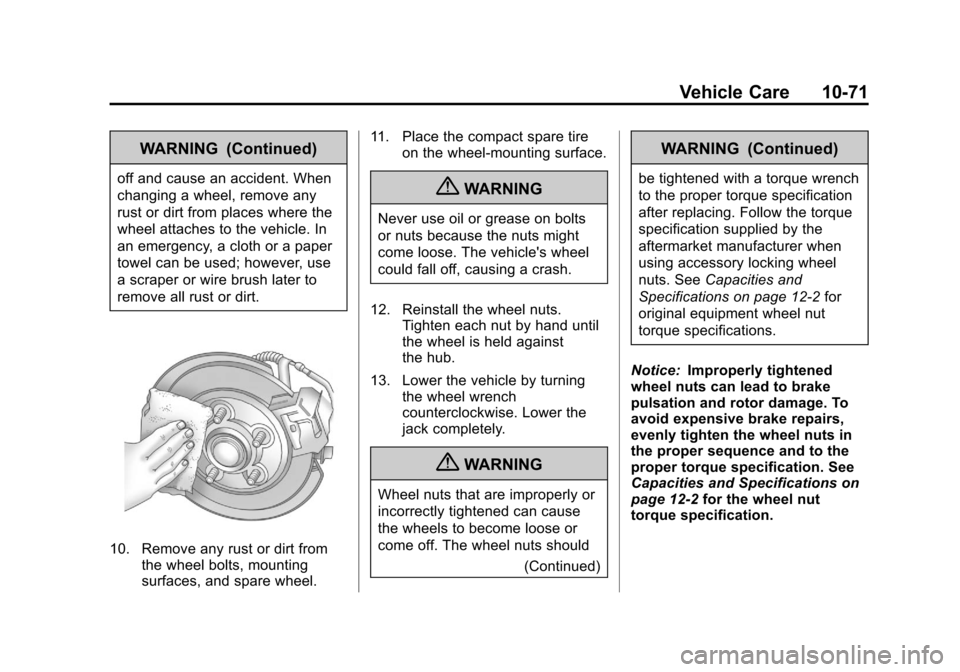
10. Remove any rust or dirt fromthe wheel bolts, mounting
surfaces, and spare wheel. 11. Place the compact spare tire
on the wheel-mounting surface.
{WARNING
Never use oil or grease on bolts
or nuts because the nuts might
come loose. The vehicle's wheel
could fall off, causing a crash.
12. Reinstall the wheel nuts. Tighten each nut by hand until
the wheel is held against
the hub.
13. Lower the vehicle by turning the wheel wrench
counterclockwise. Lower the
jack completely.
{WARNING
Wheel nuts that are improperly or
incorrectly tightened can cause
the wheels to become loose or
come off. The wheel nuts should
(Continued)
WARNING (Continued)
be tightened with a torque wrench
to the proper torque specification
after replacing. Follow the torque
specification supplied by the
aftermarket manufacturer when
using accessory locking wheel
nuts. SeeCapacities and
Specifications on page 12‑2 for
original equipment wheel nut
torque specifications.
Notice: Improperly tightened
wheel nuts can lead to brake
pulsation and rotor damage. To
avoid expensive brake repairs,
evenly tighten the wheel nuts in
the proper sequence and to the
proper torque specification. See
Capacities and Specifications on
page 12‑2 for the wheel nut
torque specification.
Page 306 of 382
Black plate (72,1)Chevrolet Sonic Owner Manual - 2013 - 2nd PrintReady - 10/11/12
10-72 Vehicle Care
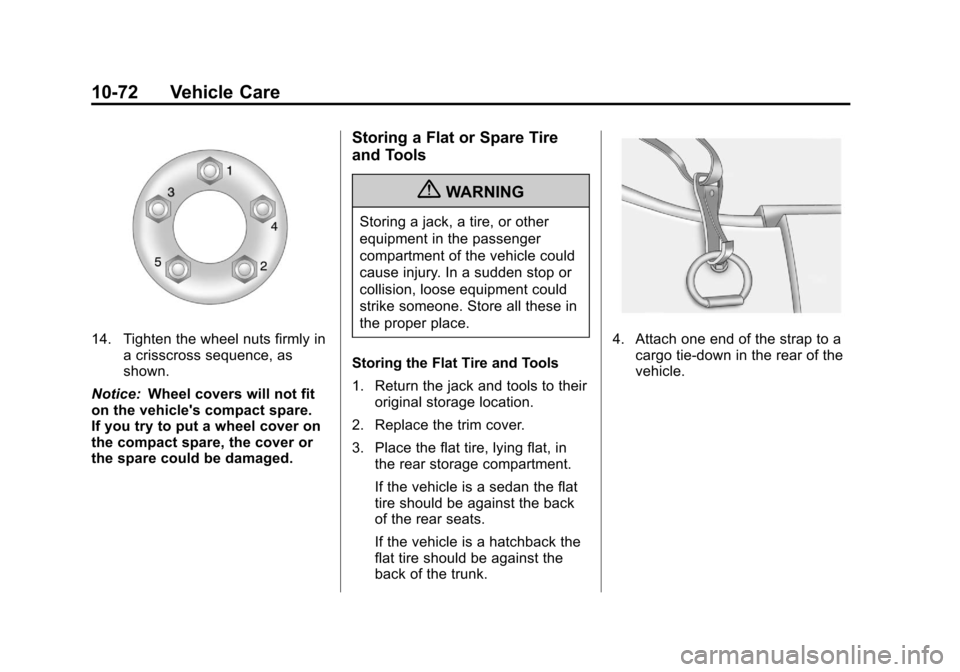
14. Tighten the wheel nuts firmly ina crisscross sequence, as
shown.
Notice: Wheel covers will not fit
on the vehicle's compact spare.
If you try to put a wheel cover on
the compact spare, the cover or
the spare could be damaged.
Storing a Flat or Spare Tire
and Tools
{WARNING
Storing a jack, a tire, or other
equipment in the passenger
compartment of the vehicle could
cause injury. In a sudden stop or
collision, loose equipment could
strike someone. Store all these in
the proper place.
Storing the Flat Tire and Tools
1. Return the jack and tools to their original storage location.
2. Replace the trim cover.
3. Place the flat tire, lying flat, in the rear storage compartment.
If the vehicle is a sedan the flat
tire should be against the back
of the rear seats.
If the vehicle is a hatchback the
flat tire should be against the
back of the trunk.
4. Attach one end of the strap to acargo tie-down in the rear of the
vehicle.
Page 307 of 382
Black plate (73,1)Chevrolet Sonic Owner Manual - 2013 - 2nd PrintReady - 10/11/12
Vehicle Care 10-73
Sedan
Hatchback
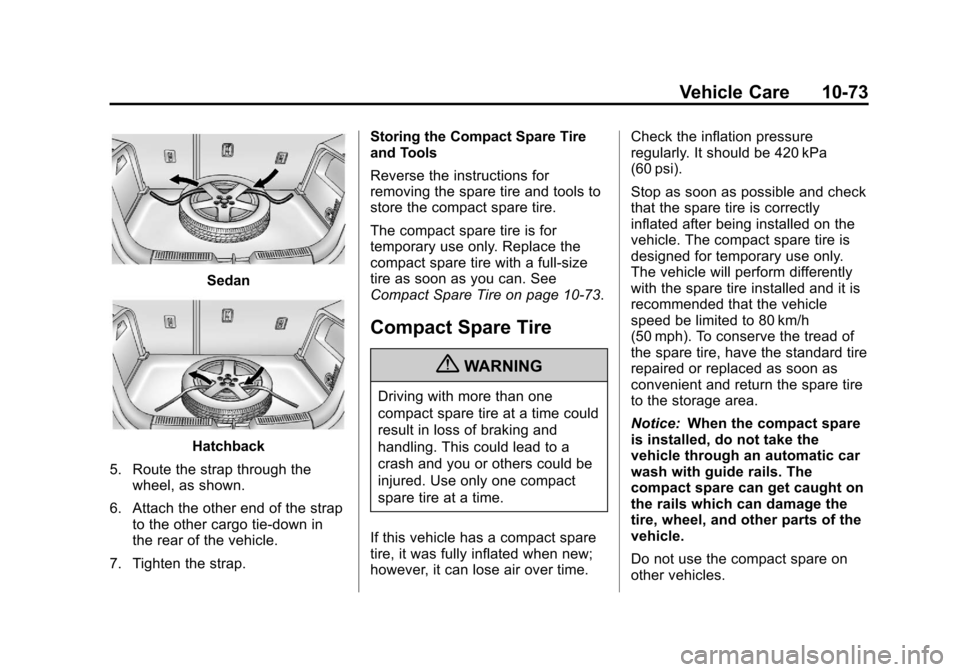
5. Route the strap through the wheel, as shown.
6. Attach the other end of the strap to the other cargo tie-down in
the rear of the vehicle.
7. Tighten the strap. Storing the Compact Spare Tire
and Tools
Reverse the instructions for
removing the spare tire and tools to
store the compact spare tire.
The compact spare tire is for
temporary use only. Replace the
compact spare tire with a full-size
tire as soon as you can. See
Compact Spare Tire on page 10‑73.
Compact Spare Tire
{WARNING
Driving with more than one
compact spare tire at a time could
result in loss of braking and
handling. This could lead to a
crash and you or others could be
injured. Use only one compact
spare tire at a time.
If this vehicle has a compact spare
tire, it was fully inflated when new;
however, it can lose air over time. Check the inflation pressure
regularly. It should be 420 kPa
(60 psi).
Stop as soon as possible and check
that the spare tire is correctly
inflated after being installed on the
vehicle. The compact spare tire is
designed for temporary use only.
The vehicle will perform differently
with the spare tire installed and it is
recommended that the vehicle
speed be limited to 80 km/h
(50 mph). To conserve the tread of
the spare tire, have the standard tire
repaired or replaced as soon as
convenient and return the spare tire
to the storage area.
Notice:
When the compact spare
is installed, do not take the
vehicle through an automatic car
wash with guide rails. The
compact spare can get caught on
the rails which can damage the
tire, wheel, and other parts of the
vehicle.
Do not use the compact spare on
other vehicles.