2013 CHEVROLET SONIC clock
[x] Cancel search: clockPage 263 of 382
Black plate (29,1)Chevrolet Sonic Owner Manual - 2013 - 2nd PrintReady - 10/11/12
Vehicle Care 10-29
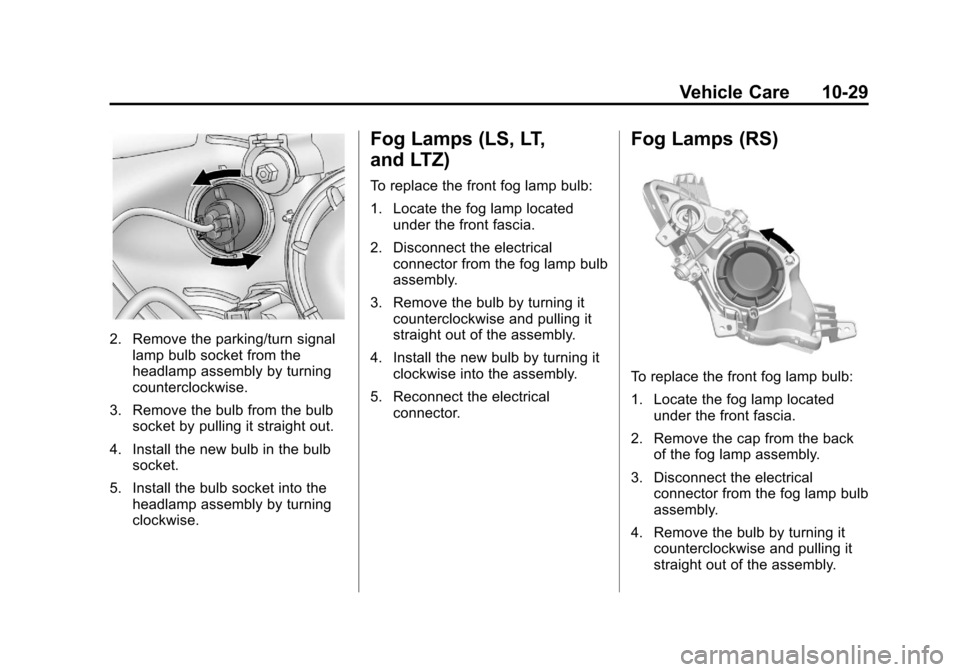
2. Remove the parking/turn signallamp bulb socket from the
headlamp assembly by turning
counterclockwise.
3. Remove the bulb from the bulb socket by pulling it straight out.
4. Install the new bulb in the bulb socket.
5. Install the bulb socket into the headlamp assembly by turning
clockwise.
Fog Lamps (LS, LT,
and LTZ)
To replace the front fog lamp bulb:
1. Locate the fog lamp locatedunder the front fascia.
2. Disconnect the electrical connector from the fog lamp bulb
assembly.
3. Remove the bulb by turning it counterclockwise and pulling it
straight out of the assembly.
4. Install the new bulb by turning it clockwise into the assembly.
5. Reconnect the electrical connector.
Fog Lamps (RS)
To replace the front fog lamp bulb:
1. Locate the fog lamp locatedunder the front fascia.
2. Remove the cap from the back of the fog lamp assembly.
3. Disconnect the electrical connector from the fog lamp bulb
assembly.
4. Remove the bulb by turning it counterclockwise and pulling it
straight out of the assembly.
Page 264 of 382
Black plate (30,1)Chevrolet Sonic Owner Manual - 2013 - 2nd PrintReady - 10/11/12
10-30 Vehicle Care
5. Install the new bulb by turning itclockwise into the assembly.
6. Reconnect the electrical connector.
7. Replace the cap on the back of the fog lamp assembly.
Taillamps, Turn Signal,
Stoplamps, and Back-Up
Lamps
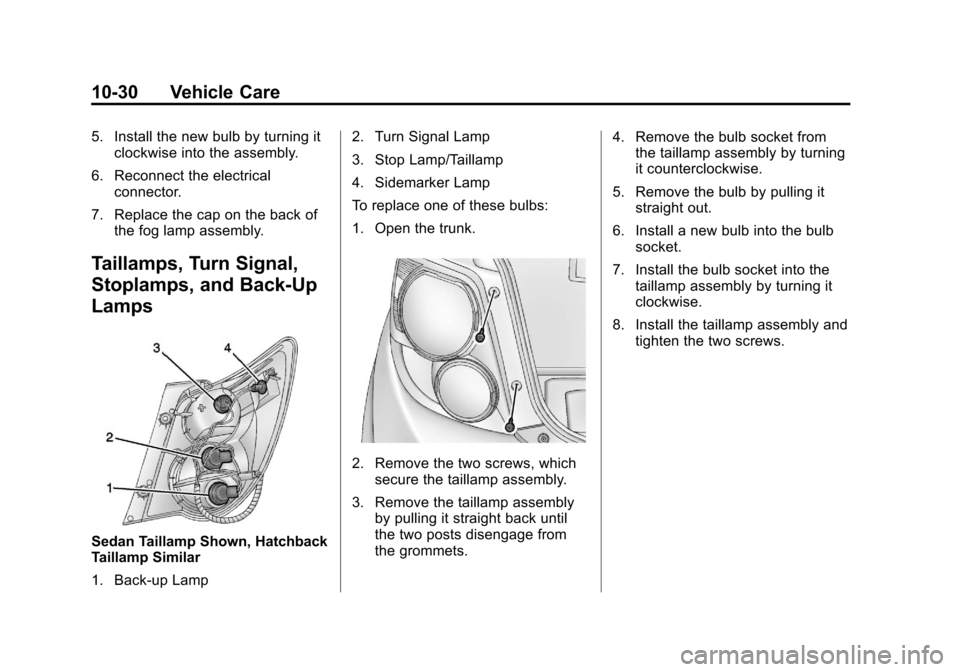
Sedan Taillamp Shown, Hatchback
Taillamp Similar
1. Back-up Lamp 2. Turn Signal Lamp
3. Stop Lamp/Taillamp
4. Sidemarker Lamp
To replace one of these bulbs:
1. Open the trunk.
2. Remove the two screws, which
secure the taillamp assembly.
3. Remove the taillamp assembly by pulling it straight back until
the two posts disengage from
the grommets. 4. Remove the bulb socket from
the taillamp assembly by turning
it counterclockwise.
5. Remove the bulb by pulling it straight out.
6. Install a new bulb into the bulb socket.
7. Install the bulb socket into the taillamp assembly by turning it
clockwise.
8. Install the taillamp assembly and tighten the two screws.
Page 265 of 382
Black plate (31,1)Chevrolet Sonic Owner Manual - 2013 - 2nd PrintReady - 10/11/12
Vehicle Care 10-31
License Plate Lamp
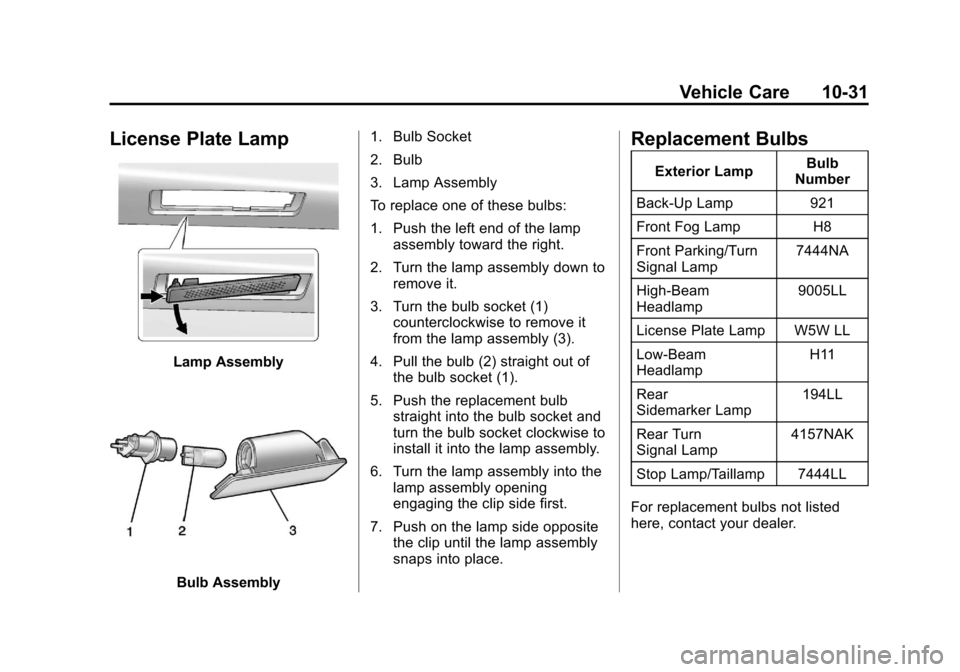
Lamp Assembly
Bulb Assembly1. Bulb Socket
2. Bulb
3. Lamp Assembly
To replace one of these bulbs:
1. Push the left end of the lamp
assembly toward the right.
2. Turn the lamp assembly down to remove it.
3. Turn the bulb socket (1) counterclockwise to remove it
from the lamp assembly (3).
4. Pull the bulb (2) straight out of the bulb socket (1).
5. Push the replacement bulb straight into the bulb socket and
turn the bulb socket clockwise to
install it into the lamp assembly.
6. Turn the lamp assembly into the lamp assembly opening
engaging the clip side first.
7. Push on the lamp side opposite the clip until the lamp assembly
snaps into place.
Replacement Bulbs
Exterior Lamp Bulb
Number
Back-Up Lamp 921
Front Fog Lamp H8
Front Parking/Turn
Signal Lamp 7444NA
High-Beam
Headlamp 9005LL
License Plate Lamp W5W LL
Low-Beam
Headlamp H11
Rear
Sidemarker Lamp 194LL
Rear Turn
Signal Lamp 4157NAK
Stop Lamp/Taillamp 7444LL
For replacement bulbs not listed
here, contact your dealer.
Page 273 of 382
Black plate (39,1)Chevrolet Sonic Owner Manual - 2013 - 2nd PrintReady - 10/11/12
Vehicle Care 10-39
Number Usage26 Airbag Run/Crank
27 Run Relay
28 Liftgate Release
29 Trailer Run/Crank
30 Clock Spring
31 Heating, Ventilation, and Air
Conditioning
32 Spare
33 Sunroof
34 Cigarette Lighter
35 Spare
36 Rear Power Windows
37 Front Power Windows
38 RAP/ACCY
39 DC/DC Converter Number Usage
40 Driver Power Window Express
Up/Down
41 PTC2
42 PTC1
43 Battery ConnectorWheels and Tires
Tires
Every new GM vehicle has
high-quality tires made by a
leading tire manufacturer. See
the warranty manual for
information regarding the tire
warranty and where to get
service. For additional
information refer to the tire
manufacturer.
{WARNING
.Poorly maintained and
improperly used tires are
dangerous.
.Overloading the tires can
cause overheating as a
result of too much flexing.
There could be a blowout
(Continued)
Page 297 of 382
Black plate (63,1)Chevrolet Sonic Owner Manual - 2013 - 2nd PrintReady - 10/11/12
Vehicle Care 10-63
There is only enough sealant to seal
one tire. After usage, the tire sealant
canister must be replaced.
Using the Tire Sealant and
Compressor Kit to Temporarily
Seal and Inflate a
Punctured Tire
When using the tire sealant and
compressor kit during cold
temperatures, warm the kit in a
heated environment for five minutes.
This will help to inflate the tire
faster.
If a tire goes flat, avoid further tire
and wheel damage by driving slowly
to a level place. Turn on the hazard
warning flashers. SeeHazard
Warning Flashers on page 6‑3.
See If a Tire Goes Flat on
page 10‑59 for other important
safety warnings.
Do not remove any objects that
have penetrated the tire. 1. Remove the tire sealant
canister (4) and compressor
from its storage location. See
Storing the Tire Sealant and
Compressor Kit on page 10‑68.
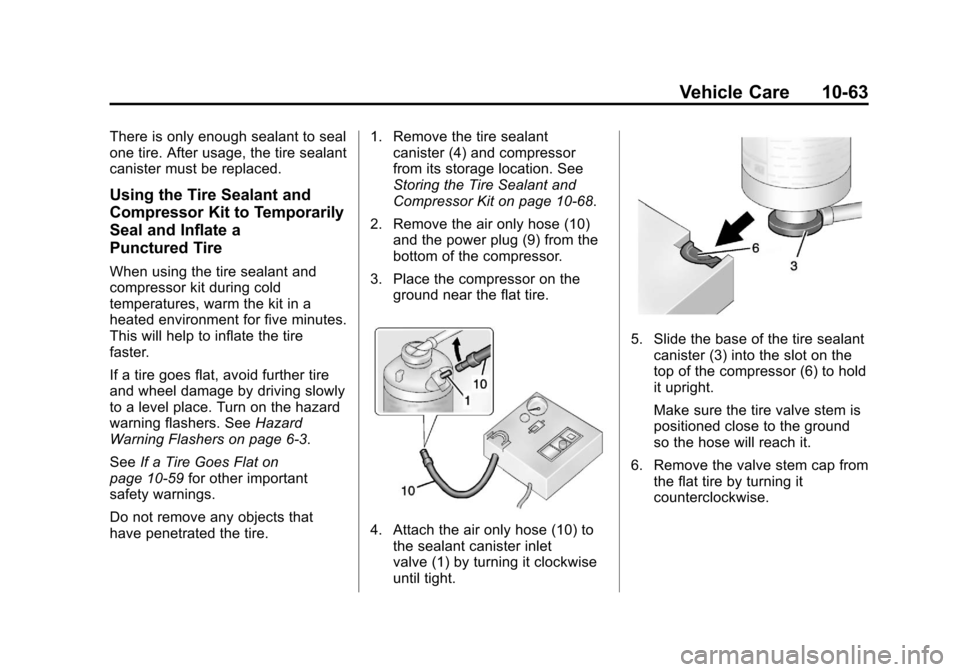
2. Remove the air only hose (10) and the power plug (9) from the
bottom of the compressor.
3. Place the compressor on the ground near the flat tire.
4. Attach the air only hose (10) tothe sealant canister inlet
valve (1) by turning it clockwise
until tight.
5. Slide the base of the tire sealant
canister (3) into the slot on the
top of the compressor (6) to hold
it upright.
Make sure the tire valve stem is
positioned close to the ground
so the hose will reach it.
6. Remove the valve stem cap from the flat tire by turning it
counterclockwise.
Page 298 of 382
Black plate (64,1)Chevrolet Sonic Owner Manual - 2013 - 2nd PrintReady - 10/11/12
10-64 Vehicle Care
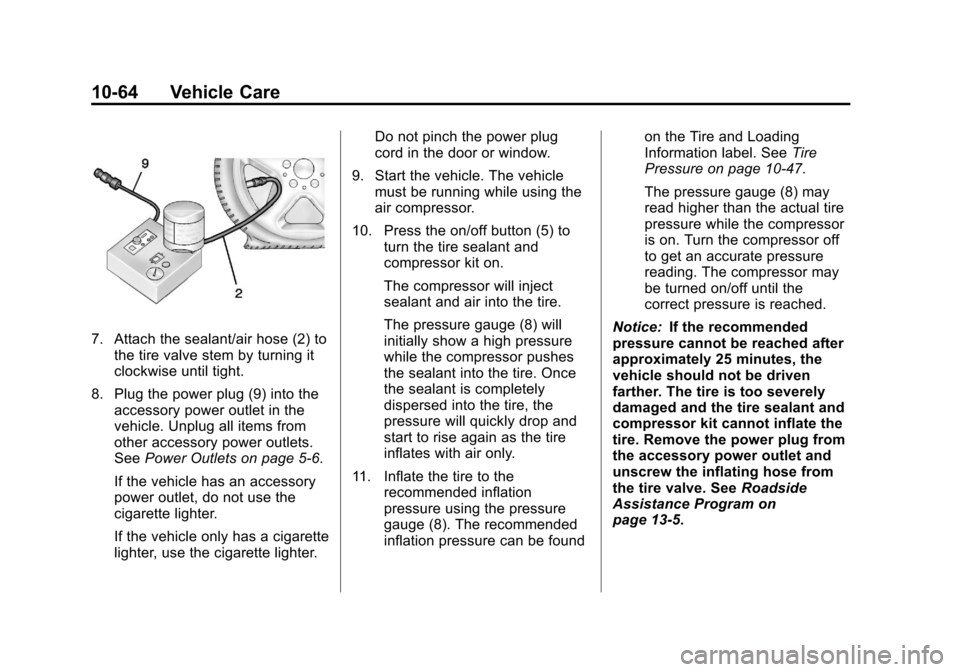
7. Attach the sealant/air hose (2) tothe tire valve stem by turning it
clockwise until tight.
8. Plug the power plug (9) into the accessory power outlet in the
vehicle. Unplug all items from
other accessory power outlets.
See Power Outlets on page 5‑6.
If the vehicle has an accessory
power outlet, do not use the
cigarette lighter.
If the vehicle only has a cigarette
lighter, use the cigarette lighter. Do not pinch the power plug
cord in the door or window.
9. Start the vehicle. The vehicle must be running while using the
air compressor.
10. Press the on/off button (5) to turn the tire sealant and
compressor kit on.
The compressor will inject
sealant and air into the tire.
The pressure gauge (8) will
initially show a high pressure
while the compressor pushes
the sealant into the tire. Once
the sealant is completely
dispersed into the tire, the
pressure will quickly drop and
start to rise again as the tire
inflates with air only.
11. Inflate the tire to the recommended inflation
pressure using the pressure
gauge (8). The recommended
inflation pressure can be found on the Tire and Loading
Information label. See
Tire
Pressure on page 10‑47.
The pressure gauge (8) may
read higher than the actual tire
pressure while the compressor
is on. Turn the compressor off
to get an accurate pressure
reading. The compressor may
be turned on/off until the
correct pressure is reached.
Notice: If the recommended
pressure cannot be reached after
approximately 25 minutes, the
vehicle should not be driven
farther. The tire is too severely
damaged and the tire sealant and
compressor kit cannot inflate the
tire. Remove the power plug from
the accessory power outlet and
unscrew the inflating hose from
the tire valve. See Roadside
Assistance Program on
page 13‑5.
Page 299 of 382

Black plate (65,1)Chevrolet Sonic Owner Manual - 2013 - 2nd PrintReady - 10/11/12
Vehicle Care 10-65
12. Press the on/off button (5) toturn the tire sealant and
compressor kit off.
The tire is not sealed and will
continue to leak air until the
vehicle is driven and the
sealant is distributed in the tire.
Therefore, Steps 13–21 must
be done immediately after
Step 12.
Be careful while handling the
tire sealant and compressor kit
as it could be warm after
usage.
13. Unplug the power plug (9) from the accessory power outlet in
the vehicle.
14. Turn the sealant/air hose (2) counterclockwise to remove it
from the tire valve stem.
15. Replace the tire valve stem cap.
16. Remove the tire sealant canister (4) from the slot on top
of the compressor (6). 17. Turn the air only hose (10)
counterclockwise to remove it
from the tire sealant canister
inlet valve (1).
18. Turn the sealant/air hose (2) clockwise onto the sealant
canister inlet valve (1) to
prevent sealant leakage.
19. Return the air only hose (10) and power plug (9) back to
their original storage location.
20. If the flat tire was able to inflateto the recommended inflation
pressure, remove the
maximum speed label from the
sealant canister and place it in
a highly visible location.
Do not exceed the speed on
this label until the damaged tire
is repaired or replaced. 21. Return the equipment to its
original storage location in the
vehicle.
22. Immediately drive the vehicle 8 km (5 mi) to distribute the
sealant in the tire.
23. Stop at a safe location and check the tire pressure. Refer
to Steps 1–10 under “Using the
Tire Sealant and Compressor
Kit without Sealant to Inflate a
Tire (Not Punctured).”
If the tire pressure has fallen
more than 68 kPa (10 psi)
below the recommended
inflation pressure, stop driving
the vehicle. The tire is too
severely damaged and the tire
sealant cannot seal the tire.
See Roadside Assistance
Program on page 13‑5.
If the tire pressure has not
dropped more than 68 kPa
(10 psi) from the recommended
inflation pressure, inflate the
tire to the recommended
inflation pressure.
Page 301 of 382

Black plate (67,1)Chevrolet Sonic Owner Manual - 2013 - 2nd PrintReady - 10/11/12
Vehicle Care 10-67
1. Remove the compressor from itsstorage location. See Storing the
Tire Sealant and Compressor Kit
on page 10‑68.
2. Remove the air only hose (10) and the power plug (9) from the
bottom of the compressor.
3. Place the compressor on the ground near the flat tire.
Make sure the tire valve stem is
positioned close to the ground
so the hose will reach it.
4. Remove the valve stem cap from the flat tire by turning it
counterclockwise.
5. Attach the air only hose (10) to the tire valve stem by turning it
clockwise until tight.
6. Plug the power plug (9) into the accessory power outlet in the
vehicle. Unplug all items from
other accessory power outlets.
See Power Outlets on page 5‑6.
If the vehicle has an accessory
power outlet, do not use the
cigarette lighter. If the vehicle only has a cigarette
lighter, use the cigarette lighter.
Do not pinch the power plug
cord in the door or window.
7. Start the vehicle. The vehicle must be running while using the
air compressor.
8. Press the on/off button (5) to turn the tire sealant and
compressor kit on.
The compressor will inflate the
tire with air only.
9. Inflate the tire to the recommended inflation pressure
using the pressure gauge (8).
The recommended inflation
pressure can be found on the
Tire and Loading Information
label. See Tire Pressure on
page 10‑47.
The pressure gauge (8) may
read higher than the actual tire
pressure while the compressor is
on. Turn the compressor off to
get an accurate pressure reading. The compressor may
be turned on/off until the correct
pressure is reached.
Notice: If the recommended
pressure cannot be reached after
approximately 25 minutes, the
vehicle should not be driven
farther. The tire is too severely
damaged and the tire sealant and
compressor kit cannot inflate the
tire. Remove the power plug from
the accessory power outlet and
unscrew the inflating hose from
the tire valve. See Roadside
Assistance Program on
page 13‑5.
10. Press the on/off button (5) to turn the tire sealant and
compressor kit off.
Be careful while handling the
compressor as it could be
warm after usage.
11. Unplug the power plug (9) from the accessory power outlet in
the vehicle.