2013 CHEVROLET SONIC instrument cluster
[x] Cancel search: instrument clusterPage 118 of 382

Black plate (24,1)Chevrolet Sonic Owner Manual - 2013 - 2nd PrintReady - 10/11/12
5-24 Instruments and Controls
To reset the average fuel economy,
press and hold the SET/CLR button
while the average fuel economy is
displayed.
Fuel Range
Metric Shown, English Similar
This displays the approximate
distance the vehicle can be driven
without refueling. The fuel range
estimate is based on an average of
the vehicle's fuel economy over
recent driving history and the
amount of fuel remaining in the
fuel tank. Units
This menu is not available while the
vehicle is moving. Press SET/CLR
while the unit display is active and
move
w xto change units when
UNIT SET is displayed. Press SET/
CLR to confirm the setting. You will
have to select 1, 2, or 3 for the unit
display. 1 is Imperial units, 2 is US
units, and 3 is metric units. This will
change the displays on the cluster
and DIC to the type of
measurements you select.
Language
This menu is not available while the
vehicle is moving. Press SET/CLR
while the language display is active
and move
w xto change the
language of the displays when
LANG SET is displayed. You will
have to select 1 or 2 for the
language display. 1 is Alphabet and
2 is Arabic Numeral. Press SET/
CLR to confirm the setting. Tire Learn
This menu is not available while the
vehicle is moving. This display
allows for matching of the TPMS
sensors. See
Tire Pressure Monitor
System on page 10‑48 andTire
Pressure Monitor Operation on
page 10‑49.
Remaining Oil Life
This menu is not available while the
vehicle is moving. This display
shows an estimate of the oil's
remaining useful life. If 99
:% is
displayed, that means 99% of the
current oil life remains.
When the remaining oil life is low,
the Code 82 message will appear
on the display. The oil should be
changed as soon as possible. See
Engine Oil on page 10‑9. In addition
to the engine oil life system
monitoring the oil life, additional
maintenance is recommended in the
Maintenance Schedule. See
Maintenance Schedule on
page 11‑2.
Page 128 of 382

Black plate (2,1)Chevrolet Sonic Owner Manual - 2013 - 2nd PrintReady - 10/11/12
6-2 Lighting
#(Front Fog Lamps):For
vehicles with fog lamps, press to
turn the lamps on or off.
See Fog Lamps on page 6‑4.
When the lights are on,
;will be
lit. See Lamps On Reminder on
page 5‑21.
Headlamp High/
Low-Beam Changer
3(Headlamp High/Low-Beam
Changer): Push the turn signal
lever away from you to turn the high
beams on.
Push the lever again or pull the
lever toward you to return to low
beams.
This indicator light turns on in the
instrument cluster when the
high-beam headlamps are on.
Flash-to-Pass
To flash the high beams, pull the
turn signal lever all the way toward
you. Then release it.
Daytime Running
Lamps (DRL)
Daytime Running Lamps (DRL) can
make it easier for others to see the
front of your vehicle during the day.
Fully functional daytime running
lamps are required on all vehicles
first sold in Canada.
This indicator light turns on in the
instrument cluster when the DRL
are on.
A light sensor on top of the
instrument panel makes the DRL
work, so be sure it is not covered.
The DRL system makes the
low-beam headlamps come on at a
reduced brightness when the
following conditions are met:
.The ignition is in the ON/
RUN mode.
.The exterior lamp control is
in AUTO.
.The engine is running.
When the DRL are on, only the
low-beam headlamps, at a reduced
level of brightness, will be on. The
Page 130 of 382

Black plate (4,1)Chevrolet Sonic Owner Manual - 2013 - 2nd PrintReady - 10/11/12
6-4 Lighting
Turn and Lane-Change
Signals
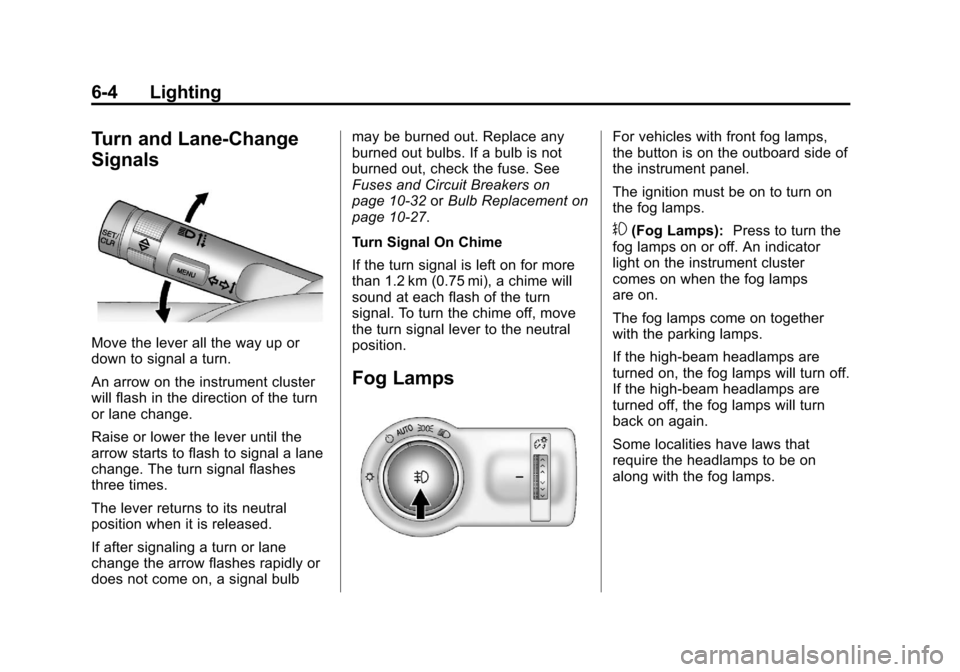
Move the lever all the way up or
down to signal a turn.
An arrow on the instrument cluster
will flash in the direction of the turn
or lane change.
Raise or lower the lever until the
arrow starts to flash to signal a lane
change. The turn signal flashes
three times.
The lever returns to its neutral
position when it is released.
If after signaling a turn or lane
change the arrow flashes rapidly or
does not come on, a signal bulbmay be burned out. Replace any
burned out bulbs. If a bulb is not
burned out, check the fuse. See
Fuses and Circuit Breakers on
page 10‑32
orBulb Replacement on
page 10‑27.
Turn Signal On Chime
If the turn signal is left on for more
than 1.2 km (0.75 mi), a chime will
sound at each flash of the turn
signal. To turn the chime off, move
the turn signal lever to the neutral
position.
Fog Lamps
For vehicles with front fog lamps,
the button is on the outboard side of
the instrument panel.
The ignition must be on to turn on
the fog lamps.
#(Fog Lamps): Press to turn the
fog lamps on or off. An indicator
light on the instrument cluster
comes on when the fog lamps
are on.
The fog lamps come on together
with the parking lamps.
If the high-beam headlamps are
turned on, the fog lamps will turn off.
If the high-beam headlamps are
turned off, the fog lamps will turn
back on again.
Some localities have laws that
require the headlamps to be on
along with the fog lamps.
Page 211 of 382

Black plate (15,1)Chevrolet Sonic Owner Manual - 2013 - 2nd PrintReady - 10/11/12
Driving and Operating 9-15
2 (ACC/ACCESSORY):This is the
position in which things like the
radio and the windshield wipers can
be operated when the engine is off.
3 (ON/RUN): This position can be
used to operate the electrical
accessories and to display some
instrument cluster warning and
indicator lights. This position can
also be used for service and
diagnostics, and to verify the proper
operation of the malfunction
indicator lamp as may be required
for emission inspection purposes.
The switch stays in this position
when the engine is running.
If you leave the key in the ACC/
ACCESSORY or ON/RUN position
with the engine off, the battery could
be drained. You may not be able to
start the vehicle if the battery is
allowed to drain for an extended
period of time. 4 (START):
This is the position that
starts the engine. When the engine
starts, release the key. The ignition
switch returns to ON/RUN for
driving.
A warning tone will sound when the
driver door is opened, the ignition is
in ACC/ACCESSORY or LOCK/
OFF, and the key is in the ignition.
If the ignition becomes difficult to
turn, see Keys on page 2‑1.
Key Lock Release
Vehicles with an automatic
transmission are equipped with an
electronic key lock release system.
This system is to prevent ignition
key removal unless the shift lever is
in P (Park).
The key lock release will not work if
the battery is charged less than
9 volts, or uncharged. Try charging
or jump starting the battery. See
Jump Starting on page 10‑74.
If charging or jump starting the
battery does not work, there is a
manual key lock release. Locate the
hole below the ignition lock. Insert a
tool or key into the opening. Locate
the lever, and press it toward the
steering wheel while removing the
key from the ignition.
Page 219 of 382

Black plate (23,1)Chevrolet Sonic Owner Manual - 2013 - 2nd PrintReady - 10/11/12
Driving and Operating 9-23
D (Drive):This position is for
normal driving. It provides the best
fuel economy. If you need more
power for passing, and you are:
.Going less than 56 km/h
(35 mph), push the accelerator
pedal about halfway down.
.Going about 56 km/h (35 mph) or
more, push the accelerator all
the way down.
M (Manual Mode): This position,
allows you to change gears similar
to a manual transmission. If the
vehicle has this feature, see
“Manual Mode” following.
Manual Mode
To use this feature:
1. Move the shift lever from
D (Drive) rearward to
M (Manual Mode).
While driving in manual mode,
the transmission will remain in
the driver selected gear. When
coming to a stop in the manual position, the vehicle will
automatically shift into
1 (First) gear.
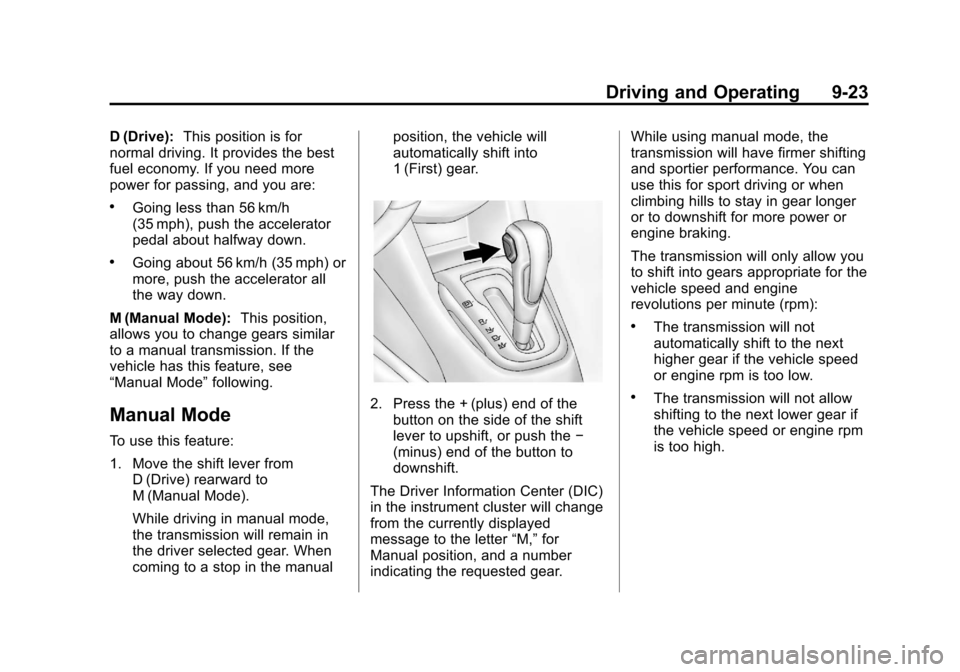
2. Press the + (plus) end of the
button on the side of the shift
lever to upshift, or push the −
(minus) end of the button to
downshift.
The Driver Information Center (DIC)
in the instrument cluster will change
from the currently displayed
message to the letter “M,”for
Manual position, and a number
indicating the requested gear. While using manual mode, the
transmission will have firmer shifting
and sportier performance. You can
use this for sport driving or when
climbing hills to stay in gear longer
or to downshift for more power or
engine braking.
The transmission will only allow you
to shift into gears appropriate for the
vehicle speed and engine
revolutions per minute (rpm):
.The transmission will not
automatically shift to the next
higher gear if the vehicle speed
or engine rpm is too low.
.The transmission will not allow
shifting to the next lower gear if
the vehicle speed or engine rpm
is too high.
Page 243 of 382

Black plate (9,1)Chevrolet Sonic Owner Manual - 2013 - 2nd PrintReady - 10/11/12
Vehicle Care 10-9
1.Engine Air Cleaner/Filter on
page 10‑13.
2. Engine Oil Dipstick. See Engine
Oil on page 10‑9.
3. Engine Cooling Fan (Out of View). See Cooling System on
page 10‑15.
4. Engine Oil Fill Cap. See Engine
Oil on page 10‑9.
5. Engine Coolant Surge Tank and Pressure Cap. See Cooling
System on page 10‑15.
6. Brake/Clutch Fluid Reservoir. See Brakes on page 10‑21 and
Hydraulic Clutch on page 10‑13.
7. Battery on page 10‑23.
8. Engine Compartment Fuse
Block on page 10‑33.
9. Windshield Washer Fluid Reservoir. See Washer Fluid on
page 10‑20.Engine Oil
To ensure proper engine
performance and long life, careful
attention must be paid to engine oil.
Following these simple, but
important steps will help protect
your investment:
.Always use engine oil approved
to the proper specification and of
the proper viscosity grade. See
“Selecting the Right Engine Oil”
in this section.
.Check the engine oil level
regularly and maintain the
proper oil level. See “Checking
Engine Oil” and“When to Add
Engine Oil” in this section.
.Change the engine oil at the
appropriate time. See Engine Oil
Life System on page 10‑11.
.Always dispose of engine oil
properly. See “What to Do with
Used Oil” in this section.
If the engine oil pressure light
comes on, check the engine oil level
right away. The oil pressure light is
on the instrument cluster. See
Engine Oil Pressure Light on
page 5‑19. Check the engine oil
level regularly; this is an added
reminder.
Checking Engine Oil
It is a good idea to check the engine
oil level at each fuel fill. In order to
get an accurate reading, the oil
must be warm and the vehicle must
be on level ground. The engine oil
dipstick handle is a loop. See
Engine Compartment Overview on
page 10‑6 for the location of the
engine oil dipstick.
1. If the engine has been running recently, turn off the engine and
allow several minutes for the oil
Page 272 of 382

Black plate (38,1)Chevrolet Sonic Owner Manual - 2013 - 2nd PrintReady - 10/11/12
10-38 Vehicle Care
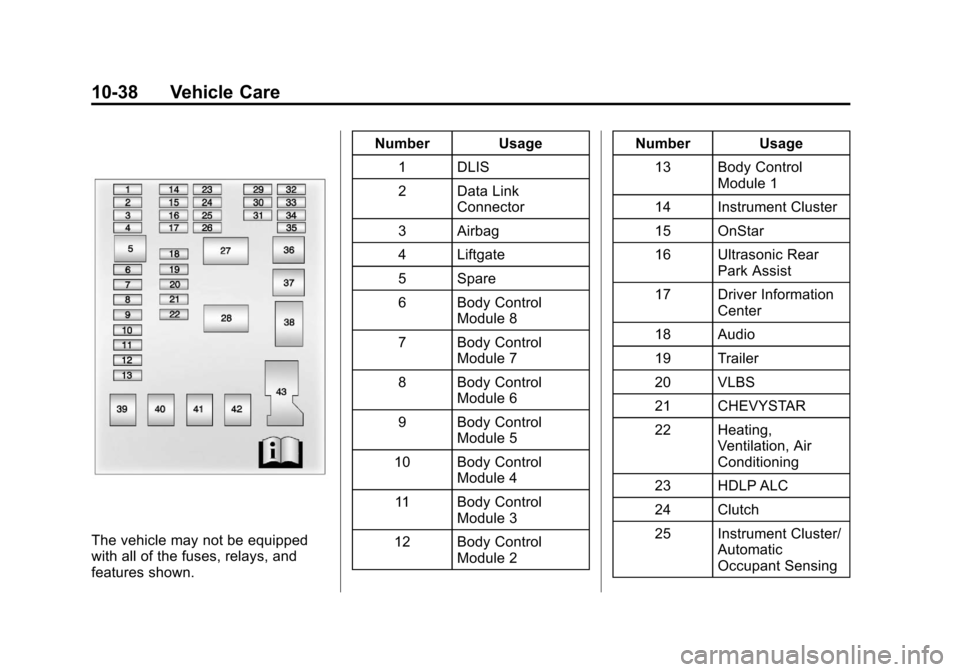
The vehicle may not be equipped
with all of the fuses, relays, and
features shown.Number Usage
1 DLIS
2 Data Link Connector
3 Airbag
4 Liftgate
5 Spare
6 Body Control Module 8
7 Body Control Module 7
8 Body Control Module 6
9 Body Control Module 5
10 Body Control Module 4
11 Body Control Module 3
12 Body Control Module 2 Number Usage
13 Body Control Module 1
14 Instrument Cluster
15 OnStar
16 Ultrasonic Rear Park Assist
17 Driver Information Center
18 Audio
19 Trailer
20 VLBS
21 CHEVYSTAR
22 Heating, Ventilation, Air
Conditioning
23 HDLP ALC
24 Clutch
25 Instrument Cluster/ Automatic
Occupant Sensing
Page 283 of 382

Black plate (49,1)Chevrolet Sonic Owner Manual - 2013 - 2nd PrintReady - 10/11/12
Vehicle Care 10-49
The TPMS malfunction indicator is
combined with the low tire pressure
telltale. When the system detects a
malfunction, the telltale will flash for
approximately one minute and then
remain continuously illuminated.
This sequence will continue upon
subsequent vehicle start-ups as
long as the malfunction exists.
When the malfunction indicator is
illuminated, the system may not be
able to detect or signal low tire
pressure as intended. TPMS
malfunctions may occur for a variety
of reasons, including the installation
of replacement or alternate tires or
wheels on the vehicle that prevent
the TPMS from functioning properly.
Always check the TPMS malfunction
telltale after replacing one or more
tires or wheels on your vehicle to
ensure that the replacement or
alternate tires and wheels allow the
TPMS to continue to function
properly.
SeeTire Pressure Monitor
Operation on page 10‑49.Federal Communications
Commission (FCC) Rules and
with Industry Canada
Standards
See Radio Frequency Statement on
page 13‑15 for information
regarding Part 15 of the Federal
Communications Commission (FCC)
Rules and with Industry Canada
Standards RSS-GEN/210/220/310.
Tire Pressure Monitor
Operation
This vehicle may have a Tire
Pressure Monitor System (TPMS).
The TPMS is designed to warn the
driver when a low tire pressure
condition exists. TPMS sensors are
mounted onto each tire and wheel
assembly, excluding the spare tire
and wheel assembly. The TPMS
sensors monitor the air pressure in
the tires and transmit the tire
pressure readings to a receiver
located in the vehicle.
When a low tire pressure condition
is detected, the TPMS illuminates
the low tire pressure warning light
located on the instrument cluster.
If the warning light comes on, stop
as soon as possible and inflate the
tires to the recommended pressure
shown on the Tire and Loading
Information label. See Vehicle Load
Limits on page 9‑9.
The low tire pressure warning light
comes on at each ignition cycle until
the tires are inflated to the correct
inflation pressure.
The low tire pressure warning light
may come on in cool weather when
the vehicle is first started, and then
turn off as the vehicle is driven. This
could be an early indicator that the
air pressure is getting low and must
be inflated to the proper pressure.