2013 CHEVROLET SONIC bulb
[x] Cancel search: bulbPage 2 of 382

Black plate (2,1)Chevrolet Sonic Owner Manual - 2013 - 2nd PrintReady - 10/11/12
2013 Chevrolet Sonic Owner ManualM
Vehicle Care. . . . . . . . . . . . . . . . . 10-1
General Information . . . . . . . . . . 10-2
Vehicle Checks . . . . . . . . . . . . . . . 10-3
Headlamp Aiming . . . . . . . . . . . 10-27
Bulb Replacement . . . . . . . . . . 10-27
Electrical System . . . . . . . . . . . . 10-32
Wheels and Tires . . . . . . . . . . . 10-39
Jump Starting . . . . . . . . . . . . . . . 10-74
Towing . . . . . . . . . . . . . . . . . . . . . . 10-77
Appearance Care . . . . . . . . . . . 10-80
Service and Maintenance . . . 11-1
General Information . . . . . . . . . . 11-1
Maintenance Schedule . . . . . . . 11-2
Special Application
Services . . . . . . . . . . . . . . . . . . . . 11-8
Additional Maintenance
and Care . . . . . . . . . . . . . . . . . . . . 11-9
Recommended Fluids . . . . . . . 11-12
Maintenance Records . . . . . . . 11-15 Technical Data
. . . . . . . . . . . . . . . 12-1
Vehicle Identification . . . . . . . . . 12-1
Vehicle Data . . . . . . . . . . . . . . . . . . 12-2
Customer Information . . . . . . . 13-1
Customer Information . . . . . . . . 13-1
Reporting Safety Defects . . . . 13-12
Vehicle Data Recording and
Privacy . . . . . . . . . . . . . . . . . . . . 13-13
OnStar . . . . . . . . . . . . . . . . . . . . . . . 14-1
OnStar Overview . . . . . . . . . . . . . 14-1
OnStar Services . . . . . . . . . . . . . . 14-2
OnStar Additional Information . . . . . . . . . . . . . . . . . . 14-5
Index . . . . . . . . . . . . . . . . . . . . . i-1
Page 113 of 382

Black plate (19,1)Chevrolet Sonic Owner Manual - 2013 - 2nd PrintReady - 10/11/12
Instruments and Controls 5-19
Engine Oil Pressure Light
The oil pressure light should come
on briefly as the engine is started.
If it does not come on, have the
vehicle serviced by your dealer.
Notice:Lack of proper engine oil
maintenance can damage the
engine. Driving with the engine
oil low can also damage the
engine. The repairs would not be
covered by the vehicle warranty.
Check the oil level as soon as
possible. Add oil if required, but
if the oil level is within the
operating range and the oil
pressure is still low, have the
vehicle serviced. Always follow
the maintenance schedule for
changing engine oil. If the vehicle has low engine oil
pressure, this light will stay on after
the engine is started, or come on
while driving.
This indicates that the engine is not
receiving enough oil. The engine
could be low on oil, or could have
some other oil problem. Have it
fixed immediately by your dealer.
The oil pressure light could also
come on in other situations:
.When the ignition is on but the
engine is not running, the light
will come on as a test to show it
is working. The light will go out
when the ignition is turned on.
If it does not come on with the
ignition on, there may be a
problem with the fuse or bulb.
Have it fixed right away.
.If the vehicle comes to a hard
stop, the light may come on for a
moment. This is normal.
Low Fuel Warning Light
This light comes on for a few
seconds when the ignition is turned
on as a check to indicate it is
working. If it does not come on,
have it fixed.
This light comes on when the
vehicle is low on fuel.
The low fuel warning light comes on
when there are approximately 6.0 L
(1.7 gal) of fuel remaining in
the tank.
To turn the light off, add fuel to the
fuel tank. See
Filling the Tank on
page 9‑36.
Page 130 of 382
Black plate (4,1)Chevrolet Sonic Owner Manual - 2013 - 2nd PrintReady - 10/11/12
6-4 Lighting
Turn and Lane-Change
Signals
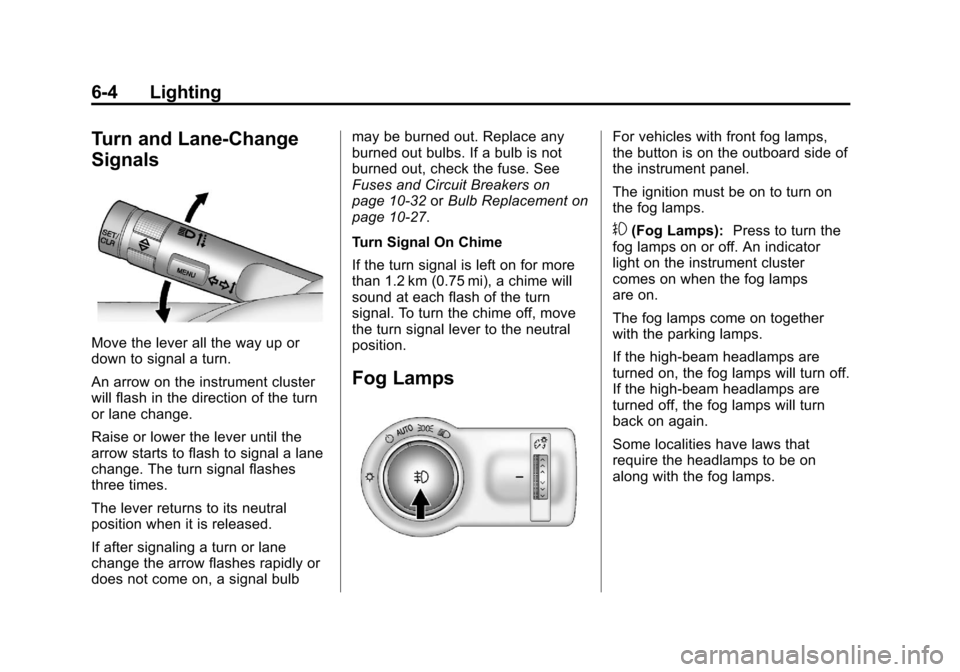
Move the lever all the way up or
down to signal a turn.
An arrow on the instrument cluster
will flash in the direction of the turn
or lane change.
Raise or lower the lever until the
arrow starts to flash to signal a lane
change. The turn signal flashes
three times.
The lever returns to its neutral
position when it is released.
If after signaling a turn or lane
change the arrow flashes rapidly or
does not come on, a signal bulbmay be burned out. Replace any
burned out bulbs. If a bulb is not
burned out, check the fuse. See
Fuses and Circuit Breakers on
page 10‑32
orBulb Replacement on
page 10‑27.
Turn Signal On Chime
If the turn signal is left on for more
than 1.2 km (0.75 mi), a chime will
sound at each flash of the turn
signal. To turn the chime off, move
the turn signal lever to the neutral
position.
Fog Lamps
For vehicles with front fog lamps,
the button is on the outboard side of
the instrument panel.
The ignition must be on to turn on
the fog lamps.
#(Fog Lamps): Press to turn the
fog lamps on or off. An indicator
light on the instrument cluster
comes on when the fog lamps
are on.
The fog lamps come on together
with the parking lamps.
If the high-beam headlamps are
turned on, the fog lamps will turn off.
If the high-beam headlamps are
turned off, the fog lamps will turn
back on again.
Some localities have laws that
require the headlamps to be on
along with the fog lamps.
Page 235 of 382
Black plate (1,1)Chevrolet Sonic Owner Manual - 2013 - 2nd PrintReady - 10/11/12
Vehicle Care 10-1
Vehicle Care
General Information
General Information . . . . . . . . . . 10-2
California Proposition65 Warning . . . . . . . . . . . . . . . . . 10-2
California Perchlorate Materials Requirements . . . . 10-3
Accessories and Modifications . . . . . . . . . . . . . . . 10-3
Vehicle Checks
Doing Your OwnService Work . . . . . . . . . . . . . . . 10-3
Hood . . . . . . . . . . . . . . . . . . . . . . . . 10-4
Engine Compartment Overview . . . . . . . . . . . . . . . . . . . 10-6
Engine Oil . . . . . . . . . . . . . . . . . . . 10-9
Engine Oil Life System . . . . . 10-11
Automatic Transmission Fluid . . . . . . . . . . . . . . . . . . . . . . 10-13
Manual Transmission Fluid . . . . . . . . . . . . . . . . . . . . . . 10-13
Hydraulic Clutch . . . . . . . . . . . . 10-13
Engine Air Cleaner/Filter . . . . 10-13
Cooling System . . . . . . . . . . . . 10-15
Engine Coolant . . . . . . . . . . . . . 10-16
Engine Overheating . . . . . . . . 10-19 Washer Fluid . . . . . . . . . . . . . . . 10-20
Brakes . . . . . . . . . . . . . . . . . . . . . 10-21
Brake Fluid . . . . . . . . . . . . . . . . . 10-22
Battery . . . . . . . . . . . . . . . . . . . . . 10-23
Starter Switch Check . . . . . . . 10-24
Automatic Transmission Shift
Lock Control Function
Check . . . . . . . . . . . . . . . . . . . . . 10-25
Ignition Transmission Lock Check . . . . . . . . . . . . . . . . . . . . . 10-25
Park Brake and P (Park) Mechanism Check . . . . . . . . 10-25
Wiper Blade Replacement . . . . . . . . . . . . . . 10-26
Headlamp Aiming
Headlamp Aiming . . . . . . . . . . 10-27
Bulb Replacement
Bulb Replacement . . . . . . . . . . 10-27
Halogen Bulbs . . . . . . . . . . . . . . 10-27
Headlamps, Front TurnSignal and Parking
Lamps . . . . . . . . . . . . . . . . . . . . 10-28
Fog Lamps (LS, LT, and LTZ) . . . . . . . . . . . . . . . . . . 10-29
Fog Lamps (RS) . . . . . . . . . . . . 10-29 Taillamps, Turn Signal,
Stoplamps, and Back-Up
Lamps . . . . . . . . . . . . . . . . . . . . 10-30
License Plate Lamp . . . . . . . . 10-31
Replacement Bulbs . . . . . . . . . 10-31
Electrical System
Electrical System Overload . . . . . . . . . . . . . . . . . . 10-32
Fuses and Circuit Breakers . . . . . . . . . . . . . . . . . . 10-32
Engine Compartment Fuse Block . . . . . . . . . . . . . . . . . . . . . 10-33
Instrument Panel Fuse Block . . . . . . . . . . . . . . . . . . . . . 10-37
Wheels and Tires
Tires . . . . . . . . . . . . . . . . . . . . . . . . 10-39
All-Season Tires . . . . . . . . . . . . 10-40
Winter Tires . . . . . . . . . . . . . . . . 10-41
Summer Tires . . . . . . . . . . . . . . 10-41
Tire Sidewall Labeling . . . . . . 10-41
Tire Designations . . . . . . . . . . . 10-43
Tire Terminology andDefinitions . . . . . . . . . . . . . . . . 10-44
Tire Pressure . . . . . . . . . . . . . . . 10-47
Tire Pressure Monitor System . . . . . . . . . . . . . . . . . . . 10-48
Page 261 of 382
Black plate (27,1)Chevrolet Sonic Owner Manual - 2013 - 2nd PrintReady - 10/11/12
Vehicle Care 10-27
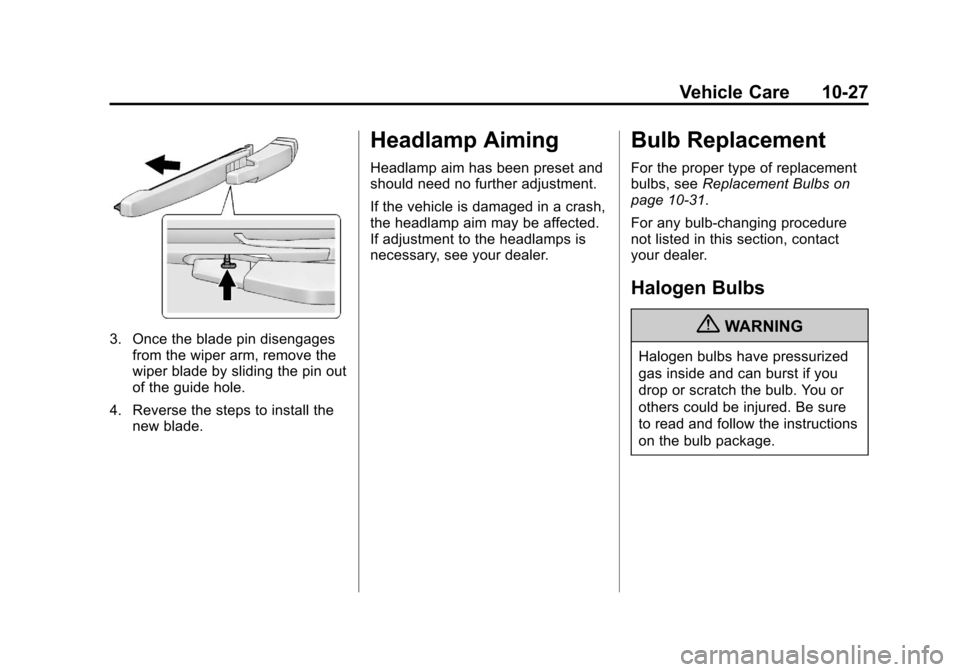
3. Once the blade pin disengagesfrom the wiper arm, remove the
wiper blade by sliding the pin out
of the guide hole.
4. Reverse the steps to install the new blade.
Headlamp Aiming
Headlamp aim has been preset and
should need no further adjustment.
If the vehicle is damaged in a crash,
the headlamp aim may be affected.
If adjustment to the headlamps is
necessary, see your dealer.
Bulb Replacement
For the proper type of replacement
bulbs, see Replacement Bulbs on
page 10‑31.
For any bulb‐changing procedure
not listed in this section, contact
your dealer.
Halogen Bulbs
{WARNING
Halogen bulbs have pressurized
gas inside and can burst if you
drop or scratch the bulb. You or
others could be injured. Be sure
to read and follow the instructions
on the bulb package.
Page 262 of 382
Black plate (28,1)Chevrolet Sonic Owner Manual - 2013 - 2nd PrintReady - 10/11/12
10-28 Vehicle Care
Headlamps, Front Turn
Signal and Parking
Lamps
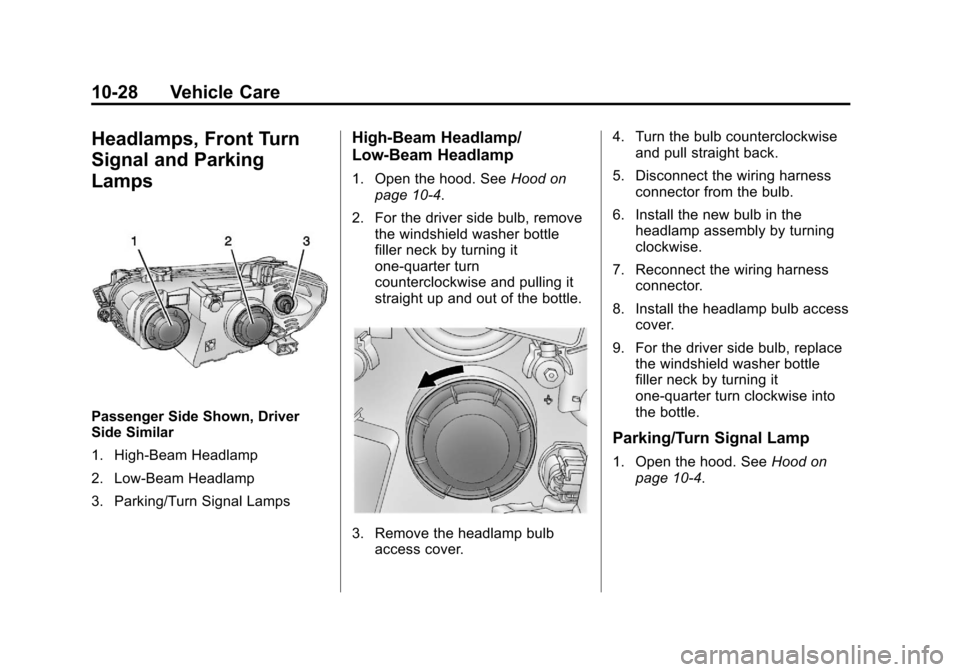
Passenger Side Shown, Driver
Side Similar
1. High-Beam Headlamp
2. Low-Beam Headlamp
3. Parking/Turn Signal Lamps
High-Beam Headlamp/
Low-Beam Headlamp
1. Open the hood. SeeHood on
page 10‑4.
2. For the driver side bulb, remove the windshield washer bottle
filler neck by turning it
one-quarter turn
counterclockwise and pulling it
straight up and out of the bottle.
3. Remove the headlamp bulbaccess cover. 4. Turn the bulb counterclockwise
and pull straight back.
5. Disconnect the wiring harness connector from the bulb.
6. Install the new bulb in the headlamp assembly by turning
clockwise.
7. Reconnect the wiring harness connector.
8. Install the headlamp bulb access cover.
9. For the driver side bulb, replace the windshield washer bottle
filler neck by turning it
one-quarter turn clockwise into
the bottle.
Parking/Turn Signal Lamp
1. Open the hood. See Hood on
page 10‑4.
Page 263 of 382
Black plate (29,1)Chevrolet Sonic Owner Manual - 2013 - 2nd PrintReady - 10/11/12
Vehicle Care 10-29
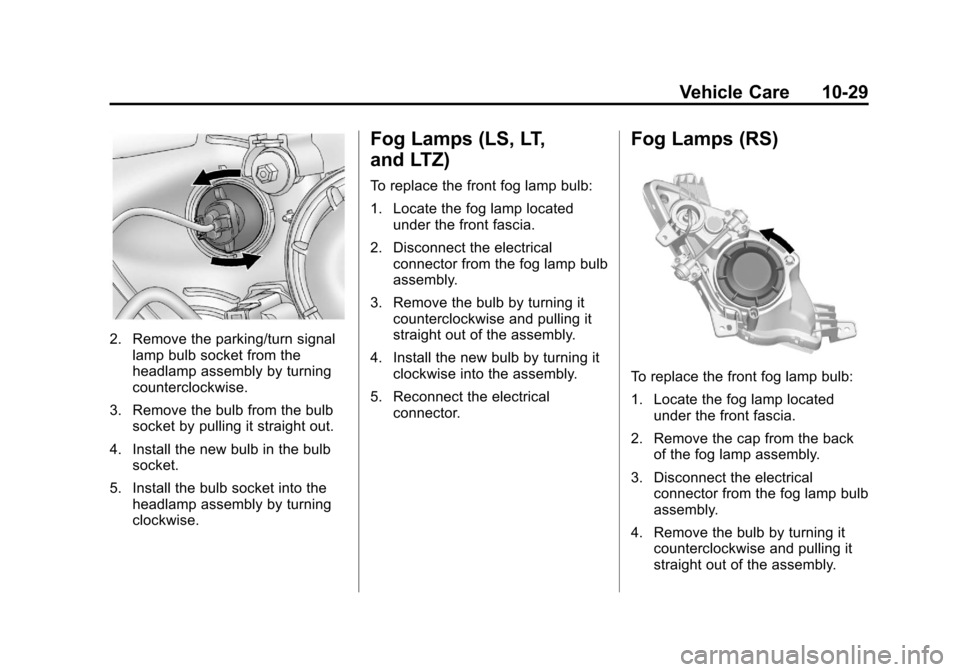
2. Remove the parking/turn signallamp bulb socket from the
headlamp assembly by turning
counterclockwise.
3. Remove the bulb from the bulb socket by pulling it straight out.
4. Install the new bulb in the bulb socket.
5. Install the bulb socket into the headlamp assembly by turning
clockwise.
Fog Lamps (LS, LT,
and LTZ)
To replace the front fog lamp bulb:
1. Locate the fog lamp locatedunder the front fascia.
2. Disconnect the electrical connector from the fog lamp bulb
assembly.
3. Remove the bulb by turning it counterclockwise and pulling it
straight out of the assembly.
4. Install the new bulb by turning it clockwise into the assembly.
5. Reconnect the electrical connector.
Fog Lamps (RS)
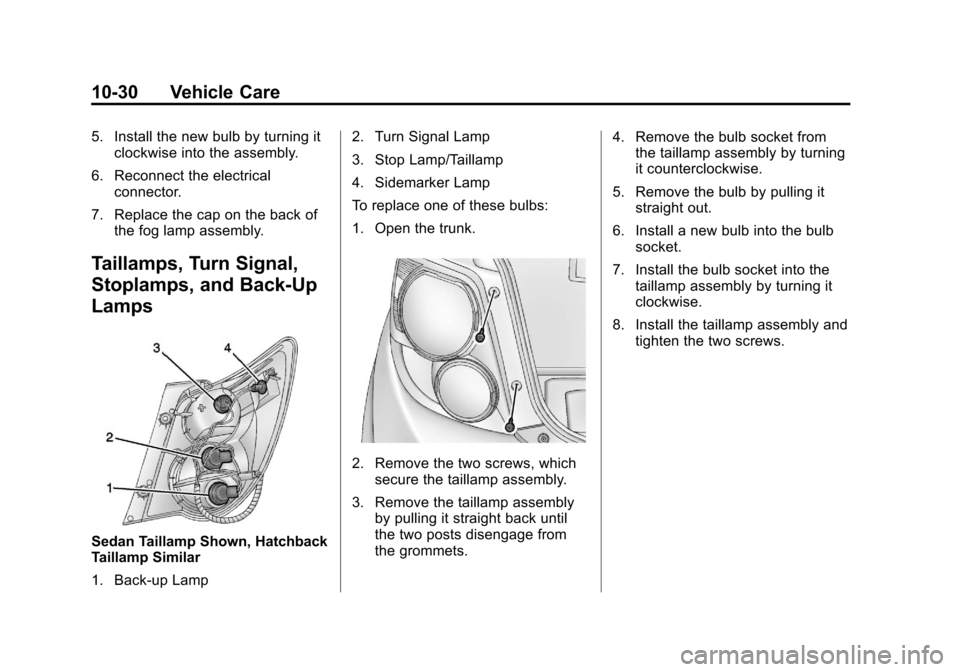
To replace the front fog lamp bulb:
1. Locate the fog lamp locatedunder the front fascia.
2. Remove the cap from the back of the fog lamp assembly.
3. Disconnect the electrical connector from the fog lamp bulb
assembly.
4. Remove the bulb by turning it counterclockwise and pulling it
straight out of the assembly.
Page 264 of 382
Black plate (30,1)Chevrolet Sonic Owner Manual - 2013 - 2nd PrintReady - 10/11/12
10-30 Vehicle Care
5. Install the new bulb by turning itclockwise into the assembly.
6. Reconnect the electrical connector.
7. Replace the cap on the back of the fog lamp assembly.
Taillamps, Turn Signal,
Stoplamps, and Back-Up
Lamps
Sedan Taillamp Shown, Hatchback
Taillamp Similar
1. Back-up Lamp 2. Turn Signal Lamp
3. Stop Lamp/Taillamp
4. Sidemarker Lamp
To replace one of these bulbs:
1. Open the trunk.
2. Remove the two screws, which
secure the taillamp assembly.
3. Remove the taillamp assembly by pulling it straight back until
the two posts disengage from
the grommets. 4. Remove the bulb socket from
the taillamp assembly by turning
it counterclockwise.
5. Remove the bulb by pulling it straight out.
6. Install a new bulb into the bulb socket.
7. Install the bulb socket into the taillamp assembly by turning it
clockwise.
8. Install the taillamp assembly and tighten the two screws.