Page 436 of 542

Black plate (60,1)Chevrolet Silverado Owner Manual - 2013 - crc2 - 8/13/12
10-60 Vehicle Care
tires to the recommended pressure
shown on the Tire and Loading
Information label. SeeVehicle Load
Limits on page 9‑15.
A message to check the pressure in
a specific tire displays in the Driver
Information Center (DIC). The low
tire pressure warning light and the
DIC warning message come on at
each ignition cycle until the tires are
inflated to the correct inflation
pressure. If the vehicle has DIC
buttons, tire pressure levels can be
viewed. For additional information
and details about the DIC operation
and displays, see Driver Information
Center (DIC) on page 5‑29 andTire
Messages on page 5‑44.
The low tire pressure warning light
may come on in cool weather when
the vehicle is first started, and then
turn off as the vehicle is driven. This
could be an early indicator that the
air pressure is getting low and
needs to be inflated to the proper
pressure. A Tire and Loading Information label
shows the size of the original
equipment tires and the correct
inflation pressure for the tires when
they are cold. See
Vehicle Load
Limits on page 9‑15, for an example
of the Tire and Loading Information
label and its location. Also see Tire
Pressure on page 10‑56.
The TPMS can warn about a low
tire pressure condition but it does
not replace normal tire
maintenance. See Tire Inspection
on page 10‑62, Tire Rotation on
page 10‑63 andTires on
page 10‑47.
Notice: Tire sealant materials are
not all the same. A non-approved
tire sealant could damage the
TPMS sensors. TPMS sensor
damage caused by using an
incorrect tire sealant is not
covered by the vehicle warranty.
Always use only the
GM-approved tire sealant
available through your dealer or
included in the vehicle.TPMS Malfunction Light and
Message
The TPMS will not function properly
if one or more of the TPMS sensors
are missing or inoperable. When the
system detects a malfunction, the
low tire pressure warning light
flashes for about one minute and
then stays on for the remainder of
the ignition cycle. A DIC warning
message also displays. The
malfunction light and DIC warning
message come on at each ignition
cycle until the problem is corrected.
Some of the conditions that can
cause these to come on are:
.One of the road tires has been
replaced with the spare tire. The
spare tire does not have a
TPMS sensor. The malfunction
light and the DIC message
should go off after the road tire
is replaced and the sensor
matching process is performed
successfully. See "TPMS Sensor
Matching Process" later in this
section.
Page 444 of 542

Black plate (68,1)Chevrolet Silverado Owner Manual - 2013 - crc2 - 8/13/12
10-68 Vehicle Care
The Tire and Loading
Information label indicates the
original equipment tires on the
vehicle. SeeVehicle Load Limits
on page 9‑15 for the label
location and more information
about the Tire and Loading
Information label.
Different Size Tires and
Wheels
If wheels or tires are installed that
are a different size than the original
equipment wheels and tires, vehicle
performance, including its braking,
ride and handling characteristics,
stability, and resistance to rollover
may be affected. If the vehicle has
electronic systems such as antilock
brakes, rollover airbags, traction
control, electronic stability control,
or All-Wheel Drive, the performance
of these systems can also be
affected.
{WARNING
If different sized wheels are used,
there may not be an acceptable
level of performance and safety if
tires not recommended for those
wheels are selected. This
increases the chance of a crash
and serious injury. Only use GM
specific wheel and tire systems
developed for the vehicle, and
have them properly installed by a
GM certified technician.
See Buying New Tires on
page 10‑66 andAccessories and
Modifications on page 10‑3.
Uniform Tire Quality
Grading
Quality grades can be found
where applicable on the tire
sidewall between tread shoulder
and maximum section width. For
example:
Treadwear 200 Traction AA
Temperature A
The following information relates
to the system developed by the
United States National Highway
Traffic Safety Administration
(NHTSA), which grades tires by
treadwear, traction, and
temperature performance. This
applies only to vehicles sold in
the United States. The grades
are molded on the sidewalls of
most passenger car tires. The
Uniform Tire Quality Grading
(UTQG) system does not apply
to deep tread, winter tires,
compact spare tires, tires with
Page 455 of 542

Black plate (79,1)Chevrolet Silverado Owner Manual - 2013 - crc2 - 8/13/12
Vehicle Care 10-79
{WARNING
Getting under a vehicle when it is
lifted on a jack is dangerous.
If the vehicle slips off the jack,
you could be badly injured or
killed. Never get under a vehicle
when it is supported only by
a jack.
{WARNING
Raising the vehicle with the jack
improperly positioned can
damage the vehicle and even
make the vehicle fall. To help
avoid personal injury and vehicle
damage, be sure to fit the jack lift
head into the proper location
before raising the vehicle.
6. Turn the wheel wrench clockwise to raise the vehicle.
Raise the vehicle far enough off the ground so there is enough
room for the spare tire to fit
under the wheel well.
7. Remove all the wheel nuts and
take off the flat tire.
{WARNING
Rust or dirt on a wheel, or on the
parts to which it is fastened, can
make wheel nuts become loose
after time. The wheel could come
off and cause an accident. When
(Continued)
WARNING (Continued)
changing a wheel, remove any
rust or dirt from places where the
wheel attaches to the vehicle. In
an emergency, a cloth or a paper
towel can be used; however, use
a scraper or wire brush later to
remove all rust or dirt.
8. Remove any rust or dirt from thewheel bolts, mounting surfaces,
and spare wheel.
9. Install the spare tire.
Page 459 of 542

Black plate (83,1)Chevrolet Silverado Owner Manual - 2013 - crc2 - 8/13/12
Vehicle Care 10-83
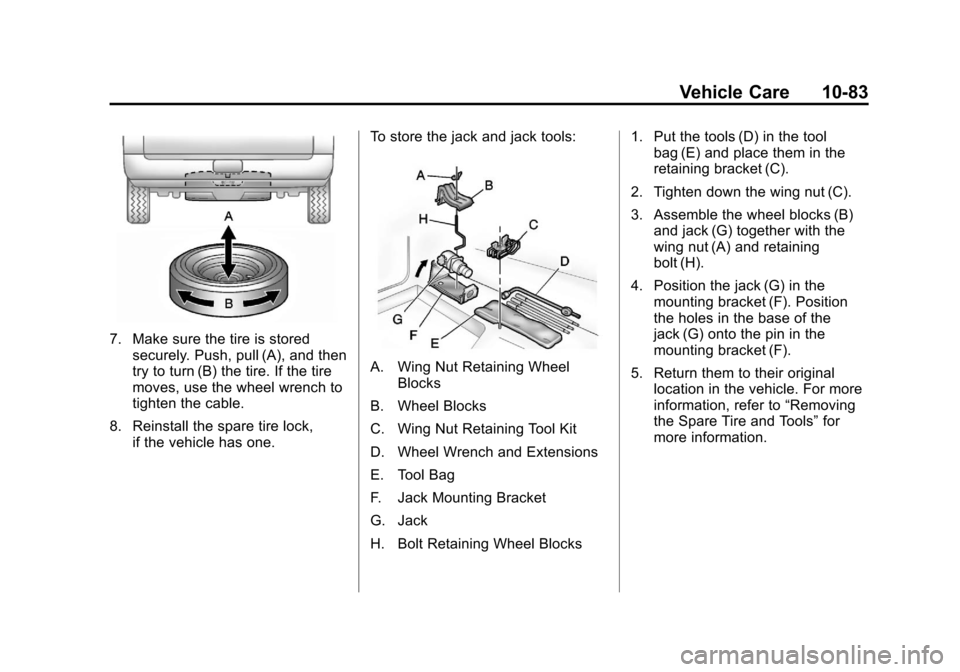
7. Make sure the tire is storedsecurely. Push, pull (A), and then
try to turn (B) the tire. If the tire
moves, use the wheel wrench to
tighten the cable.
8. Reinstall the spare tire lock, if the vehicle has one. To store the jack and jack tools:
A. Wing Nut Retaining Wheel
Blocks
B. Wheel Blocks
C. Wing Nut Retaining Tool Kit
D. Wheel Wrench and Extensions
E. Tool Bag
F. Jack Mounting Bracket
G. Jack
H. Bolt Retaining Wheel Blocks 1. Put the tools (D) in the tool
bag (E) and place them in the
retaining bracket (C).
2. Tighten down the wing nut (C).
3. Assemble the wheel blocks (B) and jack (G) together with the
wing nut (A) and retaining
bolt (H).
4. Position the jack (G) in the mounting bracket (F). Position
the holes in the base of the
jack (G) onto the pin in the
mounting bracket (F).
5. Return them to their original location in the vehicle. For more
information, refer to “Removing
the Spare Tire and Tools” for
more information.