Page 4 of 542

Black plate (4,1)Chevrolet Silverado Owner Manual - 2013 - crc2 - 8/13/12
iv Introduction
Danger, Warnings, and
Cautions
Warning messages found on vehicle
labels and in this manual describe
hazards and what to do to avoid or
reduce them.
Dangerindicates a hazard with a
high level of risk which will result in
serious injury or death.
Warning orCaution indicates a
hazard that could result in injury or
death.
{WARNING
These mean there is something
that could hurt you or other
people.
Notice: This means there is
something that could result in
property or vehicle damage. This
would not be covered by the
vehicle's warranty.
A circle with a slash through it is a
safety symbol which means “Do
Not,” “Do not do this,” or“Do not let
this happen.”
Symbols
The vehicle has components and
labels that use symbols instead of
text. Symbols are shown along with
the text describing the operation or
information relating to a specific
component, control, message,
gauge, or indicator.
M: This symbol is shown when
you need to see your owner manual
for additional instructions or
information.
*: This symbol is shown when
you need to see a service manual
for additional instructions or
information. Vehicle Symbol Chart
Here are some additional symbols
that may be found on the vehicle
and what they mean. For more
information on the symbol, refer to
the Index.
0:
Adjustable Pedals
9:Airbag Readiness Light
#:Air Conditioning
!:Antilock Brake System (ABS)
%:Audio Steering Wheel Controls
or OnStar®
$: Brake System Warning Light
":Charging System
I:Cruise Control
B: Engine Coolant Temperature
O:Exterior Lamps
#:Fog Lamps
.: Fuel Gauge
+:Fuses
3: Headlamp High/Low-Beam
Changer
Page 10 of 542
Black plate (4,1)Chevrolet Silverado Owner Manual - 2013 - crc2 - 8/13/12
1-4 In Brief
W.Climate Control Systems (with
Air Conditioning) on page 8‑1 or
Climate Control Systems (with
Heater Only) on page 8‑4
(If Equipped).
Dual Automatic Climate Control
System on page 8‑5
(If Equipped).
X. Power Take Off (PTO) Control (If Equipped). See Power Take
Off (PTO) in the Duramax diesel
supplement.
Y. Passenger Airbag Off Control (If Equipped). See Airbag
On-Off Switch on page 3‑29.
Page 12 of 542

Black plate (6,1)Chevrolet Silverado Owner Manual - 2013 - crc2 - 8/13/12
1-6 In Brief
A.Air Vents on page 8‑10.
B. Turn and Lane‐Change Lever. See Turn and Lane-Change
Signals on page 6‑5.
Windshield Wiper/Washer on
page 5‑4.
C. Instrument Cluster on
page 5‑11.
D. Hazard Warning Flashers on
page 6‑5 (Out of View).
E. Shift Lever. See Automatic
Transmission on page 9‑33.
Range Selection Mode (If
Equipped). See Manual Mode
on page 9‑37.
F. Tow/Haul Mode on page 9‑38 (If
Equipped).
G. Driver Information Center (DIC) Buttons. See Driver Information
Center (DIC) on page 5‑29. H.
Infotainment on page 7‑1.
I. Exterior Lamp Controls on
page 6‑1.
J. Integrated Trailer Brake Controller (If Equipped). See
Trailer Towing on page 9‑77.
K. Dome Lamps on page 6‑7.
L. Automatic Transfer Case Control (If Equipped). See
Four-Wheel Drive on
page 10‑29.
M. Data Link Connector (DLC) (Out of View). See Malfunction
Indicator Lamp on page 5‑21.
N. Hood Release. See Hood on
page 10‑4.
O. Parking Brake on page 9‑54.
P. Cruise Control on page 9‑59.
Q. Steering Wheel Adjustment on
page 5‑2. R.
Horn on page 5‑4.
S. Steering Wheel Controls on
page 5‑2.
T. Climate Control Systems (with
Air Conditioning) on page 8‑1 or
Climate Control Systems (with
Heater Only) on page 8‑4 (If
Equipped).
Dual Automatic Climate Control
System on page 8‑5 (If
Equipped).
U. Power Outlets on page 5‑9.
Cigarette Lighter (If Equipped).
See Ashtrays on page 5‑10 and
Cigarette Lighter on page 5‑9.
Page 21 of 542

Black plate (15,1)Chevrolet Silverado Owner Manual - 2013 - crc2 - 8/13/12
In Brief 1-15
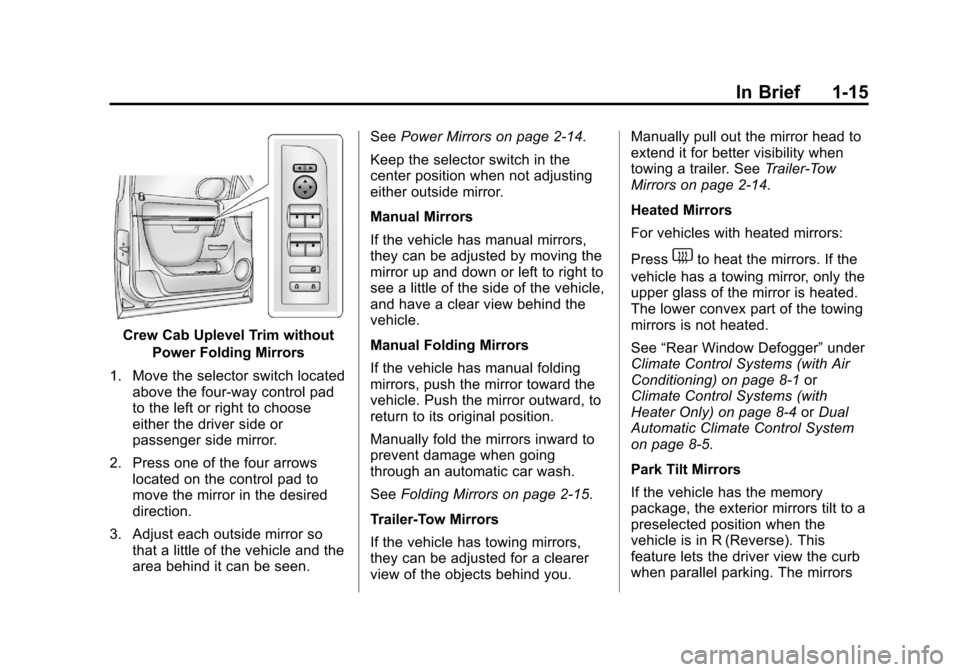
Crew Cab Uplevel Trim withoutPower Folding Mirrors
1. Move the selector switch located above the four-way control pad
to the left or right to choose
either the driver side or
passenger side mirror.
2. Press one of the four arrows located on the control pad to
move the mirror in the desired
direction.
3. Adjust each outside mirror so that a little of the vehicle and the
area behind it can be seen. See
Power Mirrors on page 2‑14.
Keep the selector switch in the
center position when not adjusting
either outside mirror.
Manual Mirrors
If the vehicle has manual mirrors,
they can be adjusted by moving the
mirror up and down or left to right to
see a little of the side of the vehicle,
and have a clear view behind the
vehicle.
Manual Folding Mirrors
If the vehicle has manual folding
mirrors, push the mirror toward the
vehicle. Push the mirror outward, to
return to its original position.
Manually fold the mirrors inward to
prevent damage when going
through an automatic car wash.
See Folding Mirrors on page 2‑15.
Trailer-Tow Mirrors
If the vehicle has towing mirrors,
they can be adjusted for a clearer
view of the objects behind you. Manually pull out the mirror head to
extend it for better visibility when
towing a trailer. See
Trailer-Tow
Mirrors on page 2‑14.
Heated Mirrors
For vehicles with heated mirrors:
Press
1to heat the mirrors. If the
vehicle has a towing mirror, only the
upper glass of the mirror is heated.
The lower convex part of the towing
mirrors is not heated.
See “Rear Window Defogger” under
Climate Control Systems (with Air
Conditioning) on page 8‑1 or
Climate Control Systems (with
Heater Only) on page 8‑4 orDual
Automatic Climate Control System
on page 8‑5.
Park Tilt Mirrors
If the vehicle has the memory
package, the exterior mirrors tilt to a
preselected position when the
vehicle is in R (Reverse). This
feature lets the driver view the curb
when parallel parking. The mirrors
Page 25 of 542
Black plate (19,1)Chevrolet Silverado Owner Manual - 2013 - crc2 - 8/13/12
In Brief 1-19
Climate Control System (With Air Conditioning)
A. Fan Control
B. Temperature Control
C. Air Delivery Mode Control
D. Air ConditioningE. Outside Air
F. Air Recirculation
G. Rear Window Defogger
Page 26 of 542
Black plate (20,1)Chevrolet Silverado Owner Manual - 2013 - crc2 - 8/13/12
1-20 In Brief
Climate Control System (With Heater Only)
A. Fan Control
B. Temperature Control
C. Air Delivery Mode ControlSee
Climate Control Systems (with
Air Conditioning) on page 8‑1 or
Climate Control Systems (with
Heater Only) on page 8‑4.
Page 27 of 542
Black plate (21,1)Chevrolet Silverado Owner Manual - 2013 - crc2 - 8/13/12
In Brief 1-21
Dual Automatic Climate Control System
A. Driver and PassengerTemperature Controls
B. Fan Control
C. AUTO
D. Defrost
E. Air Recirculation
F. Outside Air
G. Air Delivery Mode Control
H. Display
I. Power Button J. Rear Window Defogger
K. Air Conditioning
L. PASS (Passenger)
See
Climate Control Systems (with
Air Conditioning) on page 8‑1 or
Climate Control Systems (with
Heater Only) on page 8‑4 orDual
Automatic Climate Control System
on page 8‑5 (If Equipped).
Transmission
Range Selection Mode
The Range Selection Mode switch,
if equipped, is located on the shift
lever.
To enable the Range Selection
feature:
1. Move the column shift lever to
the M (Manual) position. The
current range will appear next to
the M. This is the highest
attainable range with all lower
gears accessible. As an
example, when 5 (Fifth) gear is
selected, 1 (First) through
5 (Fifth) gears are available.
Page 44 of 542

Black plate (4,1)Chevrolet Silverado Owner Manual - 2013 - crc2 - 8/13/12
2-4 Keys, Doors, and Windows
programmed to this vehicle, all
remaining transmitters must also be
reprogrammed. Any lost or stolen
transmitters will no longer work
once the new transmitter is
programmed. Each vehicle can
have up to eight transmitters
programmed to it. See your dealer
for transmitter programming.
Battery Replacement
Replace the battery if the REPLACE
BATTERY IN REMOTE KEY
message displays in the DIC.
Notice:When replacing the
battery, do not touch any of the
circuitry on the transmitter. Static
from your body could damage the
transmitter.
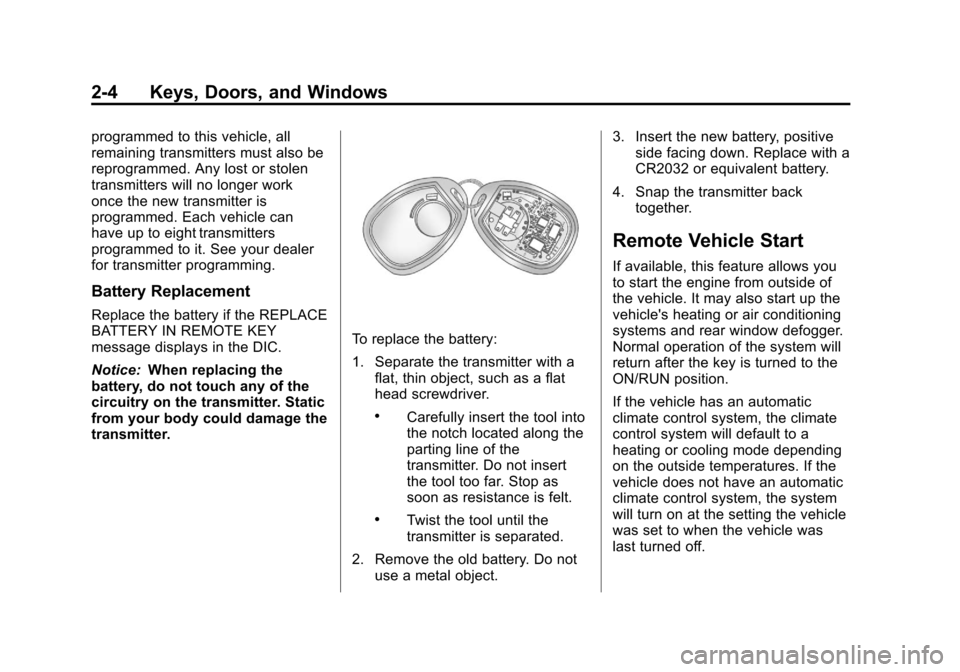
To replace the battery:
1. Separate the transmitter with a flat, thin object, such as a flat
head screwdriver.
.Carefully insert the tool into
the notch located along the
parting line of the
transmitter. Do not insert
the tool too far. Stop as
soon as resistance is felt.
.Twist the tool until the
transmitter is separated.
2. Remove the old battery. Do not use a metal object. 3. Insert the new battery, positive
side facing down. Replace with a
CR2032 or equivalent battery.
4. Snap the transmitter back together.
Remote Vehicle Start
If available, this feature allows you
to start the engine from outside of
the vehicle. It may also start up the
vehicle's heating or air conditioning
systems and rear window defogger.
Normal operation of the system will
return after the key is turned to the
ON/RUN position.
If the vehicle has an automatic
climate control system, the climate
control system will default to a
heating or cooling mode depending
on the outside temperatures. If the
vehicle does not have an automatic
climate control system, the system
will turn on at the setting the vehicle
was set to when the vehicle was
last turned off.