2013 CHEVROLET SILVERADO light
[x] Cancel search: lightPage 121 of 542

Black plate (59,1)Chevrolet Silverado Owner Manual - 2013 - crc2 - 8/13/12
Seats and Restraints 3-59
WARNING (Continued)
fail-safe. No one can guarantee
that an airbag will not deploy
under some unusual
circumstance, even though it is
turned off.
Secure rear-facing child restraints
in a rear seat, even if the airbag
is off. If you secure a
forward-facing child restraint in
the right front seat, always move
the front passenger seat as far
back as it will go. It is better to
secure the child restraint in a
rear seat.
SeePassenger Sensing System
on page 3‑32 for additional
information.
If the vehicle does not have a rear
seat that will accommodate a
rear-facing child restraint, a
rear-facing child restraint should not
be installed in the vehicle, even if
the airbag is off. If the child restraint has the LATCH
system, see
Lower Anchors and
Tethers for Children (LATCH
System) on page 3‑47 for how and
where to install the child restraint
using LATCH. If you secure a child
restraint using a safety belt and it
uses a top tether, see Lower
Anchors and Tethers for Children
(LATCH System) on page 3‑47 for
top tether anchor locations.
Do not secure a child seat in a
position without a top tether anchor
if a national or local law requires
that the top tether be anchored, or if
the instructions that come with the
child restraint say that the top strap
must be anchored.
In Canada, the law requires that
forward-facing child restraints have
a top tether, and that the tether be
attached. You will be using the lap-shoulder
belt to secure the child restraint in
this position. Follow the instructions
that came with the child restraint.
1. Move the seat as far back as it
will go before securing the
forward-facing child restraint.
When the passenger sensing
system, if equipped, has turned
off the right front passenger
frontal airbag, the off indicator in
the passenger airbag status
indicator should light and stay lit
when you start the vehicle. See
Passenger Airbag Status
Indicator on page 5‑20.
2. Put the child restraint on the seat.
3. Pick up the latch plate, and run the lap and shoulder portions of
the vehicle's safety belt through
or around the restraint. The child
restraint instructions will show
you how.
Page 123 of 542
Black plate (61,1)Chevrolet Silverado Owner Manual - 2013 - crc2 - 8/13/12
Seats and Restraints 3-61
7. If the vehicle does not have arear seat and the child restraint
has a top tether, follow the child
restraint manufacturer's
instructions regarding the use of
the top tether. See Lower
Anchors and Tethers for
Children (LATCH System) on
page 3‑47 for more information.
8. Before placing a child in the child restraint, make sure it is
securely held in place. To check,
grasp the child restraint at the
safety belt path and attempt to
move it side to side and back
and forth. When the child
restraint is properly installed,
there should be no more than
2.5 cm (1 in) of movement.
If the vehicle is equipped with a
passenger sensing system, and
when the passenger sensing system
has turned off the right front
passenger frontal airbag, the off
indicator in the passenger airbag
status indicator should light and stay
lit when you start the vehicle. If a child restraint has been installed
and the on indicator is lit, see
“If the
On Indicator is Lit for a Child
Restraint” underPassenger Sensing
System on page 3‑32 for more
information.
To remove the child restraint,
unbuckle the vehicle safety belt and
let it return to the stowed position.
If the top tether is attached to a top
tether anchor, disconnect it.
With Airbag Off Switch
This vehicle has airbags. A rear
seat is a safer place to secure a
forward-facing child restraint. See
Where to Put the Restraint on
page 3‑45.
There may be a switch in the glove
box that you can use to turn off the
right front passenger frontal airbag.
See Airbag On-Off Switch on
page 3‑29 for more information,
including important safety
information. A label on the sun visor says,
“Never put a rear-facing child seat in
the front unless airbag is off.”
This is
because the risk to the rear-facing
child is so great, if the airbag
deploys.
{WARNING
A child in a rear-facing child
restraint can be seriously injured
or killed if the right front
passenger airbag inflates. This is
because the back of the
rear-facing child restraint would
be very close to the inflating
airbag. A child in a forward-facing
child restraint can be seriously
injured or killed if the right front
passenger airbag inflates and the
passenger seat is in a forward
position.
Even if the airbag switch has
turned off the right front
passenger frontal airbag, no
system is fail-safe. No one can
(Continued)
Page 124 of 542
Black plate (62,1)Chevrolet Silverado Owner Manual - 2013 - crc2 - 8/13/12
3-62 Seats and Restraints
WARNING (Continued)
guarantee that an airbag will not
deploy under some unusual
circumstance, even though it is
turned off.
Secure rear-facing child restraints
in a rear seat, even if the airbag
is off. If you secure a
forward-facing child restraint in
the right front seat, always move
the front passenger seat as far
back as it will go. It is better to
secure the child restraint in a
rear seat.
{WARNING
If the airbag readiness light ever
comes on and stays on, it means
that something may be wrong
with the airbag system. For
example, the right front(Continued)
WARNING (Continued)
passenger airbag could inflate
even though the airbag on-off
switch is turned off.
To help avoid injury to yourself or
others, have the vehicle serviced
right away. SeeAirbag Readiness
Light on page 5‑17 for more
information, including important
safety information.
If the vehicle does not have a rear
seat that will accommodate a
rear-facing child restraint, a
rear-facing child restraint should not
be installed in the vehicle, even if
the airbag is off. If the child restraint has the LATCH
system, see
Lower Anchors and
Tethers for Children (LATCH
System) on page 3‑47 for how and
where to install the child restraint
using LATCH. If a child restraint is
secured using a safety belt and it
uses a top tether, see Lower
Anchors and Tethers for Children
(LATCH System) on page 3‑47 for
top tether anchor locations.
Do not secure a child restraint in a
position without a top tether anchor
if a national or local law requires
that the top tether be anchored, or if
the instructions that come with the
child restraint say that the top strap
must be anchored.
In Canada, the law requires that
forward-facing child restraints have
a top tether, and that the tether be
attached.
Page 125 of 542
Black plate (63,1)Chevrolet Silverado Owner Manual - 2013 - crc2 - 8/13/12
Seats and Restraints 3-63
You will be using the lap-shoulder
belt to secure the child restraint in
this position. Follow the instructions
that came with the child restraint.
1. Move the seat as far back as itwill go before securing the
forward-facing child restraint.
If you have no other choice but
to install a rear-facing child
restraint in this seat, make sure
the airbag is off once the child
restraint has been installed.
When the airbag off switch has
turned off the right front
passenger frontal airbag, the off
indicator in the airbag off light
should light and stay lit when
you start the vehicle. See Airbag
On-Off Light on page 5‑18.
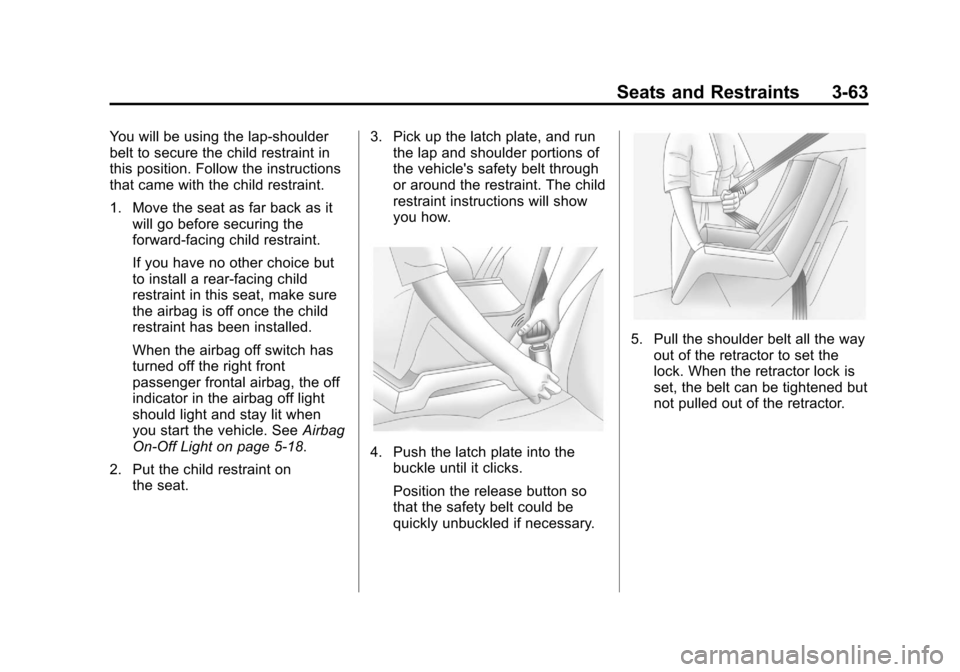
2. Put the child restraint on the seat. 3. Pick up the latch plate, and run
the lap and shoulder portions of
the vehicle's safety belt through
or around the restraint. The child
restraint instructions will show
you how.
4. Push the latch plate into thebuckle until it clicks.
Position the release button so
that the safety belt could be
quickly unbuckled if necessary.
5. Pull the shoulder belt all the way
out of the retractor to set the
lock. When the retractor lock is
set, the belt can be tightened but
not pulled out of the retractor.
Page 131 of 542
Black plate (1,1)Chevrolet Silverado Owner Manual - 2013 - crc2 - 8/13/12
Instruments and Controls 5-1
Instruments and
Controls
Controls
Steering Wheel Adjustment . . . 5-2
Steering Wheel Controls . . . . . . 5-2
Horn . . . . . . . . . . . . . . . . . . . . . . . . . . 5-4
Windshield Wiper/Washer . . . . . 5-4
Compass . . . . . . . . . . . . . . . . . . . . . 5-5
Clock . . . . . . . . . . . . . . . . . . . . . . . . . 5-7
Power Outlets . . . . . . . . . . . . . . . . . 5-9
Cigarette Lighter . . . . . . . . . . . . . . 5-9
Ashtrays . . . . . . . . . . . . . . . . . . . . . 5-10
Warning Lights, Gauges, and
Indicators
Warning Lights, Gauges, andIndicators . . . . . . . . . . . . . . . . . . 5-10
Instrument Cluster . . . . . . . . . . . 5-11
Speedometer . . . . . . . . . . . . . . . . 5-12
Odometer . . . . . . . . . . . . . . . . . . . . 5-12
Trip Odometer . . . . . . . . . . . . . . . 5-12
Tachometer . . . . . . . . . . . . . . . . . . 5-12
Fuel Gauge . . . . . . . . . . . . . . . . . . 5-13
Engine Oil Pressure Gauge . . . . . . . . . . . . . . . . . . . . . . 5-14 Engine Coolant Temperature
Gauge . . . . . . . . . . . . . . . . . . . . . . 5-15
Voltmeter Gauge . . . . . . . . . . . . . 5-16
Safety Belt Reminders . . . . . . . 5-16
Airbag Readiness Light . . . . . . 5-17
Airbag On-Off Light . . . . . . . . . . 5-18
Passenger Airbag Status Indicator . . . . . . . . . . . . . . . . . . . . 5-20
Charging System Light . . . . . . 5-21
Malfunction Indicator Lamp . . . . . . . . . . . . . 5-21
Brake System Warning Light . . . . . . . . . . . . . . . . . . . . . . . 5-24
Antilock Brake System (ABS) Warning Light . . . . . . . . . . . . . . 5-24
Four-Wheel-Drive Light . . . . . . 5-25
Tow/Haul Mode Light . . . . . . . . 5-25
StabiliTrak
®OFF Light . . . . . . . 5-25
Traction Control System (TCS)/StabiliTrak
®Light . . . . 5-26
Tire Pressure Light . . . . . . . . . . 5-26
Engine Oil Pressure Light . . . . 5-27
Low Fuel Warning Light . . . . . . 5-27
Security Light . . . . . . . . . . . . . . . . 5-28
High-Beam On Light . . . . . . . . . 5-28
Front Fog Lamp Light . . . . . . . . 5-28
Cruise Control Light . . . . . . . . . 5-28
Information Displays
Driver Information Center (DIC) . . . . . . . . . . . . . . . 5-29
Vehicle Messages
Vehicle Messages . . . . . . . . . . . 5-37
Battery Voltage and ChargingMessages . . . . . . . . . . . . . . . . . . 5-38
Brake System Messages . . . . 5-38
Door Ajar Messages . . . . . . . . . 5-39
Engine Cooling System Messages . . . . . . . . . . . . . . . . . . 5-39
Engine Oil Messages . . . . . . . . 5-40
Engine Power Messages . . . . 5-41
Fuel System Messages . . . . . . 5-41
Key and Lock Messages . . . . . 5-41
Lamp Messages . . . . . . . . . . . . . 5-41
Object Detection System Messages . . . . . . . . . . . . . . . . . . 5-42
Ride Control System Messages . . . . . . . . . . . . . . . . . . 5-42
Airbag System Messages . . . . 5-43
Security Messages . . . . . . . . . . 5-43
Starting the Vehicle Messages . . . . . . . . . . . . . . . . . . 5-43
Tire Messages . . . . . . . . . . . . . . . 5-44
Page 133 of 542

Black plate (3,1)Chevrolet Silverado Owner Manual - 2013 - crc2 - 8/13/12
Instruments and Controls 5-3
an iPod®or USB device. Press to
reject an incoming call, or end a
current call.
Radio
To select preset or favorite radio
stations:
Press and release
worc/xto
go to the next or previous radio
station stored as a preset or
favorite.
CD/DVD
To select tracks on a CD/DVD:
Press and release
worc/xto
go to the next or previous track.
Selecting Tracks on an iPod or
USB Device (Vehicles without a
Navigation System)
1. Press and hold
worc/x
while listening to a song until the
contents of the current folder
display on the radio display. 2. Press and release
worc/x
to scroll up or down the list, then
press and hold
w, or press¨to
play the highlighted track.
Navigating Folders on an iPod or
USB Device (Vehicles without a
Navigation System):
1. Press and hold
worc/x
while listening to a song until the
contents of the current folder
display on the radio display.
2. Press and hold
c/xto go
back to the previous folder list.
3. Press and release
worc/x
to scroll up or down the list.
.To select a folder, press
and hold
w, or press¨
when the folder is
highlighted.
.To go back further in the
folder list, press and hold
c/x. Navigating an iPod or USB Device
on the Main Audio Screen
(Vehicles with a Navigation
System)
1. Press and release
worc/x
to select the next or previous
track within the selected
category.
2. Press and hold
worc/xto
move quickly through the tracks.
3. Press and release
¨to move up
one track within the selected
category.
Navigating an iPod or USB Device
on the Music Navigator Screen
(Vehicles with a Navigation
System)
1. Press and release
worc/x
to select the next or previous
track within the selected
category.
2. Press and hold
worc/xto
move quickly through the tracks
within the selected category.
Page 136 of 542
Black plate (6,1)Chevrolet Silverado Owner Manual - 2013 - crc2 - 8/13/12
5-6 Instruments and Controls
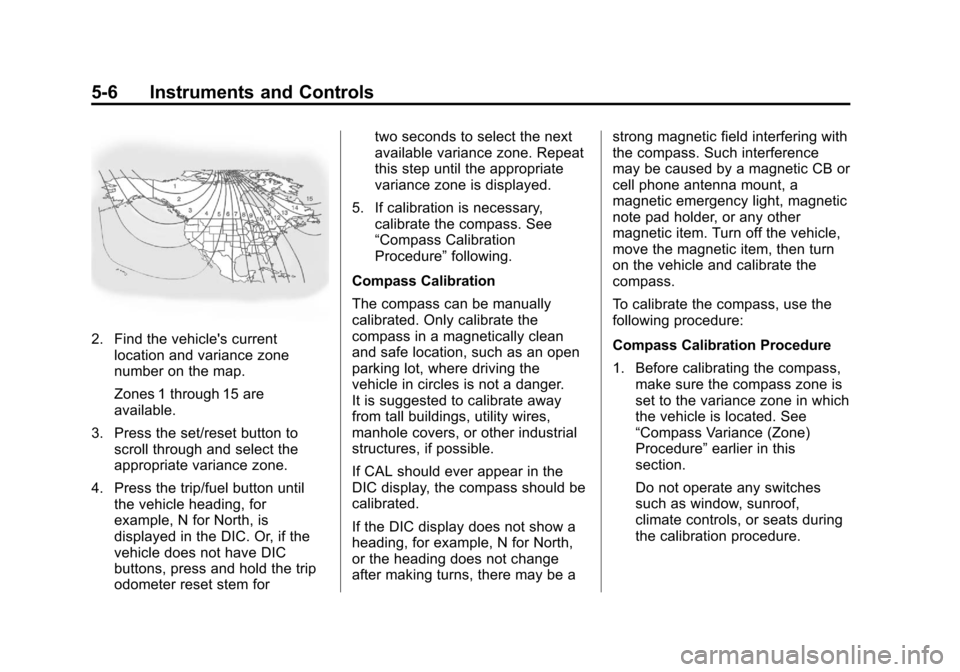
2. Find the vehicle's currentlocation and variance zone
number on the map.
Zones 1 through 15 are
available.
3. Press the set/reset button to scroll through and select the
appropriate variance zone.
4. Press the trip/fuel button until the vehicle heading, for
example, N for North, is
displayed in the DIC. Or, if the
vehicle does not have DIC
buttons, press and hold the trip
odometer reset stem for two seconds to select the next
available variance zone. Repeat
this step until the appropriate
variance zone is displayed.
5. If calibration is necessary, calibrate the compass. See
“Compass Calibration
Procedure” following.
Compass Calibration
The compass can be manually
calibrated. Only calibrate the
compass in a magnetically clean
and safe location, such as an open
parking lot, where driving the
vehicle in circles is not a danger.
It is suggested to calibrate away
from tall buildings, utility wires,
manhole covers, or other industrial
structures, if possible.
If CAL should ever appear in the
DIC display, the compass should be
calibrated.
If the DIC display does not show a
heading, for example, N for North,
or the heading does not change
after making turns, there may be a strong magnetic field interfering with
the compass. Such interference
may be caused by a magnetic CB or
cell phone antenna mount, a
magnetic emergency light, magnetic
note pad holder, or any other
magnetic item. Turn off the vehicle,
move the magnetic item, then turn
on the vehicle and calibrate the
compass.
To calibrate the compass, use the
following procedure:
Compass Calibration Procedure
1. Before calibrating the compass,
make sure the compass zone is
set to the variance zone in which
the vehicle is located. See
“Compass Variance (Zone)
Procedure” earlier in this
section.
Do not operate any switches
such as window, sunroof,
climate controls, or seats during
the calibration procedure.
Page 139 of 542
Black plate (9,1)Chevrolet Silverado Owner Manual - 2013 - crc2 - 8/13/12
Instruments and Controls 5-9
4. Press the MENU button again toapply the desired option, or let
the screen time out.
Power Outlets
Accessory power outlets can be
used to plug in electrical equipment,
such as a cell phone, MP3
player, etc.
The vehicle may have two
accessory power outlets located
below the climate control system,
or may have one accessory power
outlet and one cigarette lighter. The
cigarette lighter is designed to fit
only in the receptacle closest to the
driver.
There may be another accessory
power outlet in the rear cargo area.
If the vehicle has a floor console,
there is an accessory power outlet
inside the storage bin and one on
the rear of the floor console.
Remove the cover to access and
replace when not in use. The accessory power outlets are
powered, even when the ignition is
in LOCK/OFF. Continuing to use
power outlets while the ignition is in
LOCK/OFF may cause the vehicle's
battery to run down.
{WARNING
Power is always supplied to the
outlets. Do not leave electrical
equipment plugged in when the
vehicle is not in use because the
vehicle could catch fire and cause
injury or death.
Notice: Leaving electrical
equipment plugged in for an
extended period of time while the
vehicle is off will drain the
battery. Always unplug electrical
equipment when not in use and
do not plug in equipment that
exceeds the maximum 20 ampere
rating. Certain power accessory plugs may
not be compatible to the accessory
power outlet and could overload
vehicle or adapter fuses. If a
problem is experienced, see your
dealer.
When adding electrical equipment,
be sure to follow the proper
installation instructions included with
the equipment. See
Add-On
Electrical Equipment on page 9‑105.
Notice: Hanging heavy
equipment from the power outlet
can cause damage not covered
by the vehicle warranty. The
power outlets are designed for
accessory power plugs only, such
as cell phone charge cords.
Cigarette Lighter
To use the cigarette lighter, push it
in all the way, and let go. When it is
ready for use, the lighter pops
back out.
Notice: Holding a cigarette lighter
in while it is heating does not let
the lighter back away from the