2013 CHEVROLET SILVERADO odometer
[x] Cancel search: odometerPage 177 of 542
Black plate (47,1)Chevrolet Silverado Owner Manual - 2013 - crc2 - 8/13/12
Instruments and Controls 5-47
To change customization
preferences, use the following
procedure.
Entering the Feature
Settings Menu
1. Turn the ignition on and placethe vehicle in P (Park).
To avoid excessive drain on the
battery, turn the headlamps off.
2. Press the customization button to scroll through the available
customizable options.
Feature Settings Menu Items
The following customization features
allow you to program settings to the
vehicle:
DISPLAY IN ENGLISH
This feature will only display if a
language other than English has
been set. This feature allows you to
change the language in which the
DIC messages appear to English. Press the customization button until
the PRESS
VTO DISPLAY IN
ENGLISH screen appears on the
DIC display. Press the set/reset
button once to display all DIC
messages in English.
DISPLAY LANGUAGE
This feature allows you to select the
language in which the DIC
messages will appear.
Press the customization button until
the DISPLAY LANGUAGE screen
appears on the DIC display. Press
the set/reset button once to access
the settings for this feature. Then
press the customization button to
scroll through the following settings:
ENGLISH (default): All messages
will appear in English.
FRANCAIS: All messages will
appear in French.
ESPANOL: All messages will
appear in Spanish. NO CHANGE:
No change will be
made to this feature. The current
setting will remain.
To select a setting, press the set/
reset button while the desired
setting is displayed on the DIC.
You can also change the language
by pressing the trip odometer reset
stem. See “Language” underDriver
Information Center (DIC) on
page 5‑29 for more information.
AUTO DOOR LOCK
This feature allows you to select
when the vehicle's doors will
automatically lock. See Automatic
Door Locks on page 2‑8 for more
information.
Page 368 of 542
Black plate (100,1)Chevrolet Silverado Owner Manual - 2013 - crc2 - 8/13/12
9-100 Driving and Operating
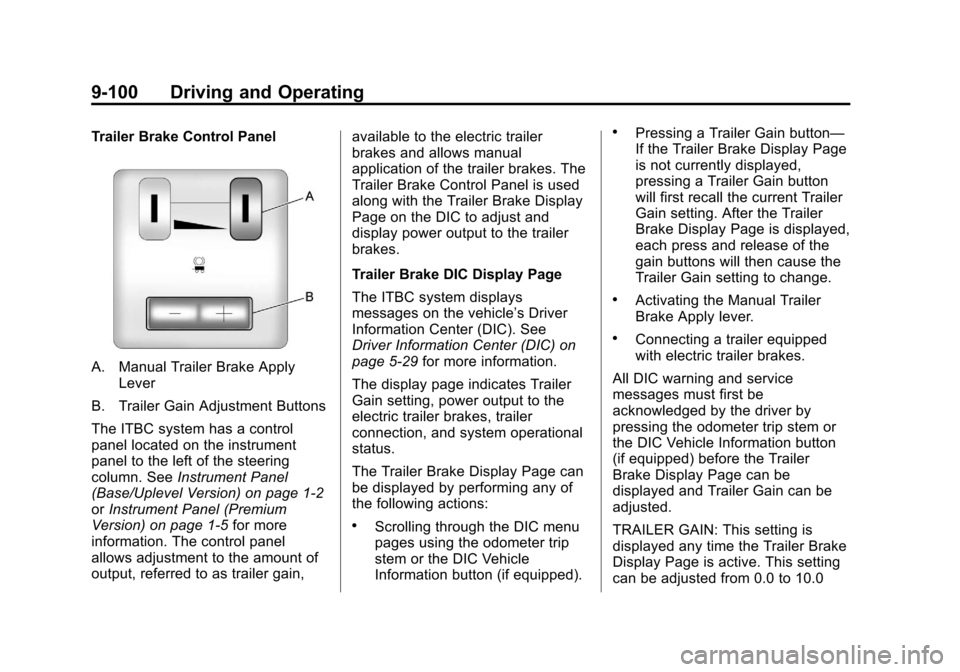
Trailer Brake Control Panel
A. Manual Trailer Brake ApplyLever
B. Trailer Gain Adjustment Buttons
The ITBC system has a control
panel located on the instrument
panel to the left of the steering
column. See Instrument Panel
(Base/Uplevel Version) on page 1‑2
or Instrument Panel (Premium
Version) on page 1‑5 for more
information. The control panel
allows adjustment to the amount of
output, referred to as trailer gain, available to the electric trailer
brakes and allows manual
application of the trailer brakes. The
Trailer Brake Control Panel is used
along with the Trailer Brake Display
Page on the DIC to adjust and
display power output to the trailer
brakes.
Trailer Brake DIC Display Page
The ITBC system displays
messages on the vehicle’s Driver
Information Center (DIC). See
Driver Information Center (DIC) on
page 5‑29
for more information.
The display page indicates Trailer
Gain setting, power output to the
electric trailer brakes, trailer
connection, and system operational
status.
The Trailer Brake Display Page can
be displayed by performing any of
the following actions:
.Scrolling through the DIC menu
pages using the odometer trip
stem or the DIC Vehicle
Information button (if equipped).
.Pressing a Trailer Gain button—
If the Trailer Brake Display Page
is not currently displayed,
pressing a Trailer Gain button
will first recall the current Trailer
Gain setting. After the Trailer
Brake Display Page is displayed,
each press and release of the
gain buttons will then cause the
Trailer Gain setting to change.
.Activating the Manual Trailer
Brake Apply lever.
.Connecting a trailer equipped
with electric trailer brakes.
All DIC warning and service
messages must first be
acknowledged by the driver by
pressing the odometer trip stem or
the DIC Vehicle Information button
(if equipped) before the Trailer
Brake Display Page can be
displayed and Trailer Gain can be
adjusted.
TRAILER GAIN: This setting is
displayed any time the Trailer Brake
Display Page is active. This setting
can be adjusted from 0.0 to 10.0
Page 385 of 542
Black plate (9,1)Chevrolet Silverado Owner Manual - 2013 - crc2 - 8/13/12
Vehicle Care 10-9
Engine Oil Life System
When to Change Engine Oil
This vehicle has a computer system
that indicates when to change the
engine oil and filter. This is based
on a combination of factors which
include engine revolutions, engine
temperature, and miles driven.
Based on driving conditions, the
mileage at which an oil change is
indicated can vary considerably. For
the oil life system to work properly,
the system must be reset every time
the oil is changed.
On some vehicles, when the system
has calculated that oil life has been
diminished, a CHANGE ENGINE
OIL SOON message comes on to
indicate that an oil change is
necessary. SeeEngine Oil
Messages on page 5‑40. Change
the oil as soon as possible within
the next 1 000 km (600 mi). It is
possible that, if driving under the
best conditions, the oil life system
might indicate that an oil change is
not necessary for up to a year. The engine oil and filter must be
changed at least once a year and,
at this time, the system must be
reset. For vehicles without the
CHANGE ENGINE OIL SOON
message, an oil change is needed
when the OIL LIFE
REMAINING percentage is near
0%. Your dealer has trained service
people who will perform this work
and reset the system. It is also
important to check the oil regularly
over the course of an oil drain
interval and keep it at the proper
level.
If the system is ever reset
accidentally, the oil must be
changed at 5 000 km (3,000 mi)
since the last oil change.
Remember to reset the oil life
system whenever the oil is changed.
How to Reset the Engine Oil
Life System
Reset the system whenever the
engine oil is changed so that the
system can calculate the next
engine oil change. Always reset the
engine oil life to 100% after every oil
change. It will not reset itself. To
reset the system on most vehicles:
1. Display the OIL LIFE
REMAINING on the DIC. If the
vehicle does not have DIC
buttons, the vehicle must be in
P (Park) to access this display.
See Driver Information Center
(DIC) on page 5‑29.
2. Press and hold the SET/RESET button on the DIC, or the trip
odometer reset stem if the
vehicle does not have DIC
buttons, for more than
five seconds. The oil life will
change to 100%.
Page 389 of 542
Black plate (13,1)Chevrolet Silverado Owner Manual - 2013 - crc2 - 8/13/12
Vehicle Care 10-13
Change the fluid and filter at the
scheduled maintenance intervals
listed inMaintenance Schedule on
page 11‑3. Be sure to use the
transmission fluid listed in
Recommended Fluids and
Lubricants on page 11‑12.
How to Check Automatic
Transmission Fluid
Notice: Too much or too little
fluid can damage the
transmission. Too much can
mean that some of the fluid could
come out and fall on hot engine
parts or exhaust system parts,
starting a fire. Too little fluid
could cause the transmission to
overheat. Be sure to get an
accurate reading if checking the
transmission fluid. Before checking the fluid level,
prepare the vehicle as follows:
1. Start the engine and park the
vehicle on a level surface. Keep
the engine running.
2. Apply the parking brake and place the shift lever in P (Park).
3. With your foot on the brake pedal, move the shift lever
through each gear range,
pausing for about three seconds
in each range. Then, move the
shift lever back to P (Park).
4. Allow the engine to idle (500 –
800 rpm) for at least 1 minute.
Slowly release the brake pedal.
5. Keep the engine running and press the Trip/Fuel button or trip
odometer reset stem until
TRANS TEMP (Transmission
Temperature) displays on the
Driver Information Center (DIC). 6. Using the TRANS TEMP
reading, determine and perform
the appropriate check
procedure. If the TRANS TEMP
reading is not within the required
temperature ranges, allow the
vehicle to cool, or operate the
vehicle until the appropriate
transmission fluid temperature is
reached.
Cold Check Procedure
Use this procedure only as a
reference to determine if the
transmission has enough fluid to be
operated safely until a hot check
procedure can be made. The hot
check procedure is the most
accurate method to check the fluid
level. Perform the hot check
procedure at the first opportunity.
Use this cold check procedure to
check fluid level when the
transmission temperature is
between 27°C and 32°C (80°F
and 90°F).
Page 438 of 542
Black plate (62,1)Chevrolet Silverado Owner Manual - 2013 - crc2 - 8/13/12
10-62 Vehicle Care
3. Press the Remote Keyless Entry(RKE) transmitter's
QandK
buttons at the same time for
approximately five seconds. The
horn sounds twice to signal the
receiver is in relearn mode and
the TIRE LEARNING ACTIVE
message displays on the DIC
screen.
If the vehicle does not have
RKE, press the Driver
Information Center (DIC) vehicle
information button until the
PRESS
VTO RELEARN TIRE
POSITIONS message displays.
The horn sounds twice to signal
the receiver is in relearn mode
and TIRE LEARNING ACTIVE
message displays on the DIC
screen.
If the vehicle does not have RKE
or DIC buttons, press the trip
odometer reset stem on the
instrument cluster until the
PRESS
VTO RELEARN TIRE
POSITIONS message displays.
The horn sounds twice to signal the receiver is in relearn mode
and TIRE LEARNING ACTIVE
message displays on the DIC
screen.
4. Start with the driver side front tire.
5. Place the relearn tool against the tire sidewall, near the valve
stem. Then press the button to
activate the TPMS sensor.
A horn chirp confirms that the
sensor identification code has
been matched to this tire and
wheel position.
6. Proceed to the passenger side front tire, and repeat the
procedure in Step 5.
7. Proceed to the passenger side rear tire, and repeat the
procedure in Step 5.
8. Proceed to the driver side rear tire, and repeat the procedure in
Step 5. The horn sounds two
times to indicate the sensor
identification code has been
matched to the driver side rear tire, and the TPMS sensor
matching process is no longer
active. The TIRE LEARNING
ACTIVE message on the DIC
display screen goes off.
9. Turn the ignition switch to LOCK/OFF.
10. Set all four tires to the recommended air pressure
level as indicated on the Tire
and Loading Information label.
Tire Inspection
We recommend that the tires,
including the spare tire, if the
vehicle has one, be inspected
for signs of wear or damage at
least once a month.
Replace the tire if:
.The indicators at three or
more places around the tire
can be seen.
.There is cord or fabric
showing through the tire's
rubber.
Page 446 of 542

Black plate (70,1)Chevrolet Silverado Owner Manual - 2013 - crc2 - 8/13/12
10-70 Vehicle Care
performance on the laboratory
test wheel than the minimum
required by law. Warning: The
temperature grade for this tire is
established for a tire that is
properly inflated and not
overloaded. Excessive speed,
underinflation, or excessive
loading, either separately or in
combination, can cause heat
buildup and possible tire failure.
Wheel Alignment and Tire
Balance
The tires and wheels were aligned
and balanced at the factory to
provide the longest tire life and best
overall performance. Adjustments to
wheel alignment and tire balancing
will not be necessary on a regular
basis. However, check the
alignment if there is unusual tire
wear or if the vehicle is pulling to
one side or the other. If the vehicle
vibrates when driving on a smoothroad, the tires and wheels might
need to be rebalanced. See your
dealer for proper diagnosis.
Wheel Replacement
Replace any wheel that is bent,
cracked, or badly rusted or
corroded. If wheel nuts keep coming
loose, the wheel, wheel bolts and
wheel nuts should be replaced.
If the wheel leaks air, replace it.
Some aluminum wheels can be
repaired. See your dealer if any of
these conditions exist.
Your dealer will know the kind of
wheel that is needed.
Each new wheel should have the
same load-carrying capacity,
diameter, width, offset and be
mounted the same way as the one it
replaces.
Replace wheels, wheel bolts, wheel
nuts, or Tire Pressure Monitor
System (TPMS) sensors with new
GM original equipment parts.
{WARNING
Using the wrong replacement
wheels, wheel bolts, or wheel
nuts can be dangerous. It could
affect the braking and handling of
the vehicle. Tires can lose air,
and cause loss of control, causing
a crash. Always use the correct
wheel, wheel bolts, and wheel
nuts for replacement.
Notice: The wrong wheel can
also cause problems with bearing
life, brake cooling, speedometer
or odometer calibration,
headlamp aim, bumper height,
vehicle ground clearance, and tire
or tire chain clearance to the
body and chassis.
Whenever a wheel, wheel bolt,
or wheel nut is replaced on a dual
wheel setup, check the wheel nut
torque after 160, 1 600 and
10 000 km (100, 1,000 and 6,000 mi)
of driving.
Page 492 of 542
Black plate (16,1)Chevrolet Silverado Owner Manual - 2013 - crc2 - 8/13/12
11-16 Service and Maintenance
Maintenance Records
After the scheduled services are performed, record the date, odometer reading, who performed the service, and the
type of services performed in the boxes provided. Retain all maintenance receipts.Date Odometer
Reading Serviced By Services Performed
Page 493 of 542
Black plate (17,1)Chevrolet Silverado Owner Manual - 2013 - crc2 - 8/13/12
Service and Maintenance 11-17
DateOdometer
Reading Serviced By Services Performed