2013 CHEVROLET SILVERADO sunroof
[x] Cancel search: sunroofPage 62 of 542
Black plate (22,1)Chevrolet Silverado Owner Manual - 2013 - crc2 - 8/13/12
2-22 Keys, Doors, and Windows
Vent:From the closed position,
press the rear of the passenger side
switch (B) to vent the sunroof.
Manual-Open/Manual-Close: To
open the sunroof, press and hold
the rear of the driver side switch (A)
until the sunroof reaches the
desired position. Press and hold the
front of the driver side switch to
close it.
Express-Open/Express-Close: To
express-open the sunroof, fully
press and release the rear of the
driver side switch (A) until the
sunroof reaches the desired
position. To express-close the
sunroof, fully press and release the
front of the driver side switch. Press
the switch again to stop it.
When the sunroof is opened, an air
deflector will automatically raise.
The air deflector will retract when
the sunroof is closed.
The sunroof also has a sunshade
which can be pulled forward to block
sun rays. The sunshade must be
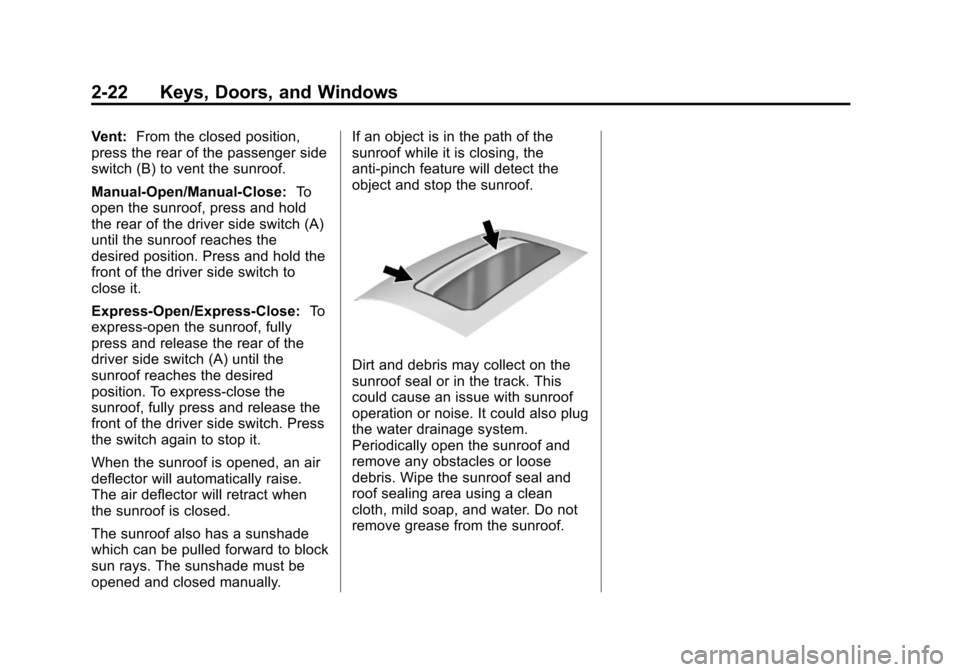
opened and closed manually. If an object is in the path of the
sunroof while it is closing, the
anti-pinch feature will detect the
object and stop the sunroof.
Dirt and debris may collect on the
sunroof seal or in the track. This
could cause an issue with sunroof
operation or noise. It could also plug
the water drainage system.
Periodically open the sunroof and
remove any obstacles or loose
debris. Wipe the sunroof seal and
roof sealing area using a clean
cloth, mild soap, and water. Do not
remove grease from the sunroof.
Page 136 of 542
Black plate (6,1)Chevrolet Silverado Owner Manual - 2013 - crc2 - 8/13/12
5-6 Instruments and Controls
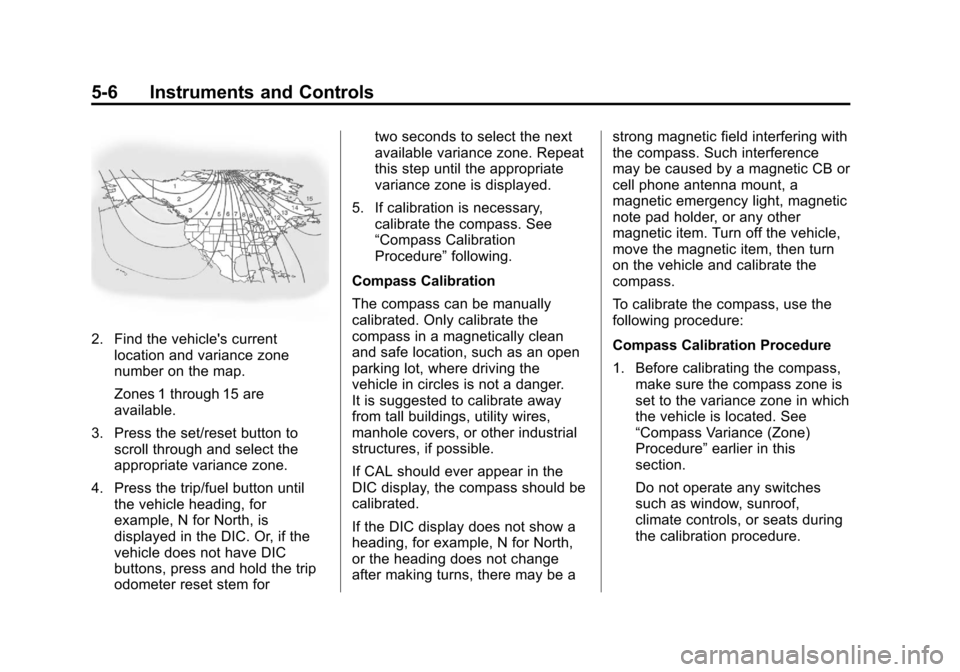
2. Find the vehicle's currentlocation and variance zone
number on the map.
Zones 1 through 15 are
available.
3. Press the set/reset button to scroll through and select the
appropriate variance zone.
4. Press the trip/fuel button until the vehicle heading, for
example, N for North, is
displayed in the DIC. Or, if the
vehicle does not have DIC
buttons, press and hold the trip
odometer reset stem for two seconds to select the next
available variance zone. Repeat
this step until the appropriate
variance zone is displayed.
5. If calibration is necessary, calibrate the compass. See
“Compass Calibration
Procedure” following.
Compass Calibration
The compass can be manually
calibrated. Only calibrate the
compass in a magnetically clean
and safe location, such as an open
parking lot, where driving the
vehicle in circles is not a danger.
It is suggested to calibrate away
from tall buildings, utility wires,
manhole covers, or other industrial
structures, if possible.
If CAL should ever appear in the
DIC display, the compass should be
calibrated.
If the DIC display does not show a
heading, for example, N for North,
or the heading does not change
after making turns, there may be a strong magnetic field interfering with
the compass. Such interference
may be caused by a magnetic CB or
cell phone antenna mount, a
magnetic emergency light, magnetic
note pad holder, or any other
magnetic item. Turn off the vehicle,
move the magnetic item, then turn
on the vehicle and calibrate the
compass.
To calibrate the compass, use the
following procedure:
Compass Calibration Procedure
1. Before calibrating the compass,
make sure the compass zone is
set to the variance zone in which
the vehicle is located. See
“Compass Variance (Zone)
Procedure” earlier in this
section.
Do not operate any switches
such as window, sunroof,
climate controls, or seats during
the calibration procedure.
Page 217 of 542
Black plate (17,1)Chevrolet Silverado Owner Manual - 2013 - crc2 - 8/13/12
Infotainment System 7-17
Satellite Radio Antenna
The XM Satellite Radio antenna is
located on the roof of the vehicle.
Keep the antenna clear of
obstructions for clear radio
reception.
If the vehicle has a sunroof, the
performance of the XM system (if
equipped) may be affected if the
sunroof is open.
Audio Players
CD Player
Care of the CD Player
Do not add any label to a CD.
It could get caught in the CD. If a
CD is recorded on a personal
computer and a description label is
needed, try labeling the top of the
recorded CD with a marking pen.
The use of CD lens cleaners is not
advised, due to the risk of
contaminating the lens of the CD
optics with lubricants internal to the
CD player mechanism.
Notice:If a label is added to a
CD, more than one CD is inserted
into the slot at a time, or an
attempt is made to play scratched
or damaged CDs, the CD player
could be damaged. While using
the CD player, use only CDs in
good condition without any label,
load one CD at a time, and keep the CD player and the loading slot
free of foreign materials, liquids,
and debris.
If an error displays, see
“CD Player
Messages” later in this section.Care of CDs
If playing a CD-R, the sound quality
can be reduced due to CD-R or
CD-RW quality, the method of
recording, the quality of the music
that has been recorded, and the
way the CD-R or CD-RW has been
handled. Handle them carefully.
Store CD-Rs or CD-RWs in their
original cases or other protective
cases and away from direct sunlight
and dust. The CD player scans the
bottom surface of the disc. If the
surface of a CD is damaged, such
as cracked, broken, or scratched,
the CD does not play properly or not
at all. Do not touch the bottom side
of a CD while handling it; this could
damage the surface. Pick up CDs
by grasping the outer edges or the
edge of the hole and the outer edge.
Page 296 of 542
Black plate (28,1)Chevrolet Silverado Owner Manual - 2013 - crc2 - 8/13/12
9-28 Driving and Operating
Fast Idle System
If the vehicle has this feature it is
available only with cruise control.
The manual fast idle switch is
operated using the cruise control
buttons located on the left hand side
of the steering wheel.
This system can be used to
increase engine idle speed
whenever the following conditions
are met:
.The parking brake is set.
.The brake pedal is not pressed.
.The vehicle must not be moving
and the accelerator must not be
pressed.
To control the fast idle:
.To enable the Fast Idle System,
press and release the cruise
control on/off button and ensure
that the switch indicator light
is lit.
.Press and release the cruise
control SET-button. Engine
speed will be held at
approximately 1200 RPM.
When the fast idle is active the
Driver Information Center (DIC) will
display “FAST IDLE ON.”
One of the following actions will turn
off the fast idle:
.Pressing the brake.
.Selecting the cruise control
cancel button.
.Releasing the parking brake.
.The transmission shift lever is
moved out of P (Park) or
N (Neutral).
.Selecting the cruise control on/
off button when it was
previously on.
.Pressing the cruise control
SET-button a second time.
.Pressing the accelerator greater
than a quarter of the way down.
.Turning the ignition switch to the
LOCK/OFF position.
Retained Accessory
Power (RAP)
The following vehicle accessories
can be used for up to 10 minutes
after the engine is turned off:
.Audio System
.Power Windows
.OnStar System (if equipped)
.Sunroof (if equipped)
These features work when the key
is in ON/RUN or ACC/
ACCESSORY. Once the key is
turned from ON/RUN to LOCK/OFF,
the windows and sunroof continue
to work up to 10 minutes until any
door is opened. The radio continues
to work for up to 10 minutes or until
the driver door is opened.
Page 419 of 542
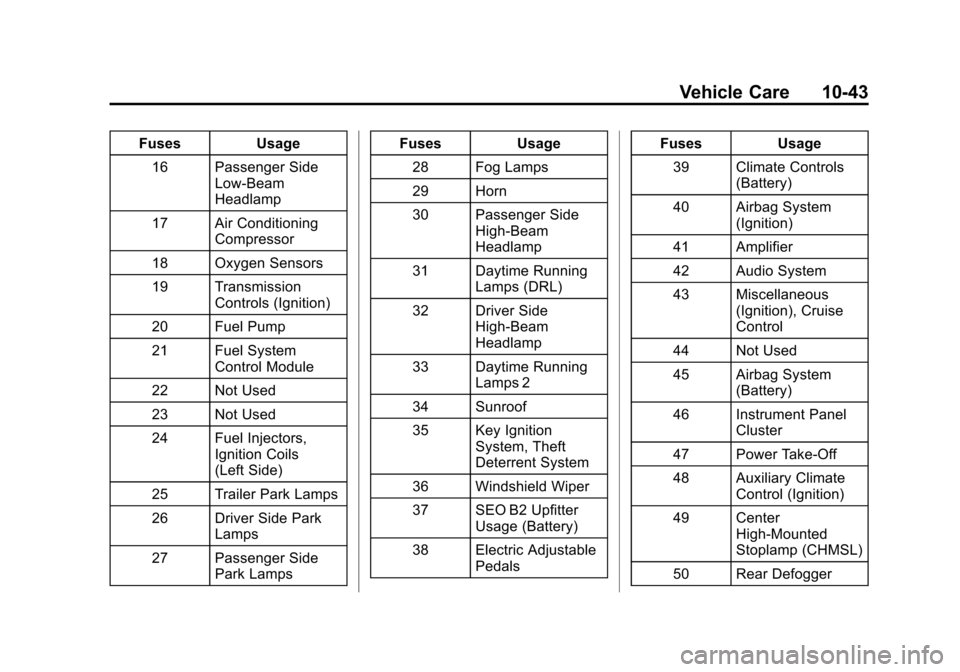
Black plate (43,1)Chevrolet Silverado Owner Manual - 2013 - crc2 - 8/13/12
Vehicle Care 10-43
FusesUsage
16 Passenger Side Low-Beam
Headlamp
17 Air Conditioning Compressor
18 Oxygen Sensors
19 Transmission Controls (Ignition)
20 Fuel Pump
21 Fuel System Control Module
22 Not Used
23 Not Used
24 Fuel Injectors, Ignition Coils
(Left Side)
25 Trailer Park Lamps
26 Driver Side Park Lamps
27 Passenger Side Park Lamps Fuses
Usage
28 Fog Lamps
29 Horn
30 Passenger Side High-Beam
Headlamp
31 Daytime Running Lamps (DRL)
32 Driver Side High-Beam
Headlamp
33 Daytime Running Lamps 2
34 Sunroof
35 Key Ignition System, Theft
Deterrent System
36 Windshield Wiper
37 SEO B2 Upfitter Usage (Battery)
38 Electric Adjustable Pedals Fuses
Usage
39 Climate Controls (Battery)
40 Airbag System (Ignition)
41 Amplifier
42 Audio System
43 Miscellaneous (Ignition), Cruise
Control
44 Not Used
45 Airbag System (Battery)
46 Instrument Panel Cluster
47 Power Take-Off
48 Auxiliary Climate Control (Ignition)
49 Center High-Mounted
Stoplamp (CHMSL)
50 Rear Defogger
Page 480 of 542

Black plate (4,1)Chevrolet Silverado Owner Manual - 2013 - crc2 - 8/13/12
11-4 Service and Maintenance
.Visually inspect steering,
suspension, and chassis
components for damaged, loose,
or missing parts or signs of
wear. SeeExterior Care on
page 10‑93.
.Check restraint system
components. See Safety System
Check on page 3‑20.
.Visually inspect fuel system for
damage or leaks.
.Visually inspect exhaust system
and nearby heat shields for
loose or damaged parts.
.Lubricate body components. See
Exterior Care on page 10‑93.
.Check starter switch. See Starter
Switch Check on page 10‑33.
.Check automatic transmission
shift lock control function. See
Automatic Transmission Shift
Lock Control Function Check on
page 10‑33.
.Check ignition transmission lock.
See Ignition Transmission Lock
Check on page 10‑34.
.Check parking brake and
automatic transmission park
mechanism. See Park Brake and
P (Park) Mechanism Check on
page 10‑34.
.Check accelerator pedal for
damage, high effort, or binding.
Replace if needed.
.Visually inspect gas strut for
signs of wear, cracks, or other
damage. Check the hold open
ability of the strut. See your
dealer if service is required.
.Inspect sunroof track and seal,
if equipped. See Sunroof (Crew
Cab) on page 2‑21 orSunroof
(Extended Cab) on page 2‑20.
.Check hybrid low pressure
coolant level, if equipped.
.Verify spare tire key lock
operation and lubricate as
needed. See Tire Changing on
page 10‑73.
Page 538 of 542

Black plate (10,1)Chevrolet Silverado Owner Manual - 2013 - crc2 - 8/13/12
i-10 INDEX
Rear Doors . . . . . . . . . . . . . . . . . . . . . 2-9
Rear Seat Audio (RSA)System . . . . . . . . . . . . . . . . . . . . . . . 7-48
Rear Seat Entertainment System . . . . . . . . . . . . . . . . . . . . . . . 7-38
Rear Seat Audio (RSA) . . . . . . . 7-48
Rear Seats . . . . . . . . . . . . . . . . . . . . 3-11
Rear Vision Camera (RVC) . . . . 9-64
Rear Windows . . . . . . . . . . . . . . . . . 2-20
Rearview Mirrors . . . . . . . . . . . . . . 2-17 Automatic Dimming . . . . . . . . . . . 2-17
Reclining Seatbacks . . . . . . . . . . . . 3-6
Recommended Fuel . . . . . . . . . . . . . . . . . . . . . . . . . . 9-69
Recommended Fluids and Lubricants . . . . . . . . . . . . . . . . . . . 11-12
Records Maintenance . . . . . . . . . . . . . . . . .11-16
Recreational Vehicle Towing . . . . . . . . . . . . . . . . . . . . . . 10-89
Reimbursement Program,
GM Mobility . . . . . . . . . . . . . . . . . . 13-7
Remote Keyless Entry (RKE) System . . . . . . . . . . . . . . . . . . . . . . . . 2-2
Remote Vehicle Start . . . . . . . . . . . 2-4 Replacement
Glass . . . . . . . . . . . . . . . . . . . . . . . 10-35
Replacement Bulbs . . . . . . . . . . . 10-39
Replacement Parts Airbags . . . . . . . . . . . . . . . . . . . . . . . 3-38
Maintenance . . . . . . . . . . . . . . . . .11-15
Replacing Airbag System . . . . . . 3-38
Replacing LATCH System
Parts after a Crash . . . . . . . . . . . 3-55
Replacing Safety Belt System Parts after a Crash . . . 3-21
Reporting Safety Defects Canadian Government . . . . . . 13-18
General Motors . . . . . . . . . . . . . 13-18
U.S. Government . . . . . . . . . . . 13-17
Restraints
Where to Put . . . . . . . . . . . . . . . . . 3-45
Retained Accessory Power (RAP) . . . . . . . . . . . . . . . . . 9-28
Ride Control Systems Messages . . . . . . . . . . . . . . . . . . . . 5-42
Roads Driving, Wet . . . . . . . . . . . . . . . . . . 9-10
Roadside Assistance Program . . . . . . . . . . . . . . . 13-7, 13-11 Roof
Sunroof . . . . . . . . . . . . . . . . . 2-20, 2-21
Rotation, Tires . . . . . . . . . . . . . . . . 10-63
Routing, Engine Drive Belt . . . . . 12-6
Running the Vehicle While Parked . . . . . . . . . . . . . . . . . . . . . . . 9-33
S
Safety Belts . . . . . . . . . . . . . . . . . . . 3-12Care . . . . . . . . . . . . . . . . . . . . . . . . . . 3-21
Extender . . . . . . . . . . . . . . . . . . . . . . 3-20
How to Wear Safety BeltsProperly . . . . . . . . . . . . . . . . . . . . . 3-13
Lap Belt . . . . . . . . . . . . . . . . . . . . . . 3-19
Lap-Shoulder Belt . . . . . . . . . . . . 3-14
Reminders . . . . . . . . . . . . . . . . . . . . 5-16
Replacing after a Crash . . . . . . 3-21
Use During Pregnancy . . . . . . . . 3-19
Safety Defects Reporting Canadian Government . . . . . . 13-18
General Motors . . . . . . . . . . . . . 13-18
U.S. Government . . . . . . . . . . . 13-17
Safety Locks . . . . . . . . . . . . . . . . . . . . 2-8
Safety System Check . . . . . . . . . . 3-20
Satellite Radio . . . . . . . . . . . . . . . . . 7-12
Scheduling Appointments . . . . . 13-12
Page 539 of 542

Black plate (11,1)Chevrolet Silverado Owner Manual - 2013 - crc2 - 8/13/12
INDEX i-11
SeatsAdjustment, Front . . . . . . . . . . . . . . 3-3
Center Seat . . . . . . . . . . . . . . . . . . . 3-5
Head Restraints . . . . . . . . . . . . . . . 3-2
Heated and Ventilated Front . . . 3-9
Lumbar Adjustment, Front . . . . . 3-5
Memory . . . . . . . . . . . . . . . . . . . . . . . . 3-8
Power Adjustment, Front . . . . . . 3-5
Rear . . . . . . . . . . . . . . . . . . . . . . . . . . 3-11
Reclining Seatbacks . . . . . . . . . . . 3-6
Securing Child
Restraints . . . . . . . . . . . . . . 3-55, 3-58
Security Light . . . . . . . . . . . . . . . . . . . . . . . . . . 5-28
Messages . . . . . . . . . . . . . . . . . . . . 5-43
OnStar
®. . . . . . . . . . . . . . . . . . . . . . 14-2
Vehicle . . . . . . . . . . . . . . . . . . . . . . . 2-10
Vehicle Alarm . . . . . . . . . . . . . . . . . 2-10
Service Accessories andModifications . . . . . . . . . . . . . . . . 10-3
Doing Your Own Work . . . . . . . . 10-3
Engine Soon Light . . . . . . . . . . . . 5-21
Maintenance Records . . . . . . .11-16 Service (cont'd)
Maintenance, General
Information . . . . . . . . . . . . . . . . . . 11-1
Parts Identification Label . . . . . 12-1
Publications Ordering
Information . . . . . . . . . . . . . . . . 13-16
Scheduling Appointments . . . 13-12
Servicing the Airbag . . . . . . . . . . . 3-36
Shift Lock Control Function Check, Automatic
Transmission . . . . . . . . . . . . . . . . 10-33
Shifting Into Park . . . . . . . . . . . . . . . . . . . . . . 9-29
Out of Park . . . . . . . . . . . . . . . . . . . 9-31
Signals, Turn and Lane-Change . . . . . . . . . . . . . . . . . 6-5
Snow Plow . . . . . . . . . . . . . . . . . . . 9-105
Specifications and Capacities . . . . . . . . . . . . . . . . . . . . 12-2
Speedometer . . . . . . . . . . . . . . . . . . 5-12
StabiliTrak OFF Light . . . . . . . . . . . . . . . . . . . . . 5-25
System . . . . . . . . . . . . . . . . . . . . . . . 9-56
Start Assist, Hills . . . . . . . . . . . . . . 9-55
Start Vehicle, Remote . . . . . . . . . . 2-4 Starter Switch Check . . . . . . . . . 10-33
Starting the Engine . . . . . . . . . . . . 9-26
Starting the Vehicle
Messsages . . . . . . . . . . . . . . . . . . . 5-43
Steering . . . . . . . . . . . . . . . . . . . . . . . . 9-4 Fluid, Power . . . . . . . . . . . . . . . . 10-24
Wheel Adjustment . . . . . . . . . . . . . 5-2
Wheel Controls . . . . . . . . . . . . . . . . 5-2
Stoplamps and Back-up Lamps Bulb Replacement . . . . . . . . . . 10-37
Storage Areas
Armrest . . . . . . . . . . . . . . . . . . . . . . . . 4-2
Center Console . . . . . . . . . . . . . . . . 4-2
Glove Box . . . . . . . . . . . . . . . . . . . . . 4-1
Instrument Panel . . . . . . . . . . . . . . 4-1
Stuck Vehicle . . . . . . . . . . . . . . . . . . 9-14
Sun Visors . . . . . . . . . . . . . . . . . . . . . 2-20
Sunroof . . . . . . . . . . . . . . . . . . 2-20, 2-21
Switches
Airbag On-Off . . . . . . . . . . . . . . . . . 3-29
Symbols . . . . . . . . . . . . . . . . . . . . . . . . . . iv
System
Infotainment . . . . . . . . . . . . . . . . . . . 7-1
Noise Control . . . . . . . . . . . . . . . 10-32