2013 CHEVROLET ORLANDO tire type
[x] Cancel search: tire typePage 123 of 372
Black plate (23,1)Chevrolet Orlando Owner Manual - 2013 - CRC - 6/5/12
Instruments and Controls 5-23
Fuel Used
This display shows the approximate
liters (L) or gallons (gal) of fuel that
have been used since last reset.
The fuel used can be reset by
pressing the SET/CLR button while
the Fuel Used display is showing.
Vehicle Information Menu
Items
Press MENU on the turn signal
lever until the Vehicle Information
menu is displayed. Use
w/xto
scroll through the menu items. Not
all items are available on every
vehicle. The following is a list of all
of the possible menu items:
.Units
.Tire Pressure
.Remaining Oil Life
.Battery Voltage
.Blank Display Units
Move
w/xto change between
metric or US when the Unit display
is active. Press SET/CLR to confirm
the setting. On some models, you
will have to select 1, 2, or 3 for the
Unit display. 1 is Imperial units, 2 is
US units, and 3 is metric units. This
will change the displays on the
cluster and DIC to the type of
measurements you select.
Tire Pressure
The display may show a vehicle
with the approximate pressures of
all four tires. Tire pressure is
displayed in either kilopascal (kPa)
or in pounds per square inch (psi).
On some models, this display only
allows for matching of the TPMS
sensors. In this case, the display
will show TIRE LEARN. See Tire
Pressure Monitor System on
page 10‑44 andTire Pressure
Monitor Operation on page 10‑45 for
more information. Remaining Oil Life
This display shows an estimate of
the oil's remaining useful life.
If REMAINING OIL LIFE 99% is
displayed, that means 99% of the
current oil life remains. On some
models, this display is shown
as
:%.
When the remaining oil life is low,
the CHANGE ENGINE OIL SOON
message, or code 82, will appear on
the display. See Engine Oil
Messages on page 5‑26 and
“Vehicle Messages (Base Level)”
following. The oil should be
changed as soon as possible. See
Engine Oil on page 10‑7. In addition
to the engine oil life system
monitoring the oil life, additional
maintenance is recommended in the
Maintenance Schedule in this
manual. See Maintenance Schedule
on page 11‑2 for more information.
Page 184 of 372
Black plate (4,1)Chevrolet Orlando Owner Manual - 2013 - CRC - 6/5/12
9-4 Driving and Operating
See specific vehicle steering
messages underService Vehicle
Messages on page 5‑28.
See your dealer if there is a
problem.
Curve Tips
.Take curves at a reasonable
speed.
.Reduce speed before entering a
curve.
.Maintain a reasonable steady
speed through the curve.
.Wait until the vehicle is out of
the curve before accelerating
gently into the straightaway.
Steering in Emergencies
.There are some situations when
steering around a problem may
be more effective than braking.
.Holding both sides of the
steering wheel allows you to turn
180 degrees without removing
a hand.
.The Antilock Brake System
(ABS) allows steering while
braking.
Off-Road Recovery
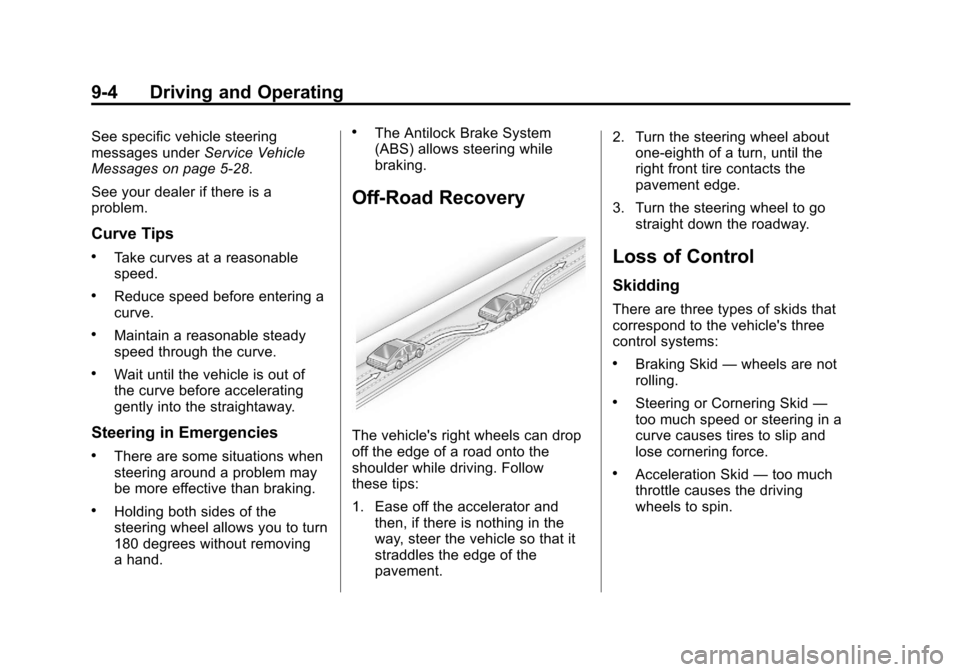
The vehicle's right wheels can drop
off the edge of a road onto the
shoulder while driving. Follow
these tips:
1. Ease off the accelerator and then, if there is nothing in the
way, steer the vehicle so that it
straddles the edge of the
pavement. 2. Turn the steering wheel about
one-eighth of a turn, until the
right front tire contacts the
pavement edge.
3. Turn the steering wheel to go straight down the roadway.
Loss of Control
Skidding
There are three types of skids that
correspond to the vehicle's three
control systems:
.Braking Skid —wheels are not
rolling.
.Steering or Cornering Skid —
too much speed or steering in a
curve causes tires to slip and
lose cornering force.
.Acceleration Skid —too much
throttle causes the driving
wheels to spin.
Page 185 of 372
Black plate (5,1)Chevrolet Orlando Owner Manual - 2013 - CRC - 6/5/12
Driving and Operating 9-5
Defensive drivers avoid most skids
by taking reasonable care suited to
existing conditions, and by not
overdriving those conditions. But
skids are always possible.
If the vehicle starts to slide, follow
these suggestions:
.Ease your foot off the
accelerator pedal and steer the
way you want the vehicle to go.
The vehicle may straighten out.
Be ready for a second skid if it
occurs.
.Slow down and adjust your
driving according to weather
conditions. Stopping distance
can be longer and vehicle
control can be affected when
traction is reduced by water,
snow, ice, gravel, or other
material on the road. Learn to
recognize warning clues—such
as enough water, ice, or packed
snow on the road to make a
mirrored surface —and slow
down when you have any doubt.
.Try to avoid sudden steering,
acceleration, or braking,
including reducing vehicle speed
by shifting to a lower gear. Any
sudden changes could cause
the tires to slide.
Remember: Antilock brakes help
avoid only the braking skid.
Driving on Wet Roads
Rain and wet roads can reduce
vehicle traction and affect your
ability to stop and accelerate.
Always drive slower in these types
of driving conditions and avoid
driving through large puddles and
deep‐standing or flowing water.
{WARNING
Wet brakes can cause crashes.
They might not work as well in a
quick stop and could cause
pulling to one side. You could
lose control of the vehicle. (Continued)
WARNING (Continued)
After driving through a large
puddle of water or a car/vehicle
wash, lightly apply the brake
pedal until the brakes work
normally.
Flowing or rushing water creates
strong forces. Driving through
flowing water could cause the
vehicle to be carried away. If this
happens, you and other vehicle
occupants could drown. Do not
ignore police warnings and be
very cautious about trying to drive
through flowing water.
Hydroplaning
Hydroplaning is dangerous. Water
can build up under the vehicle's
tires so they actually ride on the
water. This can happen if the road is
wet enough and you are going fast
enough. When the vehicle is
hydroplaning, it has little or no
contact with the road.
Page 226 of 372
Black plate (46,1)Chevrolet Orlando Owner Manual - 2013 - CRC - 6/5/12
9-46 Driving and Operating
If there are a lot of options,
equipment, passengers, or cargo in
the vehicle, it will reduce the tongue
weight the vehicle can carry, which
will also reduce the trailer weight the
vehicle can tow. If towing a trailer,
the tongue load must be added to
the GVW because the vehicle will
be carrying that weight, too. See
Vehicle Load Limits on page 9‑9.
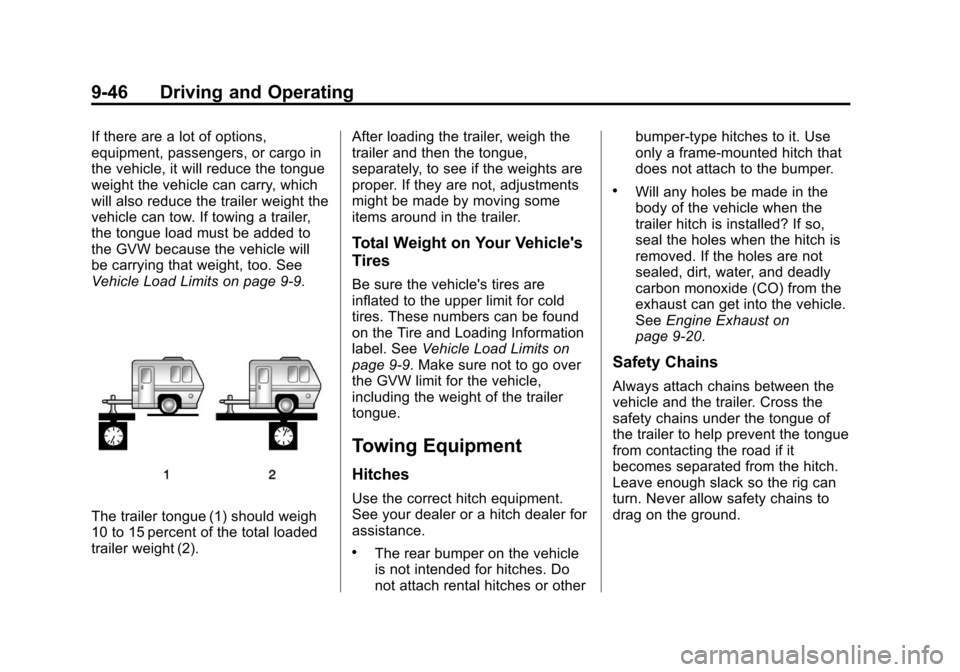
The trailer tongue (1) should weigh
10 to 15 percent of the total loaded
trailer weight (2).After loading the trailer, weigh the
trailer and then the tongue,
separately, to see if the weights are
proper. If they are not, adjustments
might be made by moving some
items around in the trailer.
Total Weight on Your Vehicle's
Tires
Be sure the vehicle's tires are
inflated to the upper limit for cold
tires. These numbers can be found
on the Tire and Loading Information
label. See
Vehicle Load Limits on
page 9‑9. Make sure not to go over
the GVW limit for the vehicle,
including the weight of the trailer
tongue.
Towing Equipment
Hitches
Use the correct hitch equipment.
See your dealer or a hitch dealer for
assistance.
.The rear bumper on the vehicle
is not intended for hitches. Do
not attach rental hitches or other bumper-type hitches to it. Use
only a frame-mounted hitch that
does not attach to the bumper.
.Will any holes be made in the
body of the vehicle when the
trailer hitch is installed? If so,
seal the holes when the hitch is
removed. If the holes are not
sealed, dirt, water, and deadly
carbon monoxide (CO) from the
exhaust can get into the vehicle.
See
Engine Exhaust on
page 9‑20.
Safety Chains
Always attach chains between the
vehicle and the trailer. Cross the
safety chains under the tongue of
the trailer to help prevent the tongue
from contacting the road if it
becomes separated from the hitch.
Leave enough slack so the rig can
turn. Never allow safety chains to
drag on the ground.
Page 266 of 372
Black plate (38,1)Chevrolet Orlando Owner Manual - 2013 - CRC - 6/5/12
10-38 Vehicle Care
Original equipment all-season tires
can be identified by the last two
characters of this TPC code, which
will be“MS.”
Consider installing winter tires on
the vehicle if frequent driving on
snow or ice-covered roads is
expected. All-season tires provide
adequate performance for most
winter driving conditions, but they
may not offer the same level of
traction or performance as winter
tires on snow or ice-covered roads.
See Winter Tires on page 10‑38.
Winter Tires
This vehicle was not, originally,
equipped with winter tires. Winter
tires are designed for increased
traction on snow and ice-covered
roads. Consider installing winter
tires on the vehicle if frequent
driving on snow or ice-covered
roads is expected. See your dealer
for details regarding winter tire availability and proper tire selection.
Also, see
Buying New Tires on
page 10‑51.
With winter tires, there may be
decreased dry road traction,
increased road noise, and shorter
tread life. After changing to winter
tires, be alert for changes in vehicle
handling and braking.
If using winter tires:
.Use tires of the same brand and
tread type on all four wheel
positions.
.Use only radial ply tires of the
same size, load range, and
speed rating as the original
equipment tires.
Winter tires with the same speed
rating as the original equipment tires
may not be available for H, V, W, Y,
and ZR speed rated tires. If winter
tires with a lower speed rating are
chosen, never exceed the tire's
maximum speed capability.
Summer Tires
This vehicle may come with high
performance summer tires. These
tires have a special tread and
compound that are optimized for
maximum dry and wet road
performance. This special tread and
compound will decrease
performance in cold climates, and
on ice and snow. We recommend
installing winter tires on the vehicle
if frequent driving in cold
temperatures or on snow or ice
covered roads is expected. See
Winter Tires on page 10‑38.
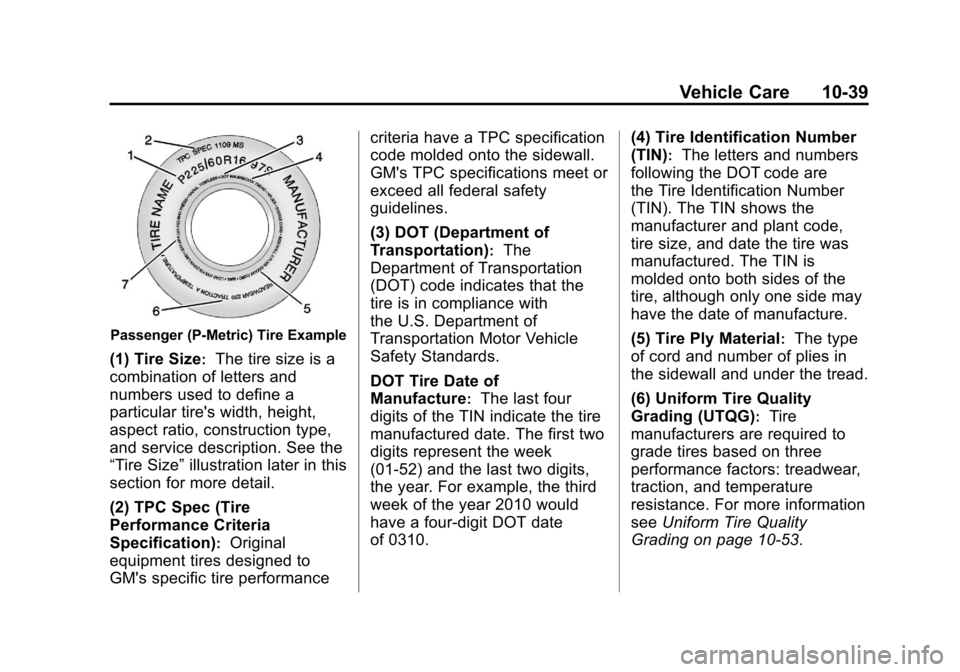
Tire Sidewall Labeling
Useful information about a tire is
molded into its sidewall. The
examples show a typical
passenger tire sidewall.
Page 267 of 372
Black plate (39,1)Chevrolet Orlando Owner Manual - 2013 - CRC - 6/5/12
Vehicle Care 10-39
Passenger (P-Metric) Tire Example
(1) Tire Size:The tire size is a
combination of letters and
numbers used to define a
particular tire's width, height,
aspect ratio, construction type,
and service description. See the
“Tire Size” illustration later in this
section for more detail.
(2) TPC Spec (Tire
Performance Criteria
Specification)
:Original
equipment tires designed to
GM's specific tire performance criteria have a TPC specification
code molded onto the sidewall.
GM's TPC specifications meet or
exceed all federal safety
guidelines.
(3) DOT (Department of
Transportation)
:The
Department of Transportation
(DOT) code indicates that the
tire is in compliance with
the U.S. Department of
Transportation Motor Vehicle
Safety Standards.
DOT Tire Date of
Manufacture
:The last four
digits of the TIN indicate the tire
manufactured date. The first two
digits represent the week
(01-52) and the last two digits,
the year. For example, the third
week of the year 2010 would
have a four-digit DOT date
of 0310. (4) Tire Identification Number
(TIN)
:The letters and numbers
following the DOT code are
the Tire Identification Number
(TIN). The TIN shows the
manufacturer and plant code,
tire size, and date the tire was
manufactured. The TIN is
molded onto both sides of the
tire, although only one side may
have the date of manufacture.
(5) Tire Ply Material
:The type
of cord and number of plies in
the sidewall and under the tread.
(6) Uniform Tire Quality
Grading (UTQG)
:Tire
manufacturers are required to
grade tires based on three
performance factors: treadwear,
traction, and temperature
resistance. For more information
see Uniform Tire Quality
Grading on page 10‑53.
Page 268 of 372
Black plate (40,1)Chevrolet Orlando Owner Manual - 2013 - CRC - 6/5/12
10-40 Vehicle Care
(7) Maximum Cold Inflation
Load Limit
:Maximum load that
can be carried and the
maximum pressure needed to
support that load.
Tire Designations
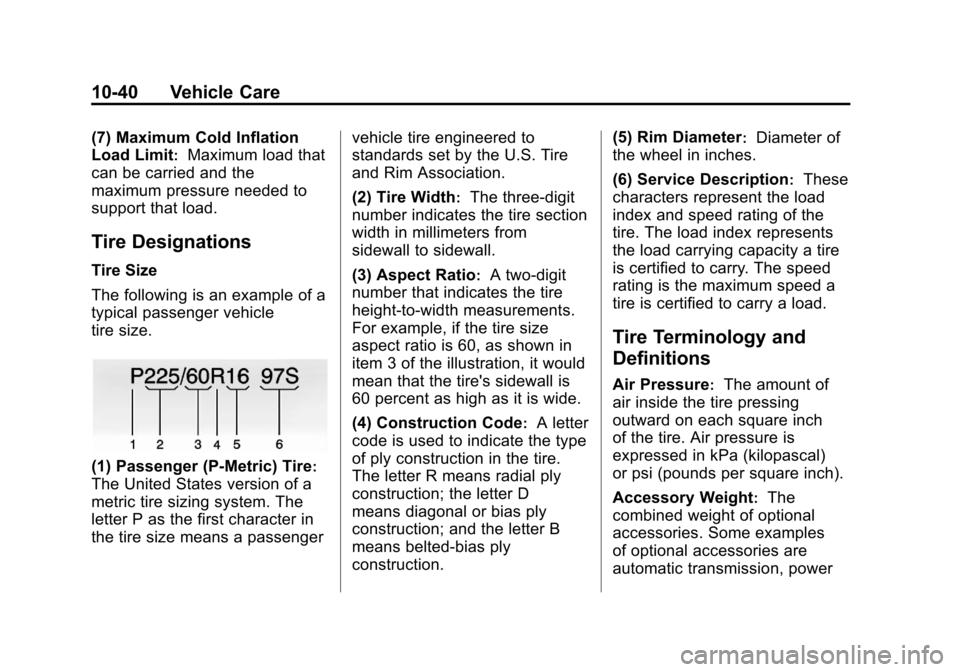
Tire Size
The following is an example of a
typical passenger vehicle
tire size.
(1) Passenger (P-Metric) Tire:
The United States version of a
metric tire sizing system. The
letter P as the first character in
the tire size means a passenger vehicle tire engineered to
standards set by the U.S. Tire
and Rim Association.
(2) Tire Width
:The three-digit
number indicates the tire section
width in millimeters from
sidewall to sidewall.
(3) Aspect Ratio
:A two-digit
number that indicates the tire
height-to-width measurements.
For example, if the tire size
aspect ratio is 60, as shown in
item 3 of the illustration, it would
mean that the tire's sidewall is
60 percent as high as it is wide.
(4) Construction Code
:A letter
code is used to indicate the type
of ply construction in the tire.
The letter R means radial ply
construction; the letter D
means diagonal or bias ply
construction; and the letter B
means belted-bias ply
construction. (5) Rim Diameter
:Diameter of
the wheel in inches.
(6) Service Description
:These
characters represent the load
index and speed rating of the
tire. The load index represents
the load carrying capacity a tire
is certified to carry. The speed
rating is the maximum speed a
tire is certified to carry a load.
Tire Terminology and
Definitions
Air Pressure:The amount of
air inside the tire pressing
outward on each square inch
of the tire. Air pressure is
expressed in kPa (kilopascal)
or psi (pounds per square inch).
Accessory Weight
:The
combined weight of optional
accessories. Some examples
of optional accessories are
automatic transmission, power
Page 272 of 372
Black plate (44,1)Chevrolet Orlando Owner Manual - 2013 - CRC - 6/5/12
10-44 Vehicle Care
For additional information
regarding how much weight the
vehicle can carry, and an
example of the Tire and Loading
Information label, seeVehicle
Load Limits on page 9‑9. How
the vehicle is loaded affects
vehicle handling and ride
comfort. Never load the vehicle
with more weight than it was
designed to carry.
When to Check
Check the tires once a month
or more.
How to Check
Use a good quality pocket-type
gauge to check the tire
pressure. Proper tire inflation
cannot be determined by looking
at the tire. Check the tire
inflation pressure when the tires
are cold, meaning the vehicle has not been driven for at least
three hours or no more than
1.6 km (1 mi).
Remove the valve cap from the
tire valve stem. Press the tire
gauge firmly onto the valve to
get the pressure measurement.
If the cold tire inflation pressure
matches the recommended
pressure on the Tire and
Loading Information label, no
further adjustment is necessary.
If the inflation pressure is low,
add air until the recommended
pressure is reached. If the
inflation pressure in high, press
on the metal stem in the center
of the tire valve to release air.
Re‐check the tire pressure with
the tire gauge.
Return the valve caps on the
valve stems to keep out dirt and
moisture and prevent leaks.Tire Pressure Monitor
System
The Tire Pressure Monitor System
(TPMS) uses radio and sensor
technology to check tire pressure
levels. The TPMS sensors monitor
the air pressure in your tires and
transmit tire pressure readings to a
receiver located in the vehicle.
Each tire, including the spare (if
provided), should be checked
monthly when cold and inflated to
the inflation pressure recommended
by the vehicle manufacturer on the
vehicle placard or tire inflation
pressure label. (If your vehicle has
tires of a different size than the size
indicated on the vehicle placard or
tire inflation pressure label, you
should determine the proper tire
inflation pressure for those tires.)
As an added safety feature, your
vehicle has been equipped with a
tire pressure monitoring system
(TPMS) that illuminates a low tire