2013 CHEVROLET ORLANDO locks
[x] Cancel search: locksPage 194 of 372
Black plate (14,1)Chevrolet Orlando Owner Manual - 2013 - CRC - 6/5/12
9-14 Driving and Operating
.Between the first 1 000 km
(600 mi) and 5 000 km
(3,000 mi), heavy
acceleration in lower gears
can be used. Vehicle speeds
above 110 km/h (68 mph)
should be limited to
five minutes per use.
.Avoid making hard stops for
the first 322 km (200 mi) or
so. During this time the new
brake linings are not yet
broken in. Hard stops with
new linings can mean
premature wear and earlier
replacement. Follow this
breaking-in guideline every
time you get new brake
linings.
.Do not tow a trailer during
break-in. SeeDriving
Characteristics and Towing
Tips on page 9‑42 for the
trailer towing capabilities of
your vehicle and more
information. Following break‐in, engine speed
and load can be gradually
increased.
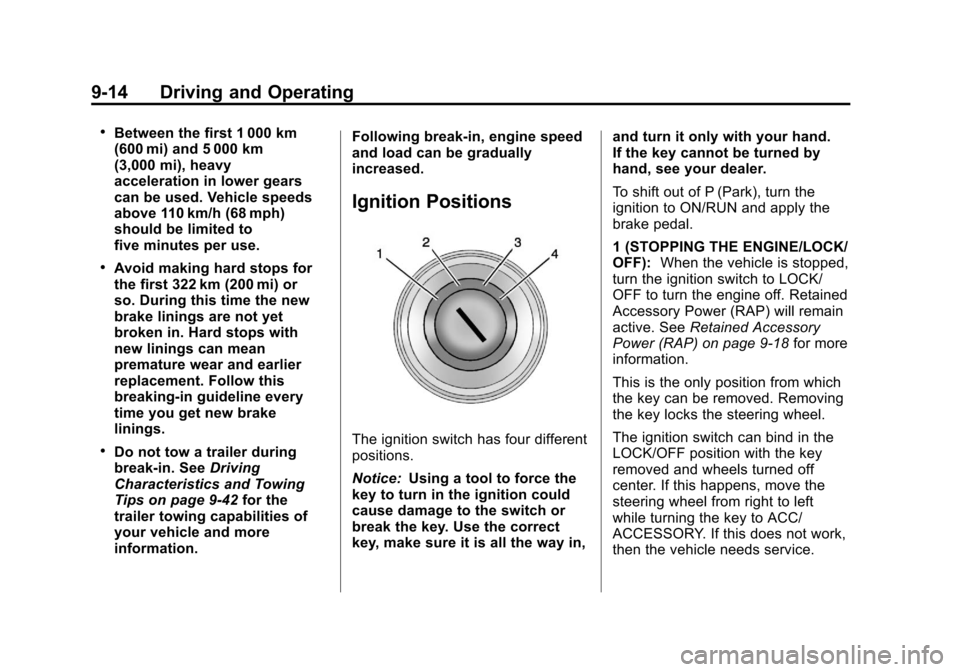
Ignition Positions
The ignition switch has four different
positions.
Notice:
Using a tool to force the
key to turn in the ignition could
cause damage to the switch or
break the key. Use the correct
key, make sure it is all the way in, and turn it only with your hand.
If the key cannot be turned by
hand, see your dealer.
To shift out of P (Park), turn the
ignition to ON/RUN and apply the
brake pedal.
1 (STOPPING THE ENGINE/LOCK/
OFF):
When the vehicle is stopped,
turn the ignition switch to LOCK/
OFF to turn the engine off. Retained
Accessory Power (RAP) will remain
active. See Retained Accessory
Power (RAP) on page 9‑18 for more
information.
This is the only position from which
the key can be removed. Removing
the key locks the steering wheel.
The ignition switch can bind in the
LOCK/OFF position with the key
removed and wheels turned off
center. If this happens, move the
steering wheel from right to left
while turning the key to ACC/
ACCESSORY. If this does not work,
then the vehicle needs service.
Page 195 of 372
Black plate (15,1)Chevrolet Orlando Owner Manual - 2013 - CRC - 6/5/12
Driving and Operating 9-15
Do not turn the engine off when the
vehicle is moving. This will cause a
loss of power assist in the brake
and steering systems and disable
the airbags.
If the vehicle must be shut off in an
emergency:
1. Brake using a firm and steadypressure. Do not pump the
brakes repeatedly. This may
deplete power assist, requiring
increased brake pedal force.
2. Shift the vehicle to neutral. This can be done while the vehicle is
moving. After shifting to neutral,
firmly apply the brakes and steer
the vehicle to a safe location.
3. Come to a complete stop. Shift to P (Park) with an automatic
transmission, or Neutral with a
manual transmission. Turn the
ignition to LOCK/OFF.
4. Set the parking brake. See Parking Brake on page 9‑27.{WARNING
Turning off the vehicle while
moving may cause loss of power
assist in the brake and steering
systems and disable the airbags.
While driving, only shut the
vehicle off in an emergency.
If the vehicle cannot be pulled over,
and must be shut off while driving,
turn the ignition to ACC/
ACCESSORY.
2 (ACC/ACCESSORY): This
position provides power to some of
the electrical accessories. It unlocks
the steering wheel. To move the key
from ACC/ACCESSORY to LOCK/
OFF, the shift lever must be in
P (Park).
3 (ON/RUN): The ignition switch
stays in this position when the
engine is running. This position can
be used to operate the electrical
accessories, as well as to display
some warning and indicator lights. This position can also be used for
service and diagnostics, and to
verify the proper operation of the
malfunction indicator lamp as may
be required for emission inspection
purposes.
The battery could be drained if the
key is left in the ACC/ACCESSORY
or ON/RUN position with the engine
off. The vehicle might not restart if
the battery is allowed to drain for an
extended period of time.
4 (START):
This position starts the
engine. When the engine starts,
release the key. The ignition switch
will return to ON/RUN for normal
driving.
A warning tone sounds when the
driver door is opened and the key is
in the ignition. If the key becomes
difficult to turn, see Keys on
page 2‑1.
Page 201 of 372
Black plate (21,1)Chevrolet Orlando Owner Manual - 2013 - CRC - 6/5/12
Driving and Operating 9-21
Running the Vehicle
While Parked
It is better not to park with the
engine running.
If the vehicle is left with the engine
running, follow the proper steps to
be sure the vehicle will not move.
SeeShifting Into Park on page 9‑18
and Engine Exhaust on page 9‑20.
If the vehicle has a manual
transmission, see Parking on
page 9‑20.
If parking on a hill and pulling a
trailer, see Driving Characteristics
and Towing Tips on page 9‑42.
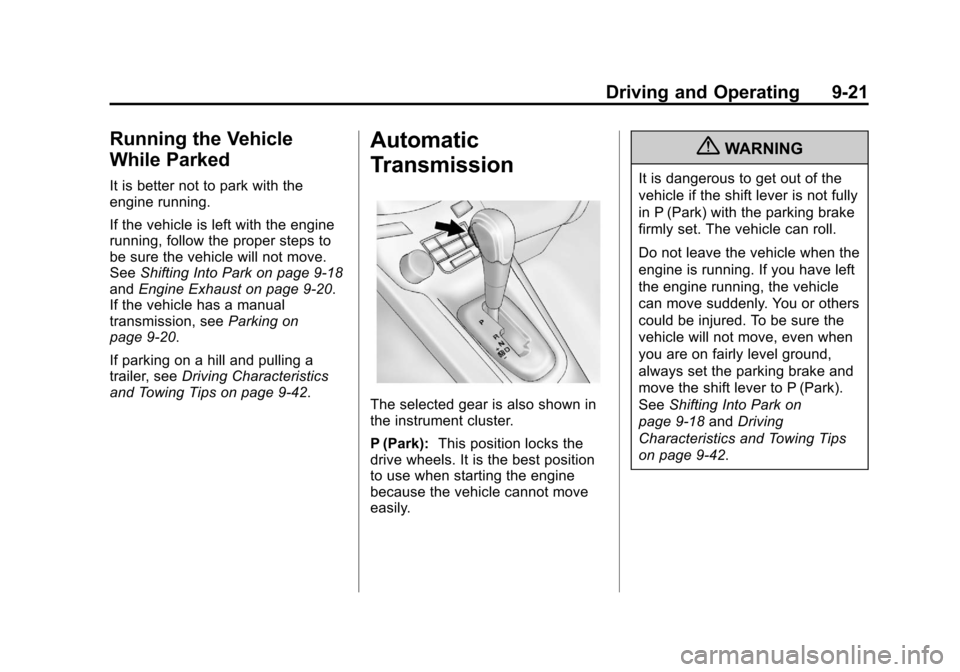
Automatic
Transmission
The selected gear is also shown in
the instrument cluster.
P (Park): This position locks the
drive wheels. It is the best position
to use when starting the engine
because the vehicle cannot move
easily.
{WARNING
It is dangerous to get out of the
vehicle if the shift lever is not fully
in P (Park) with the parking brake
firmly set. The vehicle can roll.
Do not leave the vehicle when the
engine is running. If you have left
the engine running, the vehicle
can move suddenly. You or others
could be injured. To be sure the
vehicle will not move, even when
you are on fairly level ground,
always set the parking brake and
move the shift lever to P (Park).
See Shifting Into Park on
page 9‑18 andDriving
Characteristics and Towing Tips
on page 9‑42.
Page 254 of 372
Black plate (26,1)Chevrolet Orlando Owner Manual - 2013 - CRC - 6/5/12
10-26 Vehicle Care
2. Remove the connectorretaining tab (1).
3. Disconnect the wiring harness connector from the bulb (3) by
pressing the connector
release (2) and pulling
straight back.
4. Remove the bulb (3) from the headlamp assembly by turning
counterclockwise and pulling
straight back.
5. Install the new bulb in the headlamp assembly by turning
clockwise.
6. Install the wiring harness connector to the bulb. Be sure
the connector release (2) locks
into place.
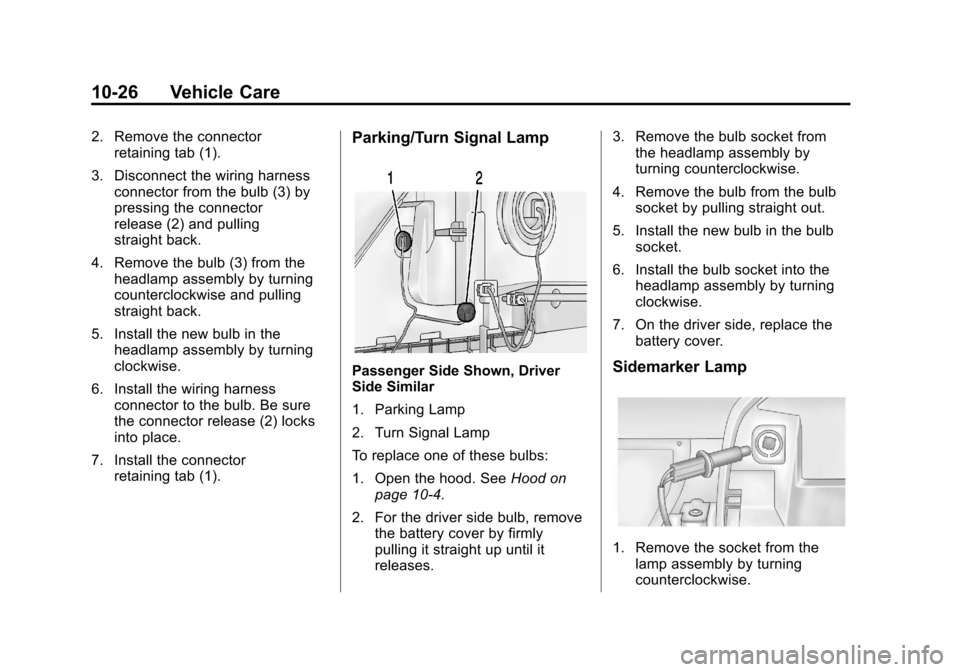
7. Install the connector retaining tab (1).Parking/Turn Signal Lamp
Passenger Side Shown, Driver
Side Similar
1. Parking Lamp
2. Turn Signal Lamp
To replace one of these bulbs:
1. Open the hood. See Hood on
page 10‑4.
2. For the driver side bulb, remove the battery cover by firmly
pulling it straight up until it
releases. 3. Remove the bulb socket from
the headlamp assembly by
turning counterclockwise.
4. Remove the bulb from the bulb socket by pulling straight out.
5. Install the new bulb in the bulb socket.
6. Install the bulb socket into the headlamp assembly by turning
clockwise.
7. On the driver side, replace the battery cover.Sidemarker Lamp
1. Remove the socket from thelamp assembly by turning
counterclockwise.
Page 285 of 372
Black plate (57,1)Chevrolet Orlando Owner Manual - 2013 - CRC - 6/5/12
Vehicle Care 10-57
WARNING (Continued)
changing a flat tire. If it is used for
anything else, you or others could
be badly injured or killed if the
vehicle slips off the jack. If a jack
is provided with the vehicle, only
use it for changing a flat tire.
If a tire goes flat, avoid further tire
and wheel damage by driving slowly
to a level place, well off the road,
if possible. Turn on the hazard
warning flashers. See Hazard
Warning Flashers on page 6‑4.
{WARNING
Changing a tire can be
dangerous. The vehicle can slip
off the jack and roll over or fall
causing injury or death. Find a
level place to change the tire. To
help prevent the vehicle from
moving:
1. Set the parking brake firmly.
2. Put an automatic transmission in P (Park) or a
manual transmission in
1 (First) or R (Reverse).
3. Turn off the engine and do not restart while the vehicle
is raised.
4. Do not allow passengers to remain in the vehicle.
5. Place wheel blocks on both sides of the tire at the
opposite corner of the tire
being changed. This vehicle may come with a jack
and spare tire or a tire sealant and
compressor kit. To use the jacking
equipment to change a spare tire
safely, follow the instructions below.
Then see
Tire Changing on
page 10‑65. To use the tire sealant
and compressor kit, see Tire
Sealant and Compressor Kit on
page 10‑58.
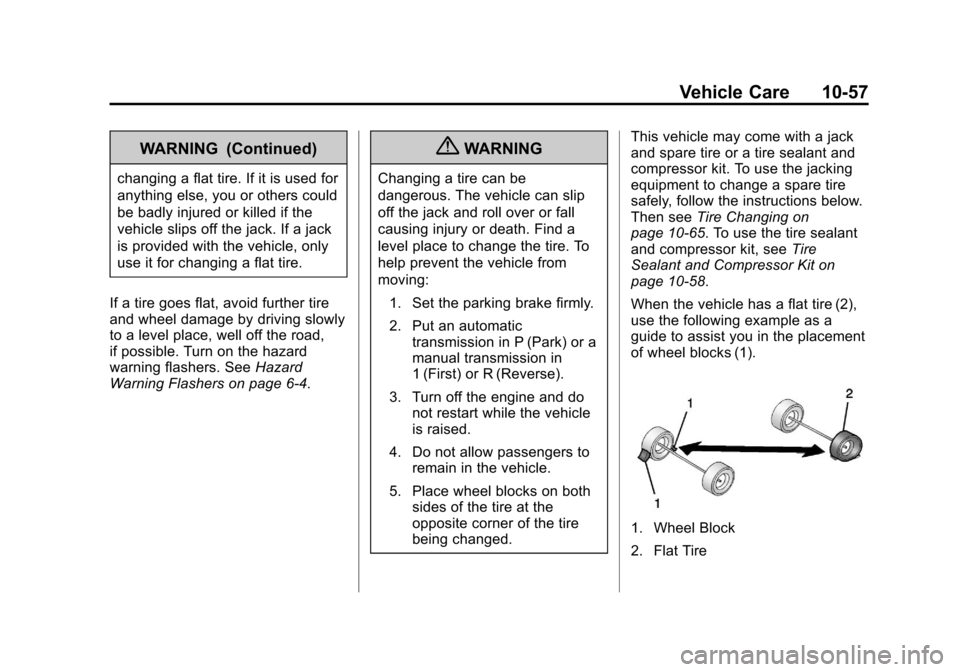
When the vehicle has a flat tire (2),
use the following example as a
guide to assist you in the placement
of wheel blocks (1).
1. Wheel Block
2. Flat Tire
Page 352 of 372
Black plate (2,1)Chevrolet Orlando Owner Manual - 2013 - CRC - 6/5/12
14-2 OnStar
Push the OnStar Emergency
button
>to get a priority
connection to an Emergency
Advisor available
24/7 to:
.Get help for an emergency.
.Be a Good Samaritan or
respond to an AMBER Alert.
.Get crisis assistance and
evacuation routes.
OnStar Services
Emergency
With Automatic Crash Response,
the built-in system can automatically
connect to help in most crashes,
even if help cannot be requested.
Push
>to connect to an
Emergency Advisor. GPS
technology is used to identify the
vehicle location and can provide
critical information to emergency
personnel. The Advisor is also
trained to offer critical assistance in
emergency situations before first
responders arrive.
Security
OnStar provides services like Stolen
Vehicle Assistance, Remote Ignition
Block, and Roadside Assistance,
if the vehicle is equipped with these
services. OnStar can unlock the
vehicle doors remotely, if it is equipped with automatic door locks,
and can help police locate the
vehicle if it is stolen.
Navigation
OnStar navigation requires the
Directions and Connections
service plan.
Push
|to receive directions or
have them sent to the vehicle
navigation screen, if equipped.
Destinations can also be forwarded
to the vehicle from Google Maps™
or MapQuest.com. The OnStar
mapping database is continuously
updated. Visit www.onstar.com for
coverage maps.
Turn-by-Turn Navigation
1. Push|to connect to a live
Advisor.
2. Request directions.
3. Directions are downloaded to the vehicle.
4. Follow the voice-guided commands.
Page 357 of 372
Black plate (7,1)Chevrolet Orlando Owner Manual - 2013 - CRC - 6/5/12
OnStar 14-7
OnStar Personal Identification
Number (PIN)
A PIN is needed to access some of
the OnStar services, like Remote
Door Unlock and Stolen Vehicle
Assistance. You will be prompted to
change the PIN the first time when
speaking with an Advisor. To
change the OnStar PIN, call OnStar
and provide the Advisor with the
current number.
Warranty
OnStar equipment may be
warranted as part of the New
Vehicle Limited Warranty. The
manufacturer of the vehicle
furnishes detailed warranty
information.
Languages
The vehicle can be programmed to
respond in French or Spanish.
Push
|and ask an Advisor.
Advisors can speak French or
Spanish.
Potential Issues
Some OnStar services are disabled
after five days. OnStar cannot
perform Remote Door Unlock or
Stolen Vehicle Assistance after the
vehicle has been off continuously
for five days. After five days, OnStar
can contact Roadside Assistance
and a locksmith to help gain access
to the vehicle.
Global Positioning
System (GPS)
.Obstruction of the GPS can
occur in a large city with tall
buildings; in parking garages;
around airports; in tunnels,
underpasses, or parking
garages; or in an area with very
dense trees. If GPS signals are
not available, the OnStar system
should still operate to call
OnStar. However, OnStar could
have difficulty identifying the
exact location.
.In emergency situations, OnStar
can use the last stored GPS
location to send to emergency
responders.
.A temporary loss of GPS can
cause loss of the ability to send
a Turn-by-Turn Navigation route.
The Advisor may give a verbal
route or may ask for a call back
after the vehicle is driven into an
open area.
Cellular and GPS Antennas
Avoid placing items over or near
the antenna to prevent blocking
cellular and GPS signal reception.
Cellular reception is required for
OnStar to send remote signals to
the vehicle.
Page 361 of 372

Black plate (1,1)Chevrolet Orlando Owner Manual - 2013 - CRC - 6/5/12
INDEX i-1
A
Accessories andModifications . . . . . . . . . . . . . . . . . 10-3
Accessory Power . . . . . . . . . . . . . . 9-18
Add-On Electrical Equipment . . . . . . . . . . . . . . . . . . . 9-47
Additional Information
OnStar
®. . . . . . . . . . . . . . . . . . . . . . 14-5
Air Cleaner/Filter, Engine . . . . . 10-11
Air Conditioning . . . . . . . . . . . . . . . . 8-3
Air Vents . . . . . . . . . . . . . . . . . . . . . . . 8-6
Airbag System Check . . . . . . . . . . . . . . . . . . . . . . . . 3-31
How Does an AirbagRestrain? . . . . . . . . . . . . . . . . . . . 3-28
What Makes an Airbag
Inflate? . . . . . . . . . . . . . . . . . . . . . . 3-28
What Will You See after an Airbag Inflates? . . . . . . . . . . . . . 3-29
When Should an Airbag
Inflate? . . . . . . . . . . . . . . . . . . . . . . 3-27
Where Are the Airbags? . . . . . . 3-26 Airbags
Adding Equipment to the
Vehicle . . . . . . . . . . . . . . . . . . . . . . 3-30
Readiness Light . . . . . . . . . . . . . . 5-11
Servicing Airbag-Equipped Vehicles . . . . . . . . . . . . . . . . . . . . . 3-30
System Check . . . . . . . . . . . . . . . . 3-24
Alarm Vehicle Security . . . . . . . . . . . . . . . 2-9
AM-FM Radio . . . . . . . . . . . . . . . . . . . 7-7
Antenna Multi-band . . . . . . . . . . . . . . . . . . . . 7-12
Satellite Radio . . . . . . . . . . . . . . . . 7-12
Antilock Brake System (ABS) . . . . . . . . . . . . . . . . 9-26
Warning Light . . . . . . . . . . . . . . . . . 5-15
Appearance Care Exterior . . . . . . . . . . . . . . . . . . . . . 10-78
Interior . . . . . . . . . . . . . . . . . . . . . . 10-82
Armrest Front Seat . . . . . . . . . . . . . . . . . . . . . 3-6
Ashtrays . . . . . . . . . . . . . . . . . . . . . . . . 5-7
Assistance Program, Roadside . . . . . . . . . . . . . . . . . . . . . 13-5
Audio Players . . . . . . . . . . . . . . . . . 7-13
CD . . . . . . . . . . . . . . . . . . . . . . . . . . . 7-13 Audio System
Radio Reception . . . . . . . . . . . . . . 7-12
Theft-Deterrent Feature . . . . . . . . 7-2
Automatic Climate Control System . . . . . . . . 8-3
Door Locks . . . . . . . . . . . . . . . . . . . . 2-7
Headlamp System . . . . . . . . . . . . . 6-3
Transmission . . . . . . . . . . . . . . . . . 9-21
Transmission Fluid . . . . . . . . . 10-10
Automatic Transmission Manual Mode . . . . . . . . . . . . . . . . . 9-23
Shift Lock Control
Function Check . . . . . . . . . . . 10-22
Auxiliary Devices . . . . . . . . . . . . . . . . . . . . . . . 7-15
B
Battery . . . . . . . . . . . . . . . . . . . . . . . 10-21Jump Starting . . . . . . . . . . . . . . . 10-73
Power Protection . . . . . . . . . . . . . . 6-7
Voltage and ChargingMessages . . . . . . . . . . . . . . . . . . . 5-25
Blade Replacement, Wiper . . . 10-23
Bluetooth . . . . . . . . . . 7-18, 7-19, 7-23
Brake
System Warning Light . . . . . . . . 5-14